Industries such as e-commerce, online gaming, and on-demand video streaming require exceptional access speed and quality of service. To significantly improve the end-user experience, you can combine Global Accelerator (GA) with Alibaba Cloud CDN. By leveraging Alibaba Cloud's premium BGP bandwidth and global transport network, GA works with Alibaba Cloud CDN to help you quickly build a global CDN back-to-origin network, ensuring comprehensive acceleration for your dynamic content.
Use case
This topic uses the scenario in the following figure as an example. A web service is deployed on Alibaba Cloud in the US (Silicon Valley) region and provides services through the domain namewww.<YOURDOMAIN>.fun. It forwards traffic on HTTP port 80. Most clients are located in China (Hong Kong). Due to the instability of the cross-border public network, clients in China (Hong Kong) often experience issues such as high latency, jitter, and packet loss when they access the web service in the US (Silicon Valley) region.
You can deploy Alibaba Cloud CDN for your web service. Alibaba Cloud CDN improves the user experience by caching content on edge nodes. When integrated with Global Accelerator, Alibaba Cloud CDN leverages Alibaba Cloud's premium BGP bandwidth and global transport network to help you quickly build a global back-to-origin network to provide comprehensive acceleration for dynamic content.
Prerequisites
-
You have an application deployed on an origin server.
This example uses an Alibaba Cloud Linux 3 server with Nginx and Netcat to build a test webpage that simulates a server with a dynamic time display and static content.
-
You have configured DNS resolution for
www.<YOURDOMAIN>.funby creating an A record that points the domain to the public IP address of the origin server.This topic uses Alibaba Cloud DNS as an example to describe how to configure DNS resolution. For information about how to add a DNS record, see Add a DNS record. If you use a different DNS provider, consult its documentation.
-
You have activated Alibaba Cloud CDN.
Procedure
Step 1: Configure a GA instance
This topic uses a pay-as-you-go standard GA instance as an example.
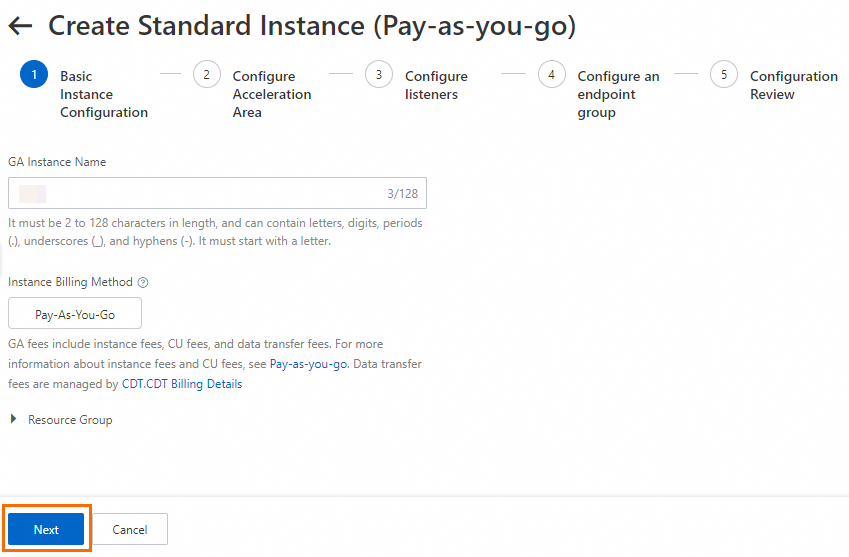
On the page of the GA console, click Create Standard Pay-as-you-go Instance.
In the Basic Instance Configuration step, configure the basic information and click Next.
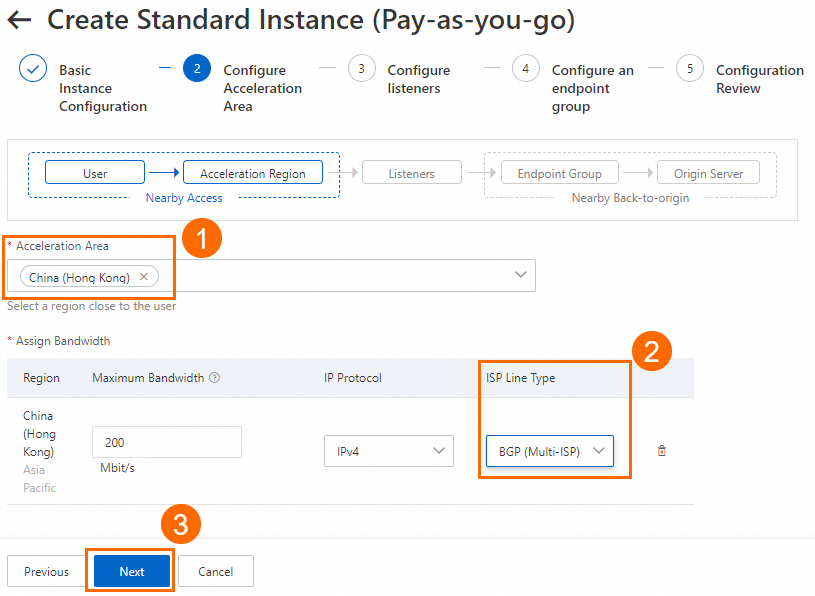
In the Configure Acceleration Area step, add an acceleration region, allocate bandwidth to the region, and then click Next.
In this example, the Acceleration Region parameter is set to China (Hong Kong), and the ISP Line Type parameter is set to BGP (Multi-ISP). You can use the default values for other parameters or modify the parameters based on your business requirements. For more information, see Add and manage acceleration areas.
ImportantIf the acceleration regions include regions in the Chinese mainland, you must apply for an ICP number for the domain name to provide services.
If you specify a small value for the maximum bandwidth, throttling may occur and packets may be dropped. Specify a maximum bandwidth based on your business requirements.
-
On the Configure listeners page, configure the forwarding protocol and port, and then click Next.
In this scenario, set Protocol to HTTP and Port to 80. You can keep the default values for other listener parameters or modify them based on your needs.
-
On the Configure an Endpoint Group page, configure the backend service for the endpoint, and then click Next.
In this scenario, set Region to US (Silicon Valley) and Backend Service Type to ECS. For Backend Service, select the target ECS instance. Then, read and select the Compliance Commitments Regarding Cross-border Data Transfers checkbox. You can keep the default values for other endpoint group parameters or modify them based on your needs.

-
On the Configuration Review page, confirm the settings and click Submit.
-
On the instance list page, find the GA instance that you created and copy the CNAME from the CNAME column.
Step 2: Configure Alibaba Cloud CDN
-
In the Alibaba Cloud CDN console, go to the Domain Names page and click Add Domain.
-
On the Specify Domain Name Information page, configure the Business Information and Origin Server settings.
-
Configure Business Information.
In this scenario, in the Business Information section, set Region to Global (Excluding the Chinese Mainland). For Domain Name to Accelerate, enter
www.<YOURDOMAIN>.fun. You can keep the default values for other parameters or modify them as needed. For more information, see Add an accelerated domain name.
-
Configure Origin Server settings.
In the Origin Server area, click Add Origin Server Information. In the Add Origin Server Information dialog box, select the origin server type, enter the origin server address, and then click OK.
In this scenario, configure Origin Server with the Site Domain type and enter the CNAME of the GA instance. Set Weight to 100. You can keep the default values for other parameters or modify them as needed. For more information, see Add an accelerated domain name.
-
Select the Compliance Commitments Regarding Cross-border Data Transfers checkbox and click Next.
-
-
On the Recommended Configurations page, you can configure settings such as cache expiration time, bandwidth cap, and page optimization. Configure them based on your needs and click One-Click Configuration, or click Skip.
In this scenario, in the Cache Expiration Time section, find the default cache rule and click Modify in the Actions column. Set Address to /dynamic and Expiration Date to 0 seconds so that dynamic content is fetched from the origin server for each request. For more information about recommended configurations, see Recommended configurations (optional).
Set Type to Directory, Weight to 99, and Rule Condition to Not used. Then, click OK.
-
On the Domain Names page, find the domain that you added and copy the CNAME from the CNAME column.
Step 3: Configure DNS resolution
After the domain name is added, you must point its DNS resolution to the CDN CNAME. This routes requests for the accelerated domain to CDN edge nodes.
To avoid conflicts between an existing A record and a CNAME record, you can set different query sources for the A record and the CNAME record. For example, in this scenario, you can first add a CNAME record for the China (Hong Kong) region to run a test. After the test succeeds, you can expand it to other regions or switch it to the default line.
-
On the Domain Name Resolution page, find your target domain name and click DNS Settings in the Actions column.
NoteIf your domain name is not registered with Alibaba Cloud, you must first add the domain name to the Alibaba Cloud DNS console before you can configure its DNS settings.
-
On the DNS Settings page, click Add Record, configure a CNAME record, and then click OK.
In this scenario, set Type to CNAME, Host to www, DNS Request Source to China (Hong Kong), and Value to the CDN CNAME. You can keep the default values for other DNS record parameters or modify them based on your needs.
Step 4: Test the acceleration
On a computer in the acceleration region (China (Hong Kong) in this topic), open your browser's developer tools and visitwww.<YOURDOMAIN>.fun to view the load time of each resource.
-
Test the network latency after you configure GA and Alibaba Cloud CDN.
Open the test page in a browser. Press F12 to open the Network panel in Chrome DevTools, select the Disable cache checkbox, and then refresh the page. Observe the response time for each resource in the request list: The HTML document request (975 B) takes about 5 ms, the static image
test.png(141 kB) takes about 5 ms, and the dynamic API request fordynamic(fetch type, 473 B) takes about 228 ms. Static resources have a very short response time due to Alibaba Cloud CDN acceleration, while the dynamic request is still fetched from the origin, and GA reduces its latency. -
Test the network latency with only Alibaba Cloud CDN configured (without GA).
Change the Alibaba Cloud CDN origin server from the GA CNAME to the public IP address of the origin server and delete the endpoint group in GA. Then, repeat the test.
Test results with only Alibaba Cloud CDN configured: Static resources (HTML document response time of about 6 ms, image response time of about 5 ms) are significantly accelerated, while the dynamic request (fetch) has a response time of about 461 ms and is not accelerated by Alibaba Cloud CDN.
-
Test the baseline network latency without GA or Alibaba Cloud CDN.
In Alibaba Cloud CDN, disable the accelerated domain name. In Alibaba Cloud DNS, disable the CNAME record that points to the CDN CNAME. Then, run the test again.
In the browser's DevTools Network panel, the page loads three resources: the page document (1.1 kB, 214 ms), the static image
test.png(140 kB, 261 ms), and the dynamic requestdynamic(154 B, 474 ms). All requests have a status of 200. -
Comparison of acceleration results:
The test data shows that Alibaba Cloud CDN reduces the access latency for static content (
test.png) and GA further reduces the access latency for dynamic content (dynamic).Scenario
Static content
test.pngTime (ms)
Dynamic content
dynamicTime (ms)
Comparison
Scenario 1: GA + Alibaba Cloud CDN
5
228
Dynamic content is 50.5% faster than in Scenario 2.
Scenario 2: Alibaba Cloud CDN only
5
461
Static content is 98.1% faster than in Scenario 3.
Scenario 3: No GA or Alibaba Cloud CDN
261
474
/
Actual acceleration results vary based on your workload and network conditions.
References
-
Pay-as-you-go GA fees include GA instance fees, CU fees, and traffic fees. For more information, see Pay-as-you-go Global Accelerator instance billing.
-
When you use GA with Alibaba Cloud CDN to accelerate back-to-origin traffic, standard Alibaba Cloud CDN charges for traffic or bandwidth apply. For more information, see Alibaba Cloud CDN billing overview.