You can create a native Object Storage Service (OSS) trigger in the Function Compute console to automatically trigger function execution when specific events occur in OSS. This allows you to easily respond to events such as file uploads, enabling you to implement a complete process quickly without adding event listening logic to your code.
Sample scenario
You can configure an OSS trigger and set the Object Prefix parameter to source in the trigger rule. In this case, when an image is stored in the source directory of the specified OSS bucket, the function is automatically triggered. The function then resizes the image and stores the processed image in the processed directory of the same bucket. For example, the source/a.png image is processed as processed/a.png.
Prerequisites
Function Compute is activated.
For more information, see Create an event function.
OSS is activated and a bucket is created.
For more information, see Create buckets.
Service quotas
You can associate up to 10 native OSS triggers with a single bucket.
NoteIf you want to associate more OSS triggers with the same bucket, consider using EventBridge-based OSS triggers. While it is technically possible to exceed 10 triggers per bucket with EventBridge, we recommend that you create a new bucket and configure the triggers there.
Neither native OSS triggers nor EventBridge-based OSS triggers support fuzzy matching or regular expression matching for the configured object prefixes and suffixes.
A native OSS trigger supports only one object prefix and one suffix configuration. To specify multiple prefixes or suffixes, use EventBridge-based OSS triggers.
Step 1: Create an OSS trigger
Log on to the Function Compute console. In the left-side navigation pane, click Functions.
In the top navigation bar, select a region. On the Functions page, click the function that you want to manage.
On the function details page, click the Configurations tab. In the left-side navigation pane, click Triggers. Then, click Create Trigger.
In the Create Trigger panel, configure the parameters as outlined below. Then, click OK.
Parameter
Configuration instruction
Example
Trigger Type
Select OSS.
OSS
Name
Customize the name of the trigger.
oss-trigger
Version or Alias
Specify the function version or alias. The default value is LATEST. If you want to create a trigger for another version or alias, select the version or alias from the Version or Alias drop-down list on the Function Details page. For more information about versions and aliases, see Manage versions and Manage aliases.
LATEST
Bucket Name
Select the bucket that you created.
testbucket
Object Prefix
Specify an object prefix to define which objects within the bucket should trigger function execution. To avoid unexpected costs caused by recursive loops, we recommend that you configure both Object Prefix and Object Suffix. If you specify the same event type for different triggers in a bucket, you must configure different prefixes and different suffixes for them. For more information, see Triggering rules.
ImportantThe prefix cannot start with a forward slash (
/). Otherwise, the OSS trigger will not function.source
Object Suffix
Specify an object suffix to define which objects within the bucket should trigger function execution. To avoid unexpected costs caused by recursive triggering, we recommend that you configure both Object Prefix and Object Suffix. If you specify the same event type for different triggers in a bucket, you must configure different prefixes and different suffixes for them. For more information, see Triggering rules.
png
Trigger Event
Select one or more trigger events from the drop-down list. For more information about the types of OSS events, see OSS events.
In this example, oss:ObjectCreated:PutObject is selected.
oss:ObjectCreated:PutObject,oss:ObjectCreated:PostObject,oss:ObjectCreated:CompleteMultipartUpload,oss:ObjectCreated:PutSymlinkRole Name
Specify the role that OSS uses to trigger Function Compute. In this example, AliyunOSSEventNotificationRole is selected.
NoteAfter you configure the preceding parameters, click OK. If this is the first time that you create a trigger of this type, click Authorize Now in the message that appears.
AliyunOSSEventNotificationRole
After the trigger is created, it is displayed on the Triggers tab. To modify or delete a trigger, see Trigger management.
Step 2: (Optional) Configure input parameters
When OSS triggers a function, it passes information in the form of an event object into the function. You can use code to parse and process the event. To test whether your code functions as expected, you can manually pass event into your function to simulate a trigger event.
On the Code tab of the function details page, click the
 icon next Test Function and select Configure Test Parameters from the drop-down list.
 In the Configure Test Parameters panel, click the Create New Test Event or Modify Existing Test Event tab, enter the event name and event content, and then click OK.
NoteConfigure the event content based on the information from the trigger creation. Make sure that the specified object exists in the OSS bucket. Otherwise, the function cannot be triggered, or the execution will fail. In this example, the object is
source/a.png.Event objects serve as the input parameters to Function Compute. When a file object is created or deleted in the specified OSS bucket, its event data is sent to the bound function in JSON format. An example of the event object is as follows:
{
    "events": [
        {
            "eventName": "ObjectCreated:PutObject",
            "eventSource": "acs:oss",
            "eventTime": "2022-08-13T06:45:43.000Z",
            "eventVersion": "1.0",
            "oss": {
                "bucket": {
                    "arn": "acs:oss:cn-hangzhou:123456789:testbucket",
                    "name": "testbucket",
                    "ownerIdentity": "164901546557****"
                },
                "object": {
                    "deltaSize": 122539,
                    "eTag": "688A7BF4F233DC9C88A80BF985AB****",
                    "key": "source/a.png",
                    "objectMeta": {
                       "mimeType": "application/zip",
                       "userMeta": {
                          "x-oss-meta-last-modified":"20250213"
                       }
                    },
                    "size": 122539
                },
                "ossSchemaVersion": "1.0",
                "ruleId": "9adac8e253828f4f7c0466d941fa3db81161****"
            },
            "region": "cn-hangzhou",
            "requestParameters": {
                "sourceIPAddress": "140.205.XX.XX"
            },
            "responseElements": {
                "requestId": "58F9FF2D3DF792092E12044C"
            },
            "userIdentity": {
                "principalId": "164901546557****"
            }
        }
    ]
}
The following table describes the parameters in an event object.
Parameter
Type
Example
Description
eventName
String
ObjectCreated:PutObject
The type of the event.
eventSource
String
acs:oss
The event source. The value is fixed to
acs.oss.eventTime
String
2022-08-13T06:45:43.000Z
The time when the event occurred. The value is in the ISO 8601 standard time format.
eventVersion
String
1.0
The version number of the event protocol.
oss
Map
The content of the event.
bucket
Map
The details of the bucket.
name
String
testbucket
The bucket name.
arn
String
acs:oss:cn-hangzhou:123456789:testbucket
The Alibaba Cloud Resource Name (ARN) of the bucket.
ownerIdentity
String
164901546557****
The ID of the user who created the bucket.
object
Map
The details of the object.
size
Int
122539
The object size. Unit: bytes.
deltaSize
Int
122539
The variation of the object size. Unit: bytes.
If a new object is added, the value of this parameter indicates the size of the object.
If an existing object is overwritten with an object of the same name, the value of this parameter indicates the size difference between the new and old objects.
eTag
String
688A7BF4F233DC9C88A80BF985AB****
The object tag.
key
String
source/a.png
The object name.
objectMeta
Map
The details of the objectMeta parameter.
mimeType
String
application/zip
The object type. For more information, see How do I configure the Content-Type header?
userMeta
Map
The user metadata. It identifies the purposes or attributes of the object.
x-oss-meta-last-modified
String
20250213
User metadata consists of a set of key-value pairs. The name of a user metadata header must start with
x-oss-meta-. In this example, the key-value pair"x-oss-meta-last-modified":"20250213"indicates that the object was last modified on February 13, 2025, on an on-premises machine. For more information, see User metadata.ossSchemaVersion
String
1.0
The version number of the OSS schema.
ruleId
String
9adac8e253828f4f7c0466d941fa3db81161****
The ID of the rule that matches the event.
region
String
cn-hangzhou
The region in which the bucket resides.
requestParameters
Map
The request parameters.
sourceIPAddress
String
140.205.XX.XX
The IP address from which the request is sent.
responseElements
Map
The details of the response.
requestId
String
58F9FF2D3DF792092E12044C
The request ID.
userIdentity
Map
The user attributes.
principalId
String
164901546557****
The ID of the Alibaba Cloud account that initiated the request.
Step 3: Write and test function code
After creating the OSS trigger, you can proceed to write and test your function code. When an OSS event occurs, function execution is triggered.
You must prevent recursive loops in your code. A typical scenario involves a function being triggered by an object upload to an OSS bucket. After execution, the function generates new objects and uploads them back to the same bucket, which triggers the function again, creating an infinite loop. For more information, see Triggering rules.
On the Code tab of the Function Details page, write code in the code editor and click Deploy.
The sample code for runtimes that support online code editing is as follows:
NoteWe recommend that you use an internal endpoint of OSS to read data from and write data to OSS buckets in your function. If you use a public endpoint to access OSS resources, you will incur charges for data transferred over the Internet. For more information about the formats of the internal endpoints, see Regions and endpoints.
"use strict"; /* The sample code is used to implement the following features: * 1. Parse the OSS trigger information from event object. * 2. Initialize the OSS client based on the obtained information. * 3. Resize the source images and then save the processed images to the specified destination directory in the OSS bucket to implement image backup. */ const OSS = require("ali-oss"); exports.handler = async function(event, context, callback) { console.log("The content in context entity is: \n"); console.dir(context); const {accessKeyId, accessKeySecret, securityToken} = context.credentials; const events = JSON.parse(event.toString()).events; console.log("The content in event entity is: \n"); console.dir(events); let objectName = events[0].oss.object.key; let region = events[0].region; let bucketName = events[0].oss.bucket.name; // Connect to the OSS bucket. const client = new OSS({ region: region, accessKeyId: accessKeyId, accessKeySecret: accessKeySecret, stsToken: securityToken, bucket: bucketName, endpoint: "https://oss-" + region + "-internal.aliyuncs.com" }); console.log("The client entity is: \n"); console.dir(events); const targetImage = objectName.replace("source/", "processed/") // Resize images to a fixed width and height of 128 px. const processStr = "image/resize,m_fixed,w_128,h_128" // Save the processed images to the destination directory. const result = await client.processObjectSave( objectName, targetImage, processStr, bucketName ); console.log(result.res.status); callback(null, "done"); }""" The sample code is used to implement the following features: * Parse the OSS trigger information from event object. * Initialize the OSS client based on the obtained information. * Resize the source images and then save the processed images to the specified destination directory in the OSS bucket to implement image backup. """ # -*- coding: utf-8 -*- import oss2, json import base64 def handler(event, context): # You can use context.credentials to obtain the AccessKey pair. print("The content in context entity is: \n") print(context) creds = context.credentials # Configure permissions for OSS SDK. auth = oss2.StsAuth( creds.access_key_id, creds.access_key_secret, creds.security_token) print("The content in event entity is: \n") print(event) # Load event content. oss_raw_data = json.loads(event) # Get oss event related parameters passed by oss trigger. oss_info_map = oss_raw_data['events'][0]['oss'] # Get oss bucket name. bucket_name = oss_info_map['bucket']['name'] # Set oss service endpoint. endpoint = 'oss-' + oss_raw_data['events'][0]['region'] + '-internal.aliyuncs.com' # Initiate oss client. bucket = oss2.Bucket(auth, endpoint, bucket_name) object_name = oss_info_map['object']['key'] # Download original images from oss bucket. remote_stream = bucket.get_object(object_name) if not remote_stream: print(f'{object_name} does not exist in bucket {bucket_name}') return # Processed images will be saved to processed/ processed_path = object_name.replace('source/', 'processed/') # Resize images to a fixed width and height of 128 px. style = 'image/resize,m_fixed,w_128,h_128' # Specify the names of the processed images. For images that are not stored in the root directory of the bucket, you must include the full path. For example: exampledir/example.jpg. process = "{0}|sys/saveas,o_{1},b_{2}".format(style, oss2.compat.to_string(base64.urlsafe_b64encode(oss2.compat.to_bytes(processed_path))), oss2.compat.to_string(base64.urlsafe_b64encode(oss2.compat.to_bytes(bucket_name)))) result = bucket.process_object(object_name, process) print(result)/*The sample code is used to implement the following features: * 1. Parse the endpoint, bucket, and object information from the request. * 2. Initialize the OSS client based on the obtained information. * 3. Resize the source images and then save the processed images to the specified destination directory in the OSS bucket to implement image backup. */ <?php use RingCentral\Psr7\Response; use OSS\OssClient; use OSS\Core\OssException; function base64url_encode($data) { return rtrim(strtr(base64_encode($data), '+/', '-_'), '='); } function handler($event, $context) { $event = json_decode($event, $assoc = true); /* The AccessKey ID and AccessKey secret of an Alibaba Cloud account can be used to access all API operations. Using these credentials to perform operations in Function Compute is a high-risk operation. We recommend that you use a Resource Access Management (RAM) user to call API operations or perform routine O&M. We recommend that you avoid saving the AccessKey pair in your project code. If this sensitive information is leaked, the security of all resources in your account could be compromised. In this example, the AccessKey pair is obtained from the context. */ $accessKeyId = $context["credentials"]["accessKeyId"]; $accessKeySecret = $context["credentials"]["accessKeySecret"]; $securityToken = $context["credentials"]["securityToken"]; $evt = $event['events']{0}; $bucketName = $evt['oss']['bucket']['name']; $endpoint = 'oss-' . $evt['region'] . '-internal.aliyuncs.com'; $objectName = $evt['oss']['object']['key']; $targetObject = str_replace("source/", "processed/", $objectName); try { // Connect to OSS. $ossClient = new OssClient($accessKeyId, $accessKeySecret, $endpoint, false, $securityToken); // Resize images to a fixed width and height of 128 px. $style = "image/resize,m_fixed,w_128,h_128"; $process = $style. '|sys/saveas'. ',o_'.base64url_encode($targetObject). ',b_'.base64url_encode($bucketName); // Save the processed images to the specified destination directory. $result = $ossClient->processObject($bucketName, $objectName, $process); // Print the processing result. print($result); } catch (OssException $e) { print_r(__FUNCTION__ . ": FAILED\n"); printf($e->getMessage() . "\n"); } print(__FUNCTION__ . ": OK" . "\n"); return $targetObject; }
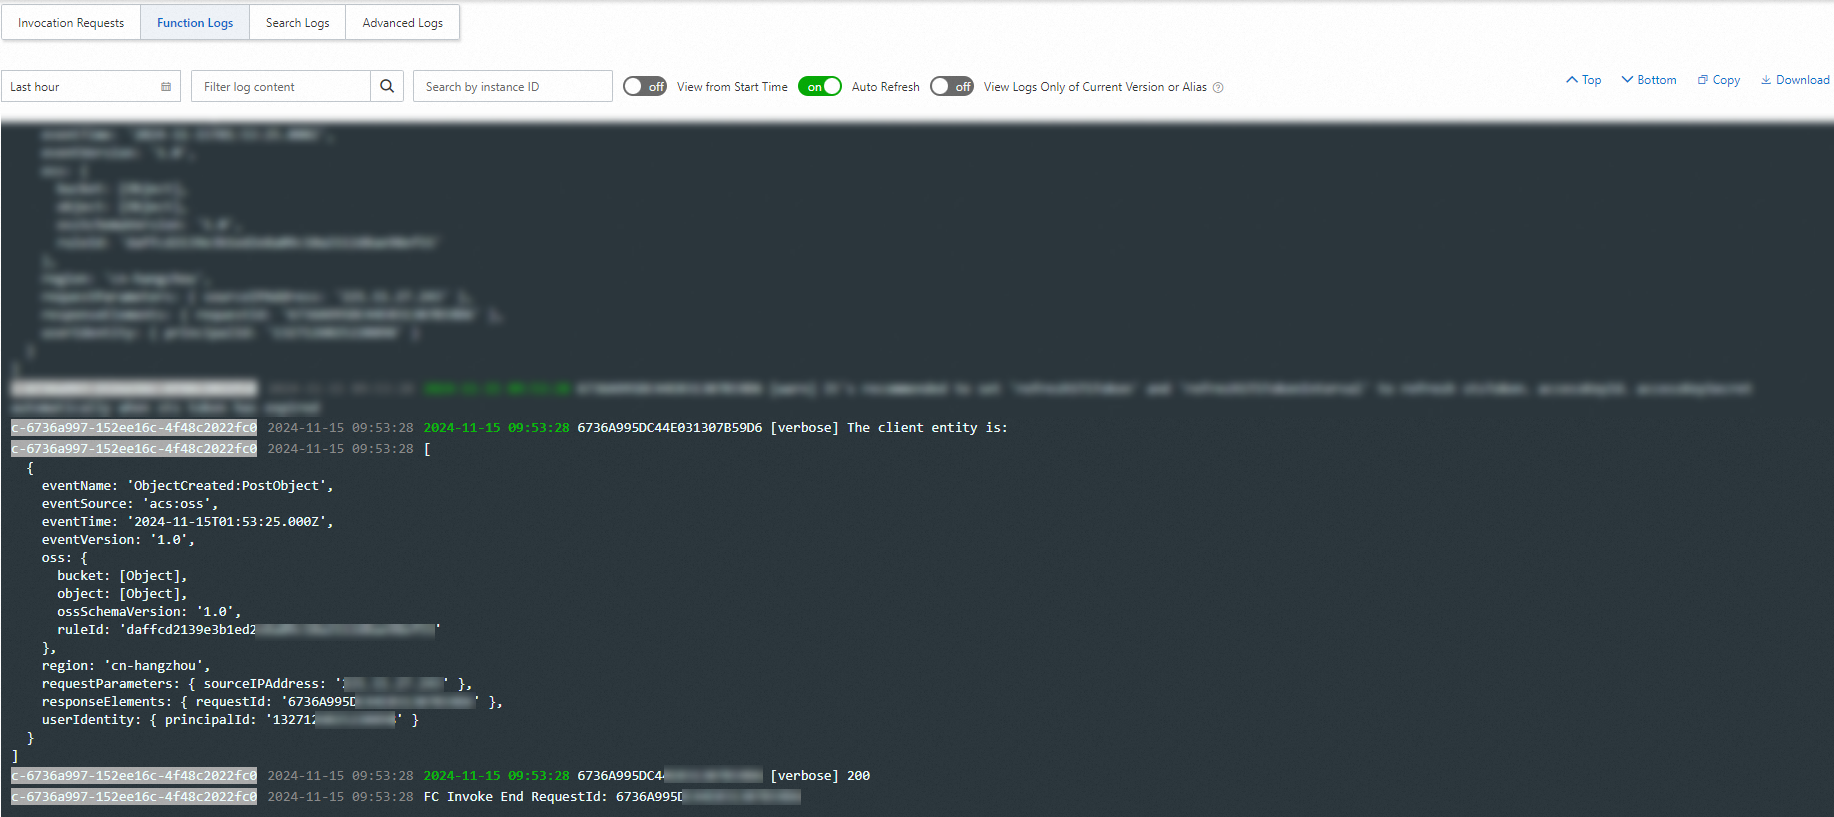
Test the function.
Method 1: If you simulated an event source by configuring
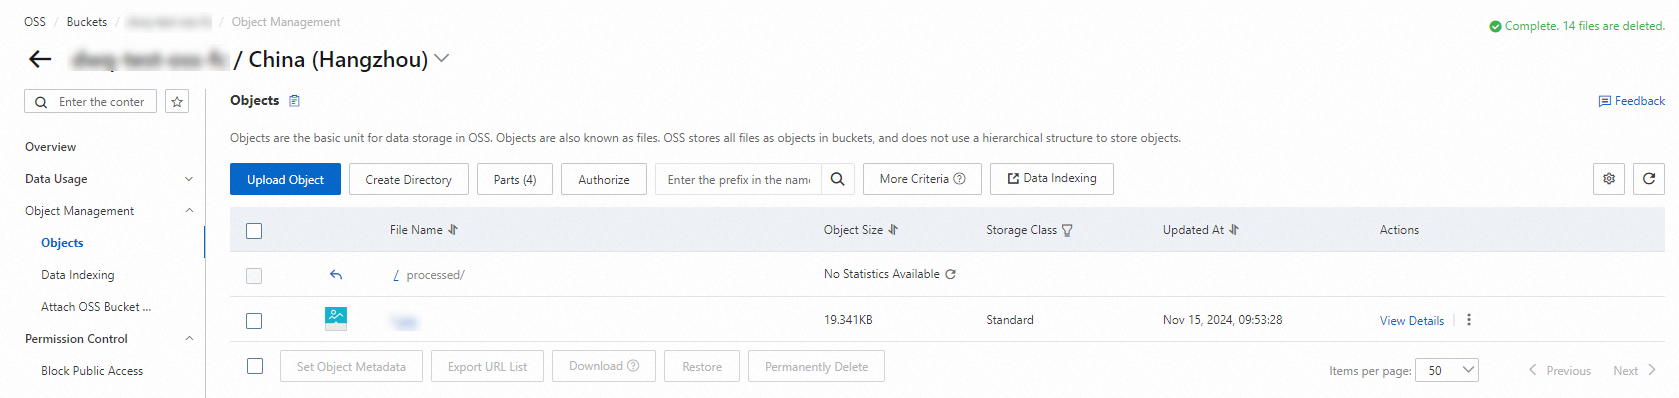
event, click Test Function.Method 2: On the page, click the bucket name to navigate to the corresponding bucket and upload an image with the specified prefix and suffix. Then, you can go to the Logs tab on the Function Details page to view the execution logs, and also check the processed image in the bucket's destination directory.
FAQ
References
For more information about the types of OSS events, see OSS events.
If you want to modify or delete existing triggers, see Modify a trigger.
If you want to associate more than 10 OSS triggers with a bucket, see Configure an EventBridge-based OSS trigger.
Trigger-related issues:
If you want to check which event triggers a function, you can specify the system to print event type logs in your code. For more information, see Logs.
To call another function within a function, you can invoke the target function via API calls or orchestrate your functions using CloudFlow. If the invoked function requires a long time to execute and involves asynchronous invocations, you can configure destination services for asynchronous invocations. For more information, see Can functions invoke each other? and Configure a destination for an asynchronous invocation.