Loggie is a lightweight, high-performance, cloud-native log collection agent written in Go. Use it in custom runtime functions to collect logs from files and upload them to Simple Log Service (SLS) for storage and analysis.
How it works
The Loggie Agent runs as an independent background process inside the function instance, alongside your application. When the function starts, the bootstrap file launches Loggie in the background, then starts your application. Loggie continuously watches the log files your application writes and ships them to SLS.
Because Loggie runs independently, a malfunctioning agent does not affect your function's execution.
Enabling the Loggie Agent adds a 10-second wait after each invocation ends, before the instance is frozen. This waiting period is billable at the same rate as the invocation phase. For more information, see Billing.
Prerequisites
Before you begin, ensure that you have:
A Simple Log Service project and Logstore in the same region as your function. See Manage a project and Create a Logstore
Step 1: Create a function
Log on to the Function Compute console. In the left navigation bar, choose Function Management > Function.
In the top navigation bar, select a region. On the Function page, click Create Function.
In the dialog box, select Web Function, then click Next.
On the Create Function page, configure the parameters below. Keep the defaults for all other parameters, then click Create. For the full parameter reference, see Create a function. For Code Upload Method, upload a folder named
codethat containsapp.py. The following sampleapp.pyshows a Flask app that writes logs to/tmp/log/fc-flask.log:The
filenamevalue inlogging.basicConfigmust match thesources.pathssetting in thepipelines.ymlfile you create in Step 2.Parameter Value Function Name (under Basic Configurations) Enter a name Runtime (under Code) Custom Runtime Code Upload Method (under Code) Upload Folder Startup Command (under Code) /code/bootstrapListening Port (under Code) 9000from flask import Flask from flask import request import logging import os REQUEST_ID_HEADER = 'x-fc-request-id' app = Flask(__name__) format_str = '[%(asctime)s] %(levelname)s in %(module)s: %(message)s' logging.basicConfig(filename='/tmp/log/fc-flask.log', filemode='w', format=format_str, encoding='utf-8', level=logging.DEBUG) @app.route("/invoke", methods=["POST"]) def hello_world(): rid = request.headers.get(REQUEST_ID_HEADER) logger = logging.getLogger() print("FC Invoke Start RequestId: " + rid) logger.info("FC Invoke Start RequestId: " + rid) data = request.stream.read() print(str(data)) logger.info("receive event: {}".format(str(data))) print("FC Invoke End RequestId: " + rid) logger.info("FC Invoke Start RequestId: " + rid) return "Hello, World!" if __name__ == '__main__': app.run(host='0.0.0.0', port=9000)The
bootstrapfile referenced as the startup command will be created in Step 2.
Step 2: Create the bootstrap file
After the function is created, go to the Code tab and use the WebIDE to create a
bootstrapfile in thecodedirectory. The followingbootstrapscript starts Loggie as a background process, then starts the application:Creates `pipelines.yml` — the Loggie pipeline configuration file. The
sourcesblock collects all.logfiles from/tmp/log/. SettingaddonMeta: trueadds default metadata about the log collection state to each log entry. Thesinkblock sends logs to SLS using environment variables set in Step 4. For the fullsourcesconfiguration reference, see Common source configurations and addonMeta.Creates `loggie.yml` — the Loggie system configuration file. An empty file uses the default configuration. For custom parameters, see Loggie system configuration.
Starts Loggie as a background process. Loggie's own runtime logs are written to
/tmp/loggie.log.Starts the application. This example uses Python. Adjust the command for your actual runtime.
#!/bin/bash

# 1. Create the pipelines.yml file.
mkdir -p /tmp/log /code/etc
cat << EOF > /code/etc/pipelines.yml
pipelines:
  - name: demo
    sources:
      - type: file
        name: fc-demo
        addonMeta: true
        fields:
          topic: "loggie"
        fieldsUnderRoot: true
        paths:
          - "/tmp/log/*.log"
    sink:
      type: sls
      endpoint: ${LOGGIE_SINK_SLS_ENDPOINT}
      accessKeyId: ${LOGGIE_SINK_SLS_ACCESS_ID}
      accessKeySecret: ${LOGGIE_SINK_SLS_ACCESS_SECRET}
      project: ${LOGGIE_SINK_SLS_PROJECT}
      logstore: ${LOGGIE_SINK_SLS_LOGSTORE}
      topic: ${LOGGIE_SINK_SLS_TOPIC}
EOF

# 2. Create the loggie.yml file.
cat << EOF > /code/etc/loggie.yml
EOF

# 3. Start the Loggie Agent as a background process.
/opt/bin/loggie -config.system=/code/etc/loggie.yml -config.pipeline=/code/etc/pipelines.yml > /tmp/loggie.log 2>&1 &

# 4. Start the application.
exec python app.py
The script does the following:
Set executable permissions on the
bootstrapfile. In the WebIDE terminal, run:chmod 777 bootstrapClick Deploy.
Step 3: Add the Loggie Agent public layer
Go to the Configuration tab. Under Advanced Settings, click Modify.
In the Layer section, click Add Layer > Add Public Layer, then select the Loggie Agent layer:
Layer name Compatible runtime Version ARN Loggie Agent custom runtime 1 acs:fc:{region}:official:layers/Loggie13x/versions/1Click Deploy.
Step 4: Set environment variables
Go to the Configuration tab. Under Advanced Settings, click Modify.
In the Environment Variables section, add the following variables. For configuration details, see Configure environment variables. Set
FC_EXTENSION_SLS_LOGGIE=true. This prevents the function instance from freezing immediately after an invocation — it waits 10 seconds to ensure Loggie finishes uploading logs. Set the SLS connection variables referenced inpipelines.yml:ImportantThe 10-second wait is billable at the same rate as the invocation phase. See Billing.
Variable Description Where to get the value LOGGIE_SINK_SLS_ENDPOINTSLS endpoint Endpoints LOGGIE_SINK_SLS_ACCESS_IDAccessKey ID Create an AccessKey pair LOGGIE_SINK_SLS_ACCESS_SECRETAccessKey secret Create an AccessKey pair LOGGIE_SINK_SLS_PROJECTSLS project name Your SLS console LOGGIE_SINK_SLS_LOGSTORELogstore for storing logs Your SLS console LOGGIE_SINK_SLS_TOPICLog topic (custom value) Define your own Click Deploy. After the function configuration is updated, execution logs can be uploaded to Simple Log Service via Loggie.
Step 5: Verify the results
On the Code tab, click Test Function. The first invocation after configuration may take slightly longer than usual. Invoke the function a few more times to generate log data.
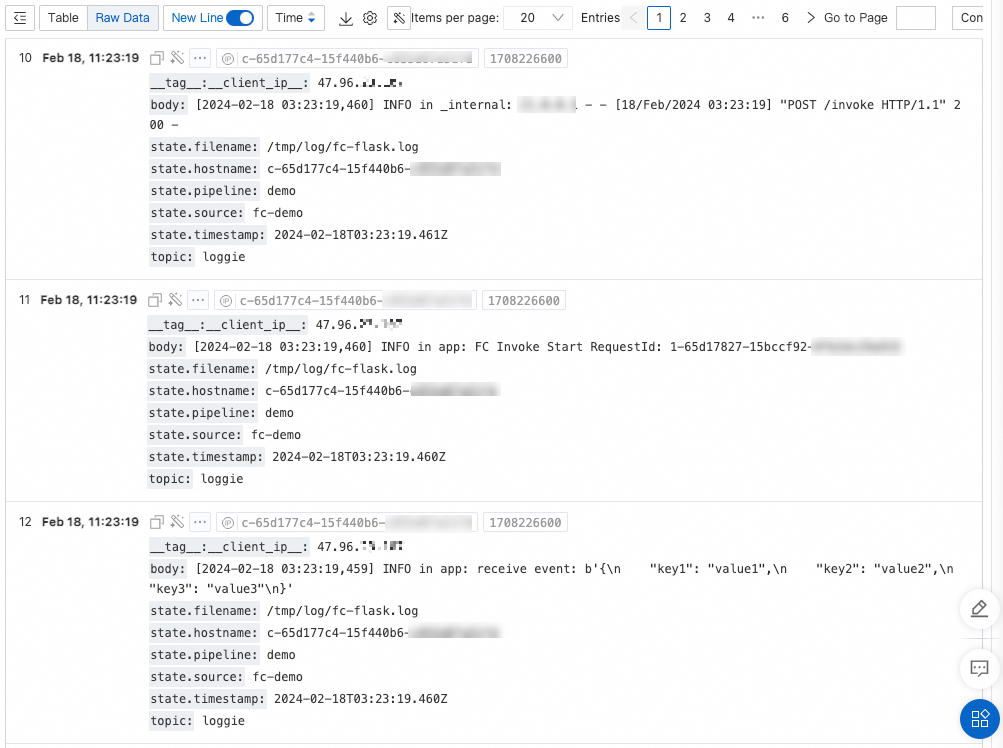
Log on to the Simple Log Service console and search for logs using the region, project, and Logstore specified in
pipelines.yml. A successful result looks like this:body: The log message content.state.*: Metadata about the log collection state. Thehostnamefield is the ID of the function instance.
If no logs appear after a few minutes, see Troubleshooting.
Troubleshooting
The function runs as expected but logs are missing
If the function runs correctly, its instance stays active for a few minutes after an invocation. Log on to the instance to inspect the Loggie Agent. For details, see Instance command-line operations.
No Loggie logs at `/tmp/loggie.log`: Try starting the agent manually from the command line.
Loggie logs exist: Check the following:
Confirm
pipelines.ymlis configured correctly.Confirm the SLS sink started successfully. Look for a log entry similar to
pipeline sink(sink/sls)-0 invoke loop start.Confirm log collection is running. Look for
start collect file: /tmp/log/fc-flask.log. If this entry is missing, check whether a log file exists at the path specified insources.paths.
Log ingestion can be delayed when first connecting to a Logstore. If Loggie's logs look normal, invoke the function several more times and wait a few minutes before querying SLS.
The function fails to run
Loggie runs as an external extension and does not affect function execution. If the function itself fails:
Remove the Loggie startup logic from the
bootstrapfile to confirm the function runs correctly on its own.If you see process exit or timeout errors, increase the function's memory or CPU allocation.
What's next
To process logs before uploading — such as parsing JSON-formatted entries or filtering out DEBUG logs — add an interceptor to
pipelines.yml. See Loggie-Interceptor.For the full Loggie documentation, see the Loggie docs.