JWT authentication lets Function Compute verify incoming requests at the gateway level—before they reach your function. You configure a public JSON Web Key Set (JWKS) on a custom domain name, and Function Compute uses it to validate the token in every request and forward verified claims directly to your function. Your function handles business logic only, with no authentication code required.
To configure JWT authentication end to end, you need to:
Generate a JWKS key pair and keep the private key confidential.
Enable JWT authentication on a custom domain name and paste the public key into the console.
Configure where Function Compute reads the token from in each request.
(Optional) Map JWT claims to function parameters.
Generate a test token and verify the configuration with Postman.
How it works
JWT authentication for custom domain names follows the same flow as JWT authentication for HTTP triggers. The process uses asymmetric encryption: a private key signs the token, and a public key verifies it.

The flow works as follows:
The client sends an authentication request to a custom authorizer, typically with a username and password.
The authorizer verifies the credentials, then uses a private key to generate a standard JWT token.
The authorizer returns the token to the client. The client caches it locally.
The client sends a business request that includes the token to the HTTP trigger.
Function Compute uses the configured public key to validate the token in the request.
If validation passes, Function Compute forwards the request to your function, including any mapped claims.
The function processes the request and returns a response.
Function Compute forwards the response to the client.
For background on JWT and token authentication, see JWT-based token authentication and Introduction to JSON Web Tokens.
Limits
Function Compute authenticates JWTs using the public JWKS you configure for the domain. You generate and distribute JWTs based on your own business logic.
JSON Web Keys (JWKs) without a key ID (
kid) are supported. At most one JWK in a JWKS can have an unspecified or emptykid.Multiple JWKs can be configured for a custom domain name. Function Compute matches the token's
kidto the correct JWK, then uses that key for signature verification.Tokens can be read from
header, query, form, andcookieparameters.Claims can be forwarded as
header, query, form, andcookieparameters.
Supported signature algorithms:
| Signature algorithm | alg value |
|---|---|
| RSASSA-PKCS1-v1_5 | RS256, RS384, or RS512 |
| RSASSA-PSS | PS256, PS384, or PS512 |
| Elliptic Curve (ECDSA) | ES256, ES384, or ES512 |
| HMAC | HS256, HS384, or HS512 |
| EdDSA | EdDSA |
HMAC uses symmetric encryption, which is less secure than asymmetric encryption. Use an asymmetric algorithm when possible. When using asymmetric encryption, include only public key information in your JWKS. Use HTTPS to protect tokens in transit and prevent token leaks.
Prerequisites
Before you begin, ensure that you have:
A custom domain name configured in Function Compute. See Configure custom domain names.
Configure JWT authentication
Step 1: Open the custom domain name settings
Log on to the Function Compute console. In the left-side navigation pane, choose Advanced Features > Custom Domains.
In the top navigation bar, select the region where your custom domain name resides.
On the Custom Domains page, click the domain name you want to configure.
In the upper-right corner, click Modify.
Step 2: Enable JWT authentication
On the Modify Custom Domain Name page, set Authentication Method to JWT Authentication.

Step 3: Configure the JWKS
JWT authentication requires a valid JWKS containing your public key. You can generate one using an online tool such as mkjwk.org. If you have a private key in PEM format, use a tool like jwx to convert it to JWKS format.
To generate a JWKS on mkjwk.org: set Key Use, Algorithm, and Show X.509, then click Generate. The tool produces two keys:
① Private key — use this in your code to sign (issue) JWT tokens. Keep it confidential.
② Public key — paste this into the
keysarray in the Function Compute console.


The JWKS you paste into the console follows this structure:
{
    "keys": [
        {
            "alg": "RS256",
            "e": "AQAB",
            "kty": "RSA",
            "n": "u1LWgoomekdOMfB1lEe96OHehd4XRNCbZRm96RqwOYTTc28Sc_U5wKV2umDzolfoI682ct2BNnRRahYgZPhbOCzHYM6i8sRXjz9Ghx3QHw9zrYACtArwQxrTFiejbfzDPGdPrMQg7T8wjtLtkSyDmCzeXpbIdwmxuLyt_ahLfHelr94kEksMDa42V4Fi5bMW4cCLjlEKzBEHGmFdT8UbLPCvpgsM84JK63e5ifdeI9NdadbC8ZMiR--dFCujT7AgRRyMzxgdn2l-nZJ2ZaYzbLUtAW5_U2kfRVkDNa8d1g__2V5zjU6nfLJ1S2MoXMgRgDPeHpEehZVu2kNaSFvDUQ",
            "use": "sig"
        }
    ]
}
Step 4: Configure the JWT token location
In the JWT Token Configuration section, set Read Position (Header, Cookie, Query Parameters, or Form Parameters) and the parameter name where Function Compute should look for the token.
If you set Read Position to Header, specify a Remove Prefix value. Function Compute strips this prefix before parsing the token. For example, if you set the prefix to Bearer, a request header Authorization: Bearer <token> causes Function Compute to extract and validate <token>.

Step 5: Configure claim forwarding (optional)
In the JWT Claim Conversion section, map JWT claims to function parameters. For each mapping, specify:
Mapping Parameter Position — where to forward the claim (Header, Cookie, Query Parameters, or Form Parameters)
The original claim name in the token
The parameter name passed to the function

Step 6: Save the configuration
Click Save.
Verify the configuration
Use the private key generated in the previous section to create a test JWT token, then use Postman to confirm the domain name authenticates requests correctly.
Generate a test token
Install the PyJWT module. See PyJWT.
Run the following Python script locally to generate a token. Replace the private key placeholder with the X.509 PEM private key from the JWKS generation step.
import jwt
import time

private_key = """
-----BEGIN PRIVATE KEY-----
<Your X.509 PEM private key>
-----END PRIVATE KEY-----
"""

headers = {
    "alg": "RS256",
    "typ": "JWT"
}

payload = {
    "sub": "1234567890",
    "name": "John Snow",
    "iat": int(time.time()),              # Token issuance time
    "exp": int(time.time()) + 60 * 60,   # Token expires in 1 hour
}

encoded = jwt.encode(payload=payload, key=private_key.encode(), headers=headers)
print("Generated token: %s" % encoded)
Test with Postman
In the Function Compute console, go to Advanced Features > Custom Domains. Copy your custom domain name and paste it into the URL field in Postman.
Add a request header that matches your JWT Token Configuration settings. For example, if the parameter name is
Authenticationand the prefix isBearer:ImportantEnsure that the formatting of the JWT in the request header aligns with the configured Remove Prefix settings. If there is a mismatch, an
invalid or expired jwterror is returned.Parameter Value Description Key AuthenticationThe parameter name configured in JWT Token Configuration Value Bearer <your-jwt-token>The configured prefix, a space, and the token generated in the previous step Click Send and check the response.
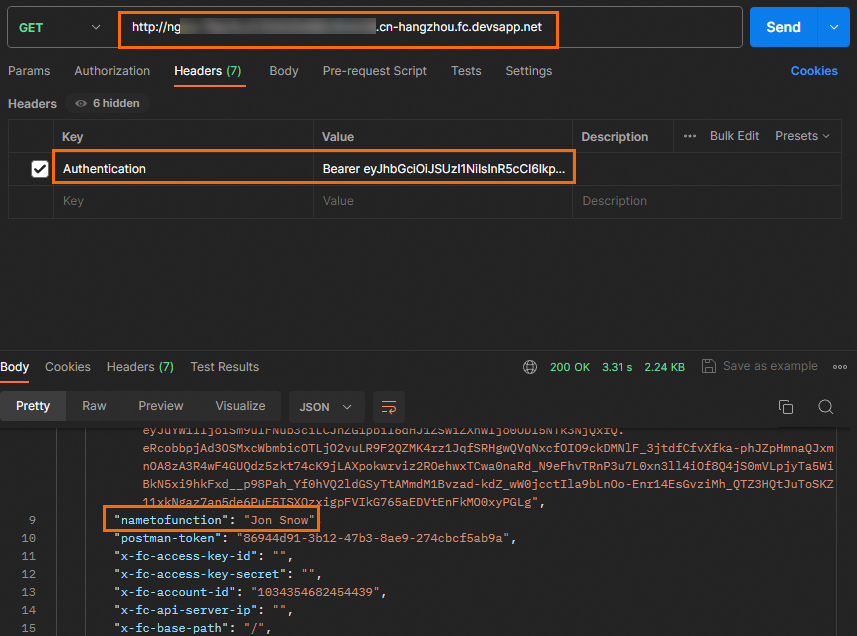
If claim forwarding is configured, the response confirms the claim was passed to the function. For example, nametofunction is the forwarded parameter name from the claim mapping.