In Function Compute, state is not shared between instances in different execution environments. To persist structured data and achieve state sharing, databases can be used. Function Compute can interact with cloud databases to query or insert data. This topic uses a Python function as an example to describe how to access ApsaraDB RDS for MySQL both within the same VPC and across different VPCs or regions.
Prerequisites
An ApsaraDB RDS for MySQL instance is created. For more information, see Create an ApsaraDB RDS for MySQL instance.
Your database and account are created. For more information, see Create a database and an account.
The logic in the index.py sample code in this topic is to query all data in a database table named "users". Modify the table name as needed and ensure that there is at least one record in the table.
Procedure
Step 1: Configure the database whitelist
Scenario 1: Access an RDS database in the same VPC
If you choose to access a database in the same VPC, make sure that the database instance and the function are in the same region. We recommend that you create the database instance in a zone that Function Compute supports. For more information, see Zones that Function Compute supports. If your database instance is not in a zone that is supported by Function Compute, you can create a vSwitch in your VPC in the same zone as Function Compute and use this vSwitch ID in the VPC configurations of the function. vSwitches in the same VPC can communicate with each other over the private network. Therefore, Function Compute can use the vSwitch to access resources in VPCs that reside in other zones. For more information, see What do I do if the vSwitch is in unsupported zone error occurs?.
Log on to the Function Compute console, create a Python web function, enable VPC access for the function, and configure the target VPC resource.
NoteMake sure that the VPC configured for the function is the same as the VPC to which the database instance is attached.
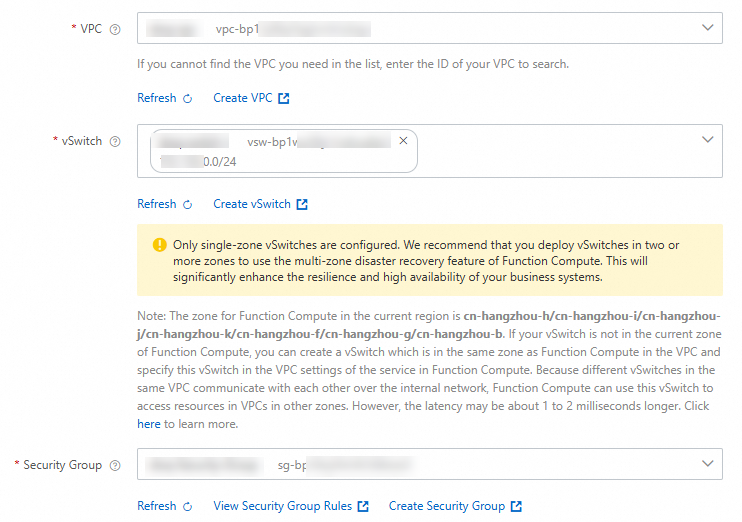
On the function details page, choose , and then on the Network page, obtain the CIDR block of the vSwitch in the function configuration.

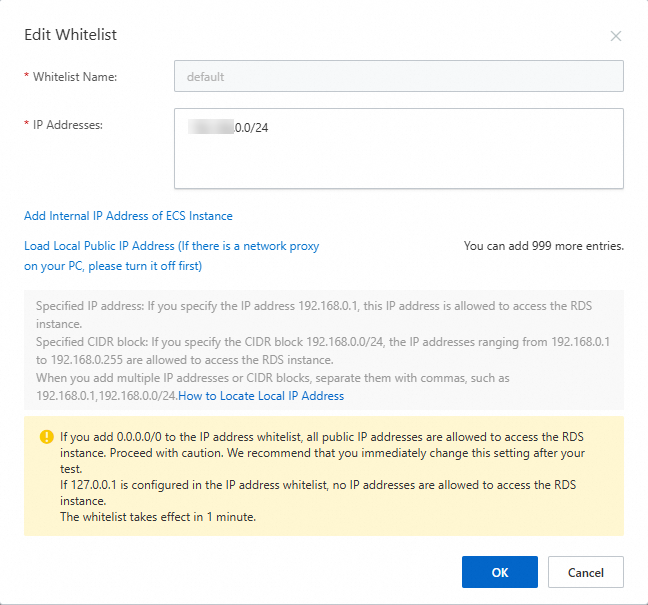
Add the CIDR block of the vSwitch obtained in the previous step to the database access whitelist.
ImportantUse an IP address whitelist to authorize functions to access the database. Do not use the security group mode. Otherwise, functions may occasionally fail to connect to the database, which affects the businesses.
Visit the RDS instance list, select a region at the top, and then click the target instance ID.
In the left navigation bar, click Whitelist and SecGroup.
On the Whitelist Settings page, you can view the current IP whitelist mode.
NoteExisting RDS instances may run in enhanced whitelist mode. All new RDS instances run in standard whitelist mode.
Click Modify to the right of the Default group. In the Modify Whitelist Group dialog box that appears, configure the IPv4 CIDR block of the vSwitch obtained in Step 2 in the whitelist, and then click OK.
After the configuration is complete, the function can access the RDS database through the internal endpoint of the database.
Scenario 2: Access an RDS database across VPCs or regions
Different VPCs and regions are completely logically isolated from each other. In general, you cannot access databases across VPCs and regions. If you need to access a database across VPCs or regions, you can configure a static public IP address for the function. In this case, the system creates a public NAT gateway in the VPC to which the function is attached. You can use the public gateway to access the database through the public IP address.
Log on to the Function Compute console. In the left navigation pane, click Functions, select a region, and then create a function as prompted.
On the function details page, choose . In the Network panel, configure a static public IP address for the function, and then click Deploy.
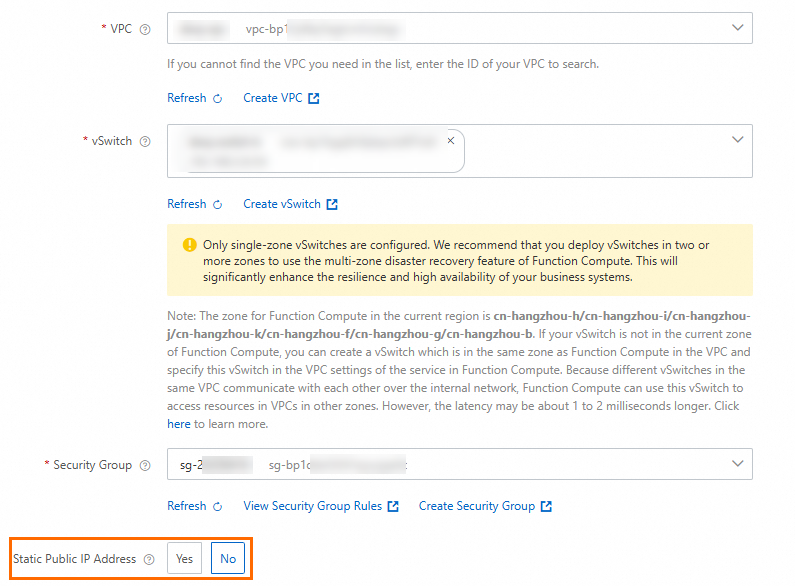
In the Static Public IP Configuration dialog box that appears, select the check box in the prompt, and then click OK. After the configuration is complete, set the Allow Default NIC To Access Internet parameter to No to make the configured static public IP address take effect.
On the function details page, choose , and then on the Network page, obtain the static public IP address configured for the function.

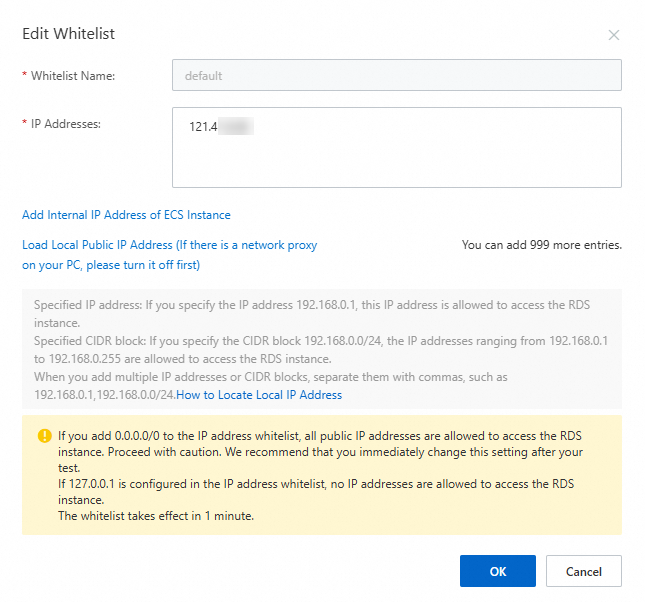
Add the static public IP address of the function obtained in the previous step to the database access whitelist.
ImportantUse an IP address whitelist to authorize functions to access the database. Do not use the security group mode. Otherwise, functions may occasionally fail to connect to the database, which affects the businesses.
Visit the RDS instance list, select a region at the top, and then click the target instance ID.
In the left navigation bar, click Whitelist and SecGroup.
On the Whitelist Settings page, you can view the current IP whitelist mode.
NoteExisting RDS instances may run in enhanced whitelist mode. All new RDS instances run in standard whitelist mode.
Click Modify to the right of the Default group. In the Modify Whitelist Group dialog box that appears, configure the IPv4 CIDR block of the vSwitch obtained in Step 2 in the whitelist, and then click OK.
After the configuration is complete, the function can access the RDS database through the public endpoint of the database.
Step 2: Access RDS in the function
Log on to the Function Compute console, find the target function in the function list, click the Code tab on the function details page, and write the following sample code in the code editor.
from flask import Flask, jsonify
import pymysql
import os
from datetime import datetime
import logging

app = Flask(__name__)

# Global variable for storing MySQL singleton connection
_mysql_connection = None

# Create database connection (singleton pattern)
def getConnection():
    global _mysql_connection
    try:
        # If connection already exists and is not disconnected, return it directly
        if _mysql_connection is not None:
            try:
                # Test if the connection is valid (simple command test)
                with _mysql_connection.cursor() as cursor:
                    cursor.execute("SELECT 1")  # Simple query to test connection status
                    result = cursor.fetchone()
                    if result and result[0] == 1:
                        return _mysql_connection
            except pymysql.OperationalError:
                # If connection is disconnected, reset it
                _mysql_connection = None

        # If connection does not exist or is disconnected, recreate it
        _mysql_connection = pymysql.connect(
            host=os.environ['MYSQL_HOST'],
            port=int(os.environ['MYSQL_PORT']),
            user=os.environ['MYSQL_USER'],
            password=os.environ['MYSQL_PASSWORD'],
            db=os.environ['MYSQL_DBNAME']
        )
        return _mysql_connection
    except Exception as e:
        logging.error(f"Error occurred during database connection: {e}")
        raise


@app.route('/', defaults={'path': ''})
@app.route('/<path:path>', methods=['GET', 'POST', 'PUT', 'DELETE'])
def hello_world(path):
    conn = getConnection()
    try:
        with conn.cursor() as cursor:
            # Query all records in the users table, modify users table according to actual table name
            sql = "SELECT * FROM users"
            cursor.execute(sql)
            result = cursor.fetchall()

            columns = [desc[0] for desc in cursor.description]  # Get list of field names

            # Convert query results to a list of dictionaries
            users = []
            for row in result:
                user = {}
                for idx, column_name in enumerate(columns):
                    value = row[idx]
                    if isinstance(value, datetime):  # Handle date type fields
                        user[column_name] = value.strftime('%Y-%m-%d %H:%M:%S')
                    else:
                        user[column_name] = value
                users.append(user)

            if users:
                # Return JSON response for all users
                return jsonify(users), 200
            else:
                # If no users are found, return 404 error
                return jsonify({'error': 'No users found'}), 404

    except Exception as e:
        logging.error(f"Error occurred during database operation: {e}")
        return jsonify({'error': 'Database error'}), 500


if __name__ == '__main__':
    app.run(host='0.0.0.0', port=9000)
On the Function Details page, choose , click Edit, and configure the following environment variables in the Environment Variables panel.
Environment variable name
Environment variable value
Description
MYSQL_HOST
rm-bp19u8e76ae****.mysql.rds.aliyuncs.com
The endpoint of the database instance.
If you choose the RDS database in the same VPC scenario, set this environment variable to the internal endpoint of the database.
If you choose the Access RDS database across VPCs or regions scenario, set this environment variable to the public endpoint of the database.
In the RDS instance list, click the target RDS instance ID. In the left navigation pane, click Database Connection. On the Database Connection page, obtain the internal endpoint or public endpoint of the database.
MYSQL_DBNAME
db_test
The name of the database created in the RDS instance.
MYSQL_PASSWORD
*****
The password of the database account.
MYSQL_PORT
3306
The private port of the database instance.
MYSQL_USER
dms_user_****
The username of the account that is used to connect to the RDS instance.
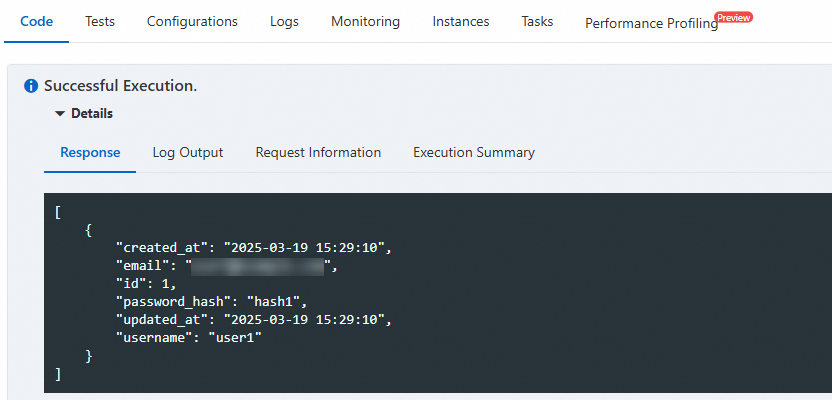
On the function details page, click the Code tab, click Test Function, and view the returned result after successful execution. The table query operation has been successfully completed.
More information
For more examples of accessing RDS MySQL databases, see Function Compute Python accessing MySQL database.
If your database access fails, you need to troubleshoot based on the problem symptoms. For more information, see Common causes of database access failures.
ApsaraDB RDS supports the MySQL, SQL Server, PostgreSQL, and MariaDB database engines. For more information, see What is ApsaraDB RDS?.
If you want to use the Serverless Devs command-line tool to create a function and access an RDS MySQL database, follow these steps.