ApsaraMQ for RabbitMQ triggers let you run a Function Compute function every time a message enters a RabbitMQ queue. The integration routes messages through EventBridge, so you can process them individually or in batches without managing any polling infrastructure.
How it works
When you create an ApsaraMQ for RabbitMQ trigger in the Function Compute console, Function Compute automatically creates an event stream in EventBridge. When a message is enqueued in the source RabbitMQ instance, EventBridge delivers it to your function as a CloudEvents-formatted event. Messages are pushed to your function one at a time or in batches, depending on your batch configuration.
You can view the trigger in the Function Compute console and the corresponding event stream resources in the EventBridge console.
ApsaraMQ for RabbitMQ triggers are suited for end-to-end streaming data processing scenarios.
Limitations
The ApsaraMQ for RabbitMQ instance and the Function Compute function must be in the same region.
If the number of event streams in your account reaches the quota, you cannot create additional triggers. For quota details, see Limits.
Prerequisites
Before you begin, ensure that you have:
Activated EventBridge and granted the required permissions — see Activate EventBridge and grant permissions to a RAM user
An event function in Function Compute — see Create an event function
An active ApsaraMQ for RabbitMQ instance with a vhost and queue configured:
Step 1: Create a trigger
Log on to the Function Compute console and go to the function details page.
Click the Configurations tab, then click Create Trigger on the Triggers page.
Configure the trigger parameters. The following figure shows the configuration panel.
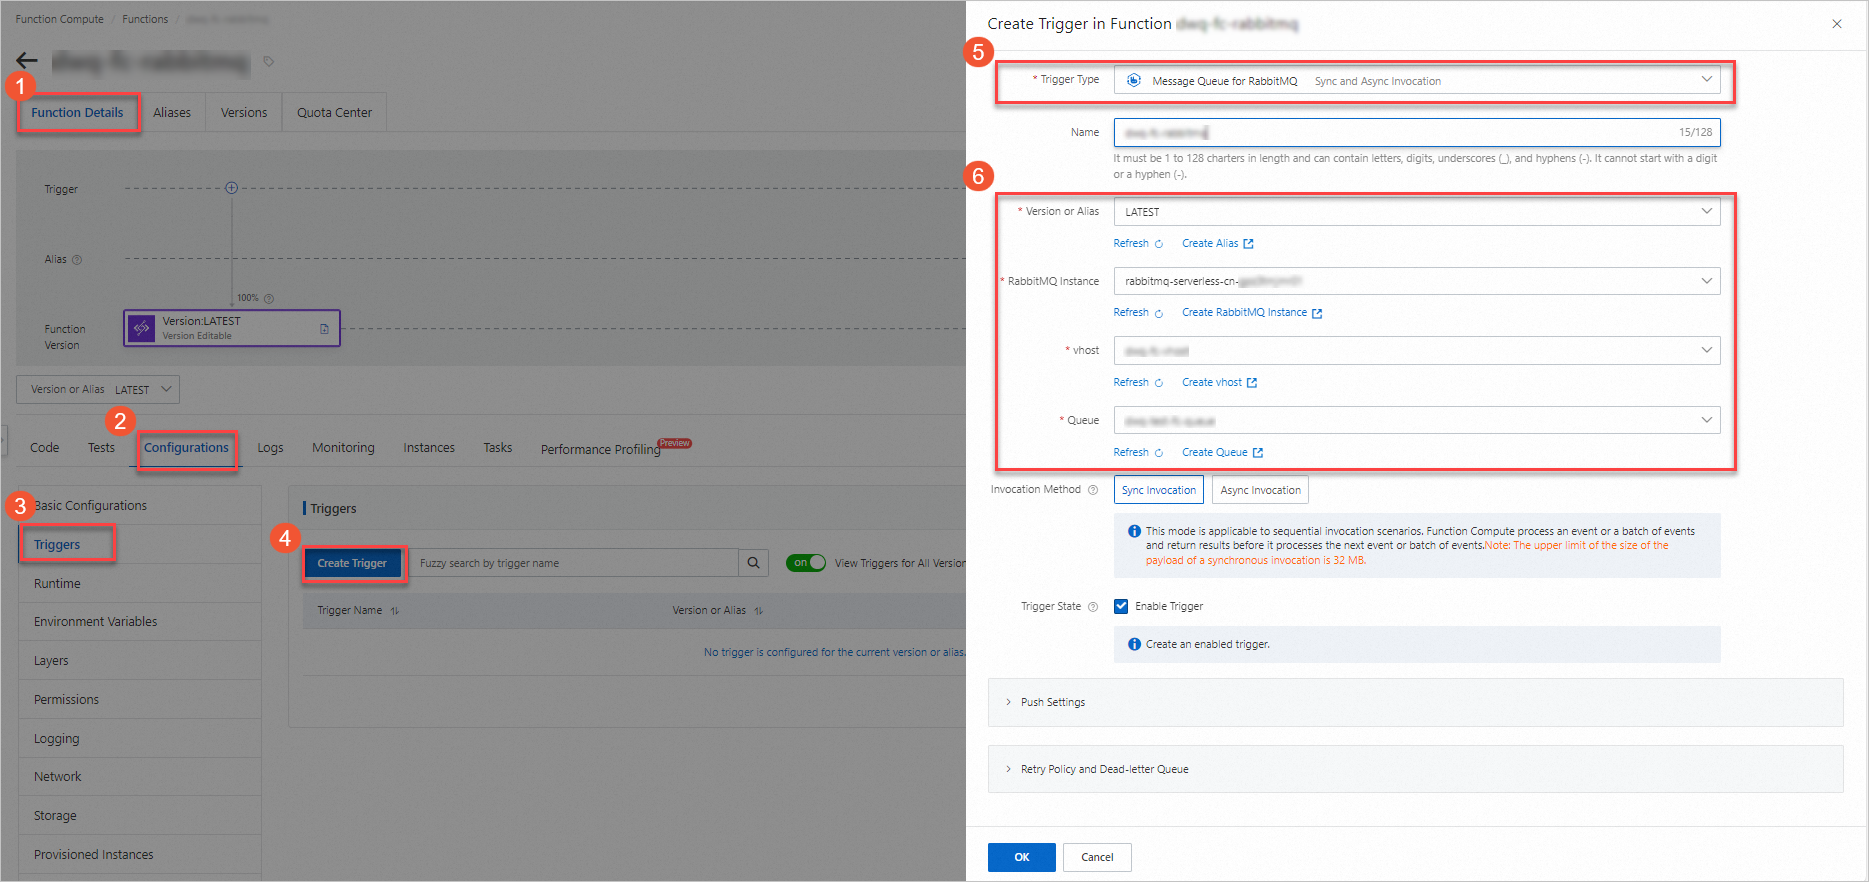
Click OK.
Invocation method
Choose how Function Compute invokes your function when messages arrive:
| Method | Max payload | Behavior | When to use |
|---|---|---|---|
| Sync Invocation | 32 MB | Processes one event or batch at a time; waits for the function to return before processing the next | Sequential processing where order matters |
| Async Invocation | 128 KB | Returns immediately and continues to the next event or batch; function runs in the background | High-throughput scenarios where speed of consumption matters more than sequential processing |
For details, see Synchronous invocation and Asynchronous invocation.
For advanced settings such as push settings, retry policies, and dead-letter queues, see Advanced features of triggers.
After creation, the trigger appears on the Triggers tab. To modify or delete it, see Trigger management.
Step 2: (Optional) Configure test parameters
ApsaraMQ for RabbitMQ passes messages to your function as an event array. To test your function code without sending real messages, simulate the event manually:
On the Code tab, click the
 icon next to Test Function and select Configure Test Parameters.
In the Configure Test Parameters panel, click Create New Test Event or Modify Existing Test Event, enter an event name and the event content below, then click OK.
The following is a sample event payload containing two messages:
[
  {
    "id": "bj694332-4cj1-389e-9d8c-b137h30b****",
    "source": "RabbitMQ-Function-rabbitmq-trigger",
    "specversion": "1.0",
    "type": "amqp:Queue:SendMessage",
    "datacontenttype": "application/json;charset=utf-8",
    "subject": "acs:amqp:cn-hangzhou:164901546557****:/instances/amqp-cn-tl32e756****/vhosts/eb-connect/queues/housekeeping",
    "time": "2021-08-12T06:56:40.709Z",
    "aliyunaccountid": "164901546557****",
    "aliyunpublishtime": "2021-10-15T08:58:55.140Z",
    "aliyunoriginalaccountid": "164901546557****",
    "aliyuneventbusname": "RabbitMQ-Function-rabbitmq-trigger",
    "aliyunregionid": "cn-chengdu",
    "aliyunpublishaddr": "42.120.XX.XX",
    "data": {
      "envelope": {
        "deliveryTag": 98,
        "exchange": "",
        "redeliver": false,
        "routingKey": "housekeeping"
      },
      "body": {
        "Hello": "RabbitMQ"
      },
      "props": {
        "contentEncoding": "UTF-8",
        "messageId": "f7622d51-e198-41de-a072-77c1ead7****"
      }
    }
  },
  {
    "id": "bj694332-4cj1-389e-9d8c-b137h30b****",
    "source": "RabbitMQ-Function-rabbitmq-trigger",
    "specversion": "1.0",
    "type": "amqp:Queue:SendMessage",
    "datacontenttype": "application/json;charset=utf-8",
    "subject": "acs:amqp:cn-hangzhou:164901546557****:/instances/amqp-cn-tl32e756****/vhosts/eb-connect/queues/housekeeping",
    "time": "2021-08-12T06:56:40.709Z",
    "aliyunaccountid": "164901546557****",
    "aliyunpublishtime": "2021-10-15T08:58:55.140Z",
    "aliyunoriginalaccountid": "164901546557****",
    "aliyuneventbusname": "RabbitMQ-Function-rabbitmq-trigger",
    "aliyunregionid": "cn-chengdu",
    "aliyunpublishaddr": "42.120.XX.XX",
    "data": {
      "envelope": {
        "deliveryTag": 98,
        "exchange": "",
        "redeliver": false,
        "routingKey": "housekeeping"
      },
      "body": {
        "Hello": "RabbitMQ"
      },
      "props": {
        "contentEncoding": "UTF-8",
        "messageId": "f7622d51-e198-41de-a072-77c1ead7****"
      }
    }
  }
]
The outer array contains one object per message in the batch. The top-level fields follow the CloudEvents specification. The data field carries the RabbitMQ-specific content:
`data` field parameters
| Parameter | Type | Example | Description |
|---|---|---|---|
body | Map | Message body containing user-defined content | |
Hello | String | EventBridge | User data within the message body |
props | Map | Message attributes | |
contentEncoding | String | utf-8 | Encoding of the message body |
messageId | String | f7622d51-e198-41de-a072-77c1ead7**** | Unique message ID |
envelope | Map | AMQP envelope metadata | |
deliveryTag | Int | 98 | Delivery tag assigned by the broker |
exchange | String | | The name of the exchange that sends the message |
redeliver | Boolean | false | Specifies whether the message can be resent. Valid values: true or false |
routingKey | String | housekeeping | Routing key used to deliver the message to the queue |
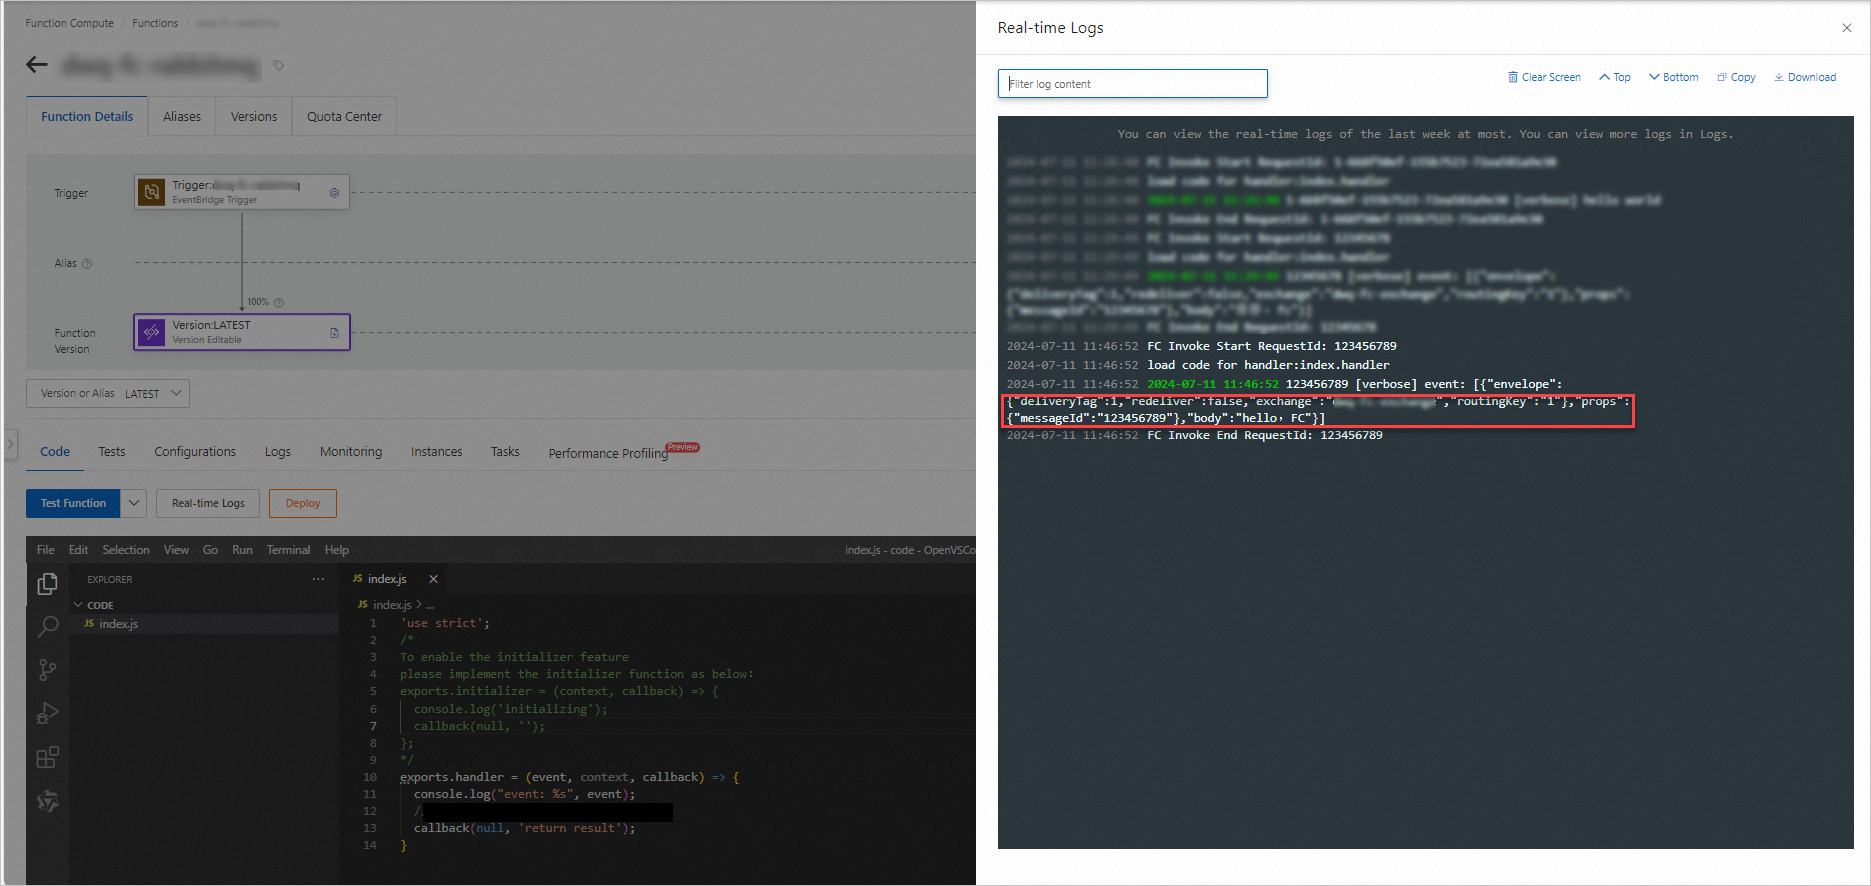
Step 3: Write and test function code
Write code in the editor to parse and process the event array your function receives. Deploy it, then test it using one of the two methods below.
On the Code tab, write your function code and click Deploy Code. The following Node.js example logs the raw event and returns a result:
'use strict';
/*
To enable the initializer feature
please implement the initializer function as below:
exports.initializer = (context, callback) => {
  console.log('initializing');
  callback(null, '');
};
*/
exports.handler = (event, context, callback) => {
  console.log("event: %s", event);
  // Parse the event parameters and process the event.
  callback(null, 'return result');
}
Test the function using one of these methods:
Simulated event: Click Test Function to run with the test parameters you configured in Step 2.
Real message: Log on to the ApsaraMQ for RabbitMQ console, select your queue, and click Send Message to publish a message. The trigger fires automatically.

After execution, check the result in Real-time Logs.
What's next
To modify or delete an existing trigger, see Manage triggers.
For advanced trigger settings including push configuration, retry policies, and dead-letter queues, see Advanced features of triggers.