File Storage NAS (NAS) is a distributed file system that provides secure, reliable, high-performance, and easy-to-use file storage services for services such as Elastic Compute Service (ECS), Elastic High Performance Computing (E-HPC), Docker, and Batch Compute. This topic describes how to configure a NAS file system in the Function Compute console.
Background information
Function Compute can seamlessly integrate with NAS. You can configure the NAS settings for a service in Function Compute. The settings include the information such as the region, mount target, and group. After you configure a NAS file system for a service, all functions in the service can access the files in the NAS file system in the same manner in which you access the on-premises file system.
The following items describe the benefits of using NAS as the mount target of Function Compute.
Temporary files can be stored in a NAS file system. The size of temporary files is not limited by the capacity of on-premises disks.
Multiple functions can share files by using one NAS file system.
Before you start
Function Compute
A NAS file system can be mounted only in a virtual private cloud (VPC). You must configure a valid VPC that allows you to access the specified NAS file system.
NAS
Configure a NAS file system
NAS settings in Function Compute are configured at the service level. After a NAS mount target is configured for a service, all functions in the service can access the files in the specified NAS file system.
Log on to the Function Compute console. In the left-side navigation pane, click Services & Functions.
In the top navigation bar, select a region. On the Services page, find the desired service and click Configure in the Actions column.
In the Storage Configuration section of the Modify Service page, configure the following parameters and click Save.
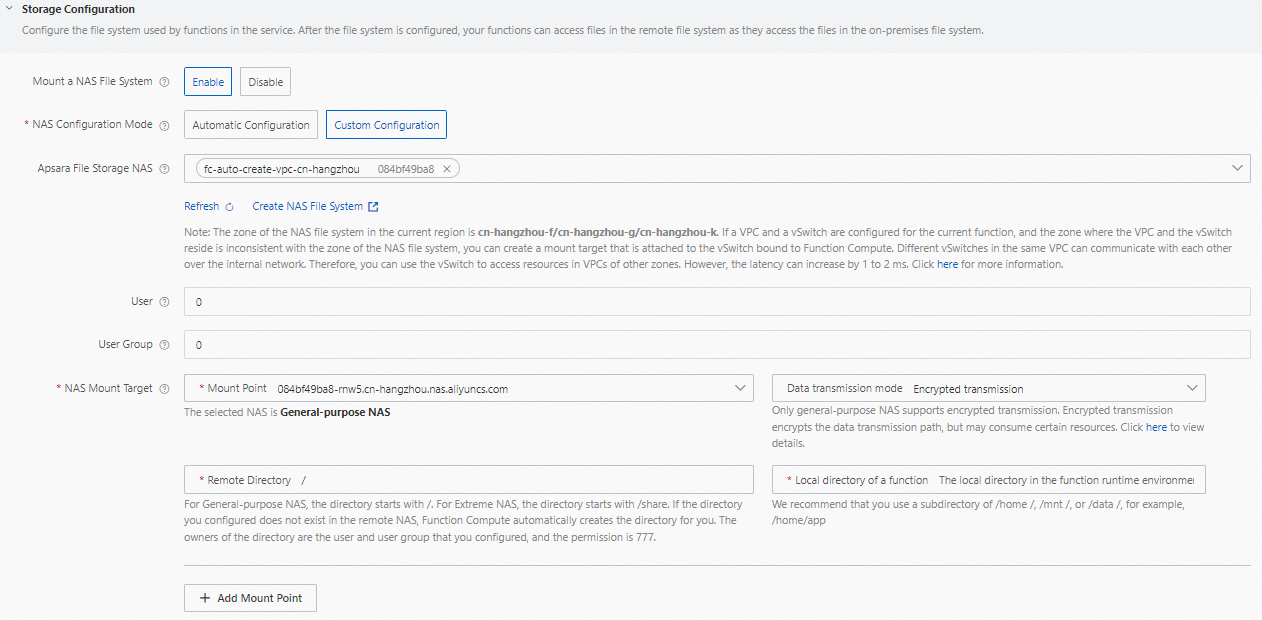
Mount a NAS File System: specifies whether to enable NAS mounting. Valid values:
Enable
Disable
NAS Configuration Mode: specifies the configuration mode of the NAS file system. Valid values:
Automatic Configuration: The system automatically configures a NAS file system.
NoteBefore you select Automatic Configuration, you must allow functions to access resources in the VPC, and configure the VPC, vSwitch, and Security Group parameters. If you do not configure these parameters, the system automatically creates the preceding resources and allocates them to the service. For information about billing, see Billing.
If you select Automatic Configuration, the system creates a General-purpose NAS file system for you. If you select Automatic Configuration again after the NAS file system is created, the system queries and uses the existing General-purpose NAS file system that was created last time when you selected Automatic Configuration. For information about billing, see Billing of General-purpose NAS file systems.
Custom Configuration: You must configure the following parameters to configure a NAS file system.
File Storage NAS: Select a NAS file system. If you want to create a NAS file system, click Create NAS File System and create the NAS file system in the File Storage NAS console. Only Network File System (NFS)-based-protocol NAS file systems are supported. Server Message Block (SMB)-based NAS file systems are not supported.
User: Enter a custom user ID. This field is optional. If you do not specify a value, the system uses the ID of the root user (
UID=0). For more information about synchronous invocation, see NAS users and user groups.User Group: Enter the custom ID of a user group. This field is optional. If you do not specify a value, the system uses the ID of the root user group (
GID=0). For more information about synchronous invocation, see NAS users and user groups.NAS Mount Target: Select mount targets and configure directories. For more information about how to configure directories, see Configure a NAS mount target.
Mount Target: Select a mount target of the NAS file system that matches the VPC and vSwitch configured for the service.
Data Transmission Mode: Select Regular Transmission or Encrypted Transmission. Only general-purpose NAS supports encrypted transmission. Encrypted transmission encrypts the data transmission paths, but consumes a certain amount of resources. For more information, see Encryption in transit for NFS file systems.
The directory in the remote NAS file system: The directory of a General-purpose NAS file system must start with /. The directory of an Extreme NAS file system must start with /share. If the directory you configured does not exist in the remote NAS file system, Function Compute creates the directory for you. The directory owner is the user and user group configured above, and the permission level is
777.The local directory in the function runtime environment: Enter a subdirectory in the /home, /mnt, or /data directory.
NoteBefore you configure NAS Mount Target, you must allow the function to access resources in the VPC and select a VPC and vSwitch that reside in the same region. For more information, see Configure network settings.
A maximum of five NAS mount targets can be configured for a service.
NAS users and user groups
When you configure a NAS mount target for a function, you must first specify the user ID and group ID. These two values are equivalent to the user and user group in NAS. You must specify the same read and write permissions on files when you configure the file owner and the corresponding group permissions based on your business requirements.
Valid values of the user ID and group ID range from 0 to 65534. If you do not specify the user ID, the system uses the ID of the root user (UID=0). If you do not specify the group ID, the system uses the ID of the root user group (GID=0).
When Function Compute uses non-root permissions to execute user code, make sure that the user who executes the code in the function instance has the read and write permissions on the subdirectory if you want to mount a subdirectory of the remote NAS file system. We recommend that you use one of the following methods to mount a subdirectory of the remote NAS file system:
Mount a root directory of the remote NAS file system by using a NAS instance. For more information, see Configure a NAS file system.
After the root directory is mounted, create a subdirectory. Example: fc-1. Then, change the value of The directory in the remote NAS file system in the NAS mount target from the root directory / to the created subdirectory /fc-1 to mount the subdirectory remotely.
#!/usr/bin/env python
# -*- coding: utf-8 -*-

import os

def handler(event, context):
  print('uid : ' + str(os.geteuid()))
  print('gid : ' + str(os.getgid()))

  # Change the value to the local directory in the on-premises file system to which the NAS file system is mounted.
  local_nas_dir = "/home/app"
  # Change the value to the name of the destination subdirectory.
  target_sub_dir = "fc-1"

  # Create the destination subdirectory by using the permissions of the current instance in Function Compute.
  new_dir = local_nas_dir + '/' + target_sub_dir + '/'
  print('new_dir : ' + str(new_dir))

  os.mkdir(new_dir)
  return 'success'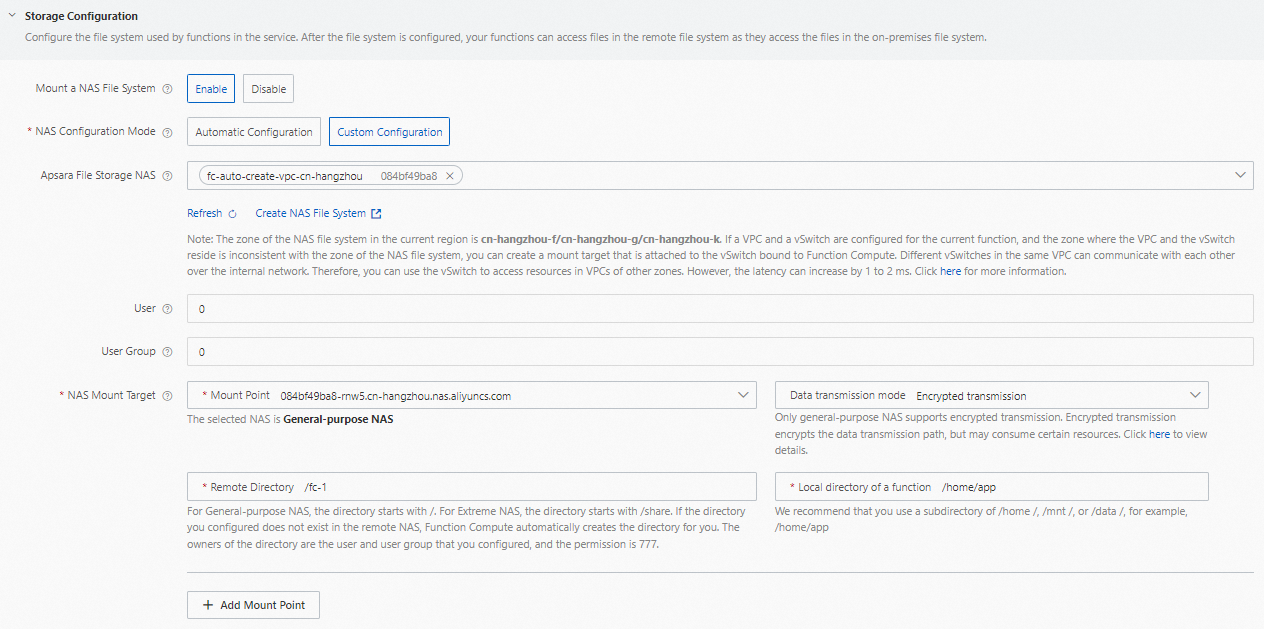
Mount a NAS file system by using an ECS instance. For more information, see Mount NAS file systems when you purchase an ECS instance.
After the NAS file system is mounted on the ECS instance, create a subdirectory and run
chmod 777to grant permissions on the subdirectory.
The default user and user group do not have the read and write permissions on files. Therefore, we recommend that you set the user ID and group ID to a specific value from 1 to 65534. After that, different functions in the service can share these file resources.
The permissions on files that are uploaded to NAS are the same as the permissions on on-premises files.
Configure a NAS mount target
You must configure the The directory in the remote NAS file system and The local directory in the function runtime environment parameters for each NAS mount target. A local directory in the on-premises file system is mapped to a remote directory in a NAS file system.
The directory in the remote NAS file system
A directory in the remote NAS file system refers to the directory of the NAS file system that the service needs to access. The directory consists of a mount target and an absolute directory. You can add mount targets in the File Storage NAS console. You can assemble a mount target and the absolute directory into a remote directory. For example, if the mount target of a NAS file system is xxxx-nas.aliyuncs.com, and the absolute directory is /workspace/document, then the remote directory is xxxx-nas.aliyuncs.com:/workspace/document.
You can log on to the File Storage NAS console, click the destination file system in the file system list, and then click Mount Targets to obtain the mount target.
The local directory in the function runtime environment
The local directory in the function running environment refers to the mount target of the local file system. You cannot mount a NAS file system by using common directories in the Linux or UNIX system, such as bin, opt, var, and dev. Function Compute allows you to mount a NAS file system by using non-system directories such as mnt, home, and data.
References
Apart from using the Function Compute console, you can also use Serverless Devs to mount a NAS file system. For more information, see Basic features.