Function Compute supports Application Load Balancer (ALB) as an event source. You can set Function Compute as a backend service for ALB. ALB forwards requests to a function in Function Compute and synchronously returns the function invocation result. This topic describes how to configure an ALB trigger to execute a function.
Prerequisites
Function Compute
Application Load Balancer (ALB)
Limits
The ALB instance and the Function Compute service must be in the same region.
The following limits apply when you use Function Compute as a backend server for ALB:
Only functions that are triggered by HTTP requests are supported.
Function Compute requires that the HTTP request header from the client contains the Date field when a function is accessed. The Date field indicates the time when the message was sent.
The following limits apply when you use Function Compute with ALB:
In ALB, you must set the server group type to Function Compute. The backend server group and the listener must use the HTTP protocol.
ALB supports adding only one Function Compute service as a backend server.
Step 1: Write and test the function code
Log on to the Function Compute console. In the left-side navigation pane, click Services & Functions.
In the top navigation bar, select a region. On the Services page, click the desired service.
On the Functions page, click the name of the desired function.
On the function details page, click the Function Code tab. Write the code in the code editor and click Deploy Code.
The following code provides an example.
var getRawBody = require('raw-body');
var getFormBody = require('body/form');
var body = require('body');


/*
To enable the initializer feature
please implement the initializer function as below:
exports.initializer = (context, callback) => {
  console.log('initializing');
  callback(null, '');
};
*/

exports.handler = (req, resp, context) => {
    console.log('hello world');

    var params = {
        path: req.path,
        queries: req.queries,
        headers: req.headers,
        method : req.method,
        requestURI : req.url,
        clientIP : req.clientIP,
        log : ("Hello World.This is FC!"),
    }

    getRawBody(req, function(err, body) {
        for (var key in req.queries) {
          var value = req.queries[key];
          resp.setHeader(key, value);
        }
        resp.setHeader("Content-Type", "text/plain");
        params.body = body.toString();
        resp.send(JSON.stringify(params, null, '    '));
    });

    /*
    getFormBody(req, function(err, formBody) {
        for (var key in req.queries) {
          var value = req.queries[key];
          resp.setHeader(key, value);
        }
        params.body = formBody;
        console.log(formBody);
        resp.send(JSON.stringify(params));
    });
    */
}
On the Function Code tab, click Test Function.
After the execution is complete, you can view the result at the top of the Function Code tab.
Step 2: Create a server group for Function Compute
Log on to the ALB console.
Go to the ALB console, in the left-side navigation pane, choose Server Groups. In the top navigation bar, select the same region as the created function, then click Create Server Group.
In the navigation pane on the left, choose .
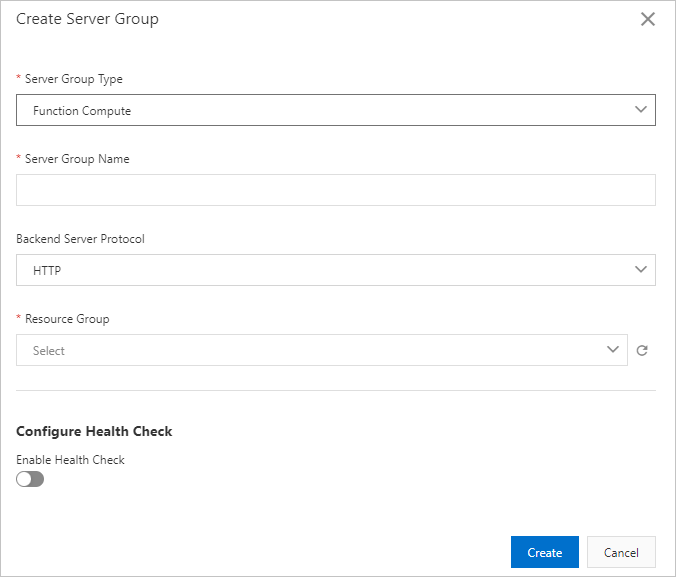
On the Server Groups page, click Create Server Group, complete the following configurations, and then click Create.
Configuration item
Description
Server Group Type
Select the type of the server group. In this example, select Function Compute Type.
Server Group Name
Custom
Backend Protocol
Select a backend protocol. In this example, select HTTP.
Select resource group
Select the resource group to which the server group belongs.
Configure Health Checks
Enable Health Check
Enable or disable health checks. In this example, the default setting is used, which is to disable health checks.
Advanced Configuration
To enable health checks, modify the advanced configurations as needed. For more information, see Create and manage server groups.
In the message that is displayed, click Add Backend Server.
On the Backend Servers tab, click Configure Function Compute.
In the Add Backend Servers panel, use one of the following methods to complete the configuration, and then click OK.
Select Resources
Configuration item
Description
Configuration Method
Select Select Resources.
Service
Select the service to which the target function belongs.
Version
Select LATEST. A newly created service has only the LATEST version by default.
Function
Select the target function.
Description
Custom.
Use ARN
Configuration item
Description
Configuration Method
Select Use ARN.
ARN
Enter the ARN of the target function. For more information about how to obtain the function ARN, see Obtain the ARN of a function.
Note:
Custom
The Add Backend Servers panel displays a message indicating that the server was added successfully. Click Close. On the Backend Servers tab, you can view the configured backend server.
Step 3: Create an ALB instance and configure a listener
Log on to the Application Load Balancer (ALB) console.
In the top menu bar, select a region. In this example, China (Hangzhou) is selected.
On the Instances page, click Create Application Load Balancer.
On the Application Load Balancer (Pay-As-You-Go) purchase page, complete the parameter settings.
This section lists only the parameters that are relevant to this topic. For information about other parameters, see Create and manage an ALB instance.
Region: In this example, select China (Hangzhou).
Network Type: In this example, select Internet.
On the Instances page, find the created ALB instance. In the Actions column of the instance, click Create Listener to open the listener configuration wizard.
In the Configure Listener wizard, complete the following configurations, and then click Next.
Configuration item
Description
Listener Protocol
Select the protocol for the listener. In this example, select HTTP.
Listener Port
Enter the listener port that receives requests and forwards them to backend servers. The port range is 1 to 65535. In this example, enter 80.
Listener Name
Custom
Advanced Configuration
In this example, the default configurations are used.
In the Select Server Group wizard, from the Select Server Group drop-down list, select Function Compute Type. Select the backend server group that you created in Step 2: Create a server group for Function Compute, and then click Next.
In the Configuration Review wizard, confirm the settings and click Submit.
Step 4: Test the connection
After you complete the preceding steps, a connection is established between Function Compute and ALB. Perform the following operations to test the connection between Function Compute and ALB.
Open a command-line window and run the curl -v command to obtain the Date header field.
Function Compute requires that the HTTP request header contains the Date field.
curl -v <ALB instance domain name>
Run the curl -H command to access the domain name of the ALB instance.
curl -H "Date header field" <ALB instance domain name>If you receive a response message as shown in the following figure, it indicates that ALB can forward requests to Function Compute and invoke the function.

More information
- Use Serverless Devs to configure triggers. For more information, see Serverless Devs.
- Use SDKs to configure triggers. For more information, see SDKs.
To modify or delete the created trigger, see Manage triggers.