If the built-in runtimes in Function Compute do not meet your business requirements, you can create a custom container function in the Function Compute console or by using the Serverless Devs tool.
Usage notes
-
To create a custom container function in Function Compute, you must use an Alibaba Cloud Container Registry image from the same region and Alibaba Cloud account. If you build images on computers with Apple silicon or other ARM-based architectures, you must specify the build platform as linux/amd64. Example:
docker build --platform linux/amd64 -t $IMAGE_NAME .. -
Function Compute resolves domain names for Alibaba Cloud Container Registry Enterprise Edition images using either the default resolution of the configured virtual private cloud (VPC) or the access IP addresses automatically resolved by Alibaba Cloud DNS PrivateZone.
-
Scenario 1: If the Default Resolution identifier is not displayed for any IP address on the Access Control page of the instance, all IP addresses in the Access IP list are automatically resolved by Alibaba Cloud DNS PrivateZone. In this case, any VPC configuration can be used.
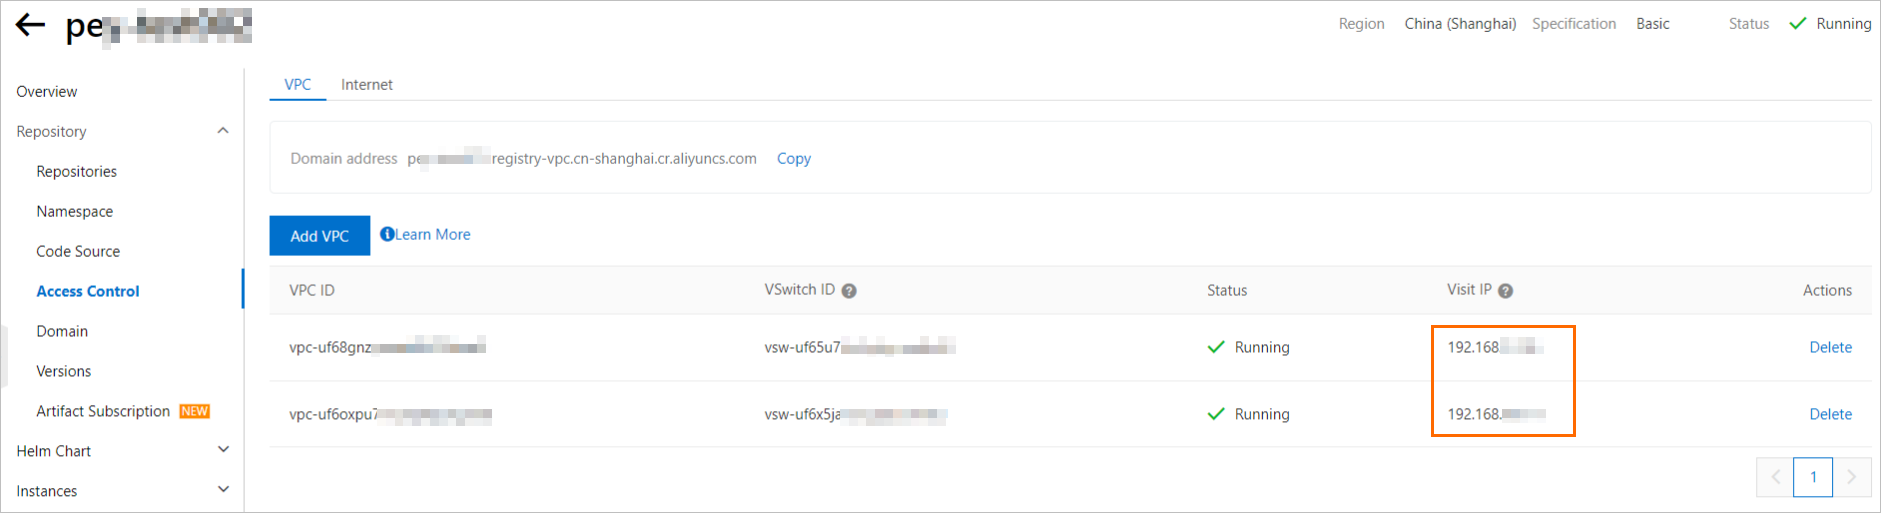
-
Scenario 2: If, on the Access Control page of a Container Registry (ACR) Enterprise Edition instance, the Access IP list contains an IP address marked with Default Resolution . That IP address is the default resolution IP address of a VPC. You must select that VPC configuration, as shown in the following figure.

-
-
When you use an Enterprise Edition instance, you can only select non-accelerated images. Each time you update a function's image configuration, the system generates a new accelerated image based on the latest original image you selected, overwriting any existing accelerated image. Do not delete the original or accelerated images, or function invocations will be affected.
-
Ensure that you update your function promptly if the image configured for it changes. Otherwise, function invocations will fail.
-
Ensure that the original image exists. Otherwise, the function enters a Failed state and cannot be invoked. Although Function Compute caches your function to reduce cold start times, invocations still require the original image.
-
Ensure that the image used in your function is not overwritten with a different digest. If this happens, you must redeploy your function with the latest image information. Function Compute records both the tag and the digest of the image version you select during function creation and updates. If the image tag is updated elsewhere to point to a new digest, function invocations will fail.
-
Prerequisites
-
Container Registry
-
Create an Enterprise Edition instance
Note-
The Personal Edition of Alibaba Cloud Container Registry (ACR) is for individual developers. It is offered as a free trial with quotas during the public beta. This edition does not include a Service Level Agreement (SLA) or compensation for damages, and has usage limits. For more information about the usage limits, see the usage notes in Create a Personal Edition instance.
-
-
-
Serverless Devs (Required only if you create the function using Serverless Devs)
Create a function in the console
Log on to the Function Compute console. In the left-side navigation pane, click Functions.
In the top navigation bar, select a region. On the Functions page, click Create Function.
-
In the dialog box that appears, select the GPU Function type based on the prompts and your actual scenario, and then click Create GPU Function.
-
On the Create GPU Function page, configure the following parameters and click Create.
-
Scaling Policy: Select an instance type. You cannot use provisioned instances and on-demand instances at the same time, and the instance type cannot be changed after the function is created.
-
Code: Configure the function's runtime environment and code-related settings.
Parameter
Description
Example
Runtime
-
Use Sample Images : Select a sample image provided by Function Compute to quickly deploy a custom container function. You must select a target image from the list under the Container Image parameter.
-
Use Container Registry Images : Click Select ACR Image under the Container Image parameter. In the Select Container Image panel, select the existing Container Registry Instance and ACR Image Repository . Then, find the target image in the image list below and click Select in the Actions column.
Note-
You cannot create a function using a public image from an Alibaba Cloud Container Registry instance that belongs to another account.
-
Ensure that you update your function promptly if the image configured for it changes. Otherwise, function invocations will fail. For more information, see Usage notes.
-
When you use an Enterprise Edition instance, you can only select non-accelerated images. Do not delete the original or accelerated images, or function invocations will be affected. For more information, see Usage notes.
-
Enterprise Edition instances do not support image addresses in a custom domain name format.
-
You cannot create functions by using images from repositories in which image acceleration is enabled in index-only mode. This applies to Container Registry Enterprise Edition (Standard and Advanced) instances.
-
After Alibaba Cloud Container Registry introduced the index-only mode feature, you can no longer create functions using images from newly created repositories in Enterprise Edition (Basic) instances if image acceleration is enabled. However, you can still use images from existing accelerated repositories in these instances. For more information about index-only mode, see Load container images on demand.
Container Image
Select the target image.
SpringBoot Web App Sample Image
Startup Command
The startup command for the program. If not specified, Function Compute uses the Entrypoint or CMD from the image by default.
None
Listening Port
The port on which the HTTP server in your code listens.
9000
Execution Timeout Period
Set the timeout period. The Execution Timeout Period defaults to 60 seconds, with a maximum of 86,400 seconds.
60
-
60
-
Permissions, Network, and Storage: Configure the function execution role, network, and storage mounting.
Configuration Item
Description
Example
Execution Role
Function Compute assumes this Resource Access Management (RAM) role to generate temporary credentials for accessing Alibaba Cloud resources and passes them to the code. For more information, see Use a function role to access other cloud services.
mytestrole
VPC Access
Allows the function to access resources within a VPC. For more information, see Configure network.
Enable
VPC
Required when VPC Access is set to Yes. Create a new VPC or select the VPC ID to access from the drop-down list.
fc.auto.create.vpc.1632317****
vSwitch
Required when VPC Access is set to Yes. Create a new vSwitch or select a vSwitch ID from the drop-down list.
fc.auto.create.vswitch.vpc-bp1p8248****
Security Group
Required when VPC Access is set to Yes. Create a new security group, or select a security group from the drop-down list.
fc.auto.create.SecurityGroup.vsw-bp15ftbbbbd****
Allow Default NIC to Access Internet
Select Yes or No to allow the function to access the Internet through the default network interface.
ImportantWhen you use the fixed public IP address feature, you must disable Allow Default NIC to Access Internet. Otherwise, the configured fixed public IP address does not take effect. For more information, see Configure a static public IP address.
Enable
NAS Mounting
Mount Configure a NAS file system to the function for persistent storage of data shared among functions, such as models shared by multiple inference functions.
If you select Automatic Configuration, the system uses the existing general-purpose network-attached storage (NAS) file system named Alibaba-Fc-V3-Component-Generated by default. If no eligible NAS file system exists under the current account, the system automatically creates one.
Enable
OSS Mounting
Mount Object Storage Service (OSS) to the function for persistent storage of logs, business files, and more. For more information, see Configure an OSS mount.
Enable
-
Logging and Tracing
Configuration Item
Description
Example
Log Feature
Configure this option to persist function execution logs to Log Service for code debugging, troubleshooting, and data analysis. For more information, see Configure the logging feature.
-
Automatic Configuration: Automatically selects the Log Project that starts with
serverless-<region_id>.Only one such Log Project is created per region. If the system detects an existing Log Project in the current region, it is used directly.
-
Custom Configuration: You must manually specify the target Log Project and Logstore.
Enable
-
-
Other Configurations
Configuration Item
Description
Example
Timezone
Select the timezone for the function. After you set the timezone, an environment variable TZ is automatically added with the value set to the target timezone.
UTC
Tags
Set Configure tags for the function to support group management. You must set both the tag key and tag value.
key : value
Resource Group
Select the Configure resource groups for the function to manage functions by group.
Default Resource Group
Environment Variables
Use environment variables to adjust the function behavior without modifying code. For more information, see Configure environment variables.
{
    "BUCKET_NAME": "MY_BUCKET",
    "TABLE_NAME": "MY_TABLE"
}
After you create the function, you can view and update it on the Functions page.
When you update the function, you can change the configured listener port, but you cannot add or remove ports. If you configured a listener port when you created the function and do not specify one during an update, the system retains the original port configuration.
Create a function with Serverless Devs
Use Serverless Devs to build and push container images and deploy functions with a single command flow.
-
Run the following command to initialize a project.
sudo s initFollow the on-screen instructions to select an Alibaba Cloud account, a custom container template, and a language (Node.js is used in this example). Then, set the project name, select a deployment region, and enter your ACR image.
-
Run the following command to enter the project directory.
cd start-fc3-custom-container-nodejs -
Edit the
s.yamlfile. For more information about the parameters in the YAML file, see YAML Specification.The following code provides an example.
In this example,
imagerefers to your Alibaba Cloud Container Registry image. Replace <your namespace>, <your image>, and <your tag> with your actual namespace, image repository name, and image tag. If you already entered the correct image information when you initialized the project in Step 1, you do not need to modify it here.edition: 3.0.0 name: hello-world-app # access specifies the key configuration required by the current application: # For key configuration, see: https://www.serverless-devs.com/serverless-devs/command/config # For key usage order, see: https://www.serverless-devs.com/serverless-devs/tool#key-usage-order-and-specifications access: "default" vars: # Global variables region: "cn-hangzhou" resources: hello_world: # To perform operations only on the hello_world business module, append hello_world to the command line. For example: # To build only hello_world: s hello_world build # If you run s build directly without specifying hello_world, the tool will build all business modules at the same level as hello_world in the current YAML file (if there are other sibling modules, such as the commented next_function below) in a certain order component: fc3 # Component name actions: # Custom execution logic pre-deploy: # Run before deploy - component: fc3 build --dockerfile ./code/Dockerfile # Component to run, in the format "component: component_name command parameters" props: region: ${vars.region} # For variable usage, see: https://docs.serverless-devs.com/serverless-devs/yaml#%E5%8F%98%E9%87%8F%E8%B5%8B%E5%80%BC functionName: "start-nodejs-ufrz" runtime: "custom-container" description: 'hello world by serverless devs' timeout: 30 memorySize: 512 cpu: 0.5 diskSize: 10240 code: ./code customContainerConfig: image: 'registry.${vars.region}.aliyuncs.com/<your namespace>/<your image>:<your tag>' # Your ACR image. Replace <your namespace>, <your image>, and <your tag> with the actual namespace name, image repository name, and image tag. # triggers: # - triggerName: httpTrigger # Trigger name # triggerType: http # Trigger type # description: 'xxxx' # qualifier: LATEST # Service version to trigger # triggerConfig: # authType: anonymous # Authentication type. Valid values: anonymous, function # disableURLInternet: false # Specifies whether to disable public network access URL # methods: # HTTP methods supported by the HTTP trigger. Valid values: GET, POST, PUT, DELETE, HEAD # - GET # - POST -
Run the following command to deploy the project.
sudo s deployThe following output is an example:
Steps for [deploy] of [hello-world-app] ==================== DEPRECATED: The legacy builder is deprecated and will be removed in a future release. BuildKit is currently disabled; enable it by removing the DOCKER_BUILDKIT=0 environment-variable. Sending build context to Docker daemon 5.12kB Step 1/7 : FROM node:14-buster 14-buster: Pulling from library/node 2ff1d7c41c74: Already exists b253aeafeaa7: Already exists 3d2201bd995c: Already exists 1de76e268b10: Already exists d9a8df589451: Already exists 6f51ee005dea: Already exists 5f32ed3c3f27: Already exists 0c8cc2f24a4d: Already exists 0d27a8e86132: Already exists Digest: sha256:a158d3b9b4e3fa813fa6c8c590b8f0a860e015ad4e59bbce5744d2f6fd8461aa Status: Downloaded newer image for node:14-buster ---> 1d12470fa662 Step 2/7 : WORKDIR /usr/src/ ---> Running in 70a8e2e4d1ea Removing intermediate container 70a8e2e4d1ea ---> 0d67b8fa2901 Step 3/7 : COPY package*.json ./ ---> 09eb15f8770a Step 4/7 : RUN npm install ---> Running in 8ae492be973b Step 5/7 : COPY . . ---> 7560c7b14431 Step 6/7 : EXPOSE 9000 ---> Running in 66b38e54ced0 Removing intermediate container 66b38e54ced0 ---> f73cce48d2ae Step 7/7 : ENTRYPOINT [ "node", "server.js" ] ---> Running in 2fb2f83fd6c0 Removing intermediate container 2fb2f83fd6c0 ---> fe51ae71448c Successfully built fe51ae71448c Successfully tagged registry.cn-hangzhou.aliyuncs.com/z****/z****:latest [2024-01-29 16:33:06][INFO][hello_world] get instanceName= and region=cn-hangzhou from registry.cn-hangzhou.aliyuncs.com/z****/z**** [2024-01-29 16:33:06][INFO][hello_world] try to docker push registry.cn-hangzhou.aliyuncs.com/z****/z**** ... WARNING! Your password will be stored unencrypted in /root/.docker/config.json. Configure a credential helper to remove this warning. See https://docs.docker.com/engine/reference/commandline/login/#credentials-store Login Succeeded Using default tag: latest The push refers to repository [registry.cn-hangzhou.aliyuncs.com/z****/z****] 85c1ec915b45: Pushed 37c36543a431: Pushed e4afd7f70434: Pushed 0d5f5a015e5d: Layer already exists 3c777d951de2: Layer already exists f8a91dd5fc84: Layer already exists cb81227abde5: Layer already exists e01a454893a9: Layer already exists c45660adde37: Layer already exists fe0fb3ab4a0f: Layer already exists f1186e5061f2: Layer already exists b2dba7477754: Layer already exists latest: digest: sha256:6bf1ed4119d197a46c99082577632957056cb625f2ee0276d2af53f60d22837d size: 2841 [hello_world] completed (688.45s) Result for [deploy] of [hello-world-app] ==================== region: cn-hangzhou cpu: 0.5 customContainerConfig: image: registry.cn-hangzhou.aliyuncs.com/z****/z**** resolvedImageUri: registry.cn-hangzhou.aliyuncs.com/z****/z****@sha256:6bf1ed4119d197a46c99082577632957056cb625f2ee0276d2af53f60d22837d description: hello world by serverless devs diskSize: 10240 functionName: start-nodejs-ufrz handler: handler instanceConcurrency: 1 internetAccess: true lastUpdateStatus: Successful memorySize: 512 role: runtime: custom-container state: Active timeout: 30 A complete log of this run can be found in: /root/.s/logs/0129162246 -
Run the following command to debug the function.
sudo s invoke -e "{\"key\":\"val\"}"The following output is an example:
 Steps for [invoke] of [hello-world-app]
====================
========= FC invoke Logs begin =========
FC Invoke Start RequestId: 1-65b764db-15eb737f-0c67ab5cd968
FC Invoke Start RequestId: 1-65b764db-15eb737f-0c67ab5cd968
hello world!

FC Invoke End RequestId: 1-65b764db-15eb737f-0c67ab5cd968

Duration: 42.27 ms, Billed Duration: 43 ms, Memory Size: 512 MB, Max Memory Used: 47.77 MB
========= FC invoke Logs end =========

Invoke instanceId: c-65b764db-15fa2aa8-bc50f7839399
Code Checksum: undefined
Qualifier: LATEST
RequestId: 1-65b764db-15eb737f-0c67ab5cd968

Invoke Result:
OK
  [hello_world] completed (4.96s)

A complete log of this run can be found in: /root/.s/logs/0129164202
Related documentation
-
When you use a custom container function, the base environment that the container image depends on takes additional time to download and decompress. To reduce cold start time, see Best practices for optimizing cold starts in Function Compute.
-
Functions can also be created by calling an API operation. For more information, see CreateFunction.
-
For more information about the applicable scenarios and differences between the built-in runtimes, custom runtimes, and custom container runtimes provided by Function Compute, see Technology selection.