System checkpoints and job snapshots are collectively referred to as state sets. This topic describes how to manage the state sets of a job, including how to create, view, and delete them, and how to restore a job from a specific state.
Background information
Concept | Details |
System checkpoint (Corresponds to Checkpoint in Apache Flink) | The checkpoint lifecycle is fully managed by the Flink system. You can configure the Checkpointing Interval, Checkpointing Timeout, and Min Interval Between Checkpoints, and monitor the checkpoint generation status. You cannot manually create or delete checkpoints. By default, a job retains one checkpoint as a selectable state for job recovery. For more information about parameter settings, see Configure job deployment information. |
Job snapshot (Corresponds to Savepoint in Apache Flink) | The lifecycle is fully managed by the user.
Note When configured for periodic generation or cleanup, the system follows user-configured rules. Therefore, these operations are also considered user-managed. |
You can perform the following operations on checkpoints and job snapshots. The following table describes the scenarios and provides links to the relevant documentation.
Operation | Scenarios | Document link |
Manually create a job snapshot | If you want to manually create a job snapshot at a specific time while the job is running or stopped and then restore the job from that snapshot, you can manually create a job snapshot. Important
| |
Configure scheduled automatic creation of job snapshots | If you need the system to automatically create job snapshots at regular intervals, you can configure a creation period for them. After you save the rule, the system automatically creates job snapshots at the specified period while the job is running. You do not need to create them manually. | |
Overview of generating system checkpoints and job snapshots | On the overview page, you can view the generation history of checkpoints and job snapshots to quickly understand the backup status of the job state and the times at which they were created. | |
Restore a job from a specified snapshot (including from another job) | If you want to restore a job from a specific snapshot, you can specify that snapshot to recover the job. Note You can share snapshots between jobs. In this case, you must ensure state compatibility between the jobs, for example, when you perform a dual run test. | Restore a job from a specified snapshot (including from another job) |
Configure automatic cleanup rules for job snapshots | If you want the system to automatically clean up job snapshots instead of manually deleting them, you can configure the number of snapshots to keep or their retention period. After you save the rule, the system automatically cleans up snapshots based on this rule while the job is running. Note
| |
Manually delete a specific job snapshot | Manually created job snapshots are not automatically deleted before a job stops. Therefore, you need to periodically delete outdated job snapshots. Otherwise, they will occupy unnecessary space in your OSS bucket and incur storage fees. | |
Set State-related parameters | Set parameters related to the stream state storage system, the State TTL for SQL jobs, and whether to store temporary data that is generated during the job snapshot process on a local disk. |
Manually create a job snapshot
You can manually create a job snapshot only for a running job.
Go to the job snapshot creation page.
Log on to the Realtime Compute for Apache Flink console.
Click Console in the Actions column of the target workspace.
On the page, click the name of the target job.
In the upper-right corner of the page, click Create Snapshot.
Select a snapshot format and enter a description.
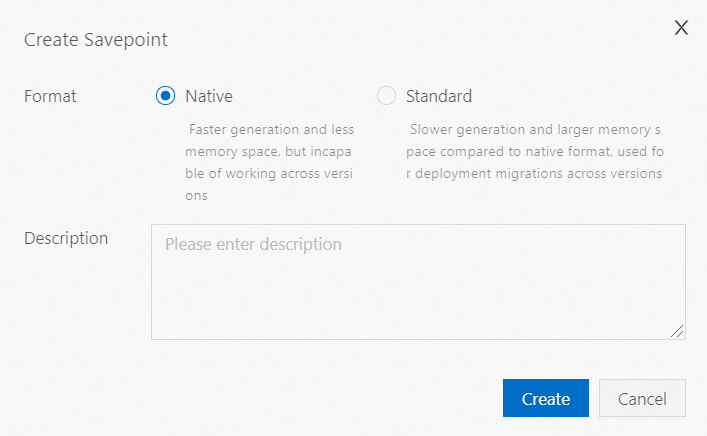
You can click Create.
Configure scheduled automatic creation of job snapshots
Go to the state set management page.
Log on to the Realtime Compute for Apache Flink console.
For the target workspace, click Console in the Actions column.
On the page, click the name of the target job.
Click State Set Management.
On the Configuration tab, you can enable Scheduled Automatic Creation of Job Snapshots and set the period.
You can click Quick Settings to select a time period, or you can manually enter a cron expression. To manually enter an expression, click each field in sequence and modify its value. The following table describes the value ranges and supported special characters for the five fields in a cron expression.
Field
Required
Value range
Special characters
Minute
Yes
[0, 59]
* , - /
Hour
Yes
[0, 23]
* , - /
Day
Yes
[1, 31]
* , - /
Month
Yes
[1, 12] or [JAN, DEC]
* , - /
Week
Yes
[1, 7] or [MON, SUN].
NoteIf you use the [1, 7] format, 1 represents Monday and 7 represents Sunday.
* , - /
NoteThe minimum interval is 10 minutes. If the interval specified in the cron expression is less than 10 minutes, the system triggers the task every 10 minutes by default.
Each field supports several special characters. Each special character has a specific meaning, as described in the following table.
Special character
Meaning
Example
*Indicates all possible values.
In the Month field,
*indicates every month. In the Week field,*indicates every day of the week.,The following are the enumeration values.
In the Minute field,
5,20indicates that the task is triggered at the 5th and 20th minutes.-Scope
In the Minute field,
5-20indicates that the task is triggered once every minute from the 5th minute to the 20th minute./Specifies increments.
In the Minute field,
0/15indicates that the task is triggered every 15 minutes, starting from minute 0. In the Minute field,3/20indicates that the task is triggered every 20 minutes, starting from minute 3.The following table provides examples of cron expressions.
Example
Description
15 10 * * *Executes the task at 10:15 AM every day.
0 12 * * *Executes the task at 12:00 PM every day.
0 10,14,16 * * *Executes the task at 10:00 AM, 2:00 PM, and 4:00 PM every day.
0/30 9-17 * * *Executes the task every 30 minutes from 9:00 AM to 5:00 PM every day.
* 14 * * *Executes the task every minute from 2:00 PM to 2:59 PM every day.
0-5 14 * * *Executes the task every minute from 2:00 PM to 2:05 PM every day.
0/5 14 * * *Executes the task every 5 minutes from 2:00 PM to 2:55 PM every day.
0/5 14,18 * * *Executes the task every 5 minutes from 2:00 PM to 2:55 PM and from 6:00 PM to 6:55 PM every day.
0 12 * * WEDExecutes the task at 12:00 PM every Wednesday.
15 10 15 * *Executes the task at 10:15 AM on the 15th of every month.
10,44 14 * 3 WEDExecutes the task at 2:10 PM and 2:44 PM every Wednesday in March of each year.
ImportantField definition: The cron expression has five fields:
minute hour day-of-month month day-of-week.Union of day-of-month and day-of-week: If you specify values for both the third field (day-of-month) and the fifth field (day-of-week), the condition is a logical OR.
0 12 1 * 5triggers the task at 12:00 PM on the first day of each month or on every Friday. It does not trigger the task only when the first day of the month is a Friday.The question mark (
?) is not supported: Do not use the?character. The system reports an error or fails to recognize the expression. To ignore a field, use the*character.
View the state generation overview
Go to the state set management page.
Log on to the Realtime Compute for Apache Flink console.
In the Actions column for the target workspace, click Console.
On the page, click the target job name.
Click State Set Management.
On the Overview tab, you can view the following information.
Category
Overview information
System checkpoint
View information about the last successful and failed checkpoints, including the ID, completion time, duration, and full storage size.
Job snapshot
View information about the last successful and failed job snapshots, including the snapshot ID, completion time, duration, or failure time.
Restore a job from a specified snapshot (including from another job)
To restore a job from a snapshot, the job must be stopped. If your job is running, stop it first.
Go to the state set management page.
Log on to the Realtime Compute for Apache Flink console.
For the target workspace, click Console in the Actions column.
Go to and click the name of the target job.
Click State Set Management.
On the History tab, find the target snapshot in the Job Snapshots list.
In the Actions column for the target snapshot, select .
In the Start Job configuration dialog box, configure the startup information for the job.
For more information about the configuration, see Start a job.
Configure automatic cleanup rules for job snapshots
Go to the state set management page.
Log on to the Realtime Compute for Apache Flink console.
For the target workspace, click Console in the Actions column.
On the page, click the target job name.
Click State Set Management.
On the Configuration tab, enable Scheduled Automatic Cleanup of Job Snapshots and configure the automatic cleanup rules.
You can configure the Number of Historical Snapshots to Keep and the Maximum Retention Period for Historical Snapshots. While a Flink job is running, snapshots are deleted if either of these conditions is met.
Click Save Changes.
Manually delete a specific job snapshot
Go to the state set management page.
Log on to the Realtime Compute for Apache Flink console.
For the target workspace, click Console in the Actions column.
On the page, click the target job name.
Click State Set Management.
On the History tab, find the target snapshot in the Job Snapshots list.
In the Actions column for the target snapshot, select .
Click OK.
Set State-related parameters
Go to the O&M page of the target job.
Log on to the Realtime Compute for Apache Flink console.
Find the target workspace, and in the Actions column, click Console.
On the page, click the target job.
On the Deployment Details tab, in the Runtime Parameter Settings section, click Edit.
In Other Configurations, add the code and click Save. The following code is an example.
state.backend.incremental: true
table.exec.state.ttl: 129600000
For more information about the basic and advanced parameters that you can set for Flink, see Enterprise-level state backend storage configuration.
References
For answers to frequently asked questions about checkpoints or job snapshots in Realtime Compute for Apache Flink, see Checkpoints and job snapshots.
For more information about the compatibility impact of SQL modifications, see SQL modifications and compatibility.