Cross-zone high availability (HA) prevents service interruptions caused by a single-zone failure by automatically failing over your Flink jobs to a secondary zone. This topic explains how cross-zone HA works, when to use it, and how to enable, disable, and stop billing for cross-zone compute units (CUs).
How it works
Realtime Compute for Apache Flink supports two CU types per workspace — single-zone CUs and cross-zone CUs — which determine whether a namespace is highly available:
-
Single-zone namespace (non-HA): Flink selects an optimal computing zone within the region. Resources are shared across zones in the same region via transparent scheduling, which improves resource elasticity.
-
Cross-zone namespace (HA): If the primary zone fails, Flink automatically fails over jobs to the secondary zone, preventing service interruptions.
When you enable HA for a namespace, Flink reclaims its single-zone CUs and allocates an equivalent number of cross-zone CUs. The reverse happens when you disable HA.

Prerequisites
Before you begin, make sure that:
-
Your workspace uses the Subscription billing method. Cross-zone CUs are only available for subscription workspaces with Intel X86 Architecture.
-
Your upstream and downstream systems are also highly available. Cross-zone HA covers only the Flink compute layer — end-to-end HA requires HA at every layer.
Usage notes
-
Cross-zone latency: Accessing external systems across zones introduces millisecond-level latency. The service-level agreement (SLA) guarantees cross-zone network latency below 3 milliseconds. Before enabling HA, check the Average Latency among Zones for your region. In most cases, the latency for accessing upstream and downstream resources is acceptable, except for Tair (Redis OSS-compatible). Evaluate the latency based on your business requirements to determine whether to enable cross-zone high availability.
-
Billing: Cross-zone CUs are priced higher than single-zone CUs. Disabling HA does not stop billing for cross-zone CUs. To stop charges, follow the steps in Stop billing for cross-zone CUs. For pricing details, see Subscription.
-
Pay-as-you-go workspaces: If your workspace uses pay-as-you-go, change the billing method to subscription first, then follow Method 2 or Method 3 below. Workspaces with Deployment model set to Cross zone cannot be changed back to pay-as-you-go.
Enable cross-zone high availability
Choose the method that matches your situation:
| Method | When to use |
|---|---|
| Method 1: Create an HA namespace at workspace creation | You are creating a new workspace and want HA from the start |
| Method 2: Add an HA namespace to an existing workspace | Your workspace does not yet have cross-zone CUs |
| Method 3: Enable HA for an existing namespace | Your workspace already has cross-zone CUs and you want to convert a single-zone namespace |
Method 1: Create an HA namespace at workspace creation
-
Purchase a workspace with the following settings: After the workspace is created, Flink automatically generates a highly available namespace named
Workspace name-default-ha.-
For Billing Method, select Subscription.
-
For CPU Architecture, select Intel X86 Architecture.
-
For Deployment model, select Cross zone.
-
In the CU Info section, enter a value in the Resource Quota field for the cross-zone CU type.
-
For vSwitch, select two vSwitches from different zones.
-
-
Click the namespace name to enter it.

-
Create and run a job in the namespace.
Method 2: Add an HA namespace to an existing workspace
Use this method if your workspace does not have Deployment model set to Cross zone.
-
Add cross-zone CUs to the workspace.
-
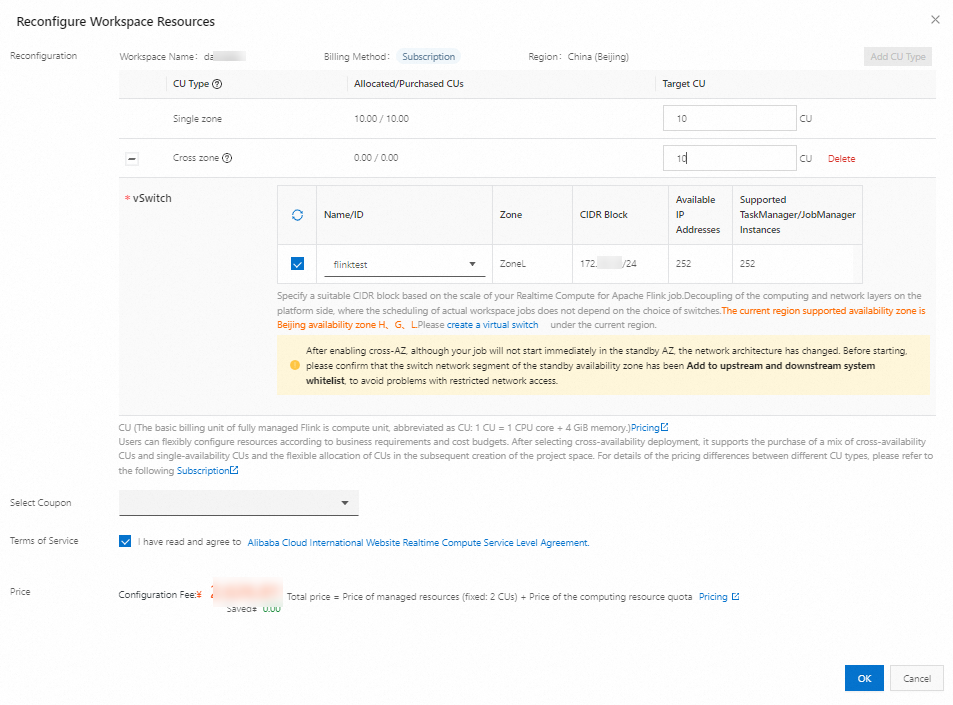
Find the target workspace and choose More > Reconfigure Workspace Resources in the Actions column.
-
In the dialog, click Add CU Type.
-
In the Target CU column, enter a value for the cross-zone CU type and select a vSwitch. Only vSwitches in your VPC within supported zones are listed. If no vSwitch is available, create a vSwitch. > Important: After adding cross-zone CUs, add the CIDR block of the new vSwitch to the whitelists of your upstream and downstream systems to prevent network access failures.
-
Read the terms of service, select the check box, and click OK to complete the payment.
-
-
Create a namespace with cross-zone CUs. This namespace is highly available.
-
Enter the namespace, then create and run a job.
Method 3: Enable HA for an existing namespace
Use this method if your workspace already has cross-zone CUs and you want to convert a single-zone namespace to HA.
Prerequisites: The number of unallocated cross-zone CUs in the workspace must equal or exceed the number of single-zone CUs currently allocated to the target namespace.
If cross-zone CUs are insufficient, add more cross-zone CUs, or reduce cross-zone CUs in another HA namespace and reallocate them. See Scale up/down resources.
-
Log on to the Realtime Compute for Apache Flink console.
-
Verify that sufficient unallocated cross-zone CUs are available in the workspace resource pool.
-
Find the target namespace and click Turn on high availability in the Actions column. In the dialog, click OK. Flink reclaims the single-zone CUs from the namespace and allocates an equivalent number of cross-zone CUs. The reclaimed single-zone CUs become available for reallocation or scaling down. Example: Workspace A has 5 single-zone CUs and 5 cross-zone CUs purchased, with 2 single-zone CUs allocated to Namespace A.
Status Single-zone CUs (allocated/purchased) Cross-zone CUs (allocated/purchased) Before 2/5 0/5 After 0/5 2/5 
-
Enter the namespace, then create and run a job.
Disable cross-zone high availability
Disabling cross-zone HA does not stop billing for cross-zone CUs. To stop charges, see Stop billing for cross-zone CUs.
Prerequisites: The number of unallocated single-zone CUs in the workspace must equal or exceed the number of cross-zone CUs currently allocated to the target namespace.
If single-zone CUs are insufficient, add single-zone CUs, or click Reconfigure Resources in the Actions column of another single-zone namespace and reduce the Resource Reconfiguration (CUs) value. See Scale up/down resources.
-
Log on to the Realtime Compute for Apache Flink console.
-
Verify that sufficient unallocated single-zone CUs are available.
-
Find the target namespace and click Turn off high availability in the Actions column. In the dialog, click OK. Flink applies the same resource swap as when enabling HA, but in reverse. After the process completes, the namespace operates as a single-zone namespace.
Stop billing for cross-zone CUs
Billing for cross-zone CUs stops only when the number of allocated cross-zone CUs in the workspace reaches 0.
-
Log on to the Realtime Compute for Apache Flink console.
-
Disable cross-zone high availability for all namespaces in the workspace.
-
Reduce the number of cross-zone CUs in the workspace to 0.
-
Find the target workspace and choose More > Reconfigure Workspace Resources in the Actions column.
-
In the Reconfigure Workspace Resources dialog, change the Target CU value for the cross-zone CU type to 0.
-
Read the terms of service, select the check box, and click OK to complete the payment.
-