The Kafka connector supports reading data in Protobuf format. This guide walks through the full pipeline: define a proto schema, generate Java classes, write test data to Kafka, and query it with Flink SQL.
Limits
Only Protocol Buffers 21.7 and earlier versions are supported.
Prerequisites
Before you begin, ensure that you have:
-
An ApsaraMQ for Kafka instance with a topic named
test -
The
protoccompiler (Protocol Buffers 21.7 or earlier) installed
Step 1: Compile the Protobuf file
1. Create a Protobuf file named order.proto.
Choose the syntax version based on your requirements. proto3 is simpler — it removes optional and required keywords, but basic types default to zero-values (0, "") with no way to distinguish an unset field from a field set to 0.
proto3
syntax = "proto3";
// The logical package name of the proto file, used to import this file in other .proto files.
package com.aliyun;
// The Java package name. If not specified, the proto package name is used by default.
option java_package = "com.aliyun";
// Set to true so that each Message generates a separate .java file instead of an inner class.
option java_multiple_files = true;
// The output class name in Java. When java_multiple_files is true, this class mainly contains metadata such as the filename, and no longer wraps the Message class.
option java_outer_classname = "OrderProtoBuf";
message Order {
  // In proto3, optional and required keywords are removed.
  // Default value for int, long, and double is 0. Default value for string is an empty string.
  // The hasOrderId() method is no longer generated, so you cannot distinguish between an unset field and a field set to 0.
  int32 orderId = 1;
  string orderName = 2;
  double orderPrice = 3;
  int64 orderDate = 4;
}
proto2
syntax = "proto2";
// The package name of the proto file.
package com.aliyun;
// The Java package name. If not specified, the proto package name is used by default.
option java_package = "com.aliyun";
// Set to true so that each Message generates a separate .java file instead of an inner class.
option java_multiple_files = true;
// The name of the wrapper class in Java.
option java_outer_classname = "OrderProtoBuf";
message Order {
  optional int32 orderId = 1;
  optional string orderName = 2;
  optional double orderPrice = 3;
  optional int64 orderDate = 4;
}
2. Generate Java source code from the proto file.
Create an empty Maven project and place order.proto in src/main/proto:
Directory example
KafkaProtobuf
- src
  - main
    - java
    - proto
      - order.proto
- pom.xml
pom.xml
In pom.xml, the protobuf-java version must match the version used to compile the proto file (for example, 3.21.7). A version mismatch causes class conflicts at runtime.
<project xmlns="http://maven.apache.org/POM/4.0.0" xmlns:xsi="http://www.w3.org/2001/XMLSchema-instance"
         xsi:schemaLocation="http://maven.apache.org/POM/4.0.0 http://maven.apache.org/maven-v4_0_0.xsd">
    <modelVersion>4.0.0</modelVersion>
        <groupId>com.aliyun</groupId>
        <artifactId>KafkaProtobuf</artifactId>
        <version>1.0-SNAPSHOT</version>

    <dependencies>
        <dependency>
            <groupId>com.google.protobuf</groupId>
            <artifactId>protobuf-java</artifactId>
            <version>3.21.7</version> <!-- Must match the Protobuf version used to generate the code. -->
        </dependency>

        <dependency>
            <groupId>org.apache.kafka</groupId>
            <artifactId>kafka-clients</artifactId>
            <version>3.3.1</version> <!-- Adjust based on your Kafka version. -->
        </dependency>

        <dependency>
            <groupId>com.github.javafaker</groupId>
            <artifactId>javafaker</artifactId>
            <version>1.0.2</version>
        </dependency>
    </dependencies>

    <build>
        <finalName>KafkaProtobuf</finalName>
        <plugins>
            <!-- Java compiler -->
            <plugin>
                <groupId>org.apache.maven.plugins</groupId>
                <artifactId>maven-compiler-plugin</artifactId>
                <version>3.13.0</version>
                <configuration>
                    <source>1.8</source>
                    <target>1.8</target>
                </configuration>
            </plugin>
            <!-- Use maven-shade to create a fat JAR that includes all required dependencies. -->
            <plugin>
                <groupId>org.apache.maven.plugins</groupId>
                <artifactId>maven-shade-plugin</artifactId>
                <version>3.5.3</version>
            </plugin>
        </plugins>
    </build>
</project>
Run the following command from the project root directory (where pom.xml is located) to generate the source code:
protoc --java_out=src/main/java --proto_path=src/main/proto src/main/proto/order.protoThis generates three classes in the java directory: the Order concrete class, the OrderOrBuilder interface, and the OrderProtobuf outer wrapper class.
3. Test serialization and deserialization.
package com.aliyun;

public class OrderTest {
    public static void main(String[] args) {
        // Create an Order object and set its field values.
        Order order = Order.newBuilder()
                .setOrderId(8513)
                .setOrderName("flink")
                .setOrderPrice(99.99)
                .setOrderDate(System.currentTimeMillis())
                .build();

        // Serialize to a byte array.
        byte[] serializedBytes = order.toByteArray();
        System.out.println("Byte length after serialization:" + serializedBytes.length);

        // Deserialize to a new Order object.
        Order deserializedOrder;
        try {
            deserializedOrder = Order.parseFrom(serializedBytes);
        } catch (Exception e) {
            System.err.println("Deserialization failed: " + e.getMessage());
            return;
        }

        System.out.println("Original object: \n" + order);
        // Verify that the deserialized object matches the original.
        if (order.getOrderId() == deserializedOrder.getOrderId() &&
                order.getOrderName().equals(deserializedOrder.getOrderName()) &&
            order.getOrderPrice() == deserializedOrder.getOrderPrice() &&
            order.getOrderDate() == deserializedOrder.getOrderDate()) {
            System.out.println("Serialization and deserialization test passed!");
        } else {
            System.out.println("Serialization and deserialization test failed!");
        }
    }
}
Step 2: Build test data and write it to Kafka
This example uses ApsaraMQ for Kafka.
1. Download the SSL root certificate. This certificate is required when connecting via an SSL endpoint.
2. Get the instance username and password from the ApsaraMQ for Kafka console:
-
ACL disabled: Get the default username and password from the Configuration Information section on the Instance Details page in the ApsaraMQ for Kafka console.
-
ACL enabled: Make sure the SASL user is a PLAIN user with permissions to send and receive messages. For details, see Use the ACL feature for access control.
3. Run the following producer code to write three Protobuf-encoded messages to the test topic:
package com.aliyun;

import org.apache.kafka.clients.CommonClientConfigs;
import org.apache.kafka.clients.producer.KafkaProducer;
import org.apache.kafka.clients.producer.ProducerConfig;
import org.apache.kafka.clients.producer.ProducerRecord;
import org.apache.kafka.clients.producer.RecordMetadata;
import org.apache.kafka.common.config.SaslConfigs;
import org.apache.kafka.common.config.SslConfigs;
import java.util.ArrayList;
import java.util.List;
import java.util.Properties;
import java.util.concurrent.Future;
import com.github.javafaker.Faker;

public class ProtoBufToKafkaTest {
    public static void main(String[] args) {
        Properties props = new Properties();
        // Obtain the bootstrap server address from the ApsaraMQ for Kafka console.
        props.put(ProducerConfig.BOOTSTRAP_SERVERS_CONFIG, "<bootstrap_servers>");
        // Use the SASL_SSL access protocol.
        props.put(CommonClientConfigs.SECURITY_PROTOCOL_CONFIG, "SASL_SSL");
        // Absolute path of the SSL root certificate. Do not package this file into the JAR.
        props.put(SslConfigs.SSL_TRUSTSTORE_LOCATION_CONFIG, "../only.4096.client.truststore.jks");
        // Password of the root certificate store. Keep this value unchanged.
        props.put(SslConfigs.SSL_TRUSTSTORE_PASSWORD_CONFIG, "KafkaOnsClient");
        // SASL authentication method. Keep this value unchanged.
        props.put(SaslConfigs.SASL_MECHANISM, "PLAIN");
        props.put(ProducerConfig.KEY_SERIALIZER_CLASS_CONFIG, "org.apache.kafka.common.serialization.StringSerializer");
        props.put(ProducerConfig.VALUE_SERIALIZER_CLASS_CONFIG, "org.apache.kafka.common.serialization.ByteArraySerializer");
        // Maximum wait time for a request, in milliseconds.
        props.put(ProducerConfig.MAX_BLOCK_MS_CONFIG, 30 * 1000);
        // Number of internal retries.
        props.put(ProducerConfig.RETRIES_CONFIG, 5);
        // Internal retry interval, in milliseconds.
        props.put(ProducerConfig.RETRY_BACKOFF_MS_CONFIG, 3000);
        props.put(SslConfigs.SSL_ENDPOINT_IDENTIFICATION_ALGORITHM_CONFIG, "");
        props.put("sasl.jaas.config", "org.apache.kafka.common.security.plain.PlainLoginModule required username=\"aliyun_flink\" password=\"123456\";");
        // Construct a Producer object. This object is thread-safe. Generally, one Producer object is sufficient for a process.
        // To improve performance, you can construct more objects, but do not create more than five.
        KafkaProducer<String, byte[]> producer = new KafkaProducer<>(props);
        String topic = "test";

        List<ProducerRecord<String, byte[]>> messages = new ArrayList<>();
        for (int i = 0; i < 3; i++) {
            byte[] value = getProtoTestData();
            ProducerRecord<String, byte[]> kafkaMessage = new ProducerRecord<>(topic, value);
            messages.add(kafkaMessage);
        }

        try {
            List<Future<RecordMetadata>> futures = new ArrayList<>();
            for (ProducerRecord<String, byte[]> message : messages) {
                Future<RecordMetadata> metadataFuture = producer.send(message);
                futures.add(metadataFuture);
            }
            producer.flush();

            for (Future<RecordMetadata> future : futures) {
                try {
                    RecordMetadata recordMetadata = future.get();
                    System.out.println("Produce ok:" + recordMetadata.toString());
                } catch (Throwable t) {
                    t.printStackTrace();
                }
            }
        } catch (Exception e) {
            // If sending still fails after internal retries, handle the error in your application.
            System.out.println("error occurred");
            e.printStackTrace();
        }
    }

    private static byte[] getProtoTestData() {
        Faker faker = new Faker();
        int orderId = faker.number().numberBetween(1000, 9999);
        String orderName = faker.commerce().productName();
        double orderPrice = faker.number().randomDouble(2, 10, 1000);
        long orderDate = System.currentTimeMillis();

        Order order = Order.newBuilder()
                .setOrderId(orderId)
                .setOrderName(orderName)
                .setOrderPrice(orderPrice)
                .setOrderDate(orderDate)
                .build();

        return order.toByteArray();
    }
}
Replace <bootstrap_servers> with the bootstrap server address from your ApsaraMQ for Kafka console.
After running the code, three Protobuf-encoded messages appear in the test topic:

Step 3: Compile, package, and upload
Upload the compiled and packaged KafkaProtobuf.jar file.
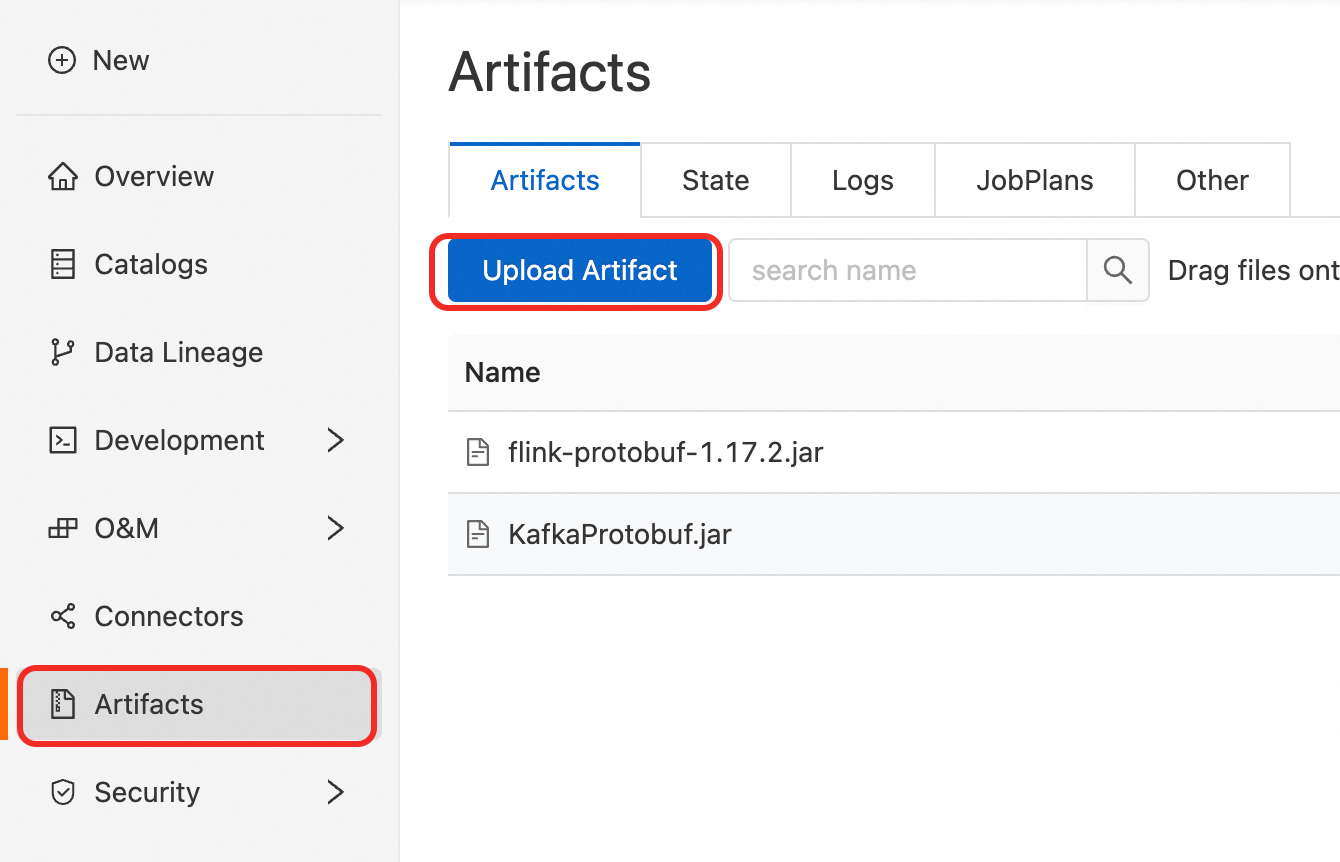
The built-in Protobuf format is supported only in Ververica Runtime (VVR) 8.0.9 and later. If you use an earlier version, add the flink-protobuf-1.17.2.jar dependency file.
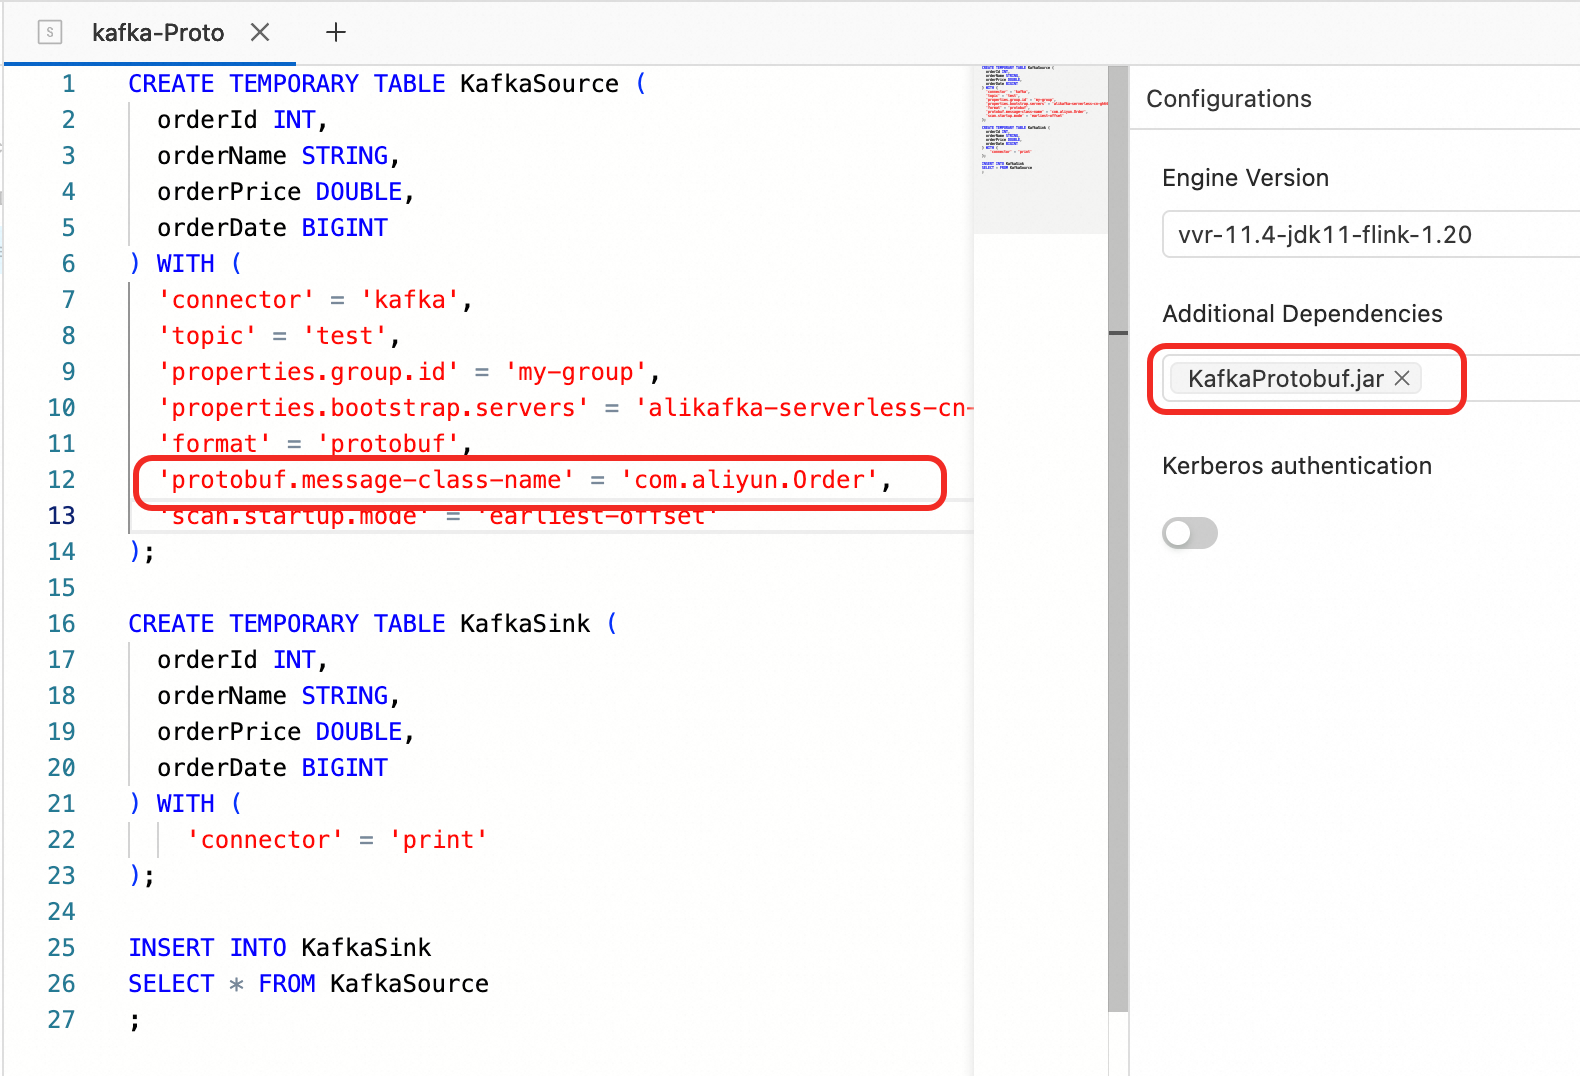
Step 4: Read data using Flink SQL
Add the protobuf.message-class-name parameter to specify the message class for the message body. For more information about protobuf parameters, see Protobuf Format.
1. Create the source and sink tables. The protobuf.message-class-name parameter specifies the message class corresponding to the message body.
CREATE TEMPORARY TABLE KafkaSource (
  orderId INT,
  orderName STRING,
  orderPrice DOUBLE,
  orderDate BIGINT
) WITH (
  'connector' = 'kafka',
  'topic' = 'test',
  'properties.group.id' = 'my-group',
  'properties.bootstrap.servers' = '<bootstrap_servers>',
  'format' = 'protobuf',
  'protobuf.message-class-name' = 'com.aliyun.Order',
  'scan.startup.mode' = 'earliest-offset'
);

CREATE TEMPORARY TABLE KafkaSink (
  orderId INT,
  orderName STRING,
  orderPrice DOUBLE,
  orderDate BIGINT
) WITH (
    'connector' = 'print'
);

INSERT INTO KafkaSink
SELECT * FROM KafkaSource;
2. Add file dependency references.
3. Debug the SQL.

4. View the output after the job is deployed and running.

Troubleshooting
`CORRUPT_MESSAGE` warnings appear after writing Protobuf data to another Kafka topic
ApsaraMQ for Kafka topics that use local storage on non-Professional Edition (High Write) instances do not support idempotent or transactional writes. This means exactly-once semantics is unavailable for the sink table. Add 'properties.enable.idempotence'='false' to the sink table definition to disable idempotent writes.
`NoClassDefFoundError` in the job runtime log
The version of the uploaded protobuf-java JAR does not match the version used to compile the proto file. Check that all attached dependency versions are consistent, no files are missing, and the fat JAR was built and packaged completely.
Job check fails with `Could not find any factory for identifier 'protobuf' that implements one of 'org.apache.flink.table.factories.EncodingFormatFactory'`
The built-in Protobuf format requires VVR 8.0.9 or later. Add the flink-protobuf dependency file to your job.