Integrate the ZOLOZ SDK into your native mobile app to enable identity verification services such as Real ID, Face Capture, ID recognition, Connect, and NFC Reader.
ZOLOZ provides a client SDK and server APIs for native mobile app integration. This topic covers the integration architecture, supported products, interaction flow, and general process.
Products supported
App SDK mode supports the following products:
-
Real ID
-
Face Capture
-
ID recognition
-
Connect
-
NFC Reader
Integration architecture
The following diagram shows the app SDK-mode integration architecture.
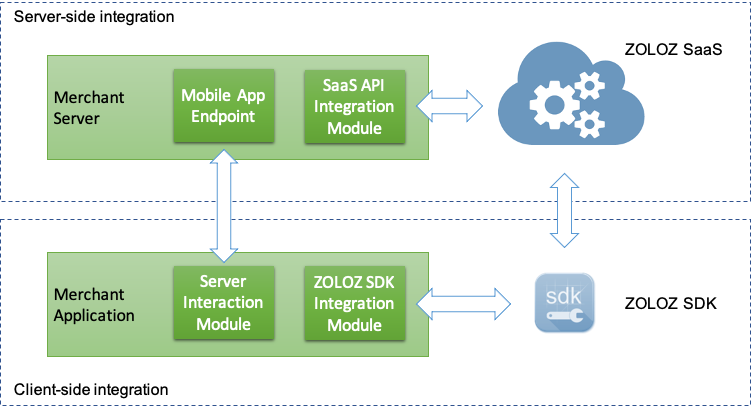
Figure 1. App-SDK mode integration architecture
The integration consists of two parts:
-
Client-side integration: integrate the ZOLOZ SDK into your app. The SDK provides drop-in screens and tools for iOS and Android to capture user data (face images, identity documents, etc.). Benefits:
-
Well-designed UI that guides users through the business process
-
High success rate and security through multiple algorithms
-
Simplified integration with direct image upload to ZOLOZ
-
-
Server-side integration: expose endpoints in your server so the client app can initialize transactions and verify results through the ZOLOZ API.
Interaction flow
The following diagram illustrates the interaction flow when a ZOLOZ service starts through the mobile app.

Figure 2. Sequence diagram
-
A user initiates a business process (for example, an identity proofing process) through the merchant application.
-
The merchant app calls the
getMetaInfointerface to obtain the meta information about the ZOLOZ SDK and the user's device for preparation. -
The ZOLOZ SDK returns the meta information to the merchant application.
-
The merchant application initializes a transaction and passes the meta information to the merchant server.
-
With the meta information as an input, the merchant server calls the initialize API to obtain the client configuration information, which includes parameters about SDK connection and behavior.
-
The ZOLOZ server performs usability check based on the meta information. If the check is passed, the ZOLOZ server returns the client configuration information to the merchant server.
-
The merchant server returns the client configuration information to the merchant application.
-
The merchant application starts the ZOLOZ SDK with the client configuration information that is obtained in Step 7.
-
The ZOLOZ SDK interacts with the user, captures required data (for example, face images) and uploads it to the ZOLOZ server for verification. There might be multiple rounds of interaction between the ZOLOZ SDK and ZOLOZ server.
-
The ZOLOZ server performs related checks on the uploaded user data, and returns the transaction status to the ZOLOZ SDK. If all the corresponding checks are passed, a result code that indicates success is returned to the ZOLOZ SDK; otherwise, the process might be interrupted and further interactions are needed between the user and the ZOLOZ SDK.
-
The ZOLOZ SDK notifies the merchant application that the transaction is completed.
-
The merchant application syncs with the merchant server that the transaction is completed and starts a double check on the transaction details.
-
The merchant server calls the checkResult API to check the transaction details with the ZOLOZ server again.
-
The ZOLOZ server returns the transaction details to the merchant server.
Note: For security, sensitive information such as captured face images is only returned to the merchant server.
-
The merchant server filters the transaction details that is returned from the ZOLOZ server, and returns the information that is not sensitive to the merchant application.
-
The merchant application informs the user that the process is completed.
General integration process
Implement the integration on both the server side and client side.
Server-side integration
Prerequisites
Before server-side integration, follow Interact with the ZOLOZ gateway to ensure the ZOLOZ gateway can be invoked successfully.
Procedure
You must expose endpoints in your server for the client app to call ZOLOZ APIs. The following sample uses Real ID APIs to demonstrate how to expose endpoints with annotations.
Note: This sample only demonstrates the ZOLOZ interaction logic. Implement your business logic as needed, for example:
-
When implementing the initialize API, save the transaction ID that is returned by the ZOLOZ server for the later retrieving purpose.
-
When implementing the checkResult API, save the transaction details, perform desensitisation, and return the desensitised information to your client side.
// Use annotation to expose endpoints for the client application to consume
@RestController
//Define the common base path for the API endpoints
@RequestMapping(value = {"/webapi"})
public class NativeClientModeController {

    // Auto wire the openApiClient object that is provided by ZOLOZ for calling ZOLOZ     // APIs
    @Autowired
    private OpenApiClient openApiClient;

    // Define the first service to map with the API URL path
    @RequestMapping(value = {"/realid/initialize"}, method = RequestMethod.POST)
    public JSONObject realIdInit(@RequestBody JSONObject request) {

        // Step 1: instantiate the request object and provide necessary parameters
        JSONObject apiReq = new JSONObject();
        apiReq.put("flowType", "REALIDLITE_KYC");
        // apiReq.put("...","..."); Add more request parameters as required. For more         // information about the request parameters of the Real ID initialize API, see         // the correspoding API specification in the API reference chapter.

        // Step 2: call the ZOLOZ API through openApiClient
        String apiRespStr = openApiClient.callOpenApi(
                "v1.zoloz.realid.initialize",
                JSON.toJSONString(apiReq)
        );

        // Step 3: process the ZOLOZ API response and construct the return object
        JSONObject apiResp = JSON.parseObject(apiRespStr);
        JSONObject response = new JSONObject(apiResp);
        response.put("rsaPubKey", openApiClient.getOpenApiPublicKey());
        // ... more codes are omitted

        // Step 4: return the service response
        return response;
    }

    // Define more services as required, for example, for Real ID, you need to define     // a service to check the transaction results
    @RequestMapping(value = "/realid/checkresult", method = RequestMethod.POST)
    public JSONObject realIdCheck(@RequestBody JSONObject request) {

        // Implement the detailed logic to create a request and handle the response
    }
}
Examples of A Minimum Merchant's Server
ZOLOZ provides sample merchant server code for different products, open sourced on Github.
Note: The merchant server code works with the ZOLOZ demo apps.
API References
ZOLOZ product API references:
Client-side integration
SDK requirements
The ZOLOZ SDK supports Android and iOS. Ensure your device meets these requirements:
-
Android 4.3 or later, or iOS 9 or later.
-
Network and camera permissions granted to the ZOLOZ SDK.
Note: x86 architecture is not supported.
Android Integration
1. Import the SDK
a. Configure the maven repository
Add the following maven repository to your project root build.gradle file.
mavenCentral()b. Add the SDK dependency
Add the SDK dependency in your module-level gradle file (usually app/build.gradle).
implementation "com.squareup.okio:okio:1.7.0@jar"
implementation "com.alibaba:fastjson:1.1.68.android"
implementation "com.zoloz.android.build:zolozcore:latest-version" // For convenience We recommend using the latest version of the SDK as it consistently enhances product experience and security, You can refer to https://docs.zoloz.com/zoloz/saas/releasenotes/ for current release notes.
implementation "com.zoloz.android.build:doc:latest-version"
implementation "com.zoloz.android.build:face:latest-version"
implementation "com.zoloz.android.build:xnn:latest-version"
implementation "com.zoloz.android.build:faceguard:latest-version"
implementation "com.zoloz.android.build:apsecurity:latest-version" //Optional Capabilities
implementation 'com.zoloz.android.build:znfc:latest-version' //Optional. nfc reader support
Notes:
-
Upgrade to the latest SDK for optimal experience and security. Version details are in the Release Notes.
-
The SDK depends on
libc++_shared.so, which must be added to your project independently to avoid runtime issues. Reference: https://github.com/zoloz-pte-ltd/zoloz-demo-android -
The
implementation 'com.zoloz.android.build:znfc:latest-version'line is for NFC. Contact the ZOLOZ team to activate NFC, or omit this line if not needed.
2. Get meta information
Call ZLZFacade.getMetaInfo to retrieve SDK and device meta information for transaction initialization. For more information about ZLZFacade and getMetaInfo, see ZLZFacade.
String metaInfo = ZLZFacade.getMetaInfo(applicationContext);3. Initialize a transaction
Send the meta information to your server to initialize a transaction. Your server calls the initialize API to obtain the client configuration and returns it to your app.
4. Start the transaction flow
a. Construct the ZLZRequest object with the client configuration
ZLZRequest request = new ZLZRequest();
request.bizConfig = new HashMap<>();
request.bizConfig.put(ZLZConstants.CONTEXT, this);
request.bizConfig.put(ZLZConstants.LOCALE, locale);
request.zlzConfig = clientCfg;
return request;
b. Start the transaction flow by calling the start method with the ZLZRequest object that is constructed in Step 5(a). You also need to override the callback functions to handle the transaction result.
ZLZFacade.getInstance().start(request, new IZLZCallback() {
    @Override
    public void onCompleted(ZLZResponse response) {
    }
    @Override
    public void onInterrupted(ZLZResponse response) {
    }
});
The result contains a result code. If the user completes the flow, onCompleted is invoked. Sync the status with your server and call the checkResult API to verify the transaction details.
If the user does not complete the flow, onInterrupted is invoked. Implement your business logic accordingly.
For more information about the classes of ZLZRequest, ZLZResponse, ZLZConstants, see Android SDK.
5. Handle ProGuard
If ProGuard is enabled, add the following rules to your ProGuard configuration file:
-dontwarn com.zoloz.**

-keep class okio.** { *; }
-keep class com.alibaba.fastjson.** { *; }
-keep class com.alibaba.fastjson2.** { *; }
-keep class com.zoloz.zhub.** { *; }
-keep class com.alipay.zoloz.** { *; }
-keep class com.zoloz.zcore.facade.common.** { *; }
-keep class com.alipay.android.phone.zoloz.** { *; }
-keep class com.alipay.biometrics.** { *; }
-keep class com.alipay.bis.** { *; }
-keep class com.alipay.mobile.security.** { *; }
-keep class com.ap.zoloz.** { *; }
-keep class com.ap.zhubid.endpoint.** { *; }
-keep class com.zoloz.android.phone.zdoc.** { *; }
-keep class zoloz.ap.com.toolkit.** { *; }
-keep class com.zoloz.builder.** { *; }
-keep class com.ant.phone.xmedia.** { *; }
-keep class com.alipay.alipaysecuritysdk.** { *; }
-keep class com.alipay.blueshield.** { *; }
-keep class com.alipay.deviceid.** { *; }
-keep class com.alipay.edge.** { *; }
-keep class com.alipay.softtee.NativeHelper { *; }
-keep class com.alipay.apmobilesecuritysdk.tool.si.SIUtils { *; }
-keep class face.security.device.api.** { *; }
-dontwarn face.security.device.api.**
Note: Update the obfuscation rules when you upgrade the SDK version.
iOS Integration
1. Privacy permission description
ZOLOZ requires the following permissions:
|
Permission |
Description |
|
NSCameraUsageDescription |
ZOLOZ use camera permissions to collect face and ID information |
|
NSLocalNetworkUsageDescription |
Used to Obtain the connectivity of devices in the local area network to detect risks such as device ranching and group control |
|
NSUserTrackingUsageDescription |
Used to obtain IDFA information and enhance the stability of device ID |
2. Configure the SDK dependency
a. Configure the private spec in Podfile:
source "https://github.com/zoloz-pte-ltd/zoloz-demo-ios"b. Add the SDK dependency in Podfile:
#zolozkit changelog https://docs.zoloz.com/zoloz/saas/releasenotes/

# #We recommend use our latest version, which includes new features and security improvements. If you need more information about specific version, please check the change log
pod 'zolozkit'  #core modules
pod 'zolozkit/ZolozNfcReader' #nfc reader module
Note: The pod 'zolozkit/ZolozNfcReader' line is for NFC. Contact the ZOLOZ team to activate NFC, or omit this line if not needed.
3. Get the SDK
Run the following command to get the SDK.
pod install4. Configure linker flags
Add the -ObjC and $(inherited) constants in Build Settings > Other Linker Flags.
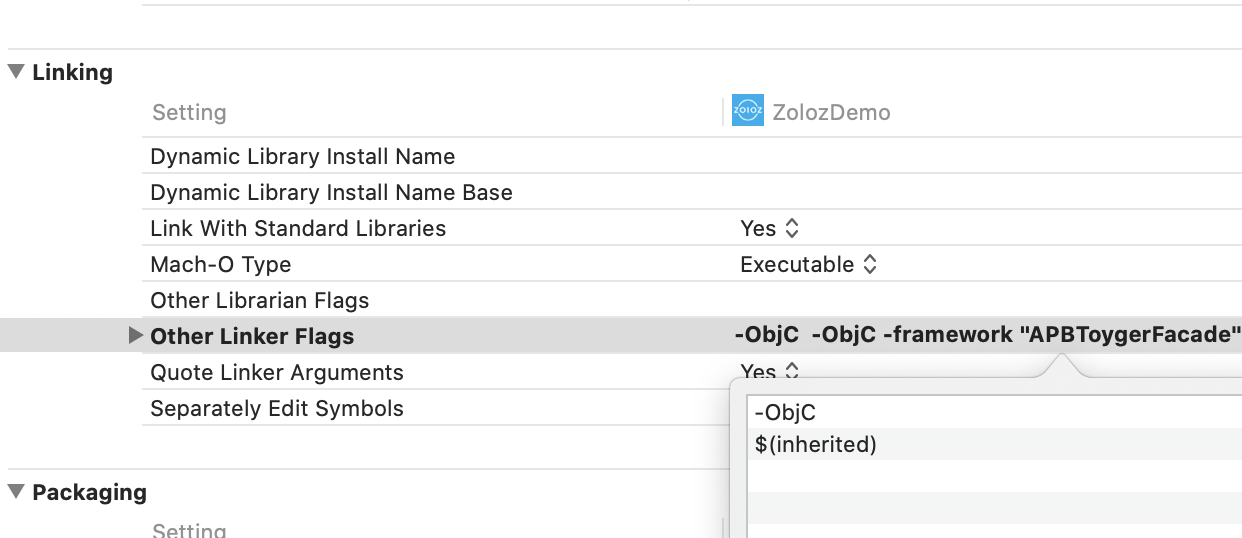
Figure 3. Settings of Other Linker Flags
5. Header references
Objective-C:
#import <hummer/ZLZFacade.h>
#import <hummer/ZLZRequest.h>
#import <hummer/ZLZResponse.h>
Swift:
import hummer6. Get meta information
Call ZLZFacae.getMetaInfo to retrieve SDK and device meta information for transaction initialization. ZLZFacade.
Objective-C:
NSString *metainfo = [ZLZFacade getMetaInfo];Swift:
let metainfo = ZLZFacade.getMetaInfo()7. Initialize a transaction
Send the meta information to your server to initialize a transaction. Your server calls the initialize API to obtain the client configuration and returns it to your app.
8. Start the transaction flow
a. Construct the ZLZRequest object with the client configuration.
Objective-C:
NSString *clientConfig = clientCfg;
NSMutableDictionary *bizConfig = [NSMutableDictionary dictionary];
// the `self` viewcontroller need nested in UINavigationController
[bizConfig setObject:self forKey:kZLZCurrentViewControllerKey];
//.pass the locale to bizConfig
[bizConfig setObject:locale forKey:kZLZLocaleKey]
ZLZRequest *request = [[ZLZRequest alloc] initWithzlzConfig:clientConfig bizConfig:bizConfig];
Swift:
let clientConfig = clientCfg
let bizConfig = NSMutableDictionary()
// the `self` viewcontroller need nested in UINavigationController
bizConfig[kZLZCurrentViewControllerKey] = self
//.pass the locale to bizConfig
bizConfig[kZLZLocaleKey] = locale
let request = ZLZRequest.init(zlzConfig: clientConfig ?? "", bizConfig: bizConfig as! [AnyHashable : Any])
b. Start the transaction flow by calling startWithRequest with the ZLZRequest object that is constructed in Step 6(a). You also need to override the callback functions to handle the transaction result.
Objective-C:
[[ZLZFacade sharedInstance] startWithRequest:request completeCallback:^(ZLZResponse *response) {
} interruptCallback:^(ZLZResponse *interrupt){
}];
Swift:
ZLZFacade.sharedInstance().start(with: request) { response in
} interruptCallback: { response in
}
The result contains a result code. If the user completes the flow, completeCallback is invoked. Sync the status with your server and call the checkResult API to verify the transaction details.
If the user does not complete the flow, interruptCallback is invoked. Implement your business logic accordingly.
For more information about the classes of ZLZRequest and ZLZResponse, see iOS SDK.
Examples of demo apps
ZOLOZ provides iOS and Android demo apps that simulate a mobile app with the SDK integrated. Use these with the merchant server code to test the full integration flow.
The demo apps are open sourced on Github:
Merchant server code: Examples of A Minimum Merchant's Server.