When your application needs to react to database changes in real time -- such as updating search indexes, invalidating caches, or feeding analytics pipelines -- you need a reliable Change Data Capture (CDC) pipeline. The Debezium PostgreSQL Source connector on EventBridge captures row-level changes from an ApsaraDB RDS for PostgreSQL database and streams them to an ApsaraMQ for Kafka topic, so downstream consumers receive every insert, update, and delete as it happens.
This topic walks you through the end-to-end setup: preparing the PostgreSQL source, deploying the connector, and verifying that CDC events reach Kafka.
Limitations
The Debezium PostgreSQL Source connector supports only one task per source (tasks.max=1). You cannot run concurrent tasks to consume CDC data from the same source.
Prerequisites
Before you begin, make sure that you have:
Activated EventBridge and granted the required permissions to a Resource Access Management (RAM) user
Activated Object Storage Service (OSS) and created a bucket
Activated Serverless App Engine (SAE)
Purchased and deployed an ApsaraMQ for Kafka instance
Step 1: Prepare the PostgreSQL database
This step covers creating an ApsaraDB RDS for PostgreSQL instance, enabling logical replication, and setting up the schema, table, and replication slot that the connector requires.
Create an ApsaraDB RDS for PostgreSQL instance
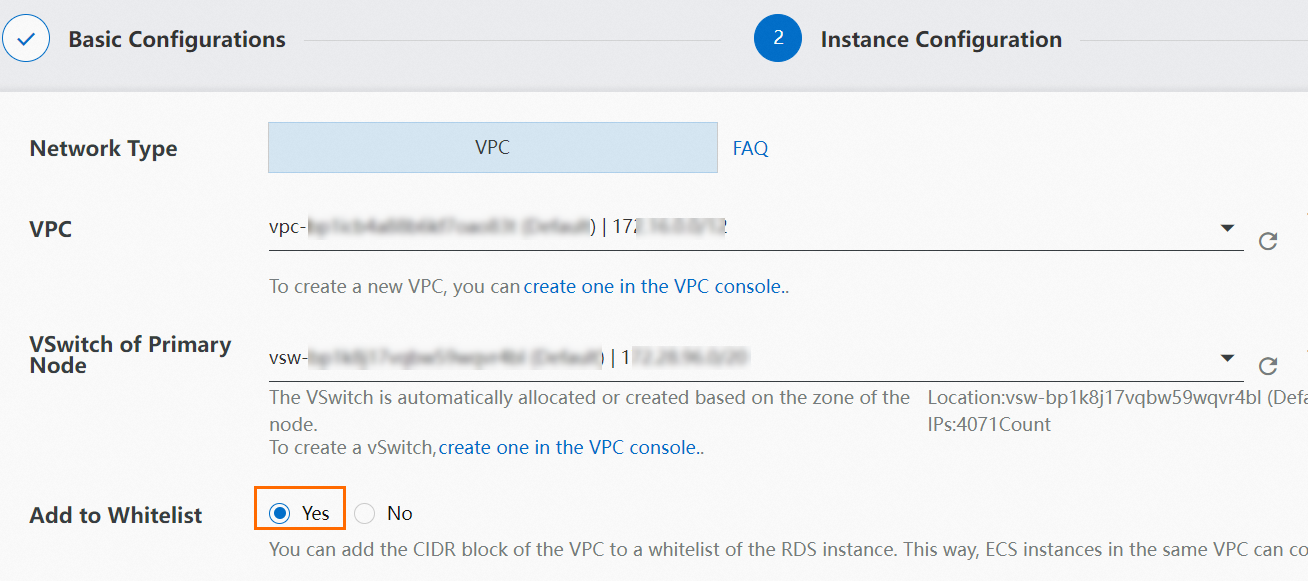
Log on to the ApsaraDB RDS console and create an ApsaraDB RDS for PostgreSQL instance. For more information, see Create an ApsaraDB RDS for PostgreSQL instance. Select the same VPC as your ApsaraMQ for Kafka instance and add the VPC CIDR block to the whitelist.
Create a database account and database
On the Instances page, click the instance you created, and then complete the following tasks:
Create a database account. For more information, see Create a database and an account on an ApsaraDB RDS for PostgreSQL instance. You can also use an existing account.
Create a database. For more information, see Create a database and an account on an ApsaraDB RDS for PostgreSQL instance. You can also use an existing database.
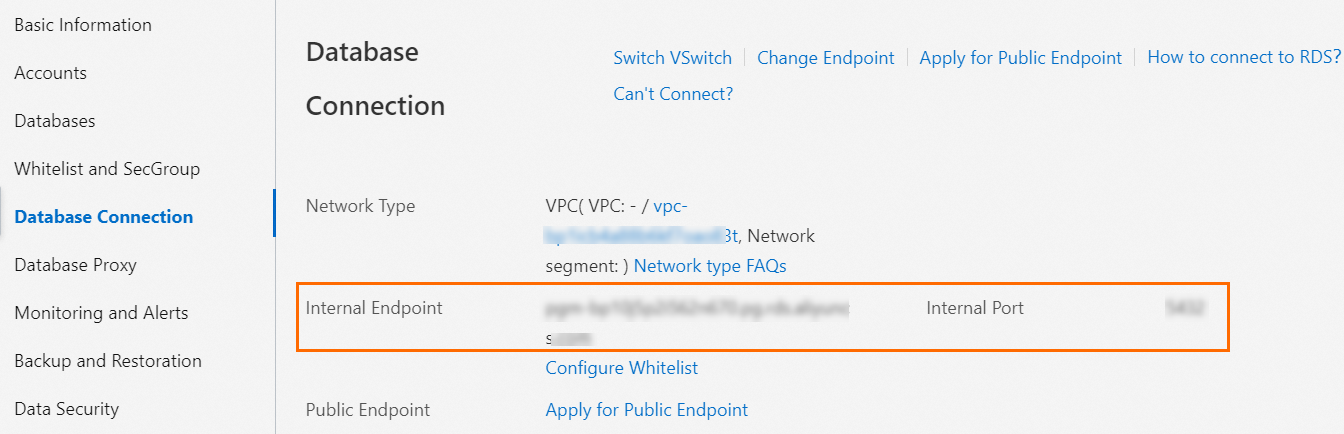
Click Database Connection and note the internal endpoint and port number. You need these values when you configure the connector.
Enable logical replication
On the instance details page, click Parameters, change the value of the
wal_levelparameter tologicalin the Running Parameter Value column, and then click Apply Changes.NoteThis change enables Write-Ahead Log (WAL) logical decoding, which the Debezium connector requires to capture row-level changes.
Create a schema, table, and replication slot
On the instance details page, click Log On to Database to open the Data Management (DMS) console. Then complete the following tasks:
Right-click the target database, select Mode Management, and then click Create Schema.
ImportantUse a custom schema. System schemas (
information,pg_catalog, andpublic) are not supported for this connector.In the new schema, run the following SQL statement to create a table. This example creates a table named
sql_tablewith two integer columns:CREATE TABLE sql_table(id INT, number INT);For more information about PostgreSQL SQL commands, see SQL Commands.
Run the following SQL statement to create a logical replication slot with the wal2json plug-in and enable data subscription:
SELECT 'init' FROM pg_create_logical_replication_slot('test_slot', 'wal2json');
Step 2: Upload the connector plug-in and create a task
Upload the connector file to OSS
Download the Debezium PostgreSQL CDC Source Connector from Confluent Hub.
ImportantSelect a version compatible with Java 8.
Upload the downloaded file to the OSS bucket you created. For more information, see Get started by using the OSS console.
Create the connector task
Log on to the ApsaraMQ for Kafka console. In the Resource Distribution section of the Overview page, select the region where your ApsaraMQ for Kafka instance resides.
In the left-side navigation pane, choose Connector Ecosystem Integration > Tasks.
On the Tasks page, click Create Task.
On the Create Task page, configure Task Name and then complete the following sections.
Source configuration
In the Source step, set Data Provider to Apache Kafka Connect and click Next Step.
Connector configuration
In the Connector step, configure the following parameters and click Next Step.
| Subsection | Parameter | Description |
|---|---|---|
| Kafka Connect Plug-in | Bucket | The OSS bucket that contains the connector file |
| File | The Debezium PostgreSQL CDC Source Connector file | |
| Message Queue for Apache Kafka Resources | Message Queue for Apache Kafka Parameters | Select Source Connect |
| Message Queue for Apache Kafka Instance | The ApsaraMQ for Kafka instance you created | |
| VPC | The VPC you created | |
| vSwitch | The vSwitch you created | |
| Security Group | A security group in the same VPC | |
| Kafka Connect | Parse .properties File in ZIP Package | Select Create .properties File |
After you select Create .properties File, a code editor opens with the connector properties. The following section explains each field.
Connector properties reference
Review and update the following fields in the code editor:
| Field | Required | Default | Description |
|---|---|---|---|
connector.class | Yes | io.debezium.connector.postgresql.PostgresConnector | The fully qualified connector class. Do not change this value. |
database.dbname | Yes | -- | The name of your ApsaraDB RDS for PostgreSQL database. |
database.hostname | Yes | -- | The internal endpoint from Step 1. |
database.port | Yes | 5432 | The port number from Step 1. |
database.user | Yes | -- | The database account username. |
database.password | Yes | -- | The database account password. |
name | Yes | -- | A name for this connector instance. Example: debezium-psql-source. |
plugin.name | Yes | -- | The PostgreSQL logical decoding plug-in. Valid values: decoderbufs, wal2json, wal2json_rds, wal2json_streaming, wal2json_rds_streaming. |
slot.drop_on_stop | No | false | Whether to drop the replication slot when the connector stops. Set to true for development environments only. |
slot.name | Yes | -- | The logical replication slot name. Must match the slot created in Step 1. Example: test_slot. |
table.whitelist | Yes | -- | The tables to monitor, in <schemaName>.<tableName> format. Separate multiple tables with commas. |
tasks.max | Yes | -- | Must be 1. Only one task can consume CDC data from a source. |
database.server.name | Yes | -- | A logical name that serves as the prefix for destination topic names. The destination topic is named <database.server.name>.<schemaName>.<tableName>. |
value.converter | No | org.apache.kafka.connect.json.JsonConverter | The message value converter. |
value.converter.schemas.enable | No | false | Whether to include schema information in message values. |
Create the destination topic in ApsaraMQ for Kafka before you start the connector. The topic name must follow the format <database.server.name>.<schemaName>.<tableName>.
The following example shows a complete .properties configuration:
connector.class=io.debezium.connector.postgresql.PostgresConnector
database.dbname=test_database
database.hostname=pgm-xxx.pg.rds.aliyuncs.com
database.password=<your-password>
database.port=5432
database.user=<your-username>
name=debezium-psql-source

# Logical decoding plug-in. Valid values: decoderbufs, wal2json,
# wal2json_rds, wal2json_streaming, wal2json_rds_streaming
plugin.name=wal2json
slot.drop_on_stop=true
slot.name=test_slot

# Tables to capture. Format: <schemaName>.<tableName>
table.whitelist=test_schema.test_table

# Only one task can consume CDC data from a single source
tasks.max=1

# Destination topic prefix.
# Resulting topic name: test-prefix.kafka_connect_schema.table2_with_pk
database.server.name=test-prefix

# Message format
value.converter=org.apache.kafka.connect.json.JsonConverter
value.converter.schemas.enable=falseDo not store passwords in plain text in production configurations. Use a secrets management mechanism such as KIP-297 to externalize sensitive credentials.
For all available connector properties, see the Connector properties section in the Debezium documentation.
Instance configuration
In the Instance step, configure the following parameters and click Next Step.
| Subsection | Parameter | Description |
|---|---|---|
| Worker Type | Worker Type | Select a worker type |
| Min. Number of Workers | Set to 1 | |
| Max. Number of Workers | Set to 1 | |
| Worker Configurations | Automatically Create Dependencies for Apache Kafka Connector Worker | (Recommended) Select this option to automatically create the internal topics and consumer groups that Kafka Connect requires |
When you select Automatically Create Dependencies for Apache Kafka Connector Worker, the system creates the following resources in your ApsaraMQ for Kafka instance:
| Resource | Naming format | Purpose |
|---|---|---|
| Offset topic | connect-eb-offset-<Task name> | Stores connector offset data |
| Config topic | connect-eb-config-<Task name> | Stores connector and task configuration |
| Status topic | connect-eb-status-<Task name> | Stores connector and task status |
| Kafka Connect consumer group | connect-eb-cluster-<Task name> | Used by Kafka Connect workers for internal topics |
| Source connector consumer group | connector-eb-cluster-<task name>-<connector name> | Used by sink connectors only |
Running configurations and role authorization
In the Running Configurations section:
Set Log Delivery to Deliver Data to Log Service or Deliver Data to ApsaraMQ for Kafka.
In the Role Authorization subsection, select a role from the Role drop-down list.
ImportantSelect a role with the
AliyunSAEFullAccesspolicy attached. Otherwise, the task may fail to start.Click Save.
Task property
Configure the retry policy and dead-letter queue for the task. For more information, see Retry policies and dead-letter queues.
When the task status changes to Running, the connector is working.
Step 3: Verify data synchronization
After the connector starts, insert a test record into your PostgreSQL table and verify that the CDC event appears in the corresponding Kafka topic.
Insert a test record
In the DMS console, insert a record into the table you created in Step 1:
INSERT INTO sql_table(id, number) VALUES(123, 20000);
Check the Kafka topic for CDC events
Log on to the ApsaraMQ for Kafka console and click the instance name on the Instances page.
In the left-side navigation pane, click Topics. Click the topic that matches the
<database.server.name>.<schemaName>.<tableName>format, and then click the Message Query tab.Verify that the CDC event appears. The following example shows a typical
INSERTevent:{ "before": null, "after": { "id": 123, "number": 20000 }, "source": { "version": "0.9.2.Final", "connector": "postgresql", "name": "test-prefix", "db": "wb", "ts_usec": 168386295815075****, "txId": 10339, "lsn": 412719****, "schema": "test_schema", "table": "sql_table", "snapshot": false, "last_snapshot_record": null }, "op": "c", "ts_ms": 168386295**** }
CDC event field reference
The following table describes the key fields in a CDC event:
| Field | Description | Example values |
|---|---|---|
before | The row state before the change. null for INSERT operations. | null, {"id": 123, "number": 10000} |
after | The row state after the change. Contains the inserted or updated column values. null for DELETE operations. | {"id": 123, "number": 20000} |
source | Metadata about the change event, including the database name, schema, table, and transaction ID. | See the example above |
op | The operation type. | c (create/insert), u (update), d (delete) |
ts_ms | The timestamp when the connector processed the event, in milliseconds since epoch. | 168386295**** |
Troubleshooting
All tasks fail to run
Error message:
All tasks under connector mongo-source failed, please check the error trace of the task.Solution: On the Message Inflow Task Details page, click Diagnostics in the Basic Information section to open the Connector Monitoring page. Review the task failure details.
Kafka Connect unexpectedly exits
Error message:
Kafka connect exited! Please check the error log /opt/kafka/logs/connect.log on sae application to find out the reason why kafka connect exited and update the event streaming with valid arguments to solve it.Solution: Refresh the page first. The status update may be delayed. If Kafka Connect remains in a failed state, access the SAE application logs:
In the Worker Information section of the Message Inflow Task Details page, click the instance name next to SAE Application.
On the Basic Information page, click the Instance Deployment Information tab.
Click Webshell in the Actions column.

Check the following log files:
Startup logs:
/home/admin/connector-bootstrap.logRuntime logs:
/opt/kafka/logs/connect.log(look forERRORorWARNentries)
After you identify and fix the issue, restart the task.
Connector parameter validation fails
Error message:
Start or update connector xxx failed. Error code=400. Error message=Connector configuration is invalid and contains the following 1 error(s):
Value must be one of never, initial_only, when_needed, initial, schema_only, schema_only_recovery
You can also find the above list of errors at the endpoint `/connector-plugins/{connectorType}/config/validate`
Solution: Identify the invalid parameter from the error message and correct its value.
If the error message does not specify which parameter failed, log on to the SAE application (see the previous section) and run the following command to validate all parameters:
curl -i -X PUT \
  -H "Accept:application/json" \
  -H "Content-Type:application/json" \
  -d @$CONNECTOR_PROPERTIES_MAPPING \
  http://localhost:8083/connector-plugins/io.confluent.connect.jdbc.JdbcSinkConnector/config/validate
The response returns the validation result for each parameter. Parameters with errors have a non-empty errors array:
{
  "value": {
    "name": "snapshot.mode",
    "value": null,
    "recommended_values": [
      "never",
      "initial_only",
      "when_needed",
      "initial",
      "schema_only",
      "schema_only_recovery"
    ],
    "errors": [
      "Value must be one of never, initial_only, when_needed, initial, schema_only, schema_only_recovery"
    ],
    "visible": true
  }
}
What to do next
Learn about all available connector properties in the Debezium Connector for PostgreSQL documentation
Set up monitoring and alerting for your connector tasks
Configure retry policies and dead-letter queues for production workloads