When your applications or third-party services expose HTTPS endpoints -- such as webhooks, REST APIs, or notification receivers -- you can use EventBridge event rules to filter events from a custom event bus and deliver them directly to those endpoints. This eliminates the need for intermediate polling or custom integration code.
This guide covers four steps: add a custom event source, create an event rule with an HTTPS target, publish a test event, and verify delivery.
Before you begin
-
Activate EventBridge and grant permissions to a Resource Access Management (RAM) user
-
Prepare an HTTPS endpoint that can receive requests
How it works
EventBridge routes events from a custom event bus to an HTTPS endpoint through three components:
-
Event source -- defines where events originate (your application, using the Custom Application provider).
-
Event rule -- filters events by pattern and specifies one or more targets. For HTTPS targets, you configure the endpoint URL, payload format, and network type.
-
HTTPS target -- the endpoint that receives the event payload.
When an event matches the rule pattern, EventBridge sends the event payload to the configured HTTPS endpoint. If delivery fails, EventBridge retries based on your retry policy. Undeliverable events can be routed to a dead-letter queue.
Add a custom event source
-
Log on to the EventBridge console. In the left-side navigation pane, click Event Buses.
-
In the top navigation bar, select a region. On the Event Buses page, click the name of the custom event bus you want to manage.
-
In the left-side navigation pane, click Event Sources, and then click Add Event Source.
-
In the Add Custom Event Source panel, configure the Name and Description parameters, select Custom Application from the Event Provider drop-down list, and then click OK.
Create an event rule with an HTTPS target
-
On the event bus details page, click Event Rules in the left-side navigation pane, and then click Create Rule.
-
In the Create Rule wizard, complete the following steps:
-
In the Configure Basic Info step, enter a Name and Description, and then click Next Step.

-
In the Configure Event Pattern step, set Event Source Type to Custom Event Source, select the event source you created in the previous section, and then click Next Step.

-
In the Configure Targets step, configure the following parameters, and then click Create.
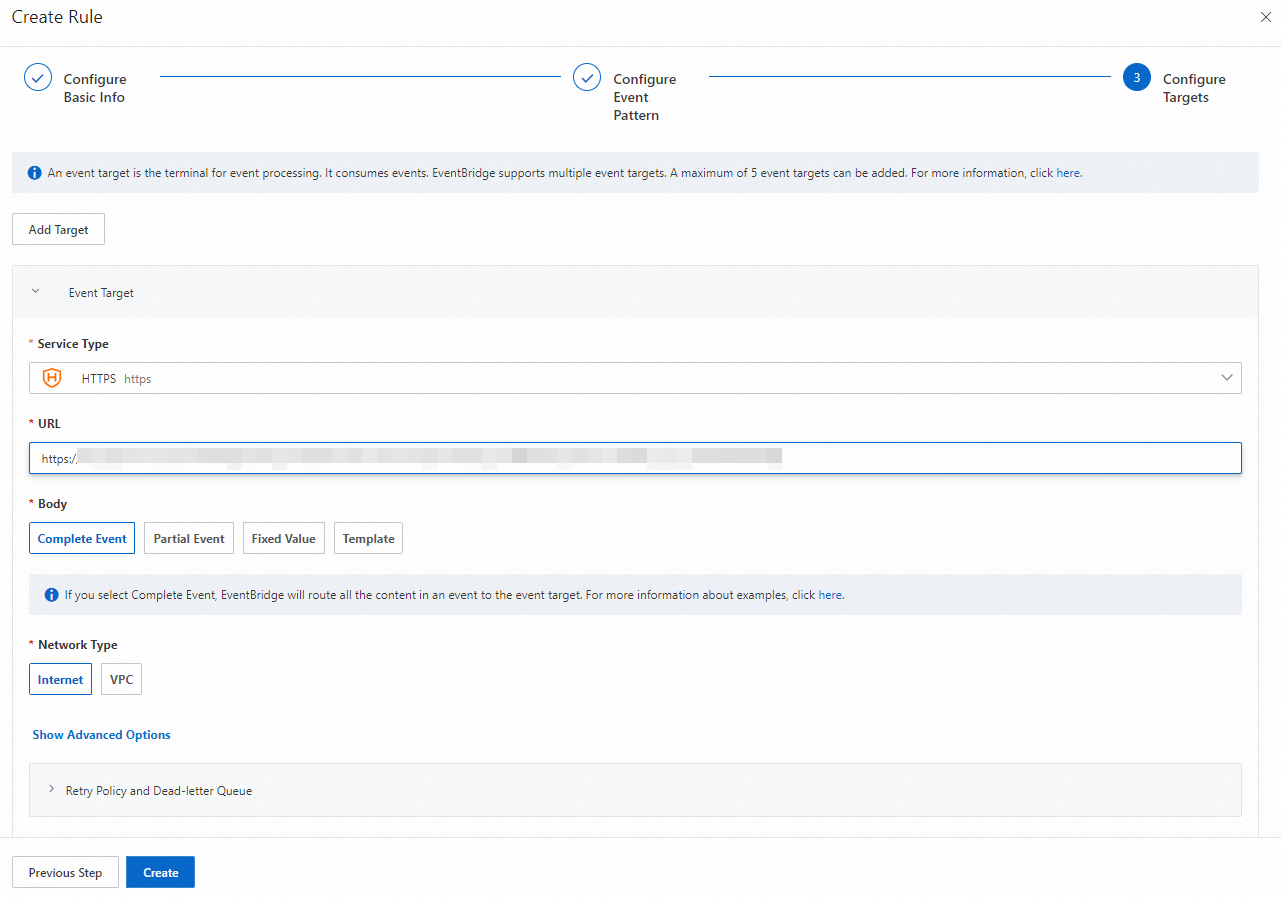
Parameter
Example
Description
Service Type
HTTPS
Select HTTPS from the drop-down list.
URL
https://******The HTTPS endpoint that receives events. The endpoint must be reachable over the network type you select below.
Body
Complete Event
The payload format sent to your endpoint. Valid values: Complete Event (full event JSON), Partial Event (selected fields), Fixed Value (static content), and Template (custom format). For details, see Event transformation.
Network Type
Internet
The network used to reach the endpoint. Valid values: Internet and VPC. If you select VPC, you must have a VPC, vSwitch, and security group already created.
Retry Policy and Dead-letter Queue
None
Controls what happens when delivery fails. Configure retry attempts and an optional dead-letter queue to capture undeliverable events. For details, see Retry policies and dead-letter queues.
-
Publish a test event
-
In the left-side navigation pane, click Event Buses. In the top navigation bar, select the region. On the Event Buses page, find your event bus and click Publish Event in the Actions column.
NoteThe EventBridge console supports publishing events only to custom event buses.
-
In the Publish Event To Custom Event Bus panel, select the event source from the Custom Event Source drop-down list, enter the event content in the Event Body code editor, and then click OK.
Note-
For details about event parameters, see Event overview.
-
After you click OK, the event ID is automatically copied to your clipboard.
-
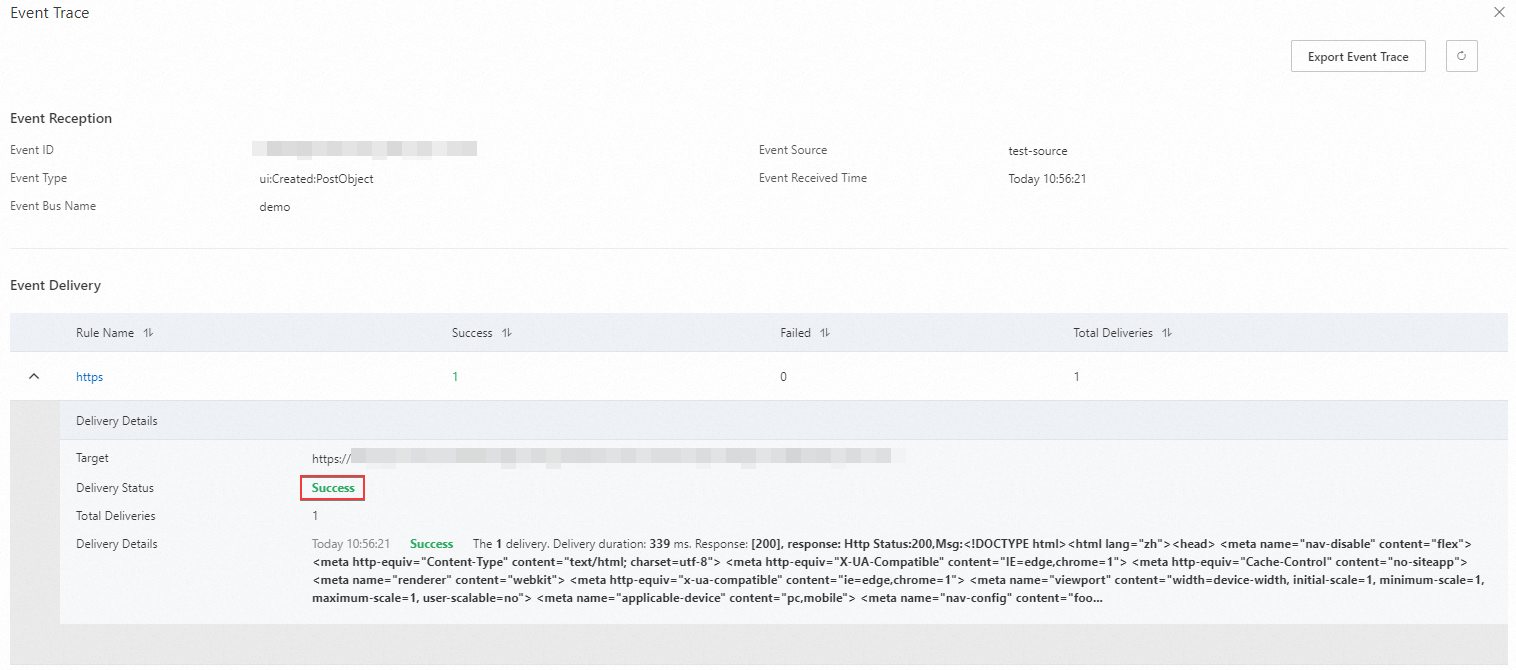
Verify delivery
-
Go to the Overview page of the event bus, and then click Event Tracking in the left-side navigation pane.
-
On the Query By Event ID tab, paste the event ID and click Query.
-
Click Event Trace in the Actions column to check whether the event was delivered to the HTTPS endpoint.