When multiple teams or business units each operate their own event bus, you often need to aggregate or share events across buses for centralized monitoring, processing, or cross-team automation. EventBridge event rules let you forward events from one bus to another, within the same account or across accounts. Both modes support cross-region delivery.
Prerequisites
Before you begin, ensure that you have:
Routing modes
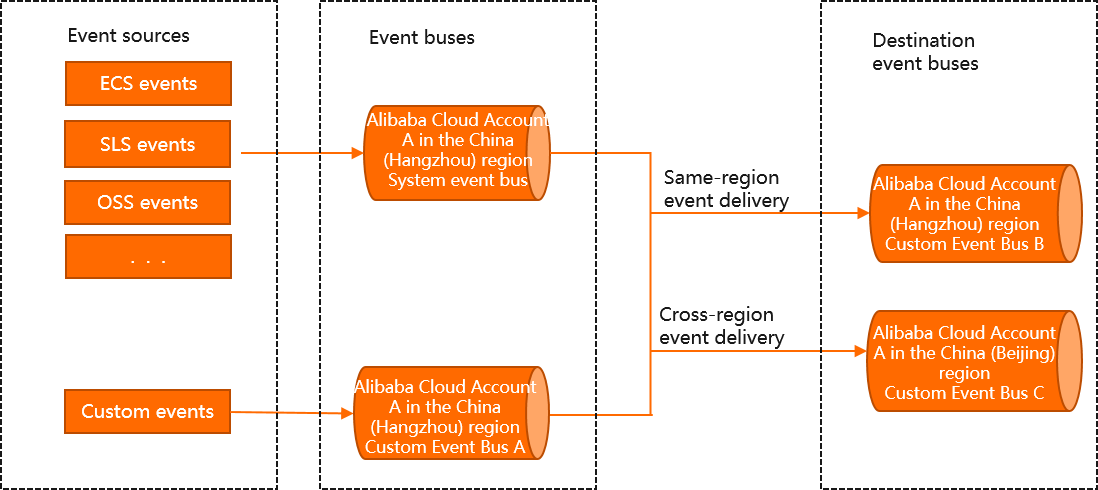
Same-account routing
In same-account routing, the default event bus and all custom event buses belong to one Alibaba Cloud account. An event rule on any bus forwards matching events to another custom bus for centralized processing.
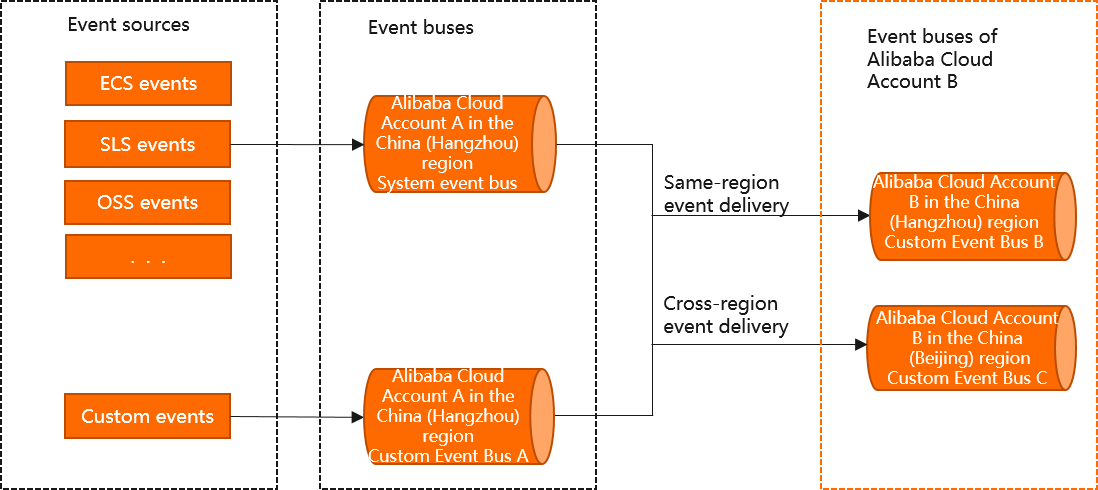
Cross-account routing
Cross-account routing forwards events from a sending account (Account A) to an event bus owned by a receiving account (Account B). This suits organizations where a central account aggregates events from multiple business-unit accounts for unified monitoring or processing.
The setup requires coordination between two accounts:
| Step | Account | Action |
|---|---|---|
| 1 | Receiving (B) | Create a RAM role that trusts the sending account (A) |
| 2 | Receiving (B) | Attach the AliyunEventBridgePutEventsPolicy to the RAM role |
| 3 | Receiving (B) | Modify the trust policy so EventBridge in Account A can assume the role |
| 4 | Sending (A) | Create an event rule that targets Account B's event bus |
A single event bus in the receiving account can accept events from multiple sending accounts. Each event includes an aliyunoriginalaccountid extension field that identifies the source account.
If you accept events from multiple sending accounts, scope every event rule on the receiving side to match only the expected aliyunoriginalaccountid values. Without this filter, rules may trigger on events from unintended accounts.
Limits
| Item | Limit |
|---|---|
| Targets per event rule | 5 |
| Source bus routing | Default bus routes only to custom buses. Custom buses route only to other custom buses. |
Route events within the same account
Log on to the EventBridge console. In the navigation pane, click Event Buses.
In the top navigation bar, select a region. On the Event Buses page, click default (System Event Bus).
In the navigation pane, click Event Rules. On the page that appears, click Create Rule.
Complete the Create Rule wizard:
On the Configure Basic Info tab, enter a Name and Description for the rule, and then click Next.
On the Configure Event Pattern tab, configure the following parameters, and then click Next.
Parameter Description Event Source The Alibaba Cloud service event source from which to deliver events Event Type The event type to deliver Pattern Content An event pattern that filters which events match this rule On the Configure Targets tab, configure the following parameters, and then click Create.
Parameter Description Service Type Select EventBridge Target Type Select Same-account Bus Region The region of the destination event bus Event Bus The destination custom event bus Event Defaults to Complete Event. Delivers the full event structure that complies with the CloudEvents 1.0 protocol, without transformation
After the rule is created, matching events are forwarded to the destination bus. To verify delivery, see Query events.
Route events across accounts
Step 1: Create a RAM role (receiving account)
Log on to the RAM console with the receiving account (Account B).
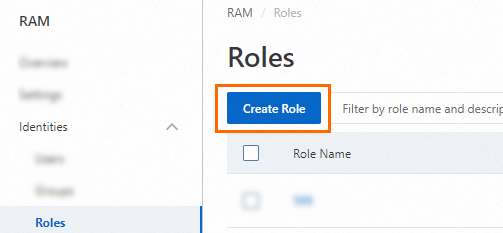
In the navigation pane, choose Identities > Roles.
On the Roles page, click Create Role.
Set Principal Type to Cloud Account.
Current Account: A RAM user or RAM role within your own account assumes the role.
Other Account: A RAM user or RAM role in a different Alibaba Cloud account assumes the role. For details, see Use a RAM role to grant permissions across Alibaba Cloud accounts. Find your account ID on the Security Settings page.

Configure the role:
Enter a Role Name.
(Optional) Enter a Description.
For Alibaba Cloud account, select Other Alibaba Cloud Account and enter the ID of the sending account (Account A). Click OK.
Step 2: Grant permissions to the RAM role (receiving account)
Log on to the RAM console with the receiving account (Account B).
In the navigation pane, choose Identities > Roles.
Find the RAM role and click Grant Permission in the Actions column. You can also select multiple RAM roles and click Grant Permission in the lower part of the RAM role list to grant permissions to multiple RAM roles at a time.

In the Add Permissions panel, configure the following settings:
Select an authorization scope:
NoteTo scope permissions by resource group, the service must support resource groups. See Services that work with Resource Group.
Account: Permissions take effect within the current Alibaba Cloud account.
Resource Group: Permissions take effect within a specified resource group.
Verify the principal. The current RAM role is selected by default. You can also add other RAM roles.
In the Policy Name list, find and select
AliyunEventBridgePutEventsPolicy, and then click OK.NoteYou can attach a maximum of five policies at a time. To attach more, repeat the operation. For fine-grained control over specific event buses, create custom policies. See Create custom policies.
Step 3: Modify the trust policy (receiving account)
Log on to the RAM console with the receiving account (Account B).
In the navigation pane, choose Identities > Roles.
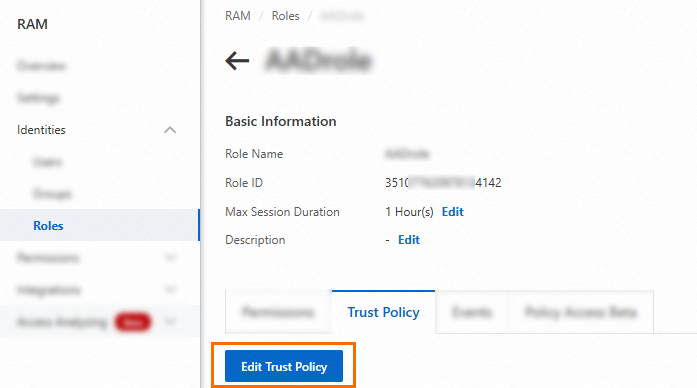
Click the name of the RAM role created in Step 1.
On the Trust Policy tab, click Edit Trust Policy.
Modify the trust policy document and click Save. Replace
${Account A}with the Alibaba Cloud account ID of the sending account (Account A). After this change, EventBridge in the sending account (Account A) can assume the RAM role.{ "Statement": [ { "Action": "sts:AssumeRole", "Effect": "Allow", "Principal": { "Service": [ "${Account A}@eventbridge.aliyuncs.com" ] } } ], "Version": "1" }
Step 4: Create an event rule (sending account)
Log on to the EventBridge console with the sending account (Account A). In the navigation pane, click Event Buses.
In the top navigation bar, select a region. On the Event Buses page, click default (System Event Bus).
In the navigation pane, click Event Rules. On the page that appears, click Create Rule.
Complete the Create Rule wizard:
On the Configure Basic Info tab, enter a Name and Description for the rule, and then click Next.
On the Configure Event Pattern tab, configure the following parameters, and then click Next.
Parameter Description Event Source The Alibaba Cloud service event source from which to deliver events Event Type The event type to deliver Pattern Content An event pattern that filters which events match this rule On the Configure Targets tab, configure the following parameters, and then click Create.
Parameter Description Service Type Select EventBridge Target Type Select Cross-account Bus Region The region of the destination account's event bus Account ID The Alibaba Cloud account ID of the receiving account (Account B) Bus Name Enter defaultRole The name of the RAM role created in Step 1 Event Defaults to Complete Event. Delivers the full event structure that complies with the CloudEvents 1.0 protocol, without transformation
After the rule is created, use the receiving account (Account B) to verify event delivery. See Query events.