This topic describes how to query and analyze custom events in the EventBridge console.
Background
Event Analysis lets you query the full content of events from a custom event bus. To do this, create a schema and map it to your events in Event Analysis. After you configure the mapping, you can use the Event Analysis platform to perform attribute searches, visual analysis, event tracing, and event source tracing based on the schema.
-
push mapping: Bind the schema URI by specifying the dataschema parameter when you publish an event using the PutEvents operation.
-
rule mapping: Bind the schema URI by specifying the schema ID when you configure an event rule.
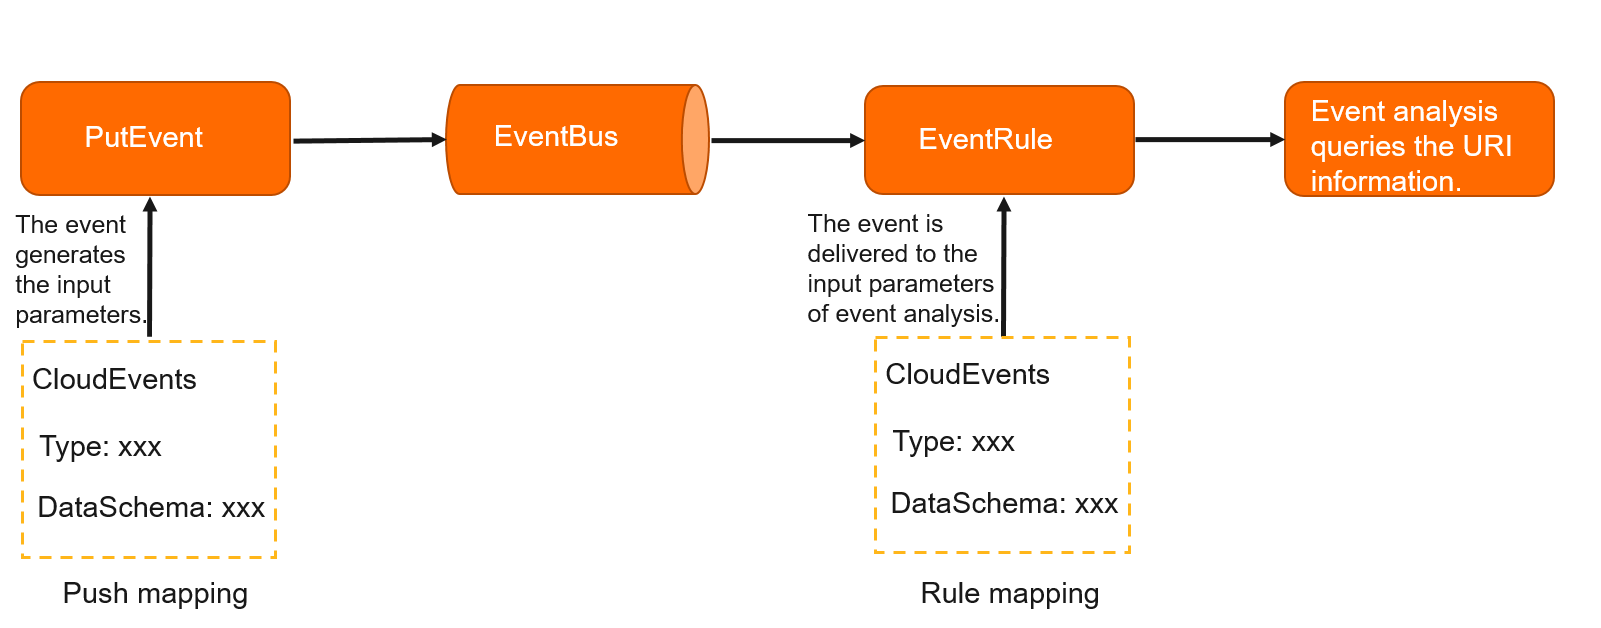
Prerequisites
-
You must have an Alibaba Cloud account and an AccessKey. You can create and view your AccessKey on the AccessKey Management page in the Alibaba Cloud console.
Limitations
You can create and query only event schemas that are in OpenAPI 3.0 format.
Step 1: Create a custom schema
- Log on to the EventBridge console. In the left-side navigation pane, click Schemas.
- In the top navigation bar, select a region.
-
On the Schemas page, click the Custom Schema Groups tab, and then click Create Schema.
-
In the Create Schema panel, set the following parameters and click OK.
Parameter
Description
Example
Schema ID
The name of the schema.
test
Schema Description
The description of the schema.
demo
Schema Content
-
Create Directly: The system automatically creates JSON text that conforms to the OpenAPI 3.0 specification.
-
Create Based on JSON: The system generates a schema based on the JSON sample that you provide.
Create Directly
Compatible Type
Specifies whether to check if a new version is compatible with previous versions. By default, no compatibility check is performed.
No Compatibility Check
After you create the schema, you can view its URI, version, format, and compatible type on the Custom Schema Groups tab of the Schemas page. The schema appears in the Custom Schema Groups list. In the Actions column, you can click Details, Edit, or Delete to manage the schema.
-
Step 2: Map the schema
Rule mapping
-
On the Event Buses page, click the name of the target custom event bus. In the left-side navigation pane, click Event Rules, and then click Create Rule.
-
In the Create Rule panel, set the following parameters and click Create.
-
On the Configure Basic Info tab, set the rule Name and Description, and then click Next.
-
On the Configure Event Pattern tab, set the custom event source that you want to query, and then click Next.
-
On the Configure Targets tab, set Service Type to Event Analysis and Mapping Method to Rule Mapping. Then, select the same Schema Group Name, Schema ID, and Schema Version as those of the schema that you created in Step 1: Create a custom schema.
-
Push mapping
-
Add the dataschema parameter and the schema URI that you obtained in Step 1: Create a custom schema to your SDK code, and then push events:
import com.aliyun.eventbridge.EventBridge; import com.aliyun.eventbridge.EventBridgeClient; import com.aliyun.eventbridge.models.CloudEvent; import com.aliyun.eventbridge.models.Config; import com.aliyun.eventbridge.models.PutEventsResponse; import com.aliyun.eventbridge.util.EventBuilder; import com.google.gson.Gson; import java.net.URI; import java.util.ArrayList; import java.util.Date; import java.util.List; public class PutEventsSample { private EventBridge eventBridgeClient; public PutEventsSample() { Config authConfig = new Config(); authConfig.accessKeyId = System.getenv("ALIBABA_CLOUD_ACCESS_KEY_ID");// The AccessKey ID used for authentication. For more information about how to obtain an AccessKey ID, see the "Prerequisites" section of this topic. authConfig.accessKeySecret =System.getenv("ALIBABA_CLOUD_ACCESS_KEY_SECRET");// The AccessKey secret used for authentication. For more information about how to obtain an AccessKey secret, see the "Prerequisites" section of this topic. authConfig.endpoint = "{endpoint}";// The endpoint. For more information, see Regions and endpoints. eventBridgeClient = new EventBridgeClient(authConfig); } public void putEventsSample() { List<CloudEvent> cloudEventList = new ArrayList<>(); CloudEvent cloudEvent = EventBuilder.builder() .withId("a5074581-7e74-4e4c-868f-47e7afdf****") .withSource(URI.create("acs.oss")) .withType("oss:ObjectCreated:PostObject") .withSubject("acs:oss:cn-hangzhou:{yourAccountId}:xls-papk/game_apk/123.jpg") .withTime(new Date()) .withJsonStringData("{ \"E-Mail\": \"${email}\" }") .withAliyunEventBus("demo-bus") .build(); cloudEvent.setDataschema("{Schema URI}");// The URI of the schema that you obtained in Step 1. cloudEventList.add(cloudEvent); PutEventsResponse putEventsResponse = eventBridgeClient.putEvents(cloudEventList); System.out.println(new Gson().toJson(putEventsResponse)); } public static void main(String[] args){ PutEventsSample sample = new PutEventsSample(); try { sample.putEventsSample(); } catch (Throwable e) { e.printStackTrace(); } } } -
On the Event Buses page, click the name of the target custom event bus. In the left-side navigation pane, click Event Rules, and then click Create Rule.
-
In the Create Rule panel, set the following parameters and click Create.
-
On the Configure Basic Info tab, set the rule Name and Description, and then click Next.
-
On the Configure Event Pattern tab, set the custom event source that you want to query, and then click Next.
-
On the Configure Targets tab, set Service Type to Event Analysis and Mapping Method to Push Mapping.
-
Step 3: Query events
- Log on to the EventBridge console. In the left-side navigation pane, choose .
- In the top navigation bar, select a region.
-
On the Event Analysis page, set the following parameters as needed, and then click Query.
Parameter
Required
Description
Event Bus
Yes
Select an event bus.
Schema
Yes
Select the schema that corresponds to the events that you want to query. For information about schemas from official Alibaba Cloud event sources, see the linked topic.
Key-value Match
No
Select a field and a conditional operator for your query. You can add multiple conditions. The following conditional operators are supported:
-
=: Retrieves all events that meet the key = value condition. -
!=: Retrieves all events that meet the key != value condition. -
exists: Retrieves all events where thekey exists. -
does-not-exist: Retrieves all events where thekey does-not-exist.
NoteYou can also specify whether to use the AND or OR operator to join multiple attribute search conditions.
Aggregate Function
No
To view results in a chart, configure aggregate functions for visualization. You can select multiple functions. Each function corresponds to a line chart.
Grouped By
No
To group queried events by attribute, select one or more event attributes.
Ordered By
No
Sorts the query results in ascending or descending order based on the aggregate functions that you select for Aggregate Function. You can select multiple sorting criteria.
Time Range
No
Select a time range for the query.
Number of Events
No
Specifies the maximum number of entries to return in a single query.
After you complete these steps, the analysis results appear on the Event Analysis and Aggregate Function tabs at the bottom of the Table page.
-
Step 4: Analyze the results
For information about the query result parameters, see Query results.