EventBridge API destinations let you call HTTP endpoints in third-party or self-managed systems directly from event rules -- without custom middleware or extra infrastructure. This helps you easily build and connect to SaaS applications and prevent data silos. Jenkins is a Java-based tool for continuous integration that you can use to build and test software projects in a continuous and automatic manner, and monitor the status of external tasks. This guide walks through connecting Jenkins to EventBridge so that published events automatically trigger Jenkins builds.
How it works
An API destination defines the metadata for an HTTP call: the URL, HTTP method, and request parameters. A connection stores the authentication credentials and network settings for that call. Together, they form a reusable integration point that any event rule can reference.
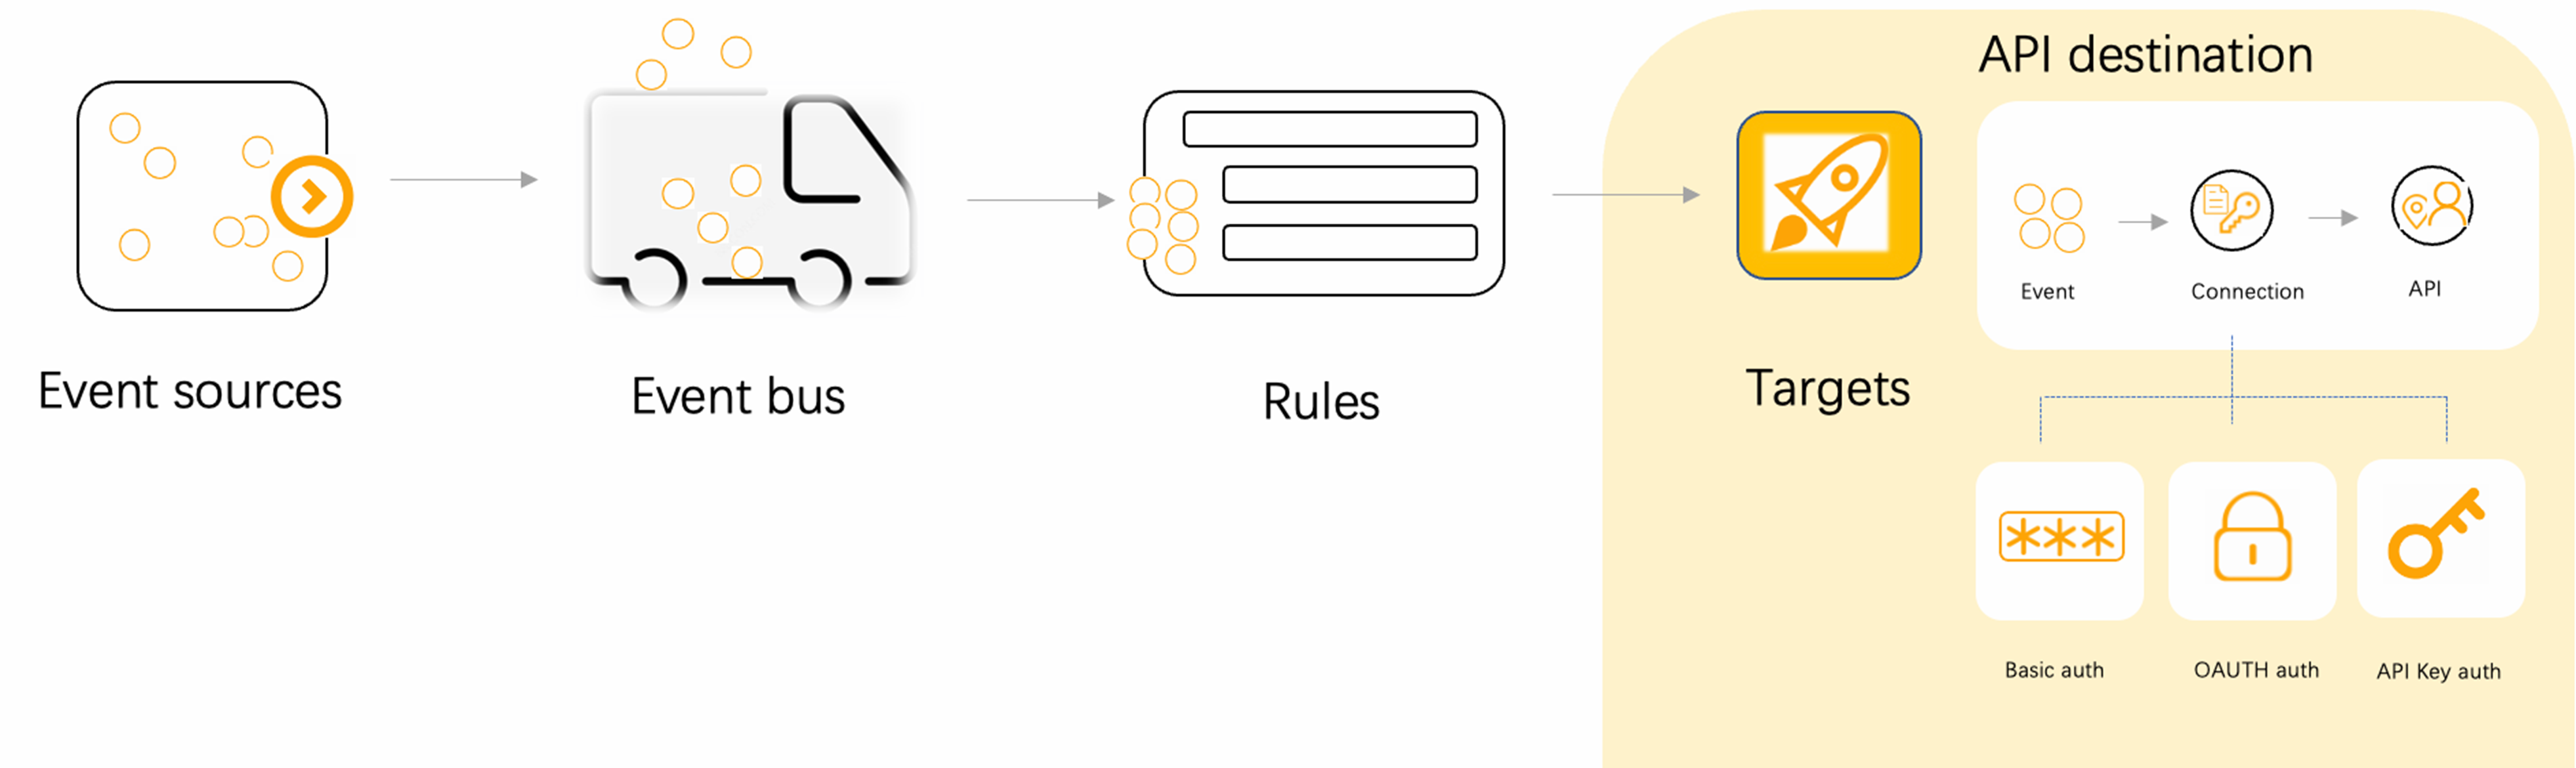
When an event matches a rule, EventBridge sends an HTTP request to the API destination using the credentials from the associated connection. In this guide, EventBridge calls the Jenkins build API with basic authentication to start a project build.
Key concepts
| Concept | Description |
|---|---|
| API destination | HTTP endpoint metadata (URL, method, parameters) that event rules invoke as a target. You can reference the same API destination from multiple event rules. Updating the API destination automatically propagates the change to every rule that uses it. |
| Connection | Reusable authentication and network configuration shared across multiple API destinations. A network configuration specifies whether a system connects over the Internet or a private network. Modify a connection once, and all linked API destinations inherit the update. |
| Event rule | Matches incoming events and routes them to one or more targets |
Supported authentication methods
| Method | How it works |
|---|---|
| Basic authentication | Sends a Base64-encoded username:password pair in the Authorization header, prefixed with Basic |
| OAuth authentication | Allows you to authorize a third-party application by using an authorization code, an implicit authorization code, a password, or a client credential. In event-driven scenarios, client credentials are commonly used. Configure the client ID, client password, and IP address of the OAuth service to obtain a client credential. Supports GET and POST token retrieval |
| API key | Sends a custom key name and value in an HTTP header |
This guide uses basic authentication with a Jenkins API token. The same workflow applies to OAuth or API key authentication -- only the connection configuration differs.
Prerequisites
Before you begin, make sure you have:
Installed Jenkins (Getting started with the Guided Tour)
Installed the Jenkins Notification plug-in
Step 1: Generate a Jenkins API token
Log on to Jenkins and click your account name in the upper-right corner.
In the left-side navigation pane, click Configure.
In the API Token section, click Add new Token.
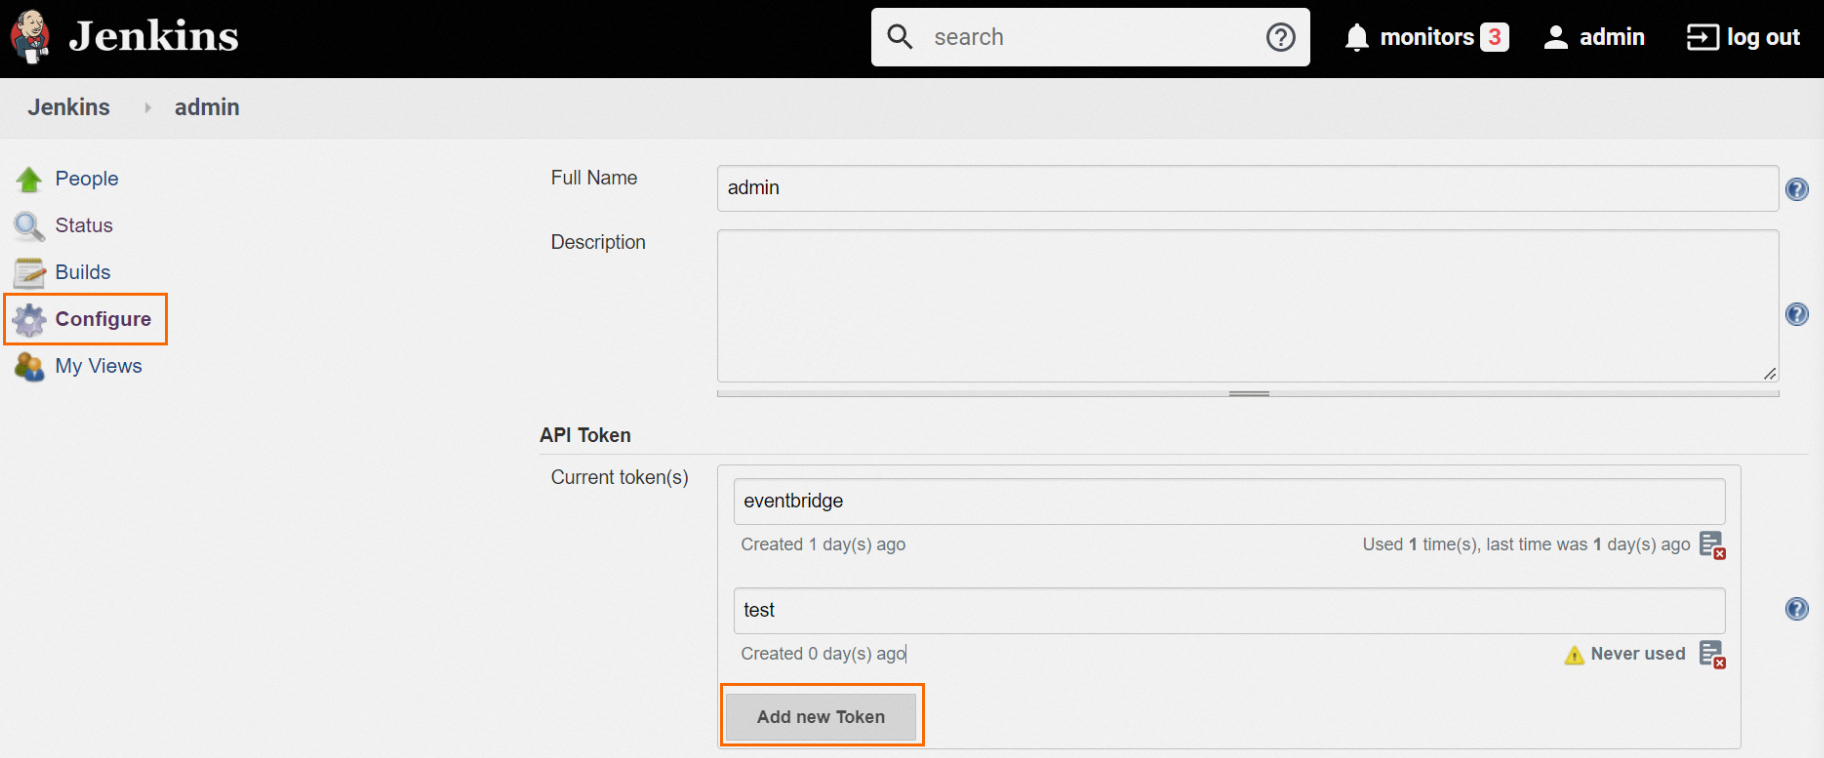
Enter a token name and click Generate.
Click the copy icon to copy the generated token string. Save it in a secure location -- you need it in the next step.

Step 2: Create a connection
A connection stores the Jenkins credentials that EventBridge uses to authenticate API requests.
Log on to the EventBridge console.
In the left-side navigation pane, choose Integration Center > API Destination.
In the top navigation bar, select the target region.
Click the Connection Configuration tab, then click Create.
In the Create Connection panel, configure the following parameters and click OK.
Parameter Value Name A descriptive name for the connection, such as jenkins-connectionDescription (Optional) A brief description Authentication Select Basic. Set Username to your Jenkins account username and Password to the API token string from Step 1 Network Internet (default)
Step 3: Create an API destination
The API destination points to the Jenkins build URL and references the connection you created in Step 2.
Click the API Destination tab, then click Create.
In the Create Connection panel, configure the following settings and click OK.
Basic Information
Parameter Value Method Select Custom Name A descriptive name, such as jenkins-buildDescription (Optional) A brief description API Configuration
Parameter Value URL The Jenkins build API URL, for example: http://<jenkins-host>:8080/job/test/buildHTTP Method Select POST Connection Configuration
Parameter Value Select Existing Connection Choose the connection created in Step 2
Step 4: Create an event rule with the API destination as the target
In the left-side navigation pane, click Event Buses.
In the Custom Event Buses section, click Create.
In the Create Custom Event Bus panel, complete the following steps:
Event Bus: Enter a Name and Description, then click Next Step.
Event Source: Enter an Event Source Name and Description. Set Event Provider to Custom Application, then click Next Step.
Event Rule: Enter an Event Rule Name and Description, then click Next Step.
Event Target: Configure the following parameters:
Parameter Value Service Type Select Triggered by API operation Method Select Use Existing Item HTTP Parameter Specify the parameters to pass when the event triggers a Jenkins build Click Create.
Step 5: Publish a test event
On the Event Buses page, find the custom event bus you created and click Publish Event in the Actions column.
In the Publish Event to Custom Event Bus panel, select your custom event source from the Custom Event Source drop-down list and click OK.
Verify the integration
After publishing the event, confirm that Jenkins received it and started a build.
Open the Jenkins home page and click the project specified in the API destination URL (for example,
test).In the Build History section, click the most recent build entry.

In the left-side navigation pane, click Console Output to view the build log. The log confirms that Jenkins received the event published by EventBridge and started the build.
