The Reindex API copies full data or data that meets specific conditions from one index to another. This process can occur within the same cluster or across clusters. This topic describes how to migrate data from one cluster to another using the Reindex API.
Limits
The two clusters must be in the same region and zone.
Deployment Control Mode: Supports migrating cluster data from v2 control mode to v3, between v2 clusters, and between v3 clusters.
Clusters have two control deployment modes: cloud-native new control (v3) and basic control (v2).

Cluster Version: Supports data migration between the same major versions (migrating data from a lower version to a higher version), such as migrating data from 8.15.1 to 8.15.1. Do not migrate data across major versions, such as migrating data from 7.7.1 to 8.15.1.
Preparations
In this example, both ES_1 and ES_2 clusters are 8.15.1 vector-enhanced versions. The goal is to migrate data from ES_2 to ES_1 using the Reindex API. Before migration, you must complete the following preparations.
Prepare Test Data
Create an index and insert test data in ES_2:
PUT /product_info
{
  "settings": {
    "number_of_shards": 5,
    "number_of_replicas": 1
  },
  "mappings": {
      "properties": {
        "productName": {
          "type": "text",
          "analyzer": "ik_smart"
        },
        "annual_rate":{
          "type":"keyword"
        },
        "describe": {
          "type": "text",
          "analyzer": "ik_smart"
        }
    }
  }
}
The example creates an index named product_info, which includes the productName, annual_rate, and describe fields. A successful creation returns the following result.
{
  "acknowledged" : true,
  "shards_acknowledged" : true,
  "index" : "product_info"
}
Insert 6 test data entries:
POST /product_info/_bulk
{"index":{}}
{"productName":"Wealth Management Product A","annual_rate":"3.2200%","describe":"180-day fixed wealth management, minimum investment of 20,000, stable returns, self-service message push selection available"}
{"index":{}}
{"productName":"Wealth Management Product B","annual_rate":"3.1100%","describe":"90-day fixed investment product, minimum investment of 10,000, daily income message push"}
{"index":{}}
{"productName":"Wealth Management Product C","annual_rate":"3.3500%","describe":"270-day fixed investment product, minimum investment of 40,000, daily income immediately pushed"}
{"index":{}}
{"productName":"Wealth Management Product D","annual_rate":"3.1200%","describe":"90-day fixed investment product, minimum investment of 12,000, daily income message push"}
{"index":{}}
{"productName":"Wealth Management Product E","annual_rate":"3.0100%","describe":"30-day fixed investment product recommendation, minimum investment of 8,000, daily income message push"}
{"index":{}}
{"productName":"Wealth Management Product F","annual_rate":"2.7500%","describe":"Popular short-term product, 3-day short term, no service fees, minimum investment of 500, receive income messages via text message"}
Create an index in ES_1 to store the data migrated from ES_2:
PUT dest
{
  "settings": {
    "number_of_shards": 5,
    "number_of_replicas": 1
  }
}
Establish Private Network Connection Between Clusters Using NLB and PrivateLink
To enhance cluster security, clusters within the same VPC or across different VPCs are network-isolated. You can establish a private network (VPC) connection between clusters using NLB and PrivateLink.
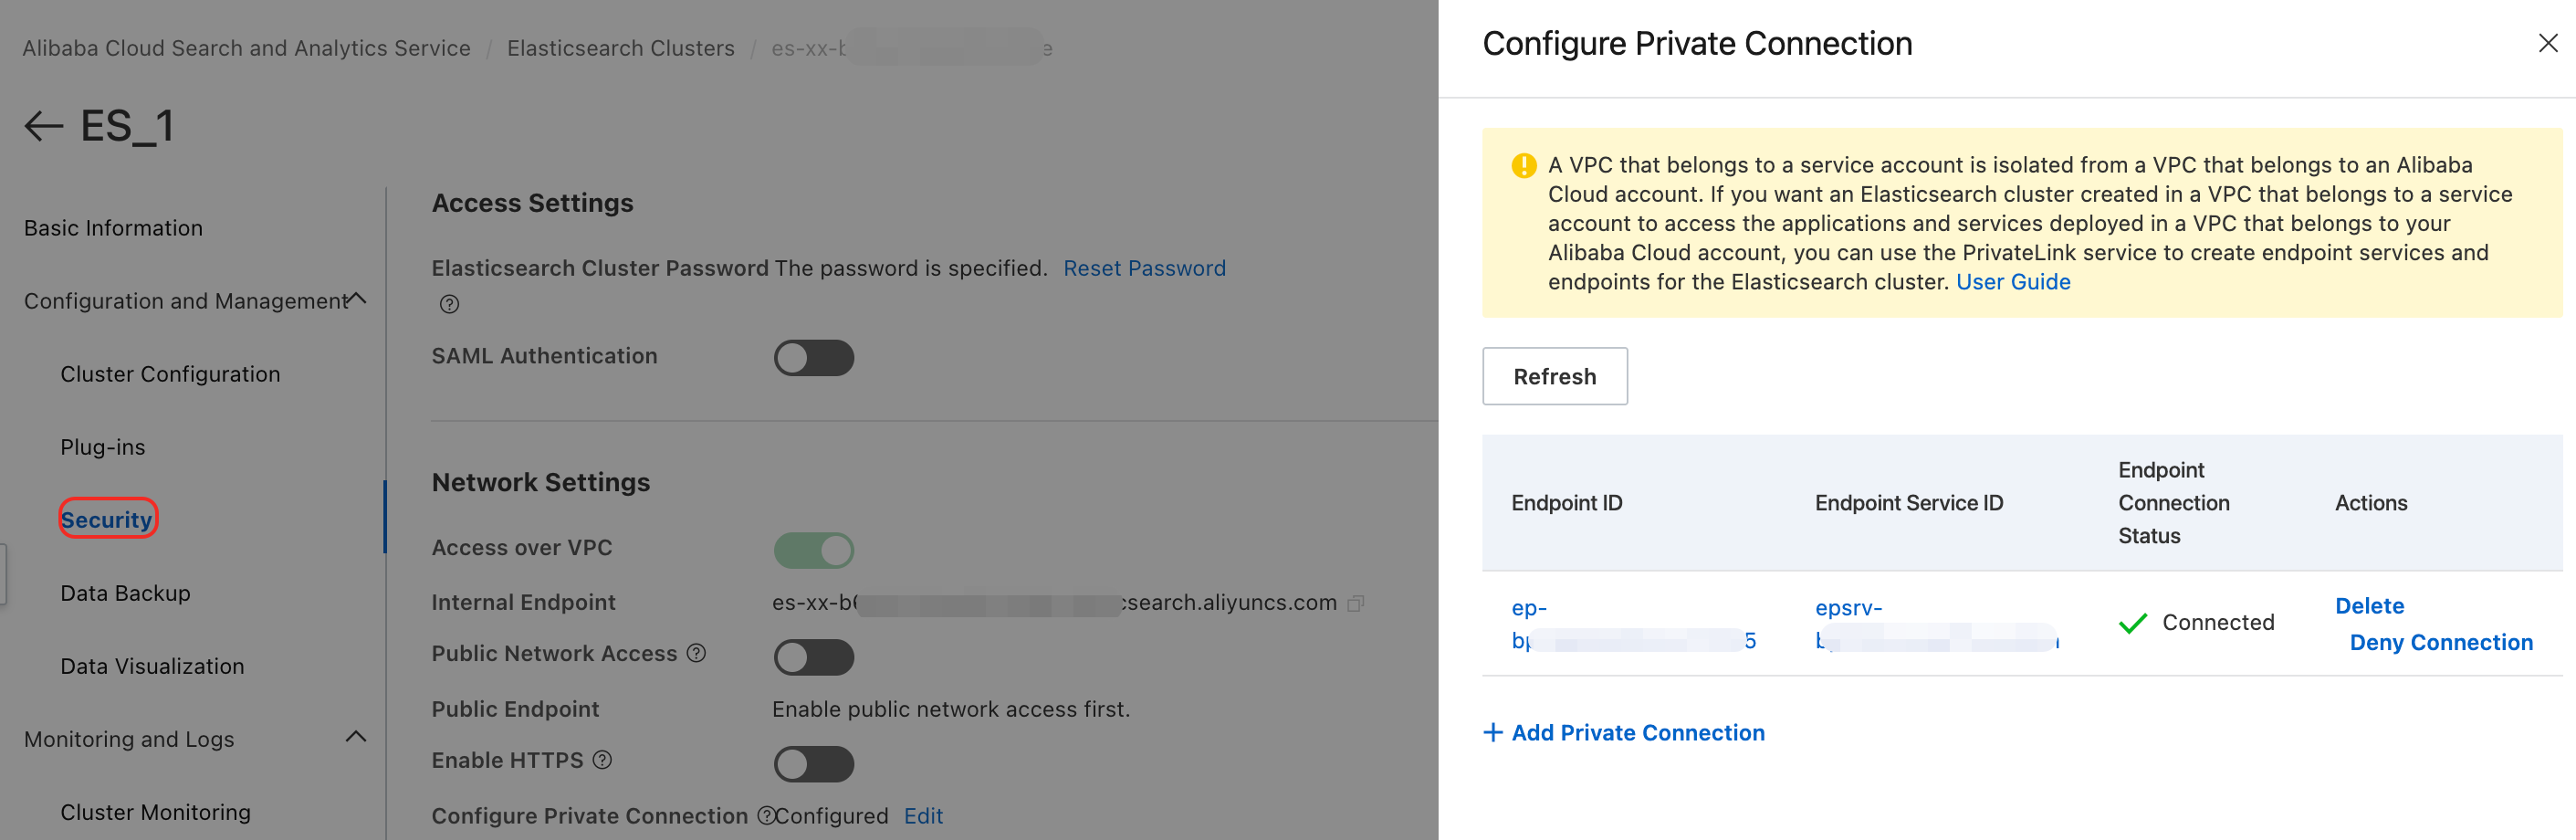
As shown in the following figure, two ES clusters are deployed in the same VPC. You can create an endpoint service using the user's VPC, then configure a private network connection between clusters in ES_1 to obtain an endpoint. Finally, associate the endpoint with the endpoint service to establish a private network connection between the two clusters.
Endpoint Service: An endpoint service allows other VPCs to establish a PrivateLink connection by creating an endpoint. Manually create the relevant service resources.
Endpoint: An endpoint is associated with an endpoint service. It establishes network connectivity for private network access to external services through a VPC. Alibaba Cloud ES automatically creates an endpoint in the ES network environment when you configure instance PrivateLink.

For configuration steps, see Private Network Peering Between Alibaba Cloud ES Clusters Using NLB and PrivateLink. You must complete steps 1, 2, and 3.
The interface appears as follows after successful configuration:
Configure Reindex API Whitelist
To ensure the security of cross-cluster data migration, you must add the ES_2 cluster's private network connection address and communication port number to ES_1's Reindex API whitelist.
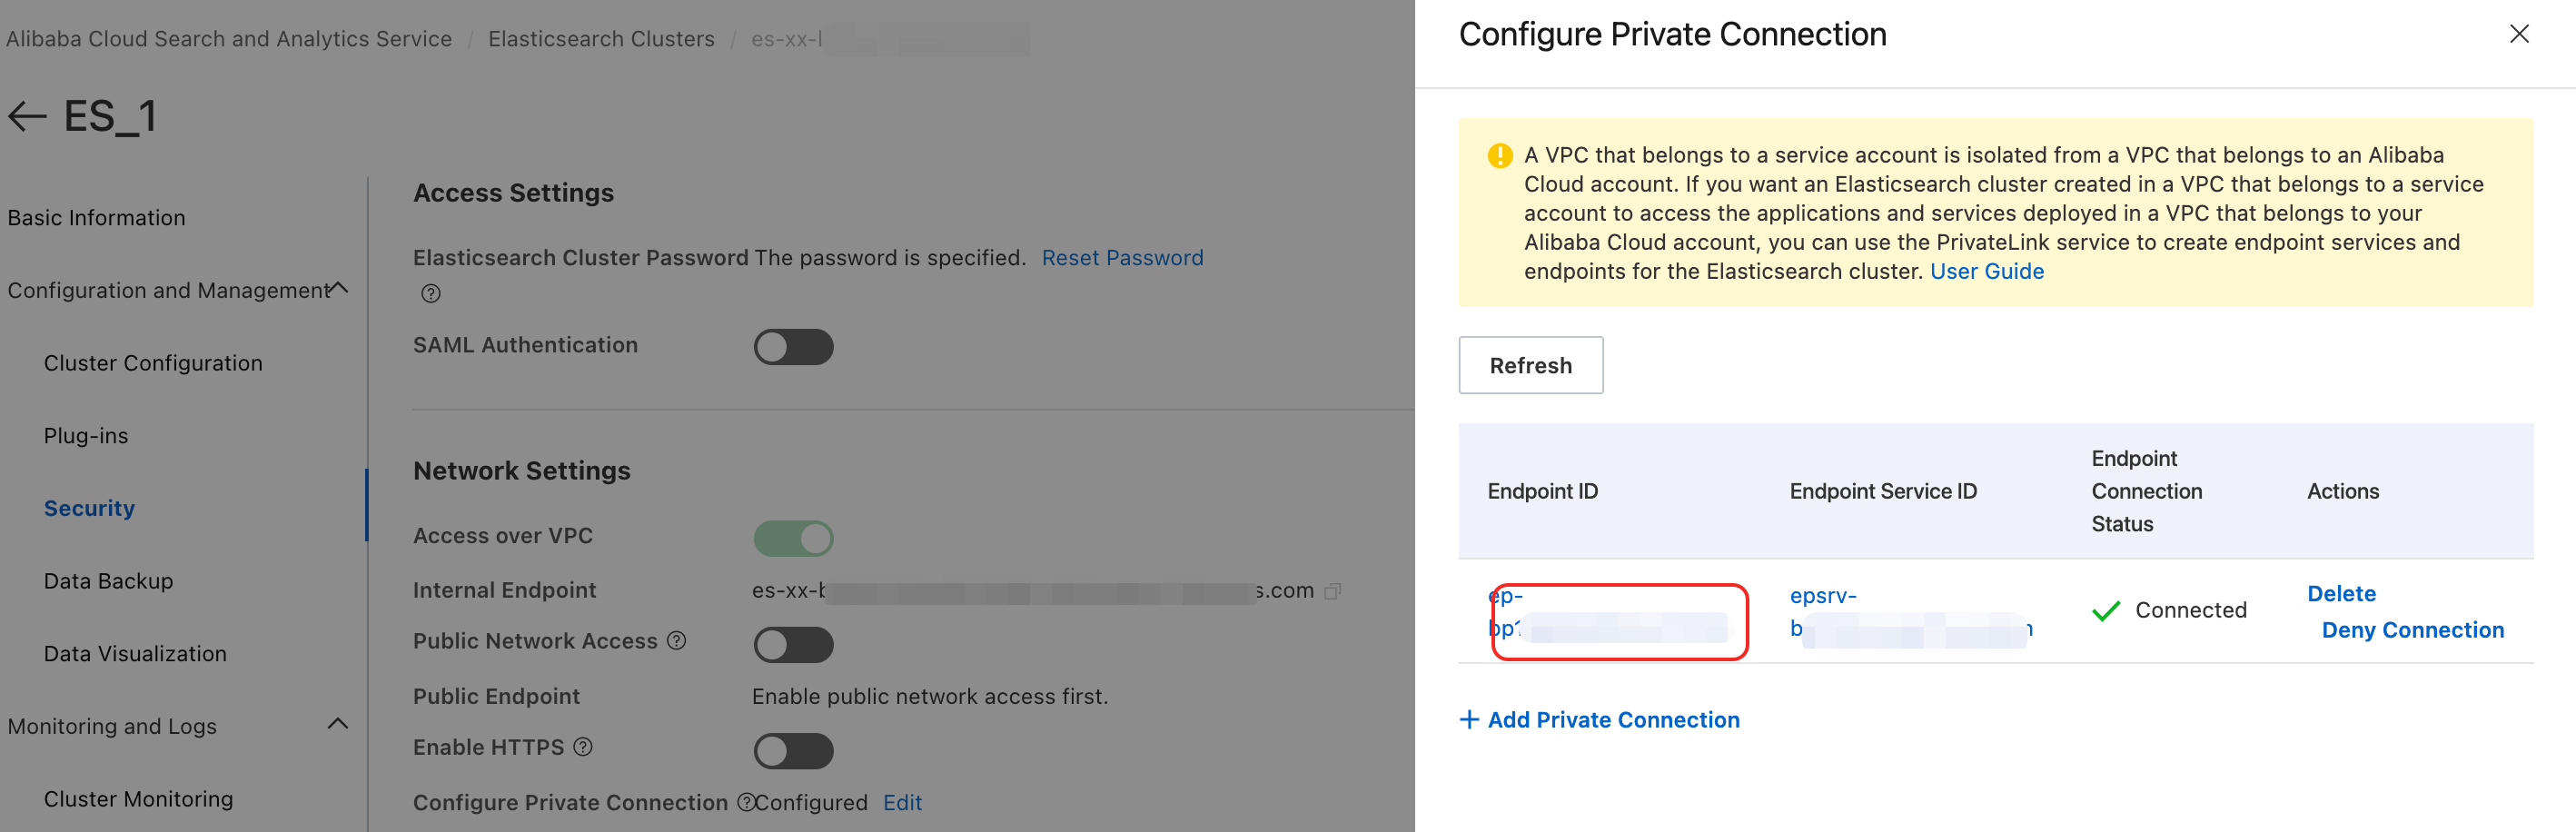
You can go to the page of ES_1. Then, click Configure Private Connection, and then click Edit. In the Configure Private Connection sidebar, click the target Endpoint ID.
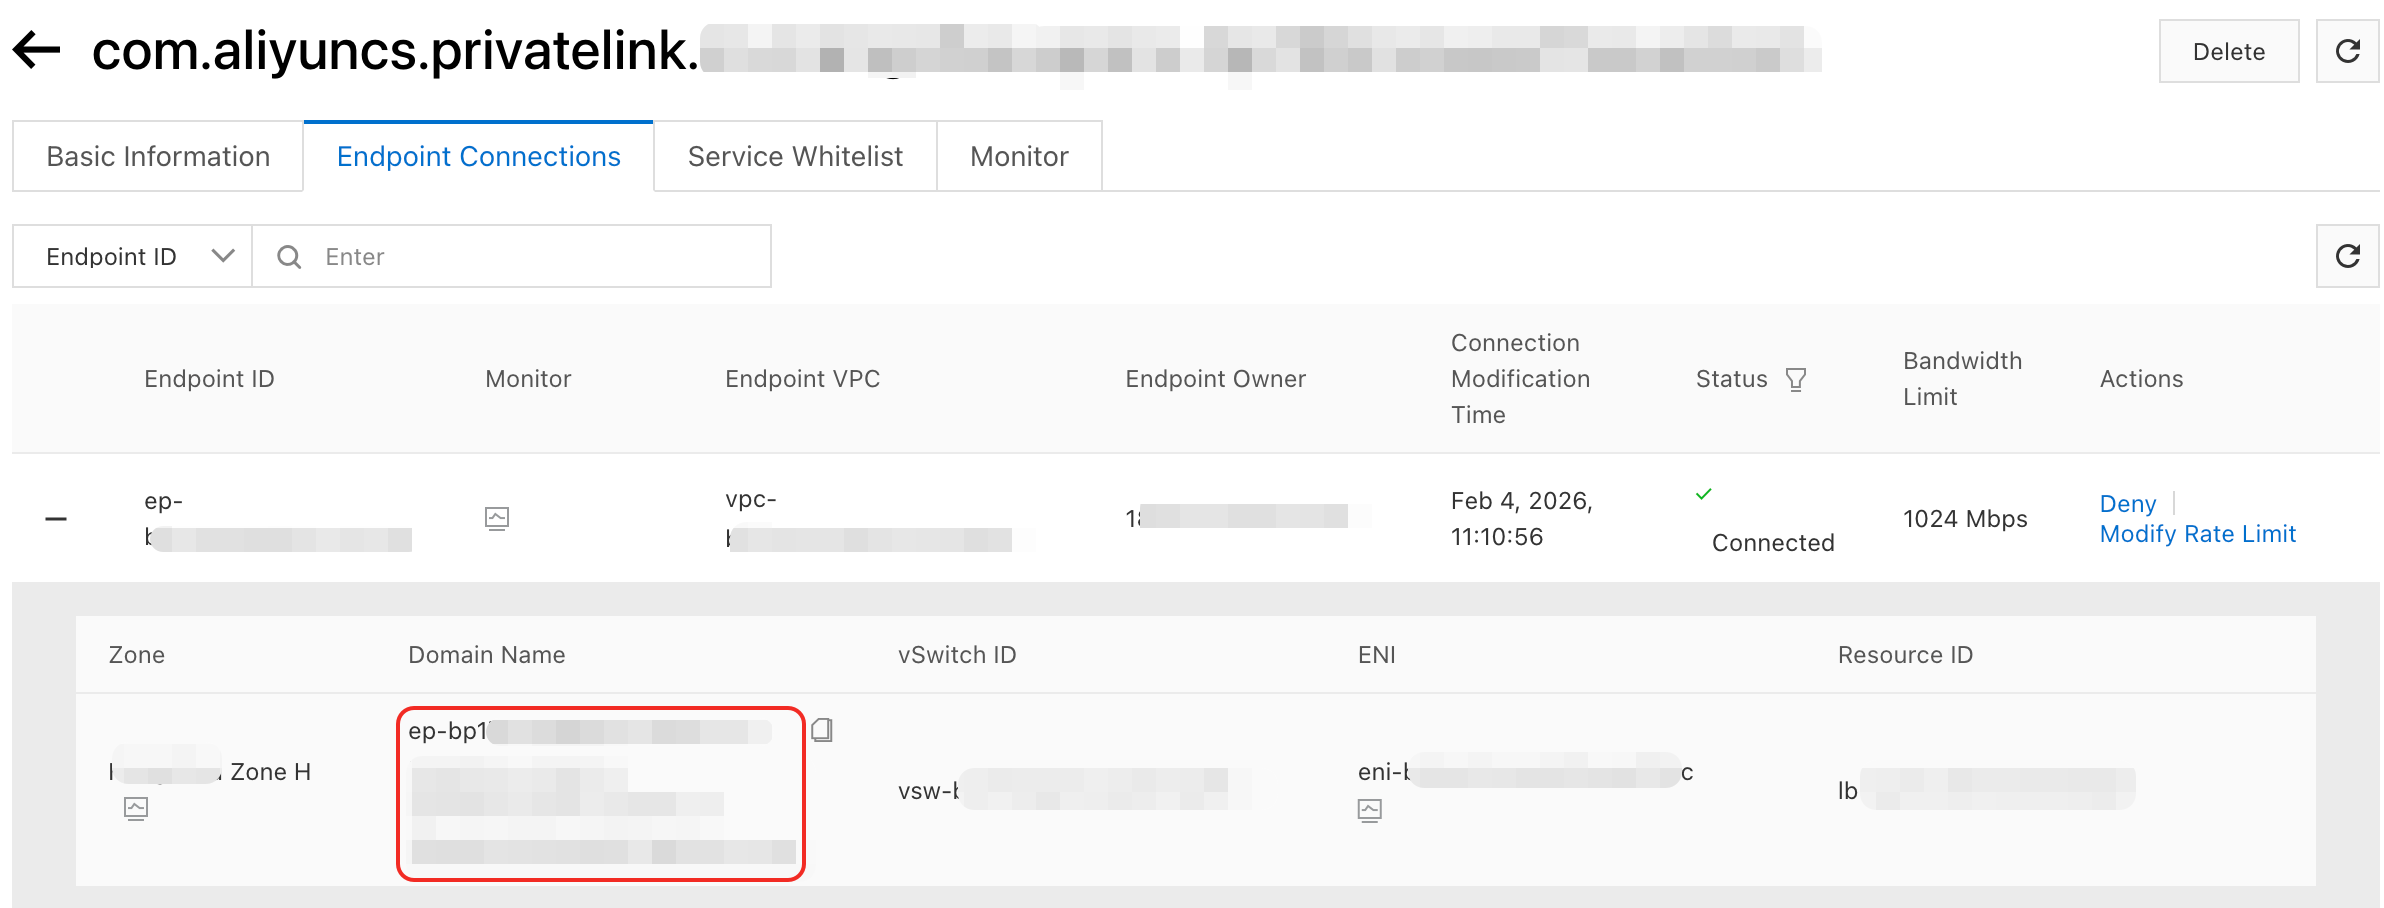
In the Endpoint Connections tab of the VPC console, click the
 icon next to the Endpoint ID to view its corresponding domain name.Important
You must remove the zone information from the domain name before configuring the Reindex API whitelist.
For example, if the full domain name is “ep-bp1****************-cn-hangzhou-i.epsrv-bp1****************.cn-hangzhou.privatelink.aliyuncs.com”, remove the zone information, which is “-cn-hangzhou-i”, to obtain the final domain name “ep-bp1bp1****************.epsrv-bp1****************.cn-hangzhou.privatelink.aliyuncs.com”.
You can configure the Reindex API whitelist in ES_1's YML file. The whitelist must include the endpoint's domain name and communication port.
reindex:
  remote:
    whitelist: >-
      ep-bp1bp1****************.epsrv-bp1****************.cn-hangzhou.privatelink.aliyuncs.com:9200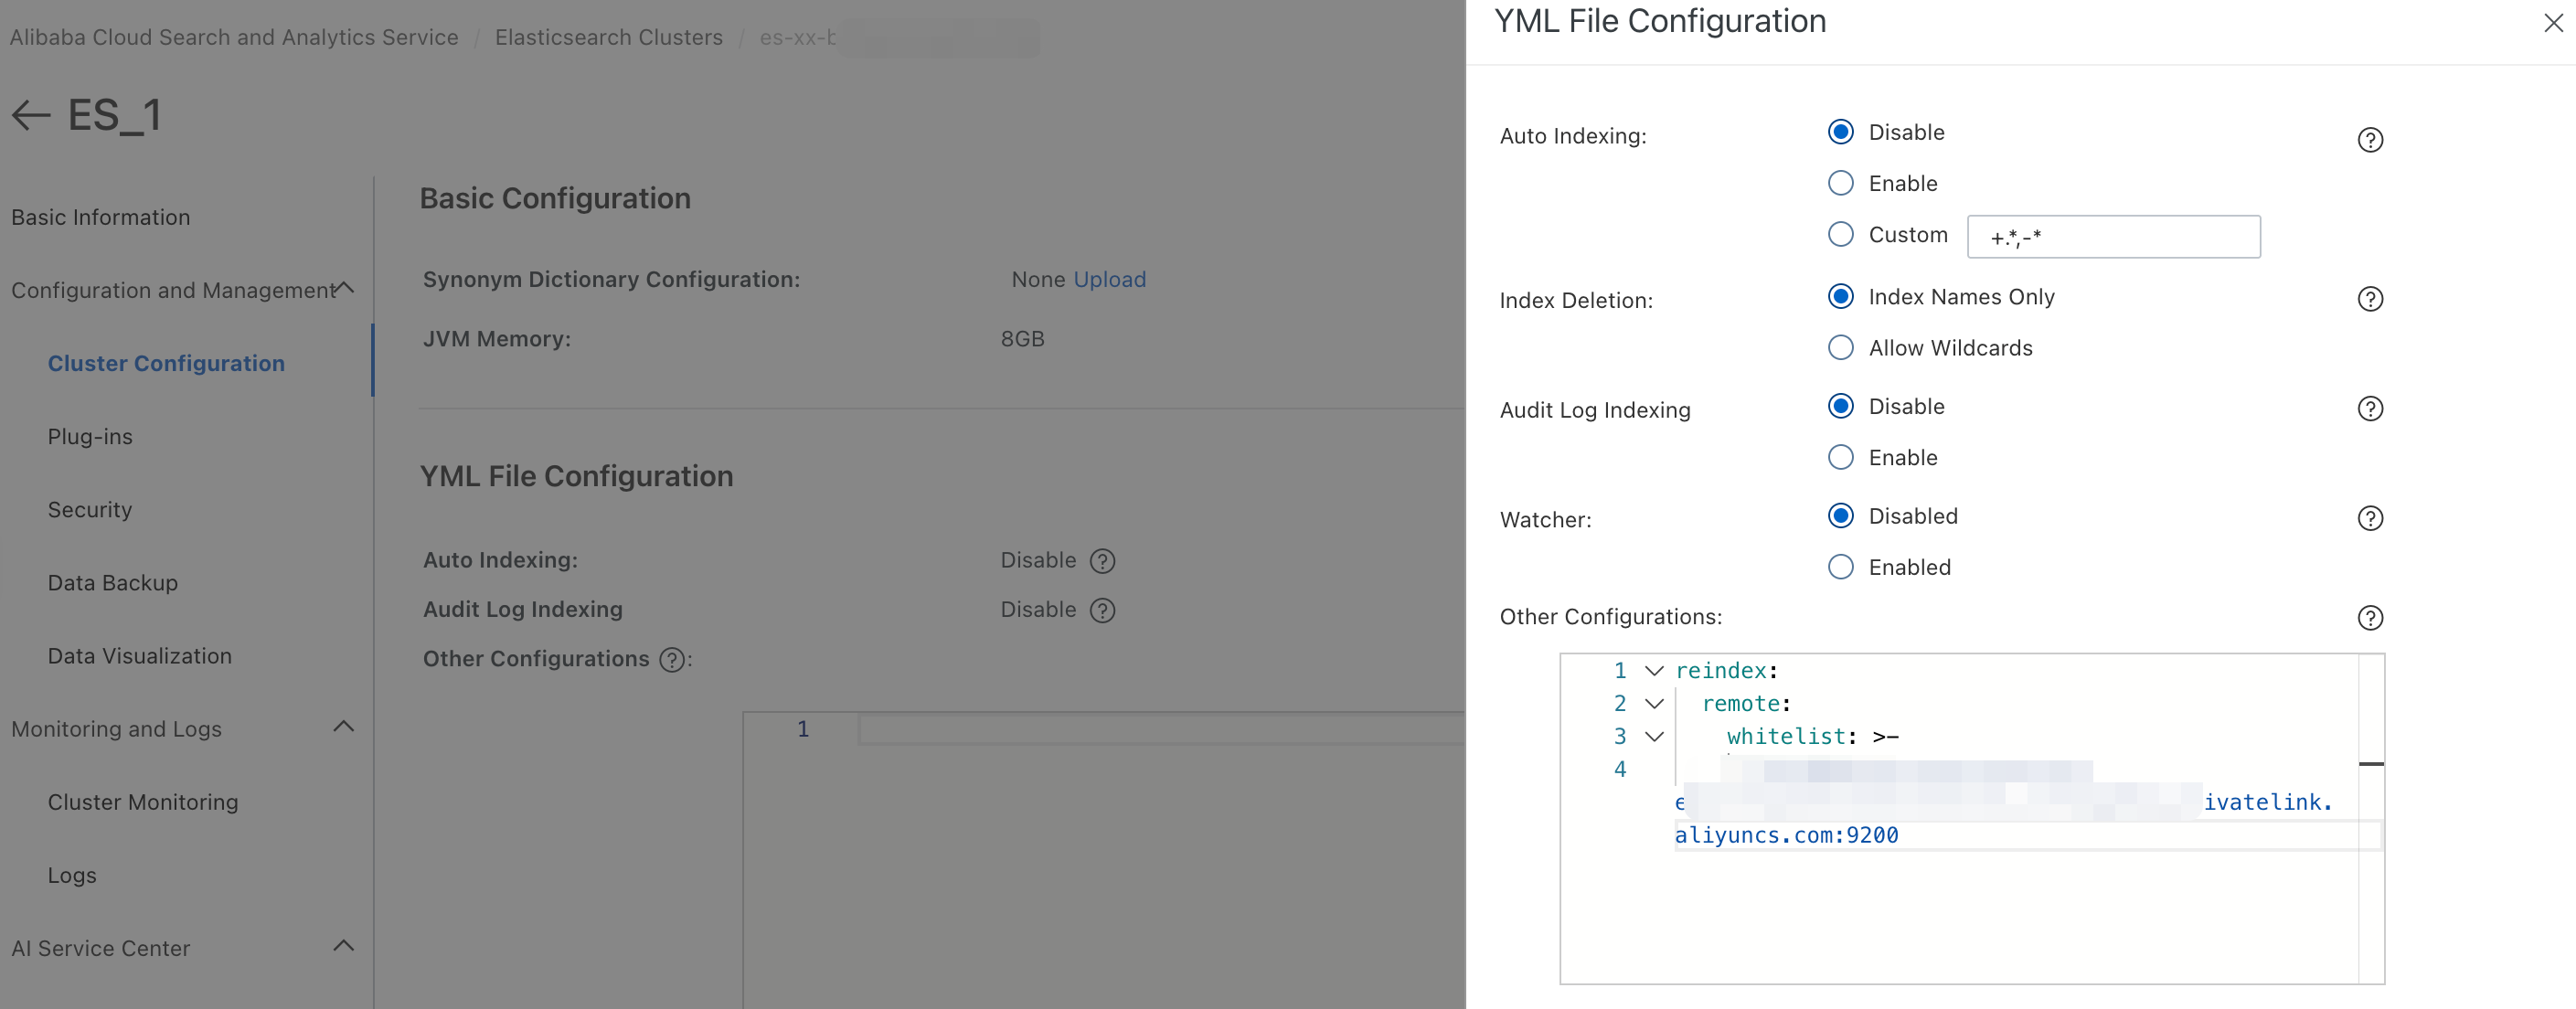
Call the Reindex API to Migrate Data
In ES_1, you can log on to the Kibana console.
In Dev Tools>Console, call the Reindex API to migrate data.
POST _reindex
{
  "source": {
    "remote": {
      "host": "http://ep-bp1bp1****************.epsrv-bp1****************.cn-hangzhou.privatelink.aliyuncs.com:9200",
      "username": "elastic",
      "password": "xxx-xxxx123!"
    },
    "index": "product_info",
    "query": {
      "match": {
        "productName": "wealth management product"
      }
    }
  },
  "dest": {
    "index": "dest"
  }
}
Category
Parameter
Description
source
remote
Indicates the remote cluster. In this example, it is ES_2.
host
The endpoint of the ES_2 cluster, which includes:
Access protocol: On the cluster's Basic Information page, view the currently used access protocol.
ImportantTo ensure security, use the HTTPS protocol to avoid transmitting passwords in plain text when connecting to the cluster. For more information, see the HTTPS protocol documentation to enable the HTTPS protocol.
Domain name: The private connection address of the ES_2 cluster, which must match the domain name configured in the Reindex whitelist.
Communication port: Fixed at 9200.
username
The cluster's default username is elastic.
password
The password for the username.
The password is set when you create a cluster. If you forget the password, you can reset the password.
index
The source index in the remote cluster.
query
Specify the data to migrate using query syntax.
In this example, data with 'wealth management product' in the `productName` field of the ES_2 cluster index is migrated to the ES_1 cluster.
dest
index
The index in the destination cluster used to store the migrated data.
Expected result after successful execution:
{
  "took": 211,
  "timed_out": false,
  "total": 6,
  "updated": 6,
  "created": 0,
  "deleted": 0,
  "batches": 1,
  "version_conflicts": 0,
  "noops": 0,
  "retries": {
    "bulk": 0,
    "search": 0
  },
  "throttled_millis": 0,
  "requests_per_second": -1,
  "throttled_until_millis": 0,
  "failures": []
}
You can call the _search API to view the migration results.
GET dest/_searchExpected result:
{
  "took": 6,
  "timed_out": false,
  "_shards": {
    "total": 5,
    "successful": 5,
    "skipped": 0,
    "failed": 0
  },
  "hits": {
    "total": {
      "value": 6,
      "relation": "eq"
    },
    "max_score": 1,
    "hits": [
      {
        "_index": "dest",
        "_id": "n9kyqpcBCRuDZhswJCpH",
        "_score": 1,
        "_source": {
          "productName": "wealth management product D",
          "annual_rate": "3.1200%",
          "describe": "90-day fixed investment product, minimum investment of 12,000, daily income message push"
        }
      },
      {
        "_index": "dest",
        "_id": "nNkyqpcBCRuDZhswJCpG",
        "_score": 1,
        "_source": {
          "productName": "wealth management product A",
          "annual_rate": "3.2200%",
          "describe": "180-day regular wealth management, minimum investment of 20,000, stable returns, can self-select message push"
        }
      },
      {
        "_index": "dest",
        "_id": "ndkyqpcBCRuDZhswJCpG",
        "_score": 1,
        "_source": {
          "productName": "wealth management product B",
          "annual_rate": "3.1100%",
          "describe": "90-day fixed investment product, minimum investment of 10,000, daily income message push"
        }
      },
      {
        "_index": "dest",
        "_id": "ntkyqpcBCRuDZhswJCpH",
        "_score": 1,
        "_source": {
          "productName": "wealth management product C",
          "annual_rate": "3.3500%",
          "describe": "270-day fixed investment product, minimum investment of 40,000, daily income message push"
        }
      },
      {
        "_index": "dest",
        "_id": "oNkyqpcBCRuDZhswJCpH",
        "_score": 1,
        "_source": {
          "productName": "wealth management product E",
          "annual_rate": "3.0100%",
          "describe": "30-day fixed investment product recommendation, minimum investment of 8,000, daily income message push"
        }
      },
      {
        "_index": "dest",
        "_id": "odkyqpcBCRuDZhswJCpH",
        "_score": 1,
        "_source": {
          "productName": "wealth management product F",
          "annual_rate": "2.7500%",
          "describe": "Popular short-term product, 3-day term, no service fees, minimum investment of 500, receive income messages via text message"
        }
      }
    ]
  }
}