When multiple applications need public access through the same IP address, associating each with a separate Server Load Balancer (SLB) instance increases costs. You can share a single SLB instance across applications by assigning each a dedicated domain name and configuring forwarding policies. SLB routes HTTP requests to the correct application based on the domain names and URLs in each request.
Domain-based forwarding with a shared port is supported only for HTTP listeners on Elastic Compute Service (ECS) clusters.
How it works
Each application is assigned to a separate vServer group behind the same SLB instance. A forwarding policy maps each domain name to its corresponding vServer group. When SLB receives an HTTP request, it inspects the domain name and forwards the request to the matching vServer group.
In the following example, the SLB instance IP address is mapped to two domain names, each associated with a different vServer group:
| Domain name | vServer group | Application |
|---|---|---|
abc***.com | vServer Group A | App1 |
xyz***.com | vServer Group B | App2 |
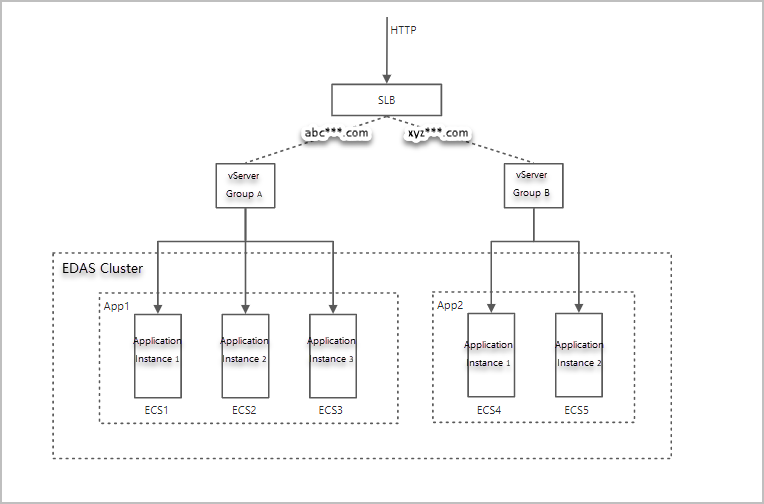
A request to abc***.com reaches App1. A request to xyz***.com reaches App2. Both use the same public IP address and port.
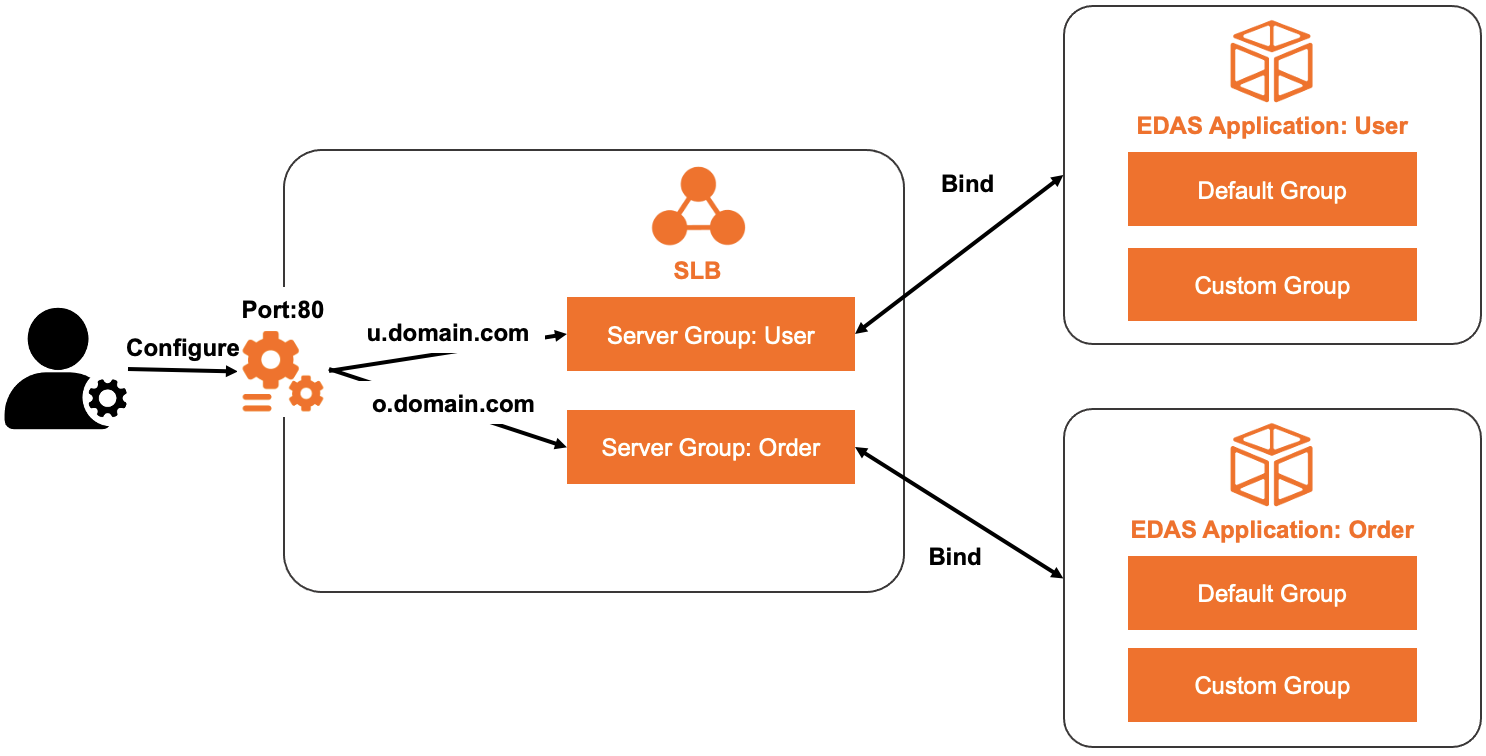
For example, you have two applications. One is the User application that is used to query orders. The other is the Order application that is used for user logon. Both applications use the same public IP address and port. By default, port 80 is used. You can configure different domain names to forward traffic for the applications: u.domain.com for the User application and o.domain.com for the Order application.
Prerequisites
Before you begin, make sure that you have:
An SLB instance (Application Load Balancer (ALB) or Classic Load Balancer (CLB)). To create one, see Create instance
Two or more applications deployed on an ECS cluster in Enterprise Distributed Application Service (EDAS)
A dedicated domain name for each application (for example,
u.domain.comando.domain.com)
Configuration overview
The following procedure shows you how to associate an SLB instance named edas-test-slb with the instances of two applications and configure different domain names to forward traffic:
Associate the SLB instance with the first application (
spring-cloud-provider) and configure a domain-based forwarding policy with the forwarding ruleprovider.test.com.Associate the same SLB instance with the second application (
spring-cloud-consumer), using the same listener port but a different vServer group and forwarding policy (consumer.test.com).Verify that each domain name routes to the correct application.
Step 1: Associate the SLB instance with the first application
Open the application settings
Log on to the EDAS console.
In the left-side navigation pane, choose Application Management > Applications.
On the Applications page, select a region in the top navigation bar and an option from the Microservice Namespace drop-down list. Select ECS Clusters from the Cluster Type drop-down list.
Click the name of the first application (for example,
spring-cloud-provider).In the Application Settings section of the Basic Information page, click Add next to SLB (Internet).
NoteIf an SLB instance is already bound, its IP address and port are displayed. Click Modify to change the settings, or Unbind to remove the binding.
Select the SLB instance
In the AddLoad Balancing(Public) wizard, set the SLBType parameter to ALB or CLB.
Select the SLB instance from the SLB (Internet) drop-down list and click Next.
Configure the listener
In the Select and Configure Listener step, configure a listening port:
ALB: Select an existing listening port.
CLB: Select Select Existing Listening Port to reuse an existing port, or select Add Listening Port to create a new listener.
If you create a new listener, configure the following parameters and click Next.
Parameter Description Protocol Select HTTP. HTTP listeners route requests based on domain names and URLs. For more information, see Add an HTTP listener for ALB or CLB. Frontend Port Number The port that SLB uses for external traffic. If the port is already in use by another protocol, choose a different port or remove the existing listener from the SLB console first. Health Check Path (URI) The URI used to check backend health. Default: /_ehc.html. For more information, see Configure and manage CLB health checks.Backend Port Number The application port. This value is fixed.
Configure the vServer group and forwarding policy
In the Configure vServer Group and Forwarding Policy step, set up a vServer group and a domain-based forwarding policy. Option A: Use an existing vServer group Option B: Create a new vServer group
Select Create VServer Group and enter a name in VServer Group Name.
Select Add Forwarding Policy and enter the domain name (for example,
provider.test.com) in the Forwarding Policy field.
NoteThe default server group does not support forwarding policies. Select a vServer group instead.
Click Next.
Confirm the configuration
In the Confirm step, review the SLB settings and click Confirm.
Step 2: Associate the SLB instance with additional applications
Repeat the configuration for each additional application. Open the second application (for example, spring-cloud-consumer) in the EDAS console and follow the same steps as Step 1 with these differences:
| Setting | First application | Additional applications |
|---|---|---|
| SLB instance | edas-test-slb | Same SLB instance |
| Listener port | Port 80 (HTTP) | Same port |
| vServer group | New or existing group | A different group |
| Forwarding policy | provider.test.com | A different domain (for example, consumer.test.com) |
Step 3: Verify the configuration
After associating the SLB instance with all applications, verify that each domain name routes to the correct application. For the full verification procedure, see Verification.
Test with local DNS entries
If the domain names are not yet registered with a DNS provider, test the configuration by adding entries to the hosts file on a Linux or macOS machine.
For example, if the SLB instance IP address is 123.1.XX.XX, add the following lines to /etc/hosts:
123.1.XX.XX provider.test.com
123.1.XX.XX consumer.test.com
Access each application to confirm correct routing:
http://provider.test.com-- should reachspring-cloud-providerhttp://consumer.test.com-- should reachspring-cloud-consumer
What's next
Configure a dedicated SLB instance for an application -- use a dedicated SLB instance instead of sharing one
Add an HTTP listener for ALB or CLB -- detailed listener configuration options