This topic describes how to use the API quick access feature.
Background information
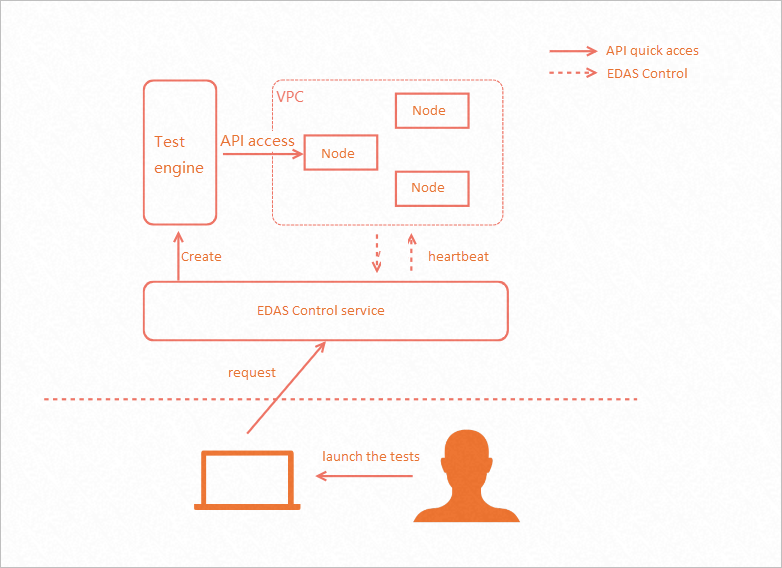
Generally, cloud service APIs can only be accessed within clusters, which causes inconvenience for testing and verification by using the service APIs. Enterprise Distributed Application Service (EDAS) addresses this problem by providing the API quick access feature, which pulls cloud test engines to initiate API calls. This improves the efficiency of testing and verification by using the APIs. The following figure shows the overall process of a quick API call.
Note on cooperation with Apifox
The framework of the API quick access page is built based on Apifox. Apifox is a leading integrated collaboration platform for API documentation, API-based debugging, API mocking, and API-based automated testing. It has served millions of developers and enterprises. Apifox integrates the capabilities of Postman, Swagger, Mock, and JMeter. https://www.apifox.cn/
Description
The following table describes the supported types of test objects.
| Test object type | Description | Required permission |
|---|---|---|
| EDAS application | An application node that is managed in EDAS | You must have the permission to view this EDAS application, and the permission to access the API for an internal API call. |
| Custom Host | A node that you want to test | For this target type, you must have the permissions to view the Virtual Private Cloud (VPC), vSwitch, and security group of the corresponding host. Otherwise, you cannot set the network where the test engine resides. |
| Ingress | An ingress endpoint that is configured for a Kubernetes cluster | You must have the permission to view the ingress of the Kubernetes cluster. |
| Load Balance(CLB) | An endpoint of Alibaba Cloud Classic Load Balancer (CLB) | You must have the permission to view the CLB, and the permissions to view the VPC, vSwitch, and security group for configuring the network where the test engine resides. |
For test objects of different types, you need to select the node in varied manners but use the same form for test parameter input.
Permission description
EDAS application
You must have the permission to read the desired application before you can select the application to initiate access by using an API. You must also have the permission to access the API before the call can succeed.
- Log on to the EDAS console.
- In the left-side navigation pane, choose .
- On the Permission Assistant page, click New permission Strategy.
- In the New permission Strategy wizard, set the Name of strategy and note parameters in the Create a new custom permission policy step.
- In the Create a new custom permission policy step, click New permission statement. In the Add authorization statement panel, perform the following operations to set the permissions, and click yes:
- In the left-side permission list of the Operations and resource authorization section, choose and . In the right-side resource list, set Region, Microservice Namespace, and Application based on your business requirements.
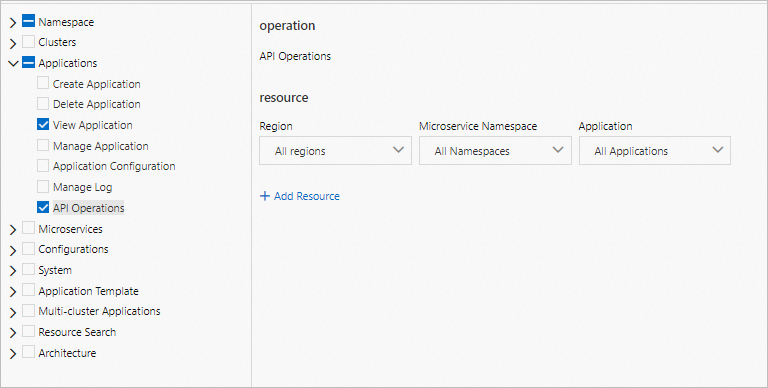
- In the left-side permission list of the Operations and resource authorization section, choose and . In the right-side resource list, set Region, Microservice Namespace, and Application based on your business requirements.
- In the New permission Strategy wizard, click next step.
- In the Strategy to preview step, preview the permissions, create a custom permission policy in the RAM console as prompted, and then grant the permissions to the RAM user. Then, click Finish. For more information, see Step 3: Create a RAM user and attach the policy to the RAM user.
The New policy authorization succeeded message appears. Click Return to list view to go to the Permission Assistant page.
Custom Host
You must have the permissions to view the VPC, vSwitch, and security group to configure the network information of the host and initiate access. For more information about how to configure permissions for the VPC, vSwitch, and security group, see Use RAM roles to manage VPC permissions.
Ingress
You must have the permission to view a Kubernetes cluster before you can select the ingress of the cluster and initiate access.
- Log on to the EDAS console.
- In the left-side navigation pane, choose .
- On the Permission Assistant page, click New permission Strategy.
- In the New permission Strategy wizard, set the Name of strategy and note parameters in the Create a new custom permission policy step.
- In the Create a new custom permission policy step, click New permission statement. In the Add authorization statement panel, perform the following operations to set the permissions, and click yes:
- In the left-side permission list of the Operations and resource authorization section, choose . In the right-side resource list, specify the cluster based on your business requirements.

- In the left-side permission list of the Operations and resource authorization section, choose . In the right-side resource list, specify the cluster based on your business requirements.
- In the Strategy to preview step, preview the permissions, create a custom permission policy in the RAM console as prompted, and then grant the permissions to the RAM user. Then, click Finish. For more information, see Step 3: Create a RAM user and attach the policy to the RAM user.
The New policy authorization succeeded message appears. Click Return to list view to go to the Permission Assistant page.
CLB
You must have the permission to view a CLB before you can select the CLB as the object. In addition, you must have the permissions on a specific VPC, vSwitch, and security group before you can configure the network where the test engine resides and initiate access.
- The permission that you need to view a CLB follows the authentication policy of the CLB. For more information, see Authorize a RAM user.
- The permissions that you need to view a VPC, vSwitch, and security group follow the authentication policy of the VPC. For more information, see Use RAM roles to manage VPC permissions.
Test engine initialization
When you initiate the first access to a specific object, the EDAS control service initializes the test engine. The initialization lasts about 30 to 60 seconds. After the initialization is complete, you can use the test engine repeatedly within 12 hours without initialization again. Each test engine corresponds to one test object. When you switch an object, the corresponding test engine is initialized.
- For an object of the EDAS application or Ingress type, the EDAS control service automatically queries the VPC and security group of the node or cluster.
- For an object of the Load Balance(CLB) or Custom Host type, you must manually select the VPC and security group on the page.
Procedure
- Log on to the EDAS console.
- In the left-side navigation pane, choose . In the top navigation bar, select a region.
- On the API Quick Test page, select a microservices namespace in the upper part, select the desired value from the type drop-down list, and then complete the configuration.
- EDAS application
Parameter Description Example app The desired application gateway-test instance An instance node, a Kubernetes service, or a CLB in the application 172.168.XX.XX:18081 path The test API of the desired instance node /echo/{string} - Ingress
Parameter Description Example Cluster The Kubernetes cluster where the ingress resides test-cluster Domain The domain name rule of the ingress demo.aliyundoc.com Path The forwarding path of the ingress / - Load Balance(CLB)
Parameter Description Example Load balancing instance The desired CLB instance. lb-bp10319**** Listening port The listening port of the CLB instance. 80 VPC - For an internal-facing CLB, the value of this parameter is the VPC in which the CLB and test engine reside.
- For an Internet-facing CLB, the value of this parameter specifies the VPC in which the test engine resides.
vpc-10af0ak3**** Security group The security group that is associated with the test engine. This security group needs to allow traffic to the desired CLB. sg-ka013k**** - Custom Host
Parameter Description Example VPC The value of this parameter specifies the VPC in which the test engine and the desired node reside. If the desired node does not reside in the same VPC as the test engine, the test engine cannot be called. vpc-10af0ak3**** Security group The security group that is associated with the test engine. This security group needs to allow traffic to the desired node. sg-ka013k****
- EDAS application
- Click Send. Wait until the test engine is initialized, and then view the return value.
The following table describes the form items.
Form item Description Params The query parameters that are used to initiate a request. The following list describes the items: - enable: specifies whether a parameter is enabled.
- Parameter names: specifies the name of a query parameter.
- The parameter value: specifies the value of a query parameter.
Body The body of the POST or PUT request. The following types are supported: - none
- x-www-form-urlencoded
- json
- xml
- raw
Headers The header of the request. The following list describes the items: - enable: specifies whether a header is enabled.
- Parameter names: specifies the name of a header parameter.
- The parameter value: specifies the value of a header parameter.
Cookies The cookie of the request. The following list describes the items: - enable: specifies whether a cookie is enabled.
- Parameter names: specifies the name of a cookie parameter.
- The parameter value: specifies the value of a cookie parameter.
The following table describes the return values.
Form item Description Body The content of a response to a request. The following formats are supported: - Pretty: The specific response structure is parsed, and the response content is formatted and displayed.
- Raw: The original content is displayed.
- Preview: The preview of the response content is displayed.
Cookie The cookie of a response to a request. Header The header of a response to a request. Actual request The URL and header of the initiated request.