After you mount a new disk to an Edge Node Service (ENS) instance, the disk cannot be used to store data. Before you can use the disk to store data, you must initialize the disk. This includes creating a partition for the disk and mounting a file system to the disk.
Usage notes
Disk initialization is a high-risk operation. Proceed with caution.
You need to initialize only new data disks. If your data disk contains data, create a snapshot for the data disk to prevent data loss.
You do not need to initialize system disks. If you use a third-party tool to forcefully initialize a system disk, unexpected risks such as system failures and data loss may occur. You can expand or add partitions after you resize the system disk. For more information, see Extend partitions and file systems on a Linux system disk.
Scenarios
If the capacity of a system disk that you specify when you create an ENS instance is the equal to the capacity of the system disk image, the system automatically partitions the system disk and mounts a file system. In this case, you do not need to initialize the system disk.
If the capacity of a system disk that you specify when you create an ENS instance is greater than the capacity of the system disk image, you must initialize the system disk to process the extra space.
A data disk that is created along with an ENS instance is automatically attached to the instance. You can initialize the data disk without the need to attach the data disk.
Before you can initialize a data disk that is separately created, you must attach the data disk to an ENS instance.
If your disk has only one independent partition, such as /dev/vdb, you do not need to divide the partition into logical partitions, such as /dev/vdb1 and /dev/vdb2. You can create a file system on the disk when you initialize the disk.
Procedure
Initialize a data disk in Linux
In this example, CentOS 7.9 is used.
Connect to an ENS instance and view the data disk
Connect to the ENS instance.
Run the following command to obtain the device name of the data disk:
sudo fdisk -luThe following command output indicates that three disks are mounted to the Linux ENS instance:
/dev/vdais the system disk, which is created together with the instance and already initialized./dev/vdband/dev/vdcare separately created data disks.

Create GPT partitions for the data disk
Run the following command to install Parted:
sudo yum install -y partedUse Parted to partition the data disk.
Run the following command to start partitioning the data disk. In this example, the
/dev/vdbdata disk is used.sudo parted /dev/vdb/dev/vdbis the device name of the data disk that you want to partition. Replace it with the actual device name of your data disk.Run the following command in the Parted interactive command-line prompt to set the partition format to GPT:
mklabel gptRun the following command to create a partition and specify the start and end positions of the partition:
mkpart <Partition name> <Start position> <End position>ImportantUse binary units, such as MiB and GiB, for the start and end positions of the partition to ensure that the partition is 4 KiB-aligned. Otherwise, the partition may not be aligned, which significantly affects disk performance.
Replace <Partition name>, <Start position>, and <End position> with actual values.
Example for creating only one partition on a disk: Run the following command to create a primary partition named primary that starts at 1 MiB and to which 100% of the disk capacity is allocated:
mkpart primary 1MiB 100%Example for creating multiple partitions on a disk. Run the following commands to create a partition named primary to which 20 GiB of the disk capacity is allocated and a partition named secondary to which the remaining disk capacity is allocated:
mkpart primary 1MiB 20GiB
mkpart secondary 20GiB 100%
Run the following command to check whether the partition is aligned.
The partition number of the partition is
1. To optimize disk performance, we recommend that you align partitions.align-check optimal 1If the partition is aligned, the following command output is returned:
1 alignedRun the following command to check the partition table:
printOptional. If the preceding partitioning operations are not performed as expected, enter rm + Partition ID to remove the incorrect partition, and then perform Steps c to e again.
ImportantBefore you delete a partition, make sure that no data is stored in the partition or the data has been backed up.
Run the following command to exit Parted:
quit
Run the following command to re-read the partition table:
partprobeRun the following command to view the new partition. In this example, the
/dev/vdbdata disk is used.sudo fdisk -lu /dev/vdb/dev/vdbis the device name of the data disk. Replace /dev/vdb with the actual device name of your data disk.The following sample command output is returned. If the new partition is created, the value of the
disk label typeis gpt.
Create and mount a file system
You must create and mount file systems on a data disk regardless of whether the disk is partitioned before the disk can be recognized by the operating system of the ENS instance to which the disk is mounted and be used as expected. The types of file systems that you can create vary based on the partition size. Create a file system that meets your business requirements.
Run the following command to install e2fsprogs:
sudo yum install -y e2fsprogsNoteThe yum command used in this step is applicable to Linux distributions such as CentOS. For other Linux distributions, modify the command based on your package management software. For example, run the
apt-get install <Package name>command for Debian or Ubuntu.Run the following command to create a file system. The following sample commands are run to create an ext4 file system and an xfs file system respectively:
Create an Ext4 file system
For example, if you want to create an ext4 file system on the
/dev/vdb1partition, run the following command:sudo mkfs -t ext4 /dev/vdb1/dev/vdb1is the partition name of the data disk. Replace /dev/vdb1 with an actual partition name.For example, if you want to create an ext4 file system on the
/dev/vdcraw device, run the following command:sudo mkfs -t ext4 /dev/vdc/dev/vdcis the device name of the data disk. Replace /dev/vdc with the actual device name of your data disk. sudo
Create an XFS file system
For example, if you want to create an xfs file system on the
/dev/vdb1partition, run the following command:sudo mkfs -t xfs /dev/vdb1/dev/vdb1is the partition name of the data disk. Replace it with an actual partition name.For example, if you want to create an xfs file system on the
/dev/vdcraw device, run the following command:sudo mkfs -t xfs /dev/vdc/dev/vdcis the name of the raw device. Replace it with the actual name of your raw device.
Run the following command to mount the file system.
In this example, run the following command to attach the
/dev/vdb1partition to the /mnt directory.sudo mount /dev/vdb1 /mnt/dev/vdb1is the partition name of the data disk. Replace /dev/vdb1 with an actual partition name./mntis the mount point of the partition. Replace it with an existing directory that contains no data. Alternatively, run thesudo mkdir -p <New directory>command to create a directory, and then replace /mnt with the new directory. Sample command:sudo mkdir -p /data.For example, if you want to mount the
/dev/vdcraw device to the /tmp directory, run the following command:sudo mount /dev/vdc /tmp/dev/vdcis the name of the raw device. Replace it with the actual name of your raw device./mntis the mount point of the partition. Replace it with an existing directory that contains no data. Alternatively, run thesudo mkdir -p <New directory>command to create a directory, and then replace /mnt with the new directory. Sample command:sudo mkdir -p /data.
Run the following command to check whether the file system is mounted as expected:
df -Th
Configure the disk partition to automatically mount on instance startup
If you want the disk partition to automatically mount on instance startup, write information about the disk partition to the /etc/fstab file and add the mount information of the disk partition to the /etc/fstab file based on your business requirements.
Run the following command to back up
etc/fstab:sudo cp /etc/fstab /etc/fstab.bakWrite the information of the new partition to
/etc/fstab.sudo sh -c "echo `blkid /dev/vdb1 | awk '{print \$2}' | sed 's/\"//g'` /mnt ext4 defaults 0 0 >> /etc/fstab"/dev/vdb1: the partition name of the data disk. Replace /dev/vdb1 with an actual partition name. You can run thedf -Thcommand to obtain the names of partitions./mnt: the mount point of the partition. Replace /mnt with an actual mount point. You can run thedf -Thcommand to obtain the mount points of partitions.ext4: the file system type of the partition. Replace ext4 with the type of the file system that you created. You can run thedf -Thcommand to obtain the file system types of partitions.defaults: the mount parameters of the file system. Configure mount parameters based on your business requirements. For more information, see fstab.
Run the following command to check the information of the new partition in
/etc/fstab:cat /etc/fstabThe following sample command output indicates that the information about the new partition is written to the /etc/fstab file.
Run the following commands to check whether the partition is automatically mounted:
sudo umount /dev/vdb1
sudo mount -a
mount | grep /mnt
Initialize a Windows data disk
Procedure
Connect to the ENS instance.
On the Windows desktop, right-click the
 icon and select Disk Management.
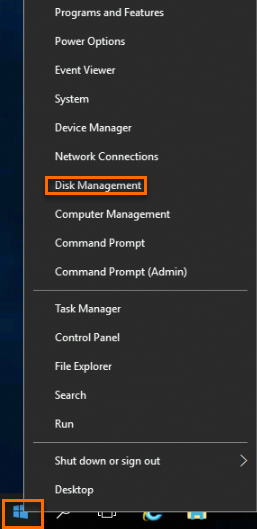
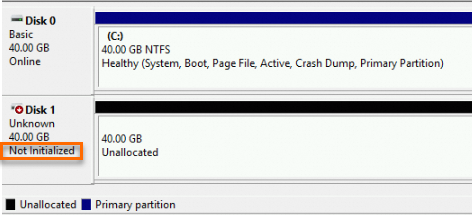
Find the data disk in the Offline state that you want to initialize. In this example, Disk 1 is used.

Right-click a blank area around Disk 1 and select Online.
When Disk 1 comes online, the disk enters the Not Initialized state.
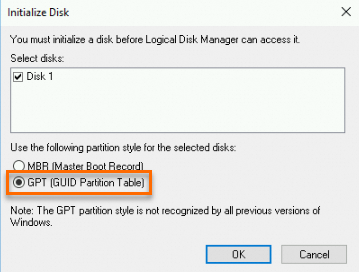
Right-click a blank area around Disk 1 and select Initialize Disk.
In the Initialize Disk dialog box, select the disk, select a disk partition format, and then click OK.
ImportantThe size of a disk that uses the master boot record (MBR) partition format is capped at 2 TiB. If your disk is larger than 2 TiB in size or the disk may be resized to larger than 2 TiB, use the GUID partition table (GPT) partition format.
Right-click the Unallocated section of Disk 1 and select New Simple Volume.
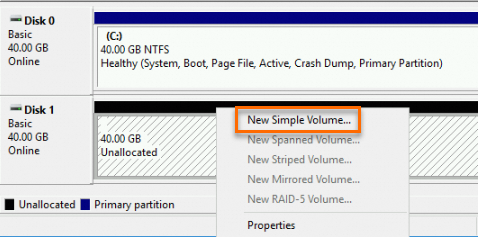
In the New Simple Volume Wizard window, click Next and follow the wizard to perform initialization operations.
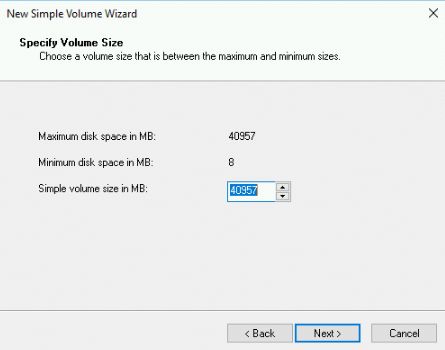
In the Specify Volume Size step, configure the Simple volume size in MB parameter and then click Next.
If you want to create only a single primary partition on the disk, use the default value. You can also specify a simple volume size based on your business requirements to divide Disk 1 into multiple partitions.
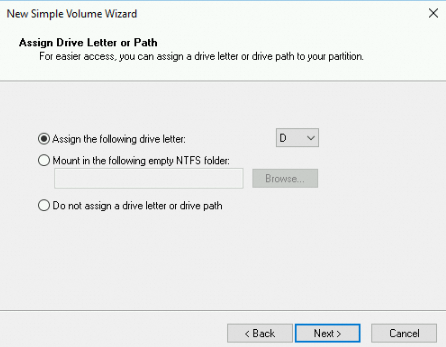
In the Assign Drive Letter or Path step, select Assign the following drive letter, select a drive letter, and then click Next. In this example, the drive letter D is selected.
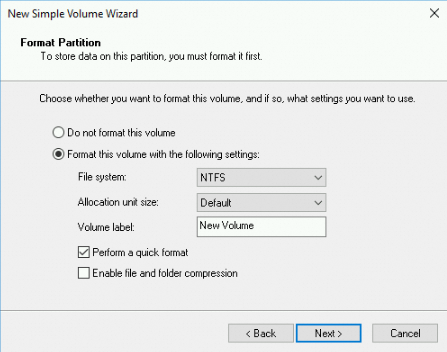
In the Format Partition step, select Format this volume with the following settings, configure formatting settings, and then click Next.
View the information about the new simple volume and click Finish to close the New Simple Volume Wizard window.
Check the result
The following figure shows the state of Disk 1 in the Disk Management window after the disk is initialized.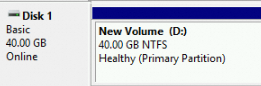
In This PC, you can find a new drive named New Volume (D:). The data disk is ready for use. 