You can connect Edge Node Service (ENS) instances with an elastic network adapter (ENA) or a third-party FortiGate appliance. This tutorial shows how to establish a site-to-site VPN connection using FortiGate. You can use a similar solution to connect an ENS node to an IDC or an ECS instance.
Overview
This tutorial explains how to install and deploy a FortiGate virtual appliance on ENS to create a site-to-site VPN connection between the private networks of two separate ENS nodes. The process has four main stages:
-
Scenario overview
-
Deploy the FortiGate appliances
-
Configure the FortiGate appliances
-
Verify the connection
Scenario overview
-
When you use multiple Edge Node Service nodes, you can connect them over a Wide Area Network (WAN) using dedicated connections or a VPN. This tutorial focuses on the VPN connection method.
-
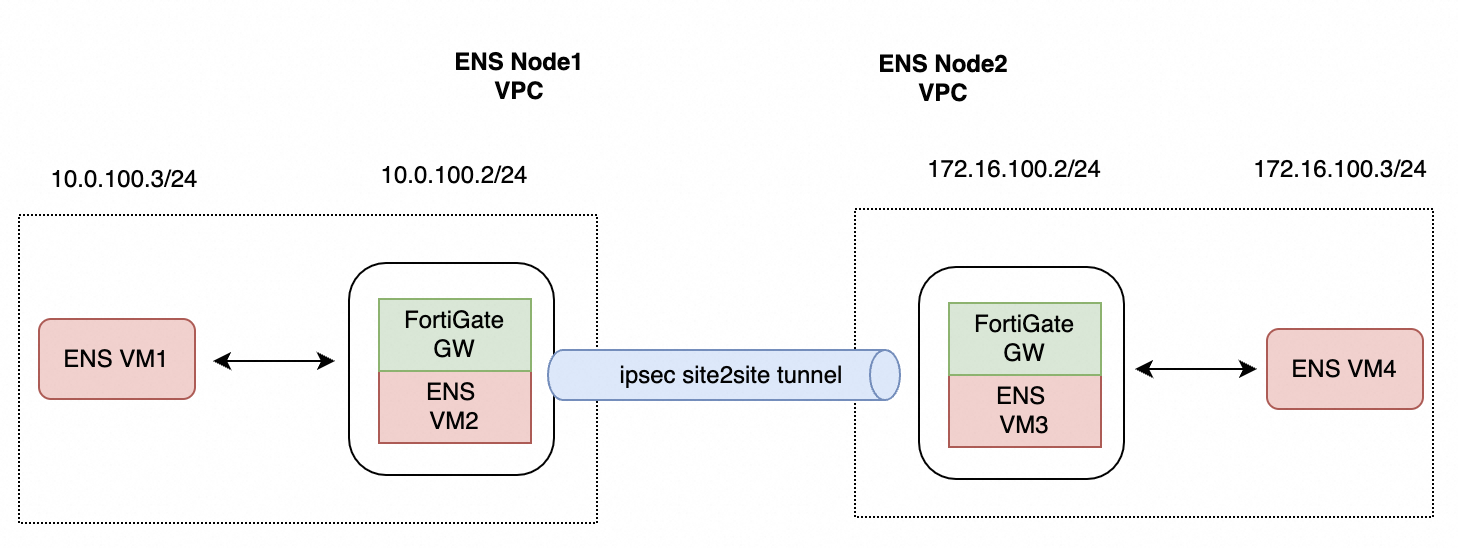
Before you start, you must plan your IP addresses. To verify the final connection, use ping to test connectivity between VM1 and VM4.
1. IP address plan
|
ENS VPC |
CIDR block |
Instance |
Private IP |
Public IP |
|
ENS VPC1 |
10.0.100.0/24 |
VM2 (FortiGate appliance) |
10.0.100.2 |
Assign during instance creation or use an EIP |
|
VM1 |
10.0.100.3 |
|||
|
ENS VPC2 |
172.16.100.0/24 |
VM3 (FortiGate appliance) |
172.16.100.2 |
Assign during instance creation or use an EIP |
|
VM4 |
172.16.100.3 |
2. Network topology
The following diagram shows the network topology. You have a VPC on ENS node 1 and another on ENS node 2, each containing independent VMs. The goal is to establish a private network connection between "ENS VM1" and "ENS VM4".
Install FortiGate
This section explains how to create the necessary VPCs, vSwitches, security groups, and instances in the ENS console to deploy FortiGate. The process involves four main steps:
-
Create VPCs and vSwitches
-
Configure security groups
-
Deploy the FortiGate instances
-
Configure traffic routing
1. Create a VPC and vSwitch on ENS
-
Log on to the ENS console. Go to . Select the Node, enter a Name and an IPv4 CIDR block, and configure the vSwitch by entering a subnet CIDR block.
The recommended IPv4 CIDR block for the VPC is
10.0.0.0/8. You cannot modify the CIDR block after creation. The default CIDR block for the vSwitch is10.0.0.0/24, which provides 253 available IP addresses. You can create up to three vSwitches per network. -
After you click Create, navigate to the Network and vSwitch pages to verify that the new VPC and vSwitch were created.
2. Configure security group
By default, security groups filter traffic. You must configure custom rules to allow the necessary traffic. For testing purposes, this guide allows all inbound traffic. For production environments, the best practice is to allow only specific protocols, such as SSH, ICMP, HTTPS, and UDP.
-
Go to .
On the Create Security Group page, enter a security group Name (required) and a Description. In the Access Rules area, configure rules on the Inbound or Outbound tab. Each rule includes an Authorization Policy, Priority, Protocol Type, Port Range, Authorization Object, and Description. By default, the system adds four inbound allow rules with a priority of 1 and an authorization object of
0.0.0.0/0: Custom UDP, Custom TCP (HTTPS/443), Custom TCP (SSH/22), and ICMP. You can add a new rule by clicking + Add, or Copy or Delete existing rules. When finished, click Create. -
Configure the Outbound rules. By default, all outbound traffic is allowed.
3. Deploy FortiGate instances
In this step, you create the FortiGate instances in the ENS console. These instances will handle the VPN traffic and correspond to VM2 in the network topology diagram.
-
Go to and click Create Instance.
-
In the Basic Configurations section, set Instance Type to X86 Compute Type. For Instance Specification, refer to the FortiGate Specifications Reference. Set Image to Custom Image, and select your pre-prepared FortiGate image. For information on how to create a custom image in ENS, see Create a custom image.
Set the Billing Method to Subscription and configure the Subscription Duration based on your requirements.
-
Configure Network and Storage. Set Network to Custom Network. For Region, select the node where your VPC is located. Then, configure the Network, vSwitch, and Security Group for the node. Select Create a Public NIC and set the Max Bandwidth.
Set Number of Instances to 1. For Bandwidth Billing Method, select Pay-By-Bandwidth. For Instance Billing Cycle, select Pay-By-Hour. Keep the default system disk type and set the capacity to 20 GB. No data disk is required.
-
Configure System Settings. Set a key pair and an instance name. For the default password, refer to the official FortiGate documentation.
On the System Settings page, the default username is root. You can choose to log in with a Custom Password or a key pair. Configure the Host Name and optionally select Ordered Suffix to add a sequential suffix to the instance and host names. You can also set Tags.
-
Confirm the order. Review the Basic configuration, Network and Storage, and System Configurations. Select the Subscription Duration and click Confirm Order.
-
After the instance is created, verify its status in the instance list.
The newly created FortiGate instance appears in the instance list. A Status of Running indicates the instance deployed successfully.
-
These steps describe how to create VM2. To create the test instance (VM1) in the same VPC, repeat the process but select a standard OS image instead of the FortiGate image.
4. Configure traffic routing
Using the ENS node on the left as an example, after you create VM1 and VM2 is running the FortiGate image, you must route traffic from VM1 destined for VM4 to the FortiGate appliance on VM2. This ensures the traffic enters the VPN tunnel. Follow these steps:
-
Go to . In the network list, select the network you created and click its associated route table.
-
Click the route table ID. On the route table details page, go to . Configure the destination IPv4 CIDR block of the remote site and set the next hop to the FortiGate instance you just created.
In the Add Route Entry dialog box, enter a Name for the route entry, add an optional Description, and click OK.
-
After configuration, the interface displays the new route, confirming that traffic will be directed to the FortiGate appliance.
On the Custom Route Entry tab of the VPC route table, you will see a custom route entry with a status of Available, and its next hop points to the FortiGate instance resource.
5. Configure Site 2 VPC and FortiGate
-
Create a second VPC and assign a subnet CIDR block.
-
Create and configure the FortiGate instance for Site 2.
-
Add a custom route entry to direct traffic to the FortiGate instance.
Configure FortiGate appliances
FortiGate configuration can vary slightly between versions. For detailed instructions, refer to the official documentation: https://handbook.fortinet.com.cn/.
The configuration process consists of the following steps:
-
Important notes
-
Import the license
-
Initialize the network
-
Initialize the system
-
Check network connectivity
-
Configure IPsec
1. Important notes
In the Chinese mainland, internet access over HTTP and HTTPS requires an ICP filing. Ports 80 and 443 will be blocked without one.
You can SSH into the FortiGate device to change the HTTPS port number before completing the filing process.
The following command changes the port to 8443:
config system global
    set admin-sport 8443
end
2. Import license and initialize
After importing the license, perform the initial setup and verify the network configuration before configuring IPsec.
2.1 Import license
-
The default username is admin. To mitigate security risks, change the default password as soon as possible after the initial configuration.
Log in to the FortiGate VM via SSH and run the diagnose debug vm-print-license command to check the current license status and confirm it is an evaluation license.
tianhong@U-Y7T49NCJ-2218 ~ % ssh admin@112.13.209.140
admin@1xxx40's password:
FortiGate-VM64-KVM # diagnose debug vm-print-license
SerialNumber: FGVMEVO84K13L75D
CreateDate: Tue Jul  2 02:39:59 2024
Model: EVAL (1)
CPU: 1
MEM: 2048
VDOM license:
    permanent: 2
    subscription: 0
FortiGate-VM64-KVM #-
You need to apply a FortiGate license. This tutorial uses the Bring Your Own License (BYOL) method.
In the FortiGate VM License dialog box, select Full license. In the Upload License File area, click Select file to choose your license file, then click OK.
-
Important: The device will restart automatically after you import the license. You will need to log in again to configure IPsec.
2.2 Initialize system
-
After the restart, access the FortiGate console by entering the public IP address in your web browser with HTTPS.
On the FortiGate management login page, enter your Username and Password, and click Login.
-
Complete the initial setup wizard.
The FortiGate Setup wizard guides you through four initialization steps: Register with FortiCare, Automatic Patch Upgrades, Dashboard Setup, and Change Your Password. Click Begin to start.
-
For a first-time deployment, we recommend upgrading to the latest stable version (e.g., 7.4.X) or consult the vendor. Newer versions can reduce manual configuration steps, such as for IPsec. Log in to the console.
After logging in, the Dashboard > Status page displays several panels: System Information (hostname, serial number, firmware version, operation mode, system time, WAN IP), Licenses (activation status for FortiCare Support, IPS, AntiVirus, Web Filtering), Virtual Machine (vCPU allocation and RAM size), FortiGate Cloud (activation status), Security Fabric (connection status), and real-time CPU usage. Confirm the current firmware version (e.g., v7.2.8) and upgrade to the recommended 7.4.X version if needed.
-
The system requires initialization before use. In the navigation pane on the left, select Settings to configure parameters such as the hostname and time zone.
Set the Host name to
FortiGWENSTestand the Time zone to(GMT+8:00) Beijing, ChongQing, HongKong.
2.3 Verify network connectivity
-
Ping the device itself:
ping 10.0.100.2.FortiGWENSTest # exec ping 10.0.100.2 PING 10.0.100.2 (10.0.100.2): 56 data bytes 64 bytes from 10.0.100.2: icmp_seq=0 ttl=255 time=0.0 ms 64 bytes from 10.0.100.2: icmp_seq=1 ttl=255 time=0.0 ms 64 bytes from 10.0.100.2: icmp_seq=2 ttl=255 time=0.0 ms 64 bytes from 10.0.100.2: icmp_seq=3 ttl=255 time=0.0 ms 64 bytes from 10.0.100.2: icmp_seq=4 ttl=255 time=0.0 ms --- 10.0.100.2 ping statistics --- 5 packets transmitted, 5 packets received, 0% packet loss round-trip min/avg/max = 0.0/0.0/0.0 ms -
Ping the test VM in the same VPC:
ping 10.0.100.3.FortiGWENSTest # exec ping 10.0.100.3 PING 10.0.100.3 (10.0.100.3): 56 data bytes 64 bytes from 10.0.100.3: icmp_seq=0 ttl=64 time=1.6 ms 64 bytes from 10.0.100.3: icmp_seq=1 ttl=64 time=0.1 ms 64 bytes from 10.0.100.3: icmp_seq=2 ttl=64 time=0.1 ms 64 bytes from 10.0.100.3: icmp_seq=3 ttl=64 time=0.1 ms 64 bytes from 10.0.100.3: icmp_seq=4 ttl=64 time=0.1 ms --- 10.0.100.3 ping statistics --- 5 packets transmitted, 5 packets received, 0% packet loss round-trip min/avg/max = 0.1/0.4/1.6 ms -
Ping a public domain such as
www.aliyun.comto verify internet connectivity.FortiGWENSTest # FortiGWENSTest # exec ping www.aliyun.com PING www.a.shifen.com (153.x.x.x): 56 data bytes 64 bytes from 153.x.x.x: icmp_seq=0 ttl=46 time=13.6 ms 64 bytes from 153.x.x.x: icmp_seq=1 ttl=46 time=10.0 ms 64 bytes from 153.x.x.x: icmp_seq=2 ttl=46 time=10.4 ms 64 bytes from 153.x.x.x: icmp_seq=3 ttl=46 time=10.0 ms 64 bytes from 153.x.x.x: icmp_seq=4 ttl=46 time=10.0 ms --- www.aliyun.com ping statistics --- 5 packets transmitted, 5 packets received, 0% packet loss round-trip min/avg/max = 10.0/10.8/13.6 ms -
Completing these steps finishes the basic configuration of the FortiGate appliance on ENS.
3. Configure IPsec
IPsec can be configured in various ways. In this topology, you will use a site-to-site deployment to enable VPN connectivity between VM1 and VM4. The two ends of the connection are designated as Site 1 and Site 2.
3.1 Site 1 configuration
Follow the configuration wizard steps as shown below:
-
In the navigation pane on the left, go to VPN > IPsec Tunnels > Create New, and then click IPsec Tunnel.
-
Enter a name and select the Site to Site template.
For Name, enter
toVPC2fortigate. For NAT Configuration, select No NAT between sites. For Remote Device Type, select FortiGate. -
Configure the interface and the pre-shared key.
Set Remote device to IP Address and enter the remote public IP. Set Outgoing Interface to port2. For Authentication method, select Pre-shared Key and enter your pre-shared key.
-
Configure the traffic selectors (the local and remote subnets for the VPN connection).
In the Policy & Routing step, set Local Interface to port4. Set Local Subnets to
10.0.100.0/24and Remote Subnets to172.16.100.0/24. For Internet Access, select None. -
Review the configuration summary and click Create.
The Object Summary on the Review Settings page shows the configuration: Phase 1 interface is
toVPC2fortigate, Local address group istoVPC2fortigate_local, Remote address group istoVPC2fortigate_remote, Phase 2 interface istoVPC2fortigate, Static route and Blackhole route are bothstatic, Local to remote policies isvpn_toVPC2fortigate_local, and Remote to local policies isvpn_toVPC2fortigate_remote. -
Configure the firewall policy. Under Policy & Objects > Firewall Policy, create a policy to allow traffic from the private network to the IPsec tunnel and from the tunnel back to the private network. Note: In newer versions, the VPN configuration template may automatically generate these policies. Refer to the official FortiGate manual.
In this example, two VPN policies are created: vpn_toVPC2fortigate_local for traffic from port4 to toVPC2fortigate (source toVPC2fortigate_local, destination toVPC2fortigate_remote), and vpn_toVPC2fortigate_remote for traffic from toVPC2fortigate to port4 (source toVPC2fortigate_remote, destination toVPC2fortigate_local). Both policies have Service set to ALL, Action to ACCEPT, Schedule to always, and NAT to Disabled.
-
Configure a static route for business traffic. In the navigation pane on the left, go to Network -> Static Routes and manually configure a route to direct traffic destined for the remote subnet through the IPsec VPN tunnel. Note: Newer versions may automate this step via the VPN configuration template.
In the New Static Route form, set Destination to Subnet with a value of
172.16.100.0/24. Set Interface to toVPC2fortigate. Set Administrative Distance to10and Status to Enabled.The static route list includes the tunnel route and corresponding Blackhole route created by the VPN wizard (Destination toVPC2fortigate_remote, Interface toVPC2fortigate, with comment VPN: toVPC2fortigate (Created by VPN wizard)), as well as any other manually added business routes.
-
Enable ping on the interface for testing. By default, ping is disabled on interface addresses. Double-click the port in the list to edit its settings and manually enable it.
Edit the port4 interface. Set Addressing mode to Manual, and enter
10.0.100.2/255.255.255.0for the IP/Netmask. In the Administrative Access area, select only PING.After configuration, the IP address for the port4 interface is
10.0.100.2/255.255.255.0, and PING is enabled under Administrative Access.
3.2 Site 2 configuration
-
On the VPN > IPsec Tunnels page, a tunnel named toVPC1 has been established under the Site to Site - FortiGate group. Its Interface Binding is port1, and its Status is Up (green).
On the Network > Static Routes page, the VPN wizard has automatically created two static routes. The first has a destination of toVPC1_remote and an interface of toVPC1 (the VPN tunnel), with a status of Enabled. The second is a Blackhole route with the same destination and an Enabled status. Both routes have the comment VPN: toVPC1 (Created by VPN wizard).
On the Policy & Objects > Firewall Policy page, the VPN wizard has automatically created two bidirectional firewall policies. Policy vpn_toVPC1_local (port2 → toVPC1) allows traffic with Source toVPC1_local and Destination toVPC1_remote. Policy vpn_toVPC1_remote (toVPC1 → port2) allows traffic with Source toVPC1_remote and Destination toVPC1_local. Both policies have Service set to ALL, Action to ACCEPT, Schedule to always, and NAT to Disabled.
Verify connection
After completing the configuration, you can test the connection. A successful ping between VM1 and VM4 confirms that the VPN tunnel is established. The following data is from the test environment:
-
Ping from VM4 to VM1
[root@i-53at57icfbliwrbmzfjtlg1ha ~]# ping 10.0.100.3 PING 10.0.100.3 (10.0.100.3) 56(84) bytes of data. 64 bytes from 10.0.100.3: icmp_seq=1 ttl=62 time=0.377 ms 64 bytes from 10.0.100.3: icmp_seq=2 ttl=62 time=0.351 ms 64 bytes from 10.0.100.3: icmp_seq=3 ttl=62 time=0.329 ms 64 bytes from 10.0.100.3: icmp_seq=4 ttl=62 time=0.358 ms 64 bytes from 10.0.100.3: icmp_seq=5 ttl=62 time=0.349 ms 64 bytes from 10.0.100.3: icmp_seq=6 ttl=62 time=0.274 ms 64 bytes from 10.0.100.3: icmp_seq=7 ttl=62 time=0.333 ms 64 bytes from 10.0.100.3: icmp_seq=8 ttl=62 time=0.341 ms 64 bytes from 10.0.100.3: icmp_seq=9 ttl=62 time=0.335 ms 64 bytes from 10.0.100.3: icmp_seq=10 ttl=62 time=0.346 ms -
Ping from VM1 to VM4
64 bytes from 172.16.100.3: icmp_seq=1 ttl=62 time=0.795 ms
64 bytes from 172.16.100.3: icmp_seq=2 ttl=62 time=0.345 ms
64 bytes from 172.16.100.3: icmp_seq=3 ttl=62 time=0.350 ms
64 bytes from 172.16.100.3: icmp_seq=4 ttl=62 time=0.334 ms
64 bytes from 172.16.100.3: icmp_seq=5 ttl=62 time=0.352 ms
64 bytes from 172.16.100.3: icmp_seq=6 ttl=62 time=0.355 ms
64 bytes from 172.16.100.3: icmp_seq=7 ttl=62 time=0.357 ms
64 bytes from 172.16.100.3: icmp_seq=8 ttl=62 time=0.326 ms
64 bytes from 172.16.100.3: icmp_seq=9 ttl=62 time=0.331 ms
64 bytes from 172.16.100.3: icmp_seq=10 ttl=62 time=0.331 ms
64 bytes from 172.16.100.3: icmp_seq=11 ttl=62 time=0.374 ms
64 bytes from 172.16.100.3: icmp_seq=12 ttl=62 time=0.359 ms
64 bytes from 172.16.100.3: icmp_seq=13 ttl=62 time=0.355 ms
64 bytes from 172.16.100.3: icmp_seq=14 ttl=62 time=0.347 ms
64 bytes from 172.16.100.3: icmp_seq=15 ttl=62 time=0.353 ms
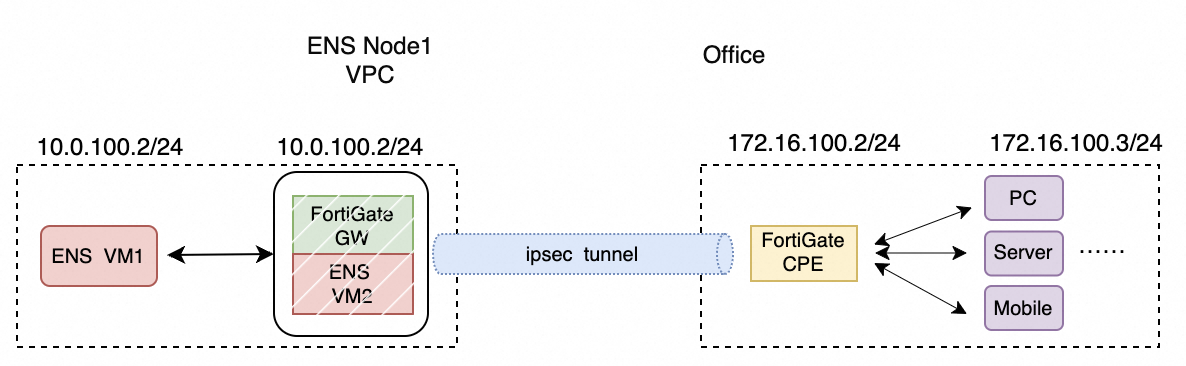
Other use cases
The preceding sections explained how to use FortiGate to establish a VPN connection between two ENS nodes. ENS serves as the underlying infrastructure, providing the compute and internet capabilities for FortiGate. Building on this foundation, FortiGate can also implement other WAN VPN connection scenarios, such as:
-
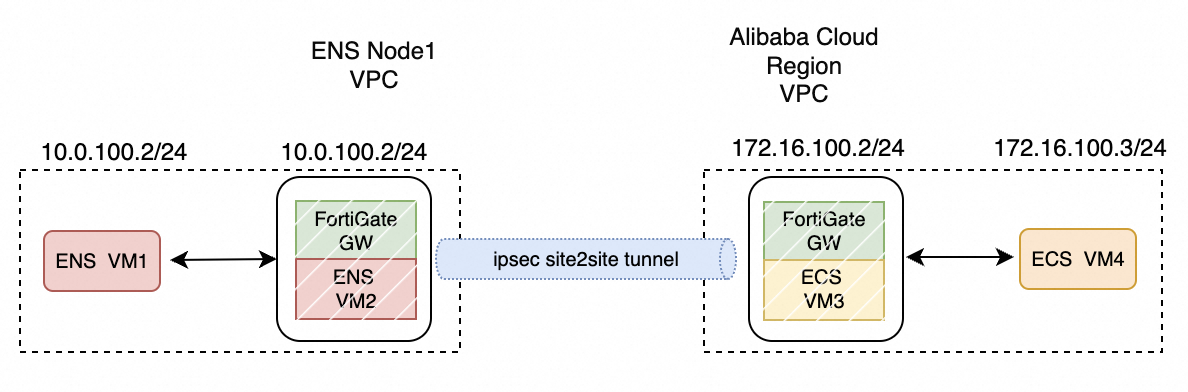
ENS to Alibaba Cloud ECS VPN connection
-
ENS to office VPN connection
-
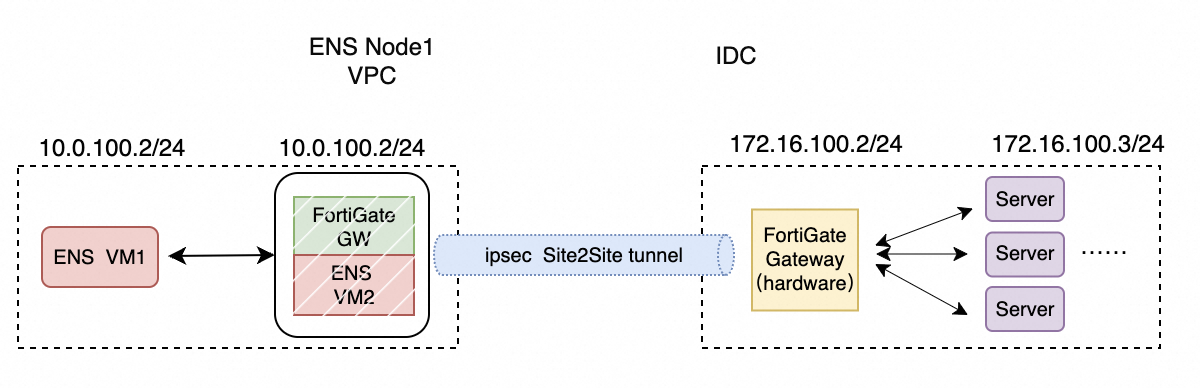
ENS to IDC connection
In these scenarios, the process for installing the FortiGate image on ENS is the same as described earlier. As long as the correct image is used and the network is functioning properly, you can complete the main configuration tasks by following the official FortiGate manual.
-
Connecting ENS to an Alibaba Cloud region VPC using FortiGate in a site-to-site configuration is similar to connecting two ENS nodes.
-
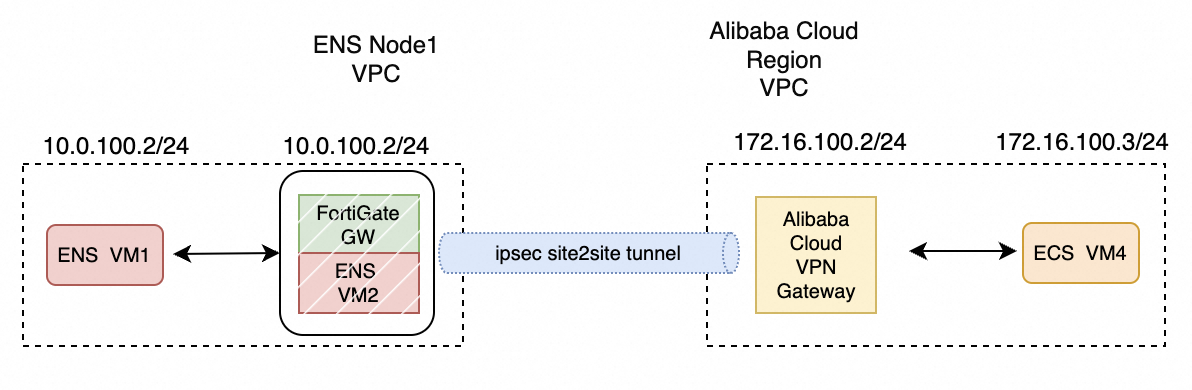
Connecting ENS to an Alibaba Cloud region VPC using a direct site-to-site connection between FortiGate and a VPN Gateway.
-
Connecting ENS to a customer's office using FortiGate in a site-to-CPE configuration.
-
Connecting ENS to a customer's IDC using FortiGate in a site-to-site configuration.