Apache Ranger provides a centralized security management framework. You can use its web interface to customize access policies and manage access for different roles and data. By integrating Apache Ranger, you can implement fine-grained permission control to ensure data access security and compliance.
Background
Apache Ranger provides the following core modules:
Ranger Admin: This is the core module of Ranger. It has a built-in web interface that you can use to create and update security policies through the interface or REST APIs. Plug-ins for various components in the Hadoop ecosystem periodically poll and pull these policies.
Agent Plugin: This plug-in is embedded in the components of the Hadoop ecosystem. It periodically pulls security policies from Ranger Admin and stores them in local files. When a user accesses a component, the plug-in evaluates the request against the security policies and sends the result to the component.
User Sync: This module pulls user and group information. It synchronizes user and group permission data with the Ranger database.
Prerequisites
Instance and cluster preparation:
An EMR Serverless StarRocks instance is created. For more information, see Create an instance.
You have a self-managed Ranger cluster or you have created a cluster that includes the Ranger service on EMR on ECS, such as a DataLake or Custom cluster. For more information, see Create a cluster.
This topic uses a DataLake cluster of EMR V5.18.1 on EMR on ECS as an example.
Network connectivity:
Make sure that the Serverless StarRocks instance and the Ranger cluster (DataLake cluster) are in the same VPC.
Add security group rules to allow the StarRocks instance to access the required ports of the Ranger cluster (DataLake cluster).
ImportantWhen you add security group rules, set the Port Range to open only the necessary ports.
Limitations
This feature requires Apache Ranger 2.1.0 or later.
Procedure
Step 1: Install the ranger-starrocks-plugin
If your Ranger cluster is a high availability cluster, you must install the ranger-starrocks-plugin on all Ranger nodes.
Log on to the EMR cluster using Secure Shell (SSH). For more information, see Log on to a cluster.
Create a
starrocksfolder in the plug-in directory of Ranger Admin.mkdir {path-to-ranger}/starrocksReplace
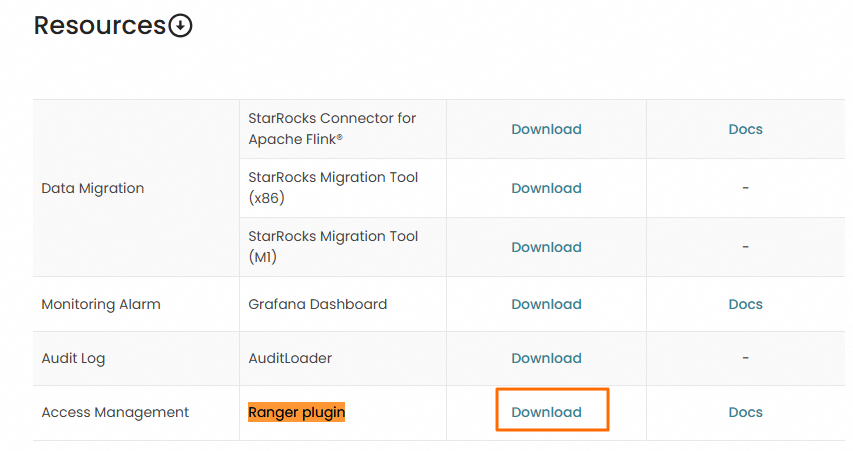
{path-to-ranger}/starrockswith the actual installation path. This topic uses an EMR V5.18.1 cluster as an example, where the path is/opt/apps/RANGER/ranger-2.3.0-1.0.6/ranger-admin/ews/webapp/WEB-INF/classes/ranger-plugins.Go to StarRocks Download, find the Ranger plugin component, and click Download.
Upload the plug-in to the
starrocksfolder that you created.Download the mysql-connector-j.jar package.
Method 1: Direct download.
Go to MySQL Community Downloads and download the latest version of the mysql-connector-j.jar package.
Method 2: Manually copy an existing JAR package to the
starrocksfolder.Find the path of the mysql-connector-j package.
sudo find / -name mysql-connector-j-*.jarThe following information is returned.
/opt/apps/STARROCKS3/starrocks-3.2.11-1.0/fe/lib/mysql-connector-j-8.0.31.jar
/opt/apps/STARROCKS2/starrocks-2.5.22-1.0/fe/lib/mysql-connector-j-8.0.33.jar
Select a version and copy it to the
starrocksfolder.sudo cp /opt/apps/STARROCKS3/starrocks-3.2.11-1.0/fe/lib/mysql-connector-j-8.0.31.jar /opt/apps/RANGER/ranger-2.3.0-1.0.6/ranger-admin/ews/webapp/WEB-INF/classes/ranger-plugins/starrocksNoteThis topic uses an EMR V5.18.1 cluster as an example. You must replace the path in the command with your actual path.
Restart Ranger Admin.
In the EMR console, on the Status tab of the Ranger service under Cluster Services, click Restart in the Actions column for RangerAdmin to activate the plug-in.
Step 2: Configure the StarRocks service in Ranger Admin
Configure the StarRocks service in Ranger Admin to manage permissions for StarRocks objects, such as databases, tables, and columns, using Ranger.
Log on to the EMR cluster using SSH. For more information, see Log on to a cluster.
Download the
ranger-servicedef-starrocks.jsonfile.wget https://raw.githubusercontent.com/StarRocks/ranger/master/agents-common/src/main/resources/service-defs/ranger-servicedef-starrocks.jsonRun the following command to add the StarRocks service.
curl -u admin:<ranger_admin_password> \-X POST -H "Accept: application/json" \-H "Content-Type: application/json" \http://<ranger-ip>:6080/service/plugins/definitions \-d@ranger-servicedef-starrocks.jsonNoteReplace the following parameters in the command with your actual information:
<ranger_admin_password>: The password of the administrator user `admin`. The default password is `Admin1234`. If you forget the default password, see Ranger.<ranger-ip>: The IP address of the RangerAdmin component. You can find the IP address in the Component List section on the Status tab of the Ranger service.
Verify and save the configuration.
On the Ranger page, click the
 icon in the STARROCKS service area.
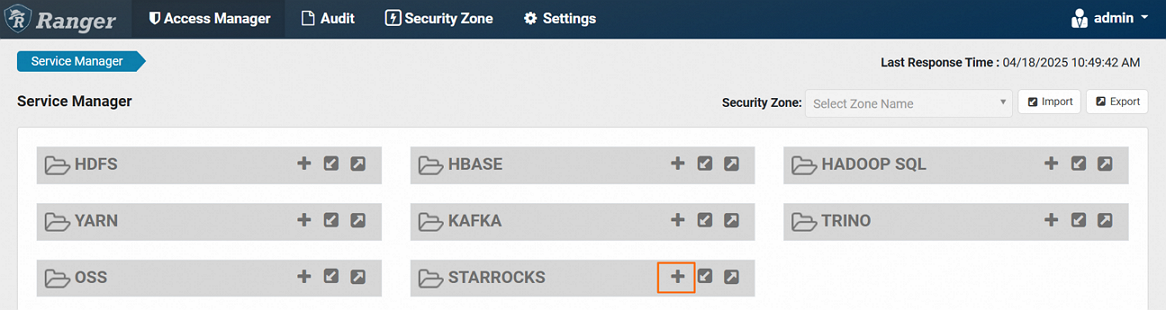
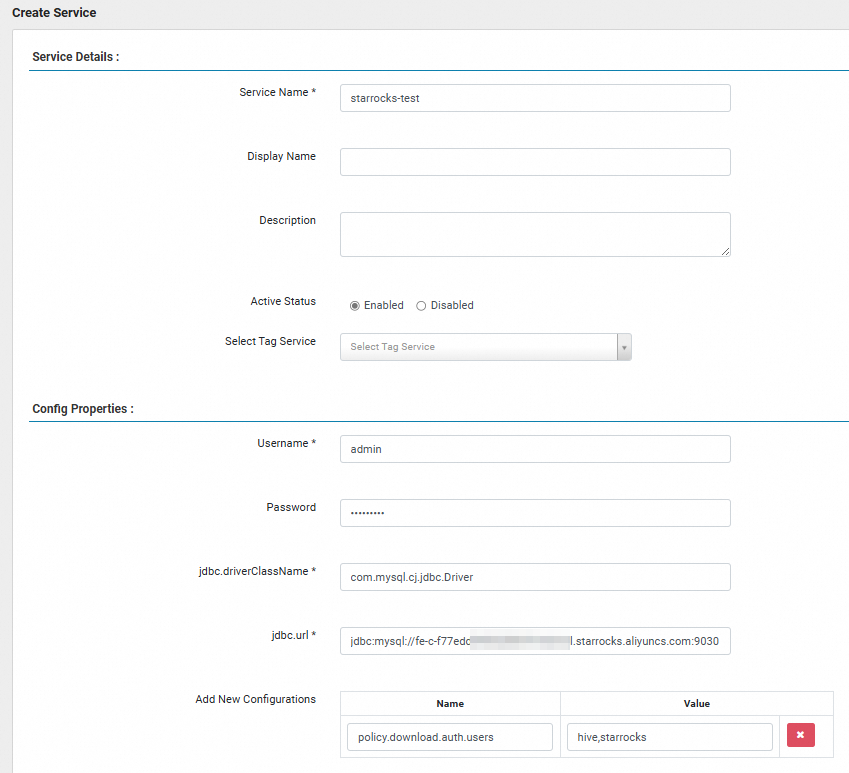
On the Create Service page, configure the following parameters.
Parameter
Description
Service Name
Required. The name of the service. For example,
starrocks-test.Username and Password
The username and password of the Serverless StarRocks instance.
jdbc.url
The IP address and port of the StarRocks instance frontend (FE). The format is
jdbc:mysql://<FE_address>:<fe_query_port>. The parameters are described as follows:<FE_address>: The internal or public IP address of the FE in the Serverless StarRocks instance. You can view it on the Instance Details page.If you use an internal IP address, make sure that the instance is in the same VPC.
If you use a public IP address, make sure that the security group rules allow communication on the corresponding port. For more information, see Network access and security configuration.
<fe_query_port>: The query port of the FE in the Serverless StarRocks instance. The default port is 9030. You can view it on the Instance Details page.
Add New Configurations
The users or roles that are allowed to access Ranger. Add a configuration where Name is set to
policy.download.auth.usersand Value is set tohive,starrocksor*.Click Test Connection to test the connectivity.
After the test is successful, click Add.
You are automatically redirected to the Service Manager page, where you can see the StarRocks service that you added.

Step 3: Configure permissions for administrative users
To use Ranger to manage permissions for internal tables in Serverless StarRocks, you must grant all StarRocks permissions to the administrative users `admin` and `root` in the Ranger service. This ensures that the management features of Serverless StarRocks function correctly. By default, the `admin` user is already created and has the required permissions.
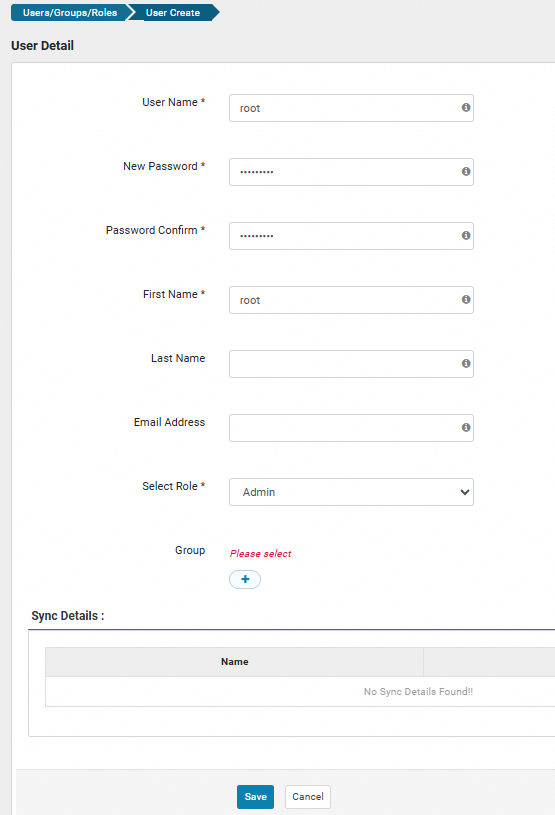
Create a new user named `root`.
On the Ranger UI page, choose .
On the Users tab, click Add New User.

On the User Detail page, enter the user information and click Save.
Grant permissions to the `root` user.
On the Ranger UI page, click Access Manager at the top.
On the Service Manager page, click the StarRocks service that you created, such as `starrocks-test`.
In the Action column of each policy, click the edit icon
 .
.In the Allow Conditions section, add the `root` user with the `admin` user.
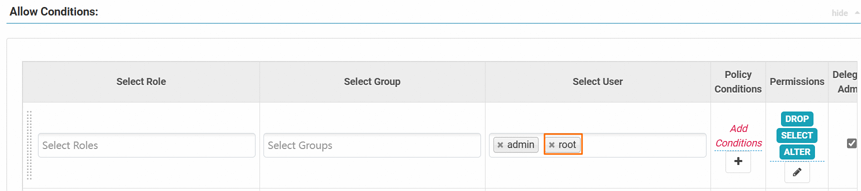
Make sure that the
rootuser has full control over objects such as databases, tables, and columns.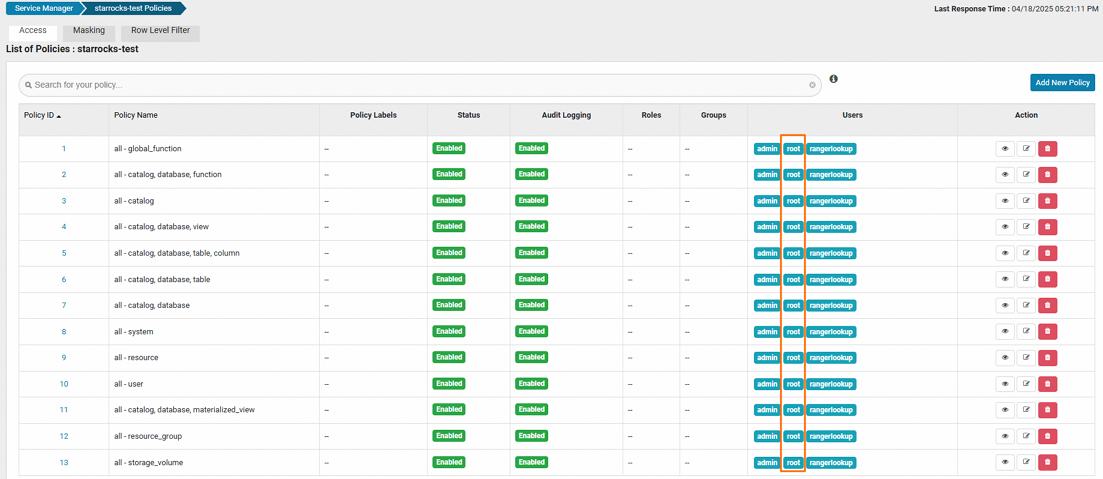
Click Save.
Step 4: Configure the Serverless StarRocks instance
This step covers all configurations related to the Serverless StarRocks instance, including authentication for internal and external tables.
Configure Kerberos authentication.
If Kerberos authentication is not enabled in your environment, you can skip this step. If Kerberos authentication is enabled, you must configure the relevant parameters for Serverless StarRocks to allow it to access Ranger using Kerberos. For more information, see Access a Hadoop cluster with Kerberos authentication enabled.
Modify the authentication method for internal tables.
To use Ranger to manage permissions for internal tables in Serverless StarRocks, such as databases, tables, and columns, follow these steps. If you do not need to manage permissions for internal tables, you can skip this step.
Go to the parameter configuration page.
Log on to the E-MapReduce console.
In the navigation pane on the left, choose .
In the top menu bar, select a region.
Click the name of the target instance.
Click the Parameter Configuration tab.
On the Parameter Configuration page, click Add Configuration Item and add the following configuration items.
File
Parameter
Description
ranger-starrocks-security.xml
ranger.plugin.starrocks.service.nameThe name of the StarRocks service in Ranger. For example,
starrocks-test.ranger.plugin.starrocks.policy.source.implThe class used to obtain Ranger authentication policies. Set this to
org.apache.ranger.admin.client.RangerAdminRESTClient.ranger.plugin.starrocks.policy.rest.urlThe address of Ranger Admin. For example,
http://master-1-1.c-aaa**********ccc.cn-beijing.emr.aliyuncs.com:6080.ranger.plugin.starrocks.policy.rest.client.cookie.enabledSpecifies whether to enable the cookie feature for the Ranger client. We recommend that you set this to
falsefor testing.FE
access_controlThe authentication method for internal tables in StarRocks. Set this to
ranger.
Reuse a Ranger service for external table authentication.
For an external catalog, you can reuse an external service, such as a Hive service, to implement access control. StarRocks lets you match different catalogs with different Ranger services. When a user accesses an external table, access control is performed based on the service that corresponds to that table. The user's permissions are consistent with the permissions of the user with the same name in Ranger.
An external table is a data table stored in an external data source. StarRocks stores only the metadata of the table and directly queries the data source where the external table is located.
To use Ranger to manage access permissions for external catalogs, such as Hive or Iceberg, follow these steps. If your business scenario does not involve external catalogs or require permission management for them, you can skip this step.
On the Parameter Configuration page, click Add Configuration Item and add the following configuration items to the
ranger-hive-security.xmlfile.Parameter
Description
ranger.plugin.hive.service.nameThe name of the Hive service in Ranger. For example,
emr-hive.ranger.plugin.hive.policy.source.implThe class used to obtain Ranger authentication policies. Set this to
org.apache.ranger.admin.client.RangerAdminRESTClient.ranger.plugin.hive.policy.rest.urlThe address of Ranger Admin. For example,
http://master-1-1.c-aaa**********ccc.cn-beijing.emr.aliyuncs.com:6080.Configure the authentication method for the external catalog.
Specify the Ranger service when you create an external catalog.
CREATE EXTERNAL CATALOG hive_catalog_1 PROPERTIES (
       "type" = "hive",
       "hive.metastore.type" = "hive",
       "hive.metastore.uris" = "thrift://xx.xx.xx.xx:9083",
       "ranger.plugin.hive.service.name" = "<ranger_hive_service_name>"
   );
Add a Ranger service to an existing external catalog.
ALTER CATALOG hive_catalog_1 SET ("ranger.plugin.hive.service.name" = "<ranger_hive_service_name>");
The parameters are described as follows:
hive.metastore.uris: The URI of the Hive metastore. You can find the value of thehive.metastore.urisparameter in the hive-site.xml file of the Hive service in the DataLake cluster.ranger.plugin.hive.service.name: The name of the Ranger Hive service.
What to do next
After you add the StarRocks service, you can click the service to create access policies and assign different permissions to different users or groups. Apache Ranger controls user access requests based on these policies. For more information about how to create access policies in Ranger to manage data security, see the official Apache Ranger website.