This topic describes how to use a MySQL client to connect to an E-MapReduce (EMR) Serverless StarRocks instance.
Prerequisites
A Serverless StarRocks instance is created. For more information, see Create an instance.
Go to the E-MapReduce (EMR) StarRocks Manager page.
Log on to the EMR console.
In the left-side navigation pane, choose .
In the top navigation bar, select a region based on your business requirements.
On the page that appears, click StarRocks Manager. Alternatively, find the desired instance and click Connect in the Actions column.
For more information about how to connect to a StarRocks instance, see Use EMR StarRocks Manager to connect to a StarRocks instance.
Connect to the EMR Serverless StarRocks instance.
Create a connection
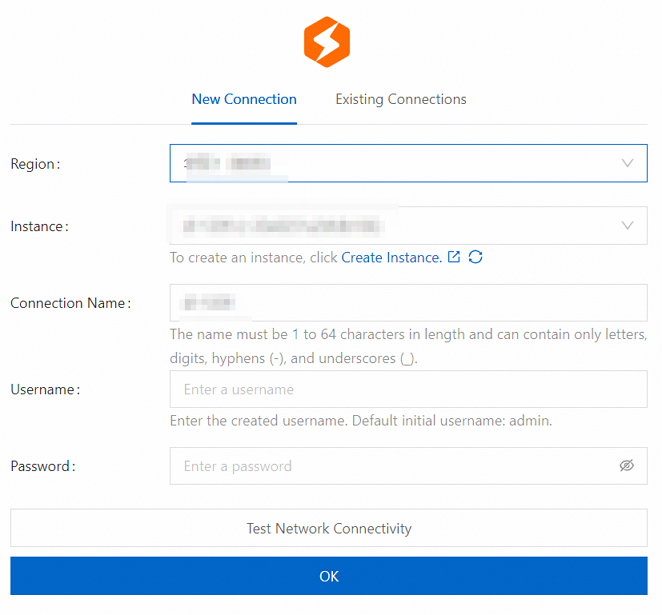
On the New Connection tab, configure the parameters that are described in the following table.
Parameter
Example
Description
Region
China (Hangzhou)
The region in which the EMR Serverless StarRocks instance resides.
Instance
StarRocks_Serverlesss
The name of the EMR Serverless StarRocks instance.
Connection Name
Connection_Serverlesss
The custom name of the connection.
The name must be 1 to 64 characters in length, and can contain letters, digits, hyphens (-), and underscores (_).
Username
The username used to log on to the EMR Serverless StarRocks instance.
The default initial username is admin. You can use this username to connect to the EMR Serverless StarRocks instance or create another user based on your business requirements.
Password
The password used to log on to the EMR Serverless StarRocks instance.
The password is specified when you create the EMR Serverless StarRocks instance.
Click Test Network Connectivity.
After the connectivity test is passed, click OK.
Use an existing connection
ImportantIf you use an existing connection, make sure that the connected EMR Serverless StarRocks instance exists. If the EMR Serverless StarRocks instance is deleted, create a connection.
On the Existing Connections tab, find the connection that you want to use and click Connect in the Actions column.

Use the MySQL client of an ECS instance to connect to a StarRocks instance
For information about how to create an Elastic Compute Service (ECS) instance, see Getting started with ECS.
If you want to use the internal endpoint to connect to a StarRocks instance, make sure that the ECS instance on which the MySQL client is installed and the StarRocks instance reside in the same virtual private cloud (VPC) and vSwitch.
You must add the IP address of the ECS instance on which the MySQL client is installed to the security group. By default, the port number of the frontend node (FE) of StarRocks instances is 9030.
Install the MySQL client. For more information, see Installing MySQL Shell.
Run the following command on the MySQL client to connect to the StarRocks instance:
mysql -hfe-c-*****.starrocks.aliyuncs.com -P 9030 -uadmin -pPerform related operations after you connect to the StarRocks instance.
Use the open source MySQL client to connect to a StarRocks instance
Step 1: Download and install the MySQL client
Download the MySQL client.
Run the following command to decompress the installation package:
tar -zxvf mysql-5.6.40-linux-glibc2.12-i686.tar.gzRun the following command to copy the decompressed MySQL directory to the on-premises software directory:
cp mysql-5.6.17-linux-glibc2.5-i686 /usr/local/mysql -rImportantThe
/usr/local/mysqldirectory cannot end with a forward slash (/).Run the following commands to add a MySQL group and a MySQL user:
sudo groupadd mysql
sudo useradd -r -g mysql mysql
Install the MySQL client.
Run the following command to go to the software directory:
cd /usr/local/mysqlRun the following command to change the owner of the directory to the mysql user:
chown -R mysql:mysql ./Run the following command to install the MySQL client:
./bin/mysql_install_db --user=mysqlYou can also run the following command to initialize the MySQL client:
sudo bin/mysqld --initialize --user=mysqlRun the following command to change the owner of the current directory to the root user:
chown -R root:root ./Run the following command to change the owner of the data directory to the mysql user:
chown -R mysql:mysql dataRun the following command to copy files:
cp /usr/local/mysql/support-files/mysql.server /etc/init.d/mysql
Run the following command to start the MySQL client:
sudo service mysql start
Step 2: Connect to a StarRocks instance
Run the following command to connect to a StarRocks instance:
/usr/local/mysql/bin/mysql -u admin -p -h fe-c-xxxxxx.starrocks.aliyuncs.com -P 9030fe-c-xxxxxxx.starrocks.aliyuncs.com: the public endpoint of the FE of the StarRocks instance.
You can view the endpoint on the Instance Details tab in the EMR console.