Connect Jupyter Notebook to EMR Serverless Spark for interactive PySpark and Scala development. This guide covers two setup methods: a Docker image for a quick, portable environment, and the sparkmagic plugin for direct integration with an existing Jupyter installation.
How it works
EMR Serverless Spark exposes a Livy Gateway that implements the Apache Livy RESTful API. When you create a Spark session from Jupyter, sparkmagic (or the preconfigured Docker image) authenticates via a token and communicates with the Livy Gateway to submit code and retrieve results. The gateway handles session lifecycle and resource scheduling on the Serverless Spark side.
Jupyter Notebook / JupyterLab
        │
        │  sparkmagic (Livy protocol)
        ▼
  Livy Gateway  ──── token auth
        │
        ▼
 EMR Serverless Spark cluster
For Livy API details, see REST API.
Choose a method
| Method | Use when |
|---|---|
| Method 1: Use a Docker image | You want a self-contained environment, or need to reproduce the same setup across machines |
| Method 2: Use the sparkmagic plugin | You already have Jupyter Notebook installed and want to add sparkmagic to it |
Prerequisites
Before you begin, ensure that you have:
A workspace. For more information, see Create a workspace.
For Method 1: Docker installed. See Docker official documentation.
For Method 2: Jupyter Notebook installed and running. See Project Jupyter | Installing Jupyter. This guide uses Jupyter Notebook with Python 3.8.
Method 1: Use a Docker image to quickly build and start an environment
Step 1: Create a gateway and a token
Create and start a gateway.
Log on to the EMR console.
In the left navigation bar, select EMR Serverless > Spark.
On the Spark page, click the name of the target workspace.
On the EMR Serverless Spark page, click O&M Center > Gateway in the left-side navigation pane.
Click the Livy Gateway tab.
Click Create Livy Gateway.
On the Create Gateway page, enter a Name (for example, Livy-gateway) and click Create. To configure additional parameters, see Manage gateways.
On the Livy Gateway page, find the created gateway and click Start in the Actions column.
Create a token.
On the Gateway page, find Livy-gateway and click Tokens in the Actions column.
Click Create Token.
In the Create Token dialog box, enter a Name (for example, Livy-token) and click OK.
Copy the token immediately after it is created.
ImportantAfter the token is created, copy it right away. The token is not displayed again after you leave the page. If the token expires or is lost, reset it or create a new one.
Step 2: Pull and start the Docker image
Pull the image:
docker pull emr-registry-registry.cn-hangzhou.cr.aliyuncs.com/serverless-spark-public/emr-spark-jupyter:latestStart the image:
docker run -p <host_port>:8888 emr-registry-registry.cn-hangzhou.cr.aliyuncs.com/serverless-spark-public/emr-spark-jupyter:latest <endpoint> <token>Parameter Description <host_port>The port on the host machine to map to the container's port 8888 <endpoint>The Livy gateway endpoint. To find it, click the gateway name on the Livy Gateway page, then check the Overview tab. <token>The token you copied in step 1 After the container starts, the output includes a URL similar to:
[I 2024-09-23 05:38:14.640 ServerApp] http://127.0.0.1:8888/lab?token=258c0dd75e22a10fb6e2c87ac738c2a7ba6a314c6b******Open the URL in a browser to access Jupyter.
NoteIf you are connecting to EMR Serverless Spark from a remote server, you must replace
127.0.0.1with the actual IP address of the server.If the
host_portis not8888, you must replace the port number with the actual port number.
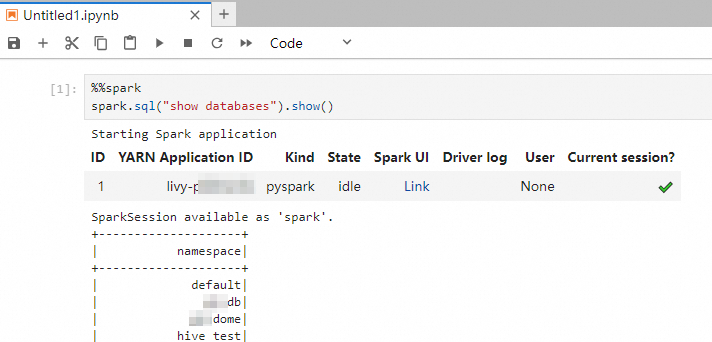
Step 3: Test the connectivity
On the JupyterLab page, click PySpark in the Notebook section.

Run the following code to query all accessible databases:
spark.sql("show databases").show()The output that is shown in the following figure is returned.
Method 2: Use the sparkmagic plugin to build and start an environment
Step 1: Create a gateway and a token
Follow the same steps as Method 1, Step 1.
Step 2: Install and enable the sparkmagic plugin
Install sparkmagic:
pip install sparkmagicEnable the plugin based on your Jupyter environment:
Jupyter Notebook:
jupyter nbextension enable --py --sys-prefix widgetsnbextensionJupyterLab:
jupyter labextension install "@jupyter-widgets/jupyterlab-manager"
For more information, see sparkmagic on GitHub.
Step 3: Configure and start a Spark session
Open Jupyter. See JupyterLab documentation if needed.
Import the sparkmagic plugin:
%load_ext sparkmagic.magicsExtend the session startup timeout to avoid failures caused by resource scheduling delays:
import sparkmagic.utils.configuration as conf
conf.override("livy_session_startup_timeout_seconds", 1000)
(Optional) Customize Spark resource configuration. The following example sets driver cores and memory. For all available parameters (including
ttlandconf), see Livy Docs - REST API.%% spark config { "conf": { "spark.driver.cores": "1", "spark.driver.memory": "7g" } }Create a Spark session. Choose Python or Scala based on your requirements. Python:
Parameter Description <session_name>A name for the Spark session. Specify any custom name. <endpoint>The Endpoint(Public) or Endpoint(Private) value from the Overview tab of the Livy gateway. If you use a private endpoint, change https://tohttp://and make sure the machine running Jupyter is in the same region as the Livy gateway.<token>The token you copied in step 1 %spark add -s <session_name> -l python -u https://<endpoint> -a username -p <token>Scala:
%spark add -s <session_name> -l scala -u https://<endpoint> -a username -p <token>Wait 1 to 5 minutes for the session to become ready. The session is ready when
idleappears in the State column. To confirm, log on to the EMR Serverless Spark console and check the Sessions tab of the Livy gateway.
Step 4: Verify the session
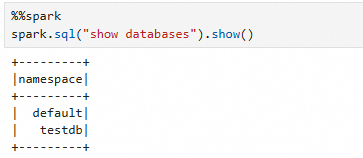
After the session is ready, run code using %%spark. The following example lists all databases in the current Spark environment:
%%spark
spark.sql("show databases").show()
The output that is shown in the following figure is returned.
Step 5: Release session resources (optional)
When you are done, release the session resources to avoid unnecessary charges.
Automatic release: Sessions idle for two hours are terminated automatically.
Manual release via sparkmagic:
%spark delete -s <session_name>Manual release via the console: On the Sessions tab of the Livy gateway, find the session and click Close in the Actions column.
