Apache Zeppelin is an interactive notebook that lets you write code, run queries, and visualize data in a browser. This tutorial walks you through connecting Apache Zeppelin to E-MapReduce (EMR) Serverless Spark using the Livy Interpreter, so you can run interactive Spark workloads from Zeppelin notebooks.
Prerequisites
Before you begin, ensure that you have:
-
An EMR Serverless Spark workspace. See Create a workspace
-
Apache Zeppelin installed and running. See Apache Zeppelin installation guide
How it works
-
Create a Livy Gateway in your EMR Serverless Spark workspace and generate a token for authentication.
-
Configure the Livy Interpreter in Apache Zeppelin to point to the gateway endpoint, using the token in the HTTP request header.
-
Create a Zeppelin notebook that uses the Livy Interpreter to submit Spark sessions and run code.
Step 1: Create a gateway and a token
Create a Livy gateway
-
Log on to the EMR console.
-
In the left-side navigation pane, choose EMR Serverless > Spark.
-
On the Spark page, find the workspace and click its name.
-
In the left-side navigation pane of the EMR Serverless Spark page, choose Operation Center > Gateways.
-
On the Gateways page, click the Livy Gateways tab.
-
Click Create Livy Gateway.
-
Enter a name in the Name field, then click Create. This tutorial uses
Livy-gatewayas the name. To configure additional parameters, see Manage gateways. -
On the Livy Gateways tab, find the gateway you just created and click Start in the Actions column.
Create a token
-
On the Livy Gateways tab, find
Livy-gatewayand click Tokens in the Actions column. -
On the Token Management tab, click Create Token.
-
Enter a name for the token and click OK.
-
Copy the token immediately.
ImportantThe token is only shown once. After you leave the page, it cannot be retrieved. If a token expires or is lost, reset it or create a new one.
Step 2: Configure Livy Interpreter for Apache Zeppelin
-
Log on to Apache Zeppelin, click your username in the upper-right corner, and select Interpreter from the drop-down list.

-
Click +Create in the upper-right corner and set the basic parameters:
Parameter Value Interpreter Name Enter a custom name, such as mylivyInterpreter Group Select livy -
After selecting livy as the Interpreter Group, configure the following connection parameters: For other available parameters, see the Apache Zeppelin Livy Interpreter documentation.
Parameter Description zeppelin.livy.url The internal endpoint of the Livy gateway. Use the format http://{endpoint}, where{endpoint}is the internal endpoint shown on the gateway details page.zeppelin.livy.session.create_timeout Maximum wait time in seconds for Zeppelin to create a Spark session. Set this to 600to allow extra time for cold starts.zeppelin.livy.http.headers Custom HTTP request header for authentication. Click the add icon, then enter x-acs-spark-livy-token:{token}, replacing{token}with the token from the Token Management tab.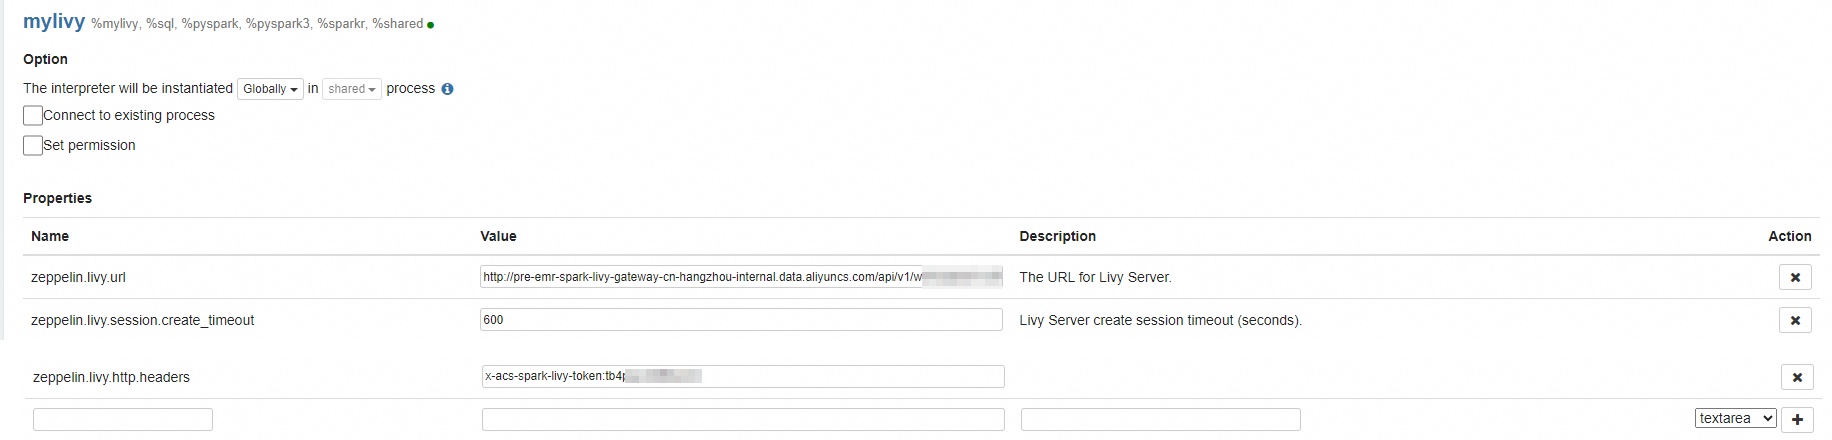
-
Click Save at the bottom of the page.
Step 3: Create a notebook and run Spark code
Create a notebook
-
In the top navigation bar, click Notebook and select Create new note.
-
Enter a name for the notebook and select
mylivyfrom the Default Interpreter drop-down list.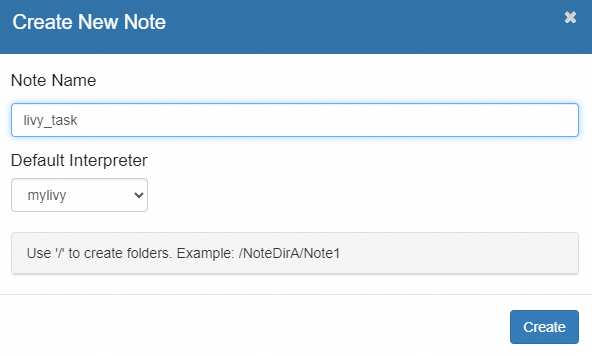
-
Click Create.
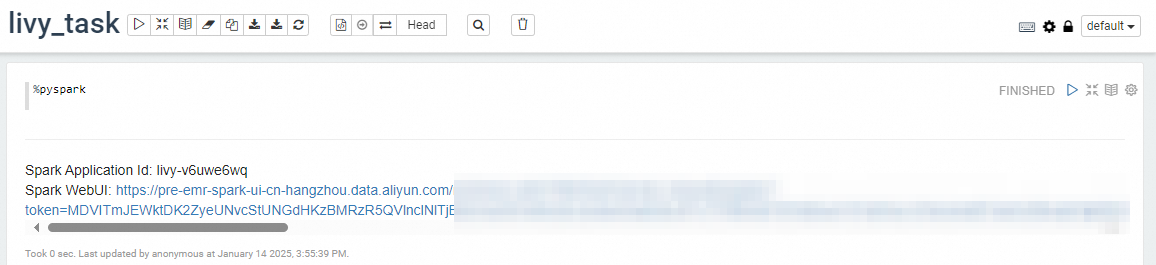
Start a Spark session
In the notebook, enter the following to start a Spark session:
%pysparkThe first startup takes 1 to 3 minutes. Use %pyspark for the Python environment or %spark for Scala. After the session starts, a link to the Spark UI appears and you can run code. Python and Scala can be used in the same notebook.
Run a query
To list all available databases in the current Spark environment:
%pyspark

spark.sql("show databases").show()
View session information (Optional)
After creating a Spark session through the Livy interface, you can view session details — including session ID and status — on the gateway's Sessions tab.
-
On the Livy Gateways tab, find the gateway and click its name.
-
Click the Sessions tab.

Troubleshooting
Jobs stop running from a Zeppelin notebook
A Livy session is shared across all notebooks. If the session is interrupted — for example, due to inactivity or a timeout — notebooks will stop running code. To recover:
-
In Zeppelin, click your username in the upper-right corner and select Interpreter.
-
Scroll to the livy interpreter and click Restart.
-
Run a code cell in any notebook to create a new session.
Connection to the gateway fails
-
Confirm that
zeppelin.livy.urluses the internal endpoint (not the public endpoint) of the Livy gateway. -
Confirm that the
x-acs-spark-livy-tokenheader value matches an active token on the Token Management tab. -
If the token has expired or been deleted, create a new token and update the
zeppelin.livy.http.headersvalue in the interpreter settings.
Session creation times out
If startup takes longer than expected — for example, when the workspace is cold-starting — increase zeppelin.livy.session.create_timeout to 600.