RocksDB is the default metadata storage backend for Namespace Service of JindoFS. This topic explains how to configure RocksDB and how to recover metadata from a Tablestore instance after a cluster is stopped or released.
RocksDB does not support high availability (HA) mode. For HA metadata storage, use Raft instances instead. For more information, see Use Raft-RocksDB-Tablestore to store metadata.
The following figure shows the structure of a single RocksDB instance for Namespace Service. 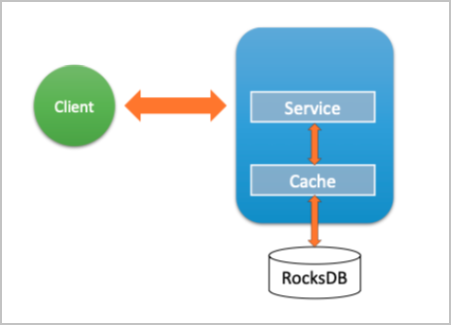
Configure RocksDB as the metadata storage backend
Prerequisites
Before you begin, make sure that you have:
An E-MapReduce (EMR) cluster with SmartData deployed
Access to the Alibaba Cloud EMR console
Configure the metadata storage backend
Go to the SmartData service.
Log on to the Alibaba Cloud EMR console.
In the top navigation bar, select the region where your cluster resides. Select a resource group if needed. By default, all resources of the account appear.
Click the Cluster Management tab.
On the Cluster Management page, find your cluster and click Details in the Actions column.
In the left-side navigation pane, click Cluster Service and then SmartData.
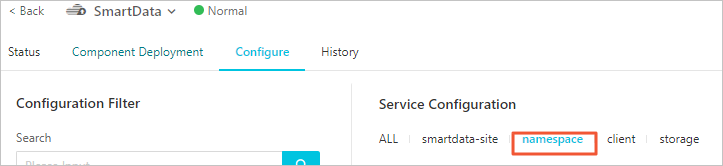
Go to the namespace tab.
Click the Configure tab.
Click the namespace tab in the Service Configuration section.
Set
namespace.backend.typetorocksdb.Save the configuration.
In the upper-right corner of the Service Configuration section, click Save.
In the Confirm Changes dialog box, enter a description and turn on Auto-update Configuration.
Click OK.
From the Actions drop-down list in the upper-right corner, select Restart Jindo Namespace Service.
(Optional) Configure Tablestore as the asynchronous backup backend
Bind the EMR cluster to a Tablestore instance to use it as an additional storage medium for Namespace Service. EMR asynchronously uploads metadata from the local RocksDB to the Tablestore instance in real time, creating a complete remote replica of your JindoFS metadata.
Set namespace.backend.rocksdb.async.ots.enabled to true before SmartData service initialization completes. If initialization has already completed, this setting has no effect because metadata has already been generated in the local RocksDB.
Configure the following parameters on the namespace tab:
| Parameter | Description | Example |
|---|---|---|
namespace.ots.instance | Name of the Tablestore instance. | emr-jfs |
namespace.ots.accessKey | AccessKey ID used to access the Tablestore instance. | <your-access-key-id> |
namespace.ots.accessSecret | AccessKey secret used to access the Tablestore instance. | <your-access-key-secret> |
namespace.ots.endpoint | Endpoint of the Tablestore instance. | http://emr-jfs.cn-hangzhou.vpc.tablestore.aliyuncs.com |
namespace.backend.rocksdb.async.ots.enabled | Whether to enable asynchronous upload to Tablestore. Set to true. | true |
Use a VPC endpoint for namespace.ots.endpoint to reduce latency and improve security.After configuring the parameters:
Save the configuration.
In the upper-right corner of the Service Configuration section, click Save.
In the Confirm Changes dialog box, enter a description and turn on Auto-update Configuration.
Click OK.
From the Actions drop-down list in the upper-right corner, select Start All Components.
Recover metadata from a Tablestore instance
If you configured a Tablestore instance as the remote asynchronous backup backend, a complete replica of JindoFS metadata is stored in Tablestore. After the original EMR cluster is stopped or released, you can recover the metadata to a new EMR cluster and access the original files from there.
Step 1: Prepare for recovery
(Optional) Record the metadata statistics of the original cluster. The output shows the number of directories and files:
hadoop fs -count jfs://test/Example output:
1596 1482809 25 jfs://test/In this example, there are 1,596 directories and 1,482,809 files.
Stop all running jobs on the original cluster. Wait 30 to 120 seconds for EMR to synchronize all metadata to Tablestore. Run the following command to check the sync status:
jindo jfs -metaStatusWhen the output contains
_synced=1, all metadata has been synchronized to Tablestore.
Stop or release the original EMR cluster. Make sure no clusters are accessing the Tablestore instance.
Step 2: Create a new EMR cluster
Create an EMR cluster in the same region as the Tablestore instance. Suspend all SmartData components during cluster creation.
Step 3: Configure metadata recovery
On the namespace tab of the new cluster, set the following parameters:
| Parameter | Description | Required value |
|---|---|---|
namespace.backend.rocksdb.async.ots.enabled | Whether to enable asynchronous upload to Tablestore. | false |
namespace.backend.rocksdb.recovery.mode | Whether to enable metadata recovery from Tablestore. | true |
Save the configuration:
In the upper-right corner of the Service Configuration section, click Save.
In the Confirm Changes dialog box, enter a description and turn on Auto-update Configuration.
Click OK.
From the Actions drop-down list in the upper-right corner, select Start All Components.
Step 4: Monitor recovery progress
After the SmartData service of the new cluster starts, EMR automatically recovers metadata from Tablestore to the local Raft-RocksDB. Run the following command to monitor progress:
jindo jfs -metaStatusWhen the state is FINISH, recovery is complete. ![]()
The cluster is in read-only mode during recovery. Write operations return the following error: ErrorCode : 25021, ErrorMsg: Namespace is under recovery mode, and is read-only.Step 5: Verify recovered metadata
Compare the file and directory counts of the new cluster against the original cluster's statistics:
# Count directories and files on the new cluster
[hadoop@emr-header-1 ~]$ hadoop fs -count jfs://test/
        1596      1482809                 25 jfs://test/

# Read a file to verify data accessibility
[hadoop@emr-header-1 ~]$ hadoop fs -cat jfs://test/testfile
this is a test file

# List directory contents
[hadoop@emr-header-1 ~]$ hadoop fs -ls jfs://test/
Found 3 items
drwxrwxr-x   - root   root            0 2020-03-25 14:54 jfs://test/emr-header-1.cluster-50087
-rw-r-----   1 hadoop hadoop          5 2020-03-25 14:50 jfs://test/haha-12096RANDOM.txt
-rw-r-----   1 hadoop hadoop         20 2020-03-25 15:07 jfs://test/testfile
Step 6: Re-enable asynchronous upload
After recovery is complete, re-enable asynchronous upload to Tablestore and disable recovery mode. On the namespace tab, set the following parameters:
| Parameter | Required value |
|---|---|
namespace.backend.rocksdb.async.ots.enabled | true |
namespace.backend.rocksdb.recovery.mode | false |
Then restart the new cluster:
Click the Cluster Management tab.
On the Cluster Management page, find the cluster. In the Actions column, click More and select Restart.
What's next
Use Raft-RocksDB-Tablestore to store metadata: Configure a high-availability metadata storage backend using Raft instances.