In cache mode, JindoFS stores data as objects in Object Storage Service (OSS) and caches frequently accessed data on local EMR cluster disks. This accelerates read/write performance and reduces bandwidth usage without requiring data migration or format conversion — your existing OSS clients and jobs continue to work as-is.
How it works
JindoFS cache mode uses OSS as the storage backend. When a job reads data, JindoFS checks whether the data is already cached on local cluster disks. If it is, the data is served from the local disk (faster). If not, JindoFS fetches it from OSS and optionally caches it for future reads.
When local disk usage exceeds the configured high watermark, JindoFS automatically deletes cold data from local disks.
Prerequisites
Before you begin, make sure you have:
An EMR cluster with the SmartData service enabled
Access to the Alibaba Cloud EMR console
Choose an access method
Cache mode supports two ways to access files in OSS:
| Method | Path format | When to use |
|---|---|---|
| OSS Scheme (recommended) | oss://<bucket_name>/<path> | Default for all new and existing jobs. No extra configuration needed after cluster creation. |
| JFS Scheme | jfs://test/<path> | When you need a JindoFS-native namespace with per-namespace OSS backend and credential configuration. |
Use OSS Scheme unless you have a specific reason to use JFS Scheme. Existing jobs reading and writing OSS data continue to work without any configuration changes.
Configure JFS Scheme (optional)
Skip this section if you are using OSS Scheme.
Open the SmartData service in the EMR console.
Log on to the Alibaba Cloud EMR console.
In the top navigation bar, select the region where your cluster resides. Select a resource group if needed.
Click the Cluster Management tab.
Find your cluster and click Details in the Actions column.
In the left-side navigation pane, click Cluster Service > SmartData.
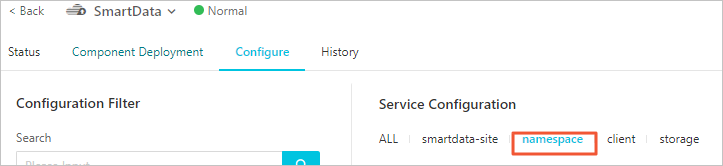
Go to the namespace configuration.
Click the Configure tab.
In the Service Configuration section, click the namespace tab.
Configure the namespace parameters. Set
jfs.namespacesto your namespace name. This example usestest. To configure multiple namespaces, separate them with commas (,). Click Custom Configuration. In the Add Configuration Item dialog box, configure the following parameters and click OK.Parameter Description Example jfs.namespaces.test.oss.uriThe OSS backend for the testnamespace. Set this to a specific OSS directory or the root of an OSS bucket.oss://<oss_bucket>/<oss_dir>/jfs.namespaces.test.modeThe storage mode. Set to cachefor cache mode.cacheIn the upper-right corner of the Service Configuration section, click Save.
From the Actions drop-down list, select Restart Jindo Namespace Service.
After the Namespace Service restarts, access files using jfs://test/<path_of_file>.
Enable local cache (optional)
By default, local cache is disabled and EMR reads data directly from OSS. Enable local cache to store hot data on local cluster disks, which significantly reduces latency for repeated reads.
In the left-side navigation pane, click Cluster Service > SmartData. On the SMARTDATA page, click the Configure tab. In the Service Configuration section, click the client tab.
Set
jfs.cache.data-cache.enableto1.
The change takes effect immediately on the client — no SmartData service restart is needed.
After enabling local cache, Jindo automatically manages cached data based on the high and low watermarks configured under Control disk space usage.
Control disk space usage
JindoFS automatically deletes cold data from local disks when disk usage reaches the high watermark, and stops deleting when usage drops to the low watermark. Both parameters accept decimal values between 0 and 1.
Tune these watermarks based on your workload:
Increase the high watermark if your working dataset is large and you want to cache more data to maximize hit rates.
Decrease the high watermark if you need to reserve more local disk space for compute tasks.
The high watermark must be greater than the low watermark.
In the Service Configuration section for the SmartData service, click the storage tab and configure the following parameters.
Parameter Description Default storage.watermark.high.ratioUpper disk usage limit. When JindoFS data exceeds this ratio, cold data is automatically deleted from local disks. 0.4storage.watermark.low.ratioLower disk usage target. After deletion starts, JindoFS removes cold data until disk usage drops to this ratio. 0.2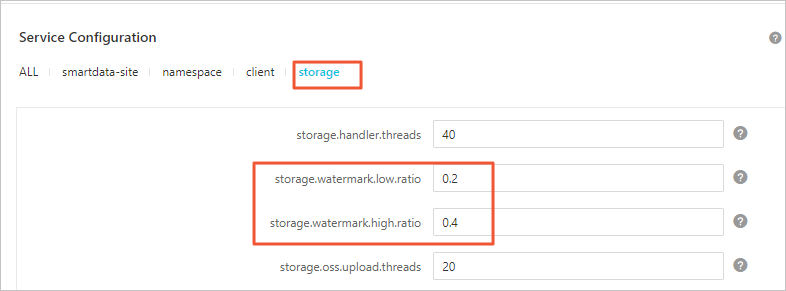
Save the configuration.
In the upper-right corner of the Service Configuration section, click Save.
In the Confirm Changes dialog box, fill in Description and turn on Auto-update Configuration.
Click OK.
Restart Jindo Storage Service to apply the changes.
From the Actions drop-down list, select Restart Jindo Storage Service.
In the Cluster Activities dialog box, configure the parameters and click OK.
In the confirmation message, click OK.
Access an OSS bucket in a different account or region
If the OSS bucket and your EMR cluster are under the same Alibaba Cloud account and in the same region, no additional credential configuration is required.
If the bucket is in a different account or region, configure the AccessKey pair and endpoint based on your access method.
OSS Scheme
In the left-side navigation pane, click Cluster Service > SmartData. On the SMARTDATA page, click the Configure tab. In the Service Configuration section, click the smartdata-site tab.
Click Custom Configuration. In the Add Configuration Item dialog box, configure the following parameters and click OK.
Parameter Description fs.jfs.cache.oss-accessKeyIdThe AccessKey ID for the OSS bucket. fs.jfs.cache.oss-accessKeySecretThe AccessKey secret for the OSS bucket. fs.jfs.cache.oss-endpointThe endpoint of the OSS bucket.
JFS Scheme
In the left-side navigation pane, click Cluster Service > SmartData. On the SMARTDATA page, click the Configure tab. In the Service Configuration section, click the namespace tab.
Set
jfs.namespacestotest.Click Custom Configuration. In the Add Configuration Item dialog box, configure the following parameters and click OK.
Parameter Description jfs.namespaces.test.oss.uriThe OSS backend for the testnamespace, with the endpoint included in the URI. Example:oss://<oss_bucket.endpoint>/<oss_dir>.jfs.namespaces.test.oss.access.keyThe AccessKey ID for the OSS bucket. jfs.namespaces.test.oss.access.secretThe AccessKey secret for the OSS bucket.
Advanced configuration
These parameters tune upload throughput and cache behavior. All changes take effect immediately on the client — no SmartData service restart is required.
Upload performance (client tab)
In the Service Configuration section, click the client tab and configure the following parameters.
| Parameter | Description | Default |
|---|---|---|
client.oss.upload.threads | Number of OSS upload threads per write stream. | 4 |
client.oss.upload.max.parallelism | Maximum concurrent OSS upload threads per process. Caps total bandwidth and memory usage from uploads. | 16 |
Cache and rename behavior (smartdata-site tab)
In the Service Configuration section, click the smartdata-site tab and configure the following parameters.
| Parameter | Description | Default |
|---|---|---|
fs.jfs.cache.copy.simple.max.byte | File size threshold for rename operations. Files smaller than this threshold use the standard copy interface; larger files use Multipart Copy for better performance. If the OSS fast copy feature is enabled, set this to -1 so all files use the standard copy interface for optimal rename performance. | — |
fs.jfs.cache.write.buffer.size | Write stream buffer size in bytes. Must be a power of 2, with a maximum of 8388608 (8 MB). Reduce this value if write streams consume too much memory. | 1048576 |
fs.oss.committer.magic.enabled | Enables Jindo Job Committer, which commits jobs without rename operations and improves job commit performance. In cache mode, rename performance is below standard, so this option is recommended. | true |