JindoFS cache mode stores files as objects in Object Storage Service (OSS) and caches them locally in your E-MapReduce cluster based on access patterns. This improves data access efficiency while preserving OSS object semantics and ensuring full compatibility with other OSS clients.
Background information
Cache mode preserves the original OSS object semantics, so you can use JindoFS without migrating or converting existing data. The local cluster cache improves data access performance and reduces bandwidth consumption for OSS read and write operations.
Method 1: Configure the OSS scheme (recommended)
The OSS scheme uses the standard oss://<bucket_name>/<path_of_your_file> path format. It works out of the box after you create an E-MapReduce cluster, with no additional configuration required. Existing jobs that read from or write to OSS run without modification.
Method 2: JFS scheme
Configure the JFS scheme
- Go to the SmartData service.
- Log on to the EMR console.
- In the top navigation bar, select a region and a resource group as needed.
- Click the Clusters tab.
- On the Clusters page, find your cluster and click Details in the Actions column.
- In the navigation pane on the left, choose .
- Log on to the EMR console.
- Go to the namespace tab for the SmartData service.
- Click the Configure tab.
- Click the namespace tab in the Service Configuration section.
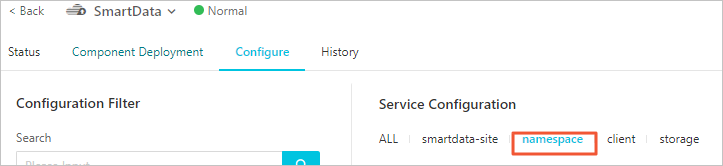
- Configure the following parameters.
JindoFS supports multiple namespaces. This topic uses
testas an example namespace.- Set jfs.namespaces to test.
test is an example namespace name. To configure multiple namespaces, separate their names with commas (,).
- Click Custom Configuration. In the Add Configuration Item dialog box, add the following parameters.
Parameter Description Example jfs.namespaces.test.oss.uri The storage backend for the testnamespace.oss://<oss_bucket>/<oss_dir>/ Note You must set this parameter to a specific directory in an OSS bucket or to the root directory.jfs.namespaces.test.mode Specifies that the testnamespace uses cache mode.cache
- Set jfs.namespaces to test.
- Click OK.
- Save the configuration.
- In the upper-right corner, click Save.
- In the Confirm dialog box, enter an execution reason and turn on Auto-update Configuration.
- Click OK.
- In the upper-right corner, choose .
After the service restarts, you can access files in JindoFS using the path
jfs://test/<path_of_file>.
Enable caching
By default, caching is disabled, meaning all data is read directly from OSS. When enabled, JindoFS caches hot data blocks on local disks.
- On the Configure tab of the SmartData service page, click the client tab.
- Set jfs.cache.data-cache.enable to true to enable the cache mode.
This change does not require restarting the SmartData service.
- Save the configuration.
- In the upper-right corner, click Save.
- In the Confirm dialog box, enter an execution reason and turn on Auto-update Configuration.
- Click OK.
After caching is enabled, JindoFS automatically manages and clears the local cache based on disk space watermarks. Allocate sufficient disk space for caching based on your requirements. For more information, see Control the disk space watermark.
Control disk space usage
JindoFS uses OSS as its storage backend, which provides vast storage capacity. However, the local disk space on your cluster is finite. To manage this space, JindoFS automatically evicts cold data from the local cache. You can control this eviction behavior with the storage.watermark.high.ratio and storage.watermark.low.ratio parameters. These parameters accept decimal values between 0 and 1 that represent the ratio of disk space used.
- Modify disk usage configurations. In the Service Configuration section for the SmartData service, click the storage tab and configure the parameters described in the following table.
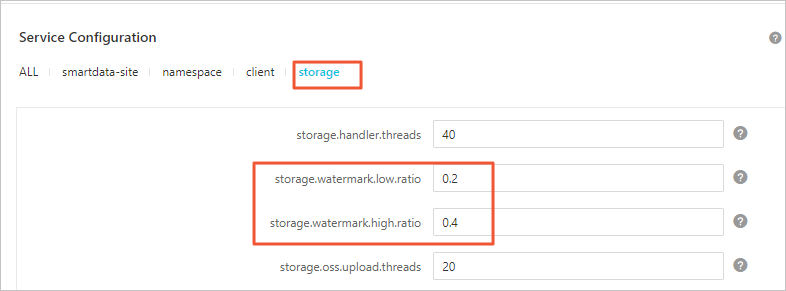
Parameter Description storage.watermark.high.ratio The upper limit of disk usage. When the disk usage of JindoFS data exceeds this limit, JindoFS automatically deletes data in the disk. Default value: 0.4. storage.watermark.low.ratio The lower limit of disk usage. After automatic data deletion is triggered, JindoFS starts to delete data until the disk usage of JindoFS data is reduced to this limit. Default value: 0.2. Note You can configure the upper limit and lower limit to adjust the disk space assigned to JindoFS. Make sure that the upper limit is greater than the lower limit. - Save the configurations.
- In the upper-right corner of the Service Configuration section, click Save.
- In the Confirm Changes dialog box, specify Description and turn on Auto-update Configuration.
- Click OK.
- Restart Jindo Storage Service to apply the configurations.
- Select Restart Jindo Storage Service from the drop-down list in the upper-right corner.
- In the Cluster Activities dialog box, specify the related parameters.
- Click OK.
- In the Confirm message, click OK.
Access OSS buckets
- OSS Scheme
- On the Configure tab of the SmartData service page, click the smartdata-site tab.
- On the smartdata-site page, click Custom Configuration.
- In the Add Configuration Item dialog box, add the required parameters.
Parameter Description fs.jfs.cache.oss.accessKeyId The AccessKey ID for the OSS storage backend. fs.jfs.cache.oss.accessKeySecret The AccessKey secret for the OSS storage backend. fs.jfs.cache.oss.endpoint The endpoint for the OSS storage backend. Note These configuration items are compatible with the settings used in EMR versions earlier than 3.30.0. You can also use the configuration items from those earlier versions. - Click OK.
- JFS Scheme
- On the Configure tab of the SmartData service page, click the namespace tab.
- On the namespace page, set jfs.namespaces to test.
In this topic, the namespace
testis used as an example. - Click Custom Configuration.
- In the Add Configuration Item dialog box, add the required parameters.
Parameter Description jfs.namespaces.test.oss.uri The OSS storage backend for the testnamespace. Example: oss://<oss_bucket.endpoint>/<oss_dir>.The endpoint is configured directly in the oss.uri parameter.
jfs.namespaces.test.oss.access.key The AccessKey ID for the OSS storage backend. jfs.namespaces.test.oss.access.secret The AccessKey secret for the OSS storage backend. - Click OK.
Advanced configuration
The cache mode provides advanced parameters for performance tuning. These are client-side configurations and do not require restarting the SmartData service.
- In the Service Configuration section, on the client tab, configure the following parameters.
Parameter Description client.oss.upload.threads The number of OSS upload threads for each file write stream. Default value: 4. client.oss.upload.max.parallelism A process-level limit on total OSS upload parallelism to prevent excessive threads from causing high bandwidth usage and memory consumption. Default value: 16. - In the Service Configuration section, on the smartdata-site tab, configure the following parameters.
Parameter Description fs.jfs.cache.write.buffer.size The buffer size for a file write stream. Must be a power of 2, with a maximum of 8 MB. Reduce this value if concurrent write streams cause high memory consumption. Default value: 1048576. fs.oss.committer.magic.enabled Enables the Jindo Job Committer, which improves performance by avoiding the rename operation. Default value: true. Note The Jindo Job Committer was introduced to address the poor performance of the rename operation on object storage systems such as OSS when used in cache mode.