JindoFS block storage mode uses Object Storage Service (OSS) as the storage backend and caches data on local cluster disks to accelerate access. Hadoop Distributed File System (HDFS)-compatible metadata management is handled by Namespace Service, which delivers low-latency metadata queries and high availability.
When to use block storage mode
Block storage mode is designed for workloads that write data once and read it repeatedly. It addresses the tradeoff between OSS's unlimited capacity and the latency of reading directly from object storage:
Write Once Read Many (WORM) workloads: Frequently accessed data is cached on local disks, increasing read throughput without requiring additional OSS requests.
Large-scale clusters that need elastic scaling: OSS provides virtually unlimited capacity independent of cluster size. Scale the cluster in or out without affecting stored data.
High-frequency metadata access: Namespace Service provides metadata performance comparable to HDFS, avoiding the latency and instability that occur when metadata and data are accessed concurrently at high frequency via OssFileSystem.
Data-local job scheduling: Jobs scheduled on EMR nodes where data is already cached reduce network transmission and improve read performance.
Prerequisites
Before you begin, ensure that you have:
An EMR cluster with the SmartData service installed
An OSS bucket in the same region and under the same account as the EMR cluster (recommended for password-free access and best performance)
Configure block storage mode
Go to the SmartData service.
Log on to the Alibaba Cloud EMR console.
In the top navigation bar, select the region where your cluster resides. Select the resource group as required. By default, all resources of the account appear.
Click the Cluster Management tab.
On the Cluster Management page, find the target cluster and click Details in the Actions column.
In the left-side navigation pane, click Cluster Service and then SmartData.
Go to the namespace tab.
Click the Configure tab.
In the Service Configuration section, click the namespace tab.
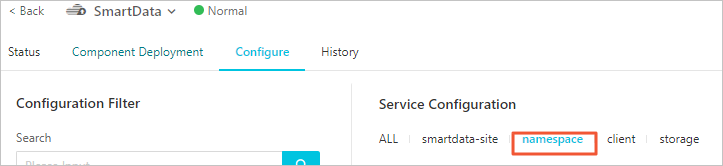
Configure the namespace parameters. JindoFS supports multiple namespaces. The following steps use a namespace named
testas an example.Set
jfs.namespacestotest. To configure multiple namespaces, separate their names with commas (,).In the upper-right corner of the Service Configuration section, click Custom Configuration. In the Add Configuration Item dialog box, add the following parameters.
Parameter Description Example jfs.namespaces.test.oss.uriThe storage backend of the testnamespace. Set this to a directory within the OSS bucket. The namespace stores data blocks in this directory.oss://<oss_bucket>/<oss_dir>/jfs.namespaces.test.modeThe storage mode of the testnamespace. Set this toblock.blockjfs.namespaces.test.oss.access.keyThe AccessKey ID of the OSS bucket. Not required if the bucket is in the same region and account as the EMR cluster, as password-free access applies. xxxxjfs.namespaces.test.oss.access.secretThe AccessKey secret of the OSS bucket. Not required for same-region, same-account buckets. — Click OK.
In the upper-right corner of the Service Configuration section, click Save.
Select Restart Jindo Namespace Service from the Actions drop-down list in the upper-right corner.
After Namespace Service is restarted, you can use jfs://test/<path_of_file> to access files in JindoFS.
Control disk space usage
JindoFS automatically evicts cold data from local disks when usage exceeds a threshold. Two parameters control eviction behavior:
# Start evicting when JindoFS data usage reaches this ratio of local disk capacity
storage.watermark.high.ratio=0.4

# Stop evicting when JindoFS data usage drops to this ratio
storage.watermark.low.ratio=0.2
Both parameters accept decimal values between 0 and 1. The high ratio must be greater than the low ratio.
Modify the disk usage configuration. In the Service Configuration section for the SmartData service, click the storage tab and update the parameters.
Parameter Description Default storage.watermark.high.ratioThe upper limit of disk usage. Automatic eviction starts when JindoFS data exceeds this ratio. 0.4storage.watermark.low.ratioThe lower limit of disk usage. Automatic eviction stops when JindoFS data drops to this ratio. 0.2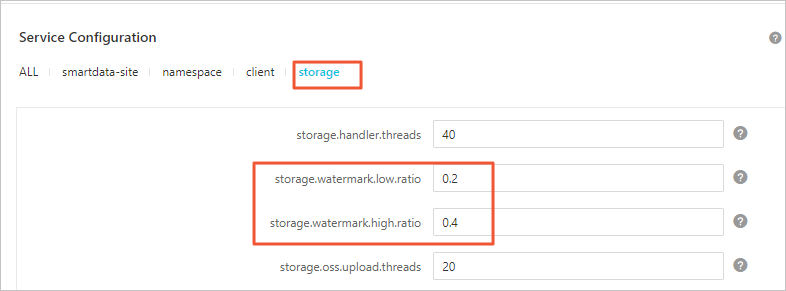
Save the configuration.
In the upper-right corner of the Service Configuration section, click Save.
In the Confirm Changes dialog box, enter a description and turn on Auto-update Configuration.
Click OK.
Restart Jindo Storage Service to apply the changes.
Select Restart Jindo Storage Service from the Actions drop-down list in the upper-right corner.
In the Cluster Activities dialog box, configure the required parameters.
Click OK.
In the Confirm message, click OK.