JindoFS uses Object Storage Service (OSS) as the persistent storage layer and local disks as a distributed cache layer, with Namespace Service managing metadata locally for fast access. This topic describes how to configure JindoFS in block storage mode and control local disk usage.
How it works
JindoFS splits storage into two layers:
Persistent layer (OSS): All data blocks are stored in OSS. Storage capacity scales independently of the EMR cluster — scale the cluster in or out without affecting stored data.
Cache layer (local disks): JindoFS stores backup data on local cluster disks to accelerate read operations. This is especially effective for Write Once Read Many (WORM) workloads, where the same data is read repeatedly.
Namespace Service runs locally in the cluster and manages all metadata, providing HDFS-like metadata query performance without the instability caused by routing metadata queries to OSS.
When to use block storage mode
Block storage mode provides fast metadata queries (via the local Namespace Service), local disk cache for backup data, and maximal data locality when jobs run in the EMR cluster. Use block storage mode when your workloads require fast metadata queries, repeated reads on the same dataset (WORM), or maximum data locality for compute jobs.
Prerequisites
Before you begin, make sure you have:
An EMR cluster with the SmartData service deployed
An OSS bucket to use as the storage backend
(Optional) An AccessKey ID and AccessKey secret — not required if the OSS bucket is in the same region and under the same Alibaba Cloud account as your EMR cluster
Configure block storage mode
Go to the SmartData service.
Log on to the Alibaba Cloud EMR console.
In the top navigation bar, select the region where your cluster resides. Select the resource group as required. By default, all resources of the account appear.
Click the Cluster Management tab.
On the Cluster Management page, find your cluster and click Details in the Actions column.
In the left-side navigation pane, click Cluster Service, then click SmartData.
Open the namespace configuration tab.
Click the Configure tab.
In the Service Configuration section, click the namespace tab.
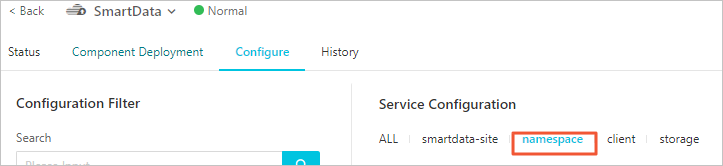
Configure namespace parameters. JindoFS supports multiple namespaces. The following steps use a namespace named
testas an example.Set
jfs.namespacestotest. To configure multiple namespaces, separate them with commas (,).In the upper-right corner of the Service Configuration section, click Custom Configuration. In the Add Configuration Item dialog box, add the following parameters.
Parameter Description Example jfs.namespaces.test.oss.uriThe OSS path used as the storage backend for the testnamespace. Set this to a directory within an OSS bucket — JindoFS stores data blocks under this path.oss://<oss_bucket>/<oss_dir>/jfs.namespaces.test.modeThe storage mode. Set to blockfor block storage mode.blockjfs.namespaces.test.oss.access.keyThe AccessKey ID of the OSS bucket. Skip this parameter if the bucket is in the same region and under the same account as the EMR cluster — the cluster accesses the bucket without credentials in that case. xxxxjfs.namespaces.test.oss.access.secretThe AccessKey secret of the OSS bucket. The same exemption applies as above. — Click OK.
In the upper-right corner of the Service Configuration section, click Save.
From the Actions drop-down list in the upper-right corner, select Restart Jindo Namespace Service.
After Namespace Service restarts, access files in JindoFS using the path format jfs://test/<path_of_file>.
Control disk space usage
JindoFS automatically deletes cold data in local disks when disk usage crosses the high watermark. Two parameters control this behavior:
| Parameter | Default | Description |
|---|---|---|
storage.watermark.high.ratio | 0.4 | Upper limit of disk usage. When JindoFS data on a local disk exceeds this ratio, background eviction starts. |
storage.watermark.low.ratio | 0.2 | Lower limit of disk usage. Eviction continues until disk usage drops to this ratio. |
Set both parameters to decimal values between 0 and 1. The high watermark must be greater than the low watermark.
To adjust disk space usage:
In the Service Configuration section, click the storage tab and update the watermark parameters.
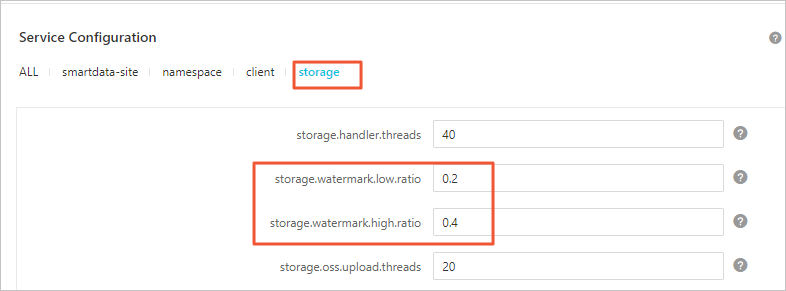
Save the configuration.
In the upper-right corner, click Save.
In the Confirm Changes dialog box, enter a description and turn on Auto-update Configuration.
Click OK.
Restart Jindo Storage Service to apply the changes.
In the upper-right corner, choose Actions > Restart Jindo Storage Service.
In the Cluster Activities dialog box, configure the parameters.
Click OK.
In the confirmation message, click OK.