Spark Load offloads data preprocessing to an external Spark cluster before importing data into StarRocks. This reduces the compute burden on your StarRocks cluster and is the recommended approach for first-time migrations or large-scale imports at the TB level.
The user account must have the USAGE-PRIV permission on the Spark resource before submitting any import job.
How it works
Spark Load is an asynchronous import method. Submit jobs using the MySQL protocol and check results with SHOW LOAD.
The following figure shows the workflow.
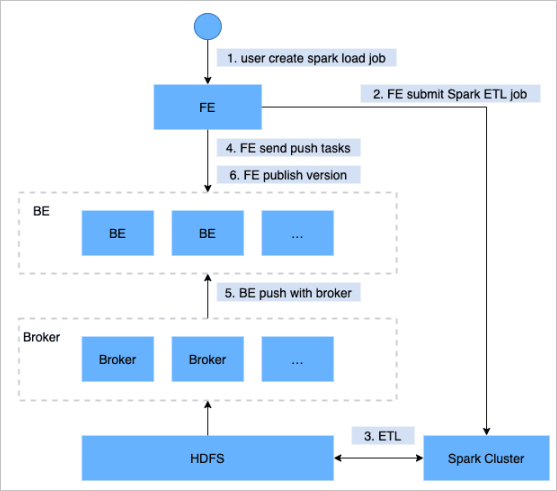
Submit a Spark Load job to the frontend node.
The frontend node schedules and submits an extract, transform, and load (ETL) job to the Spark cluster.
The Spark cluster runs the ETL job: it builds bitmap global dictionaries, and partitions, sorts, and aggregates data.
After the ETL job completes, the frontend node identifies the preprocessed data directories for each partition and schedules backend nodes to run a push job.
Backend nodes use Brokers to read data from Hadoop Distributed File System (HDFS) and convert it to the format that StarRocks stores internally.
The frontend node publishes a new StarRocks version and marks the import job as complete.
Key concepts
Spark ETL The Spark program that performs ETL operations on data before import. It handles global dictionary creation, data partitioning, sorting, and aggregation.
Broker A stateless process that wraps file system interfaces, allowing StarRocks to read files from remote storage systems such as HDFS.
Global dictionary A data structure that maps raw values to encoded integers. Global dictionaries are used to precompute bitmap columns before import. StarRocks bitmap columns use roaring bitmaps, which require integer input.
Global dictionary workflow
Bitmap columns in StarRocks require integer input. A global dictionary handles this conversion:
Read source data and store it in a temporary Hive table (
hive-table).Deduplicate values from
hive-tableinto a table nameddistinct-value-table.Create a dictionary table (
dict-table) with one column for raw values and one for encoded integers.LEFT JOIN
distinct-value-tablewithdict-table, apply a window function to encode new raw values, and write the results back todict-table.JOIN
dict-tablewithhive-tableto replace raw values with their encoded integers.Pass the encoded
hive-tabledata to subsequent ETL steps and import it into StarRocks.
Global dictionaries are only supported when importing from a Hive table.
Data preprocessing
After the global dictionary is built (if applicable), Spark preprocesses the data:
Read data from an HDFS file or Hive table.
Apply field mappings and expression-based calculations. Generate a
bucket-idfield based on partition information.Build rollup trees from the rollup metadata in the StarRocks table.
Traverse rollup trees and aggregate data layer by layer, with each layer computed from the previous one.
Distribute aggregated data to buckets based on
bucket-idand write to HDFS.Brokers read the HDFS files and push data into the StarRocks backend nodes.
Prerequisites
Before you begin, make sure you have:
An EMR cluster with a running Spark cluster and YARN ResourceManager
A Broker configured in StarRocks (
ALTER SYSTEM ADD BROKER)The
USAGE-PRIVpermission granted on the Spark external resourceSpark 2.4.5 or a later 2.x version downloaded and stored on the frontend node
Hadoop 2.5.2 or a later 2.x version downloaded and stored on the frontend node
Set up Spark Load
Complete these steps in order: create an external Spark resource → configure the Spark client → configure the YARN client → submit import jobs.
Step 1: Create an external Spark resource
Register the Spark cluster as an external resource in StarRocks so that the frontend node can submit ETL jobs to it.
Syntax
CREATE EXTERNAL RESOURCE "resource_name"
PROPERTIES
(
    "type" = "spark",
    "spark.master" = "yarn",
    "spark.submit.deployMode" = "<cluster|client>",
    "spark.hadoop.fs.defaultFS" = "hdfs://<namenode-host>:<port>",
    "spark.hadoop.yarn.resourcemanager.address" = "<resourcemanager-host>:8032",
    "working_dir" = "hdfs://<namenode-host>:<port>/tmp/starrocks",
    "broker" = "<broker-name>",
    "broker.username" = "<username>",
    "broker.password" = "<password>"
);
Resource properties
| Property | Required | Description |
|---|---|---|
type | Yes | Set to spark. |
spark.master | Yes | Set to yarn. |
spark.submit.deployMode | Yes | Deploy mode for the Spark program. Valid values: cluster, client. |
spark.hadoop.fs.defaultFS | Yes | Required when spark.master is yarn. |
spark.hadoop.yarn.resourcemanager.address | No | Address of the YARN ResourceManager, in host:port format. |
spark.hadoop.yarn.resourcemanager.ha.enabled | No | Set to true to enable high availability on the ResourceManager. Default value: true. |
spark.hadoop.yarn.resourcemanager.ha.rm-ids | No | Logical IDs of the ResourceManagers (for HA). |
spark.hadoop.yarn.resourcemanager.hostname.rm-id | No | Hostname corresponding to each logical ID. Configure either this or spark.hadoop.yarn.resourcemanager.address.rm-id. |
spark.hadoop.yarn.resourcemanager.address.rm-id | No | Address (host:port) corresponding to each logical ID. Configure either this or spark.hadoop.yarn.resourcemanager.hostname.rm-id. |
working_dir | Yes (for ETL) | HDFS directory where Spark ETL resources are staged. Example: hdfs://host:port/tmp/starrocks. |
broker | Yes (for ETL) | Name of the Broker to use. Run ALTER SYSTEM ADD BROKER to add one first. |
broker.property_key | No | Authentication properties the Broker uses to read ETL intermediate files. |
For a full list of Spark configuration options, see the Spark Configuration documentation.
Examples
Yarn cluster mode (standard):
CREATE EXTERNAL RESOURCE "spark0"
PROPERTIES
(
    "type" = "spark",
    "spark.master" = "yarn",
    "spark.submit.deployMode" = "cluster",
    "spark.jars" = "xxx.jar,yyy.jar",
    "spark.files" = "/tmp/aaa,/tmp/bbb",
    "spark.executor.memory" = "1g",
    "spark.yarn.queue" = "queue0",
    "spark.hadoop.yarn.resourcemanager.address" = "resourcemanager_host:8032",
    "spark.hadoop.fs.defaultFS" = "hdfs://namenode_host:9000",
    "working_dir" = "hdfs://namenode_host:9000/tmp/starrocks",
    "broker" = "broker0",
    "broker.username" = "user0",
    "broker.password" = "password0"
);
Yarn cluster mode with YARN high availability:
CREATE EXTERNAL RESOURCE "spark1"
PROPERTIES
(
    "type" = "spark",
    "spark.master" = "yarn",
    "spark.submit.deployMode" = "cluster",
    "spark.hadoop.yarn.resourcemanager.ha.enabled" = "true",
    "spark.hadoop.yarn.resourcemanager.ha.rm-ids" = "rm1,rm2",
    "spark.hadoop.yarn.resourcemanager.hostname.rm1" = "host1",
    "spark.hadoop.yarn.resourcemanager.hostname.rm2" = "host2",
    "spark.hadoop.fs.defaultFS" = "hdfs://namenode_host:9000",
    "working_dir" = "hdfs://namenode_host:9000/tmp/starrocks",
    "broker" = "broker1"
);
HDFS high-availability mode:
CREATE EXTERNAL RESOURCE "spark2"
PROPERTIES
(
    "type" = "spark",
    "spark.master" = "yarn",
    "spark.hadoop.yarn.resourcemanager.address" = "resourcemanager_host:8032",
    "spark.hadoop.fs.defaultFS" = "hdfs://myha",
    "spark.hadoop.dfs.nameservices" = "myha",
    "spark.hadoop.dfs.ha.namenodes.myha" = "mynamenode1,mynamenode2",
    "spark.hadoop.dfs.namenode.rpc-address.myha.mynamenode1" = "nn1_host:rpc_port",
    "spark.hadoop.dfs.namenode.rpc-address.myha.mynamenode2" = "nn2_host:rpc_port",
    "spark.hadoop.dfs.client.failover.proxy.provider" = "org.apache.hadoop.hdfs.server.namenode.ha.ConfiguredFailoverProxyProvider",
    "working_dir" = "hdfs://myha/tmp/starrocks",
    "broker" = "broker2",
    "broker.dfs.nameservices" = "myha",
    "broker.dfs.ha.namenodes.myha" = "mynamenode1,mynamenode2",
    "broker.dfs.namenode.rpc-address.myha.mynamenode1" = "nn1_host:rpc_port",
    "broker.dfs.namenode.rpc-address.myha.mynamenode2" = "nn2_host:rpc_port",
    "broker.dfs.client.failover.proxy.provider" = "org.apache.hadoop.hdfs.server.namenode.ha.ConfiguredFailoverProxyProvider"
);
Manage resources
-- List all resources
SHOW RESOURCES;
SHOW PROC "/resources";

-- Grant or revoke USAGE-PRIV
GRANT USAGE_PRIV ON RESOURCE "spark0" TO "user0"@"%";
GRANT USAGE_PRIV ON RESOURCE "spark0" TO ROLE "role0";
GRANT USAGE_PRIV ON RESOURCE * TO "user0"@"%";
GRANT USAGE_PRIV ON RESOURCE * TO ROLE "role0";
REVOKE USAGE_PRIV ON RESOURCE "spark0" FROM "user0"@"%";
REVOKE USAGE_PRIV ON RESOURCE "spark0" FROM ROLE "role0";
With an ordinary account,SHOW RESOURCESonly displays resources for which the account hasUSAGE-PRIV. Root and admin accounts see all resources.
Drop a resource
DROP RESOURCE "resource_name";Step 2: Configure the Spark client
The frontend node uses spark-submit to submit Spark Load jobs, so the Spark client must be installed on the frontend node host.
Download Spark 2.4.5 or a later 2.x version and place it on the frontend node. Then configure the following parameters in the frontend node's configuration file (fe.conf):
Set the Spark home directory Set
spark_home_default_dirto the directory where you placed the Spark client. The default value islib/spark2xunder the frontend node root directory. This parameter cannot be left blank.Package Spark dependencies Package all JAR files from the Spark client's
jars/folder into a ZIP file. Setspark_resource_pathto the path of that ZIP file. If left blank, the frontend node looks forlib/spark2x/jars/spark-2x.zipin its root directory—if not found, an error is returned. When a Spark Load job is submitted, the dependency package is uploaded to a remote staging location atworking_dir/{cluster_id}/. The staging location is named in the--spark-repository--{resource-name}format. Example directory structure:---spark-repository--spark0/ |---archive-1.0.0/ | |---lib-990325d2c0d1d5e45bf675e54e44fb16-spark-dpp-1.0.0-jar-with-dependencies.jar | |---lib-7670c29daf535efe3c9b923f778f61fc-spark-2x.zip |---archive-1.1.0/ | |---lib-64d5696f99c379af2bee28c1c84271d5-spark-dpp-1.1.0-jar-with-dependencies.jar | |---lib-1bbb74bb6b264a270bc7fca3e964160f-spark-2x.zipThe default dependency package name is
spark-2x.zip. The frontend node also uploads the Dynamic Partition Pruning (DPP) dependency. Once uploaded, these packages are reused for subsequent jobs.
Step 3: Configure the YARN client
The frontend node runs YARN commands to check application status and stop applications, so the YARN client must also be installed on the frontend node.
Download Hadoop 2.5.2 or a later 2.x version and configure the following parameters in fe.conf:
Set the YARN executable path Set
yarn_client_pathto the path of the YARN binary file. The default islib/yarn-client/hadoop/bin/yarnunder the frontend node root directory.(Optional) Set the YARN config directory When the frontend node checks application status or stops applications, it generates
core-site.xmlandyarn-site.xmlinlib/yarn-config/by default. To change this location, setyarn_config_dir.
Import data
Create an import job
Supported data sources: CSV files and Hive tables.
LOAD LABEL db_name.label_name
    (data_desc, ...)
WITH RESOURCE resource_name
[resource_properties]
[PROPERTIES (key1=value1, ...)]
Where data_desc is one of:
-- From HDFS files
DATA INFILE ("file_path", ...)
[NEGATIVE]
INTO TABLE tbl_name
[PARTITION (p1, p2)]
[COLUMNS TERMINATED BY separator]
[(col1, ...)]
[COLUMNS FROM PATH AS (col2, ...)]
[SET (k1=f1(xx), k2=f2(xx))]
[WHERE predicate]

-- From a Hive table
DATA FROM TABLE hive_external_tbl
[NEGATIVE]
INTO TABLE tbl_name
[PARTITION (p1, p2)]
[SET (k1=f1(xx), k2=f2(xx))]
[WHERE predicate]
For the full syntax, run HELP SPARK LOAD.
Key parameters
| Parameter | Description |
|---|---|
label | Unique identifier for the import job within the database. Same specification as Broker Load. |
| Data description | Supports CSV files and Hive tables as data sources. Other specifications are the same as Broker Load. |
| Job properties | Same as the opt_properties in Broker Load. |
| Spark resource properties | Per-job Spark resource overrides. Takes effect for this job only and does not change the cluster-level resource configuration. |
Example 1: Import from HDFS CSV files
LOAD LABEL db1.label1
(
    DATA INFILE("hdfs://emr-header-1.cluster-xxx:9000/user/starRocks/test/ml/file1")
    INTO TABLE tbl1
    COLUMNS TERMINATED BY ","
    (tmp_c1, tmp_c2)
    SET
    (
        id=tmp_c2,
        name=tmp_c1
    ),
    DATA INFILE("hdfs://emr-header-1.cluster-xxx:9000/user/starRocks/test/ml/file2")
    INTO TABLE tbl2
    COLUMNS TERMINATED BY ","
    (col1, col2)
    WHERE col1 > 1
)
WITH RESOURCE 'spark0'
(
    "spark.executor.memory" = "2g",
    "spark.shuffle.compress" = "true"
)
PROPERTIES
(
    "timeout" = "3600"
);
Example 2: Import from a Hive table with a global dictionary
Use this approach when the target StarRocks table has a bitmap aggregation column. The bitmap_dict() function maps raw Hive column values to encoded integers via the global dictionary.
Create a Hive external resource:
CREATE EXTERNAL RESOURCE hive0
PROPERTIES
(
    "type" = "hive",
    "hive.metastore.uris" = "thrift://emr-header-1.cluster-xxx:9083"
);
Create an external Hive table:
CREATE EXTERNAL TABLE hive_t1
(
    k1 INT,
    K2 SMALLINT,
    k3 VARCHAR(50),
    uuid VARCHAR(100)
)
ENGINE=hive
PROPERTIES
(
    "resource" = "hive0",
    "database" = "tmp",
    "table" = "t1"
);
Submit the import job:
LOAD LABEL db1.label1
(
    DATA FROM TABLE hive_t1
    INTO TABLE tbl1
    SET
    (
        uuid=bitmap_dict(uuid)
    )
)
WITH RESOURCE 'spark0'
(
    "spark.executor.memory" = "2g",
    "spark.shuffle.compress" = "true"
)
PROPERTIES
(
    "timeout" = "3600"
);
View an import job
SHOW LOAD ORDER BY createtime DESC LIMIT 1\GExample output:
*************************** 1. row ***************************
       JobId: 76391
       Label: label1
       State: FINISHED
    Progress: ETL:100%; LOAD:100%
        Type: SPARK
     EtlInfo: unselected.rows=4; dpp.abnorm.ALL=15; dpp.norm.ALL=28133376
    TaskInfo: cluster:cluster0; timeout(s):10800; max_filter_ratio:5.0E-5
    ErrorMsg: N/A
  CreateTime: 2019-07-27 11:46:42
EtlStartTime: 2019-07-27 11:46:44
EtlFinishTime: 2019-07-27 11:49:44
LoadStartTime: 2019-07-27 11:49:44
LoadFinishTime: 2019-07-27 11:50:16
         URL: http://1.1.*.*:8089/proxy/application_1586619723848_0035/
  JobDetails: {"ScannedRows":28133395,"TaskNumber":1,"FileNumber":1,"FileSize":200000}
Output fields
| Field | Description |
|---|---|
State | Job status. Transitions: PENDING → ETL → LOADING → FINISHED (or CANCELLED on failure). |
Progress | ETL and LOAD progress percentages. LOAD progress is calculated as: imported tablets across all replicas / total tablets × 100%. The job reaches 99% before the import takes effect, then jumps to 100%. Progress is not always linear. |
Type | Import type. Shows SPARK for Spark Load jobs. |
CreateTime | Time the import job was created. |
EtlStartTime | Time the job entered the ETL state. |
EtlFinishTime | Time the job left the ETL state. |
LoadStartTime | Time the job entered the LOADING state. |
LoadFinishTime | Time the job completed. |
JobDetails | Details including scanned rows, task count, file count, and total data size. Example: {"ScannedRows":139264,"TaskNumber":1,"FileNumber":1,"FileSize":940754064}. |
URL | URL for the Spark application web UI. Open in a browser to view job details. |
For the full parameter reference, see Broker Load.
For the full syntax, run HELP SHOW LOAD.
View job logs
Spark Load logs are stored in log/spark_launcher_log/ under the frontend node root directory, named in the format spark-launcher-{load-job-id}-{label}.log. Logs are retained for three days by default and are deleted when the associated import metadata is purged.
Cancel an import job
Cancel a job that is not in FINISHED or CANCELLED state:
CANCEL LOAD WHERE LABEL = "label1";For the full syntax, run HELP CANCEL LOAD.
System configuration
These parameters in fe.conf control Spark Load behavior at the system level.
| Parameter | Default | Description |
|---|---|---|
enable_spark_load | false | Enables Spark Load and external resource creation. Set to true to activate. |
spark_load_default_timeout_second | 259200 (3 days) | Default timeout for import jobs, in seconds. |
spark_home_default_dir | fe/lib/spark2x | Directory where the Spark client is stored. |
spark_resource_path | (empty) | Path to the packaged Spark dependency ZIP file. |
spark_launcher_log_dir | fe/log/spark-launcher-log | Directory where Spark client submission logs are stored. |
yarn_client_path | fe/lib/yarn-client/hadoop/bin/yarn | Path to the YARN client binary. |
yarn_config_dir | fe/lib/yarn-config | Directory where YARN command configuration files are generated. |
Best practices
Use Spark Load for imports in the tens of GB to TB range from HDFS. For smaller datasets, Stream Load or Broker Load are more appropriate—they have lower setup overhead and faster turnaround.
For complete end-to-end sample code, see 03_sparkLoad2StarRocks.md on GitHub.
What's next
Broker Load — alternative import method for smaller datasets
Resource Management — manage external Spark resources in StarRocks