When a broker in an E-MapReduce (EMR) Kafka cluster experiences a local disk hardware exception, the restoration process requires Kafka-specific O&M steps at each stage of the ECS Repair wizard — unlike the standard flow for general-purpose Elastic Compute Service (ECS) instances. This topic walks you through all three stages: dismounting the faulty disk, waiting for Alibaba Cloud to replace it, and mounting the restored disk with Kafka log directories recovered.
This topic uses /dev/vdh as the example disk name and /mnt/disk7 as the example mount directory.
Prerequisites
Before you begin, ensure that you have:
-
Received a hardware exception email from Alibaba Cloud for a local disk on a Kafka broker node
-
Access to the ECS console and the EMR console
-
SSH access to the Kafka cluster. For details, see Log on to a cluster
Stage 1: Dismount the faulty disk
You can monitor the disk restoration progress in the ECS console.
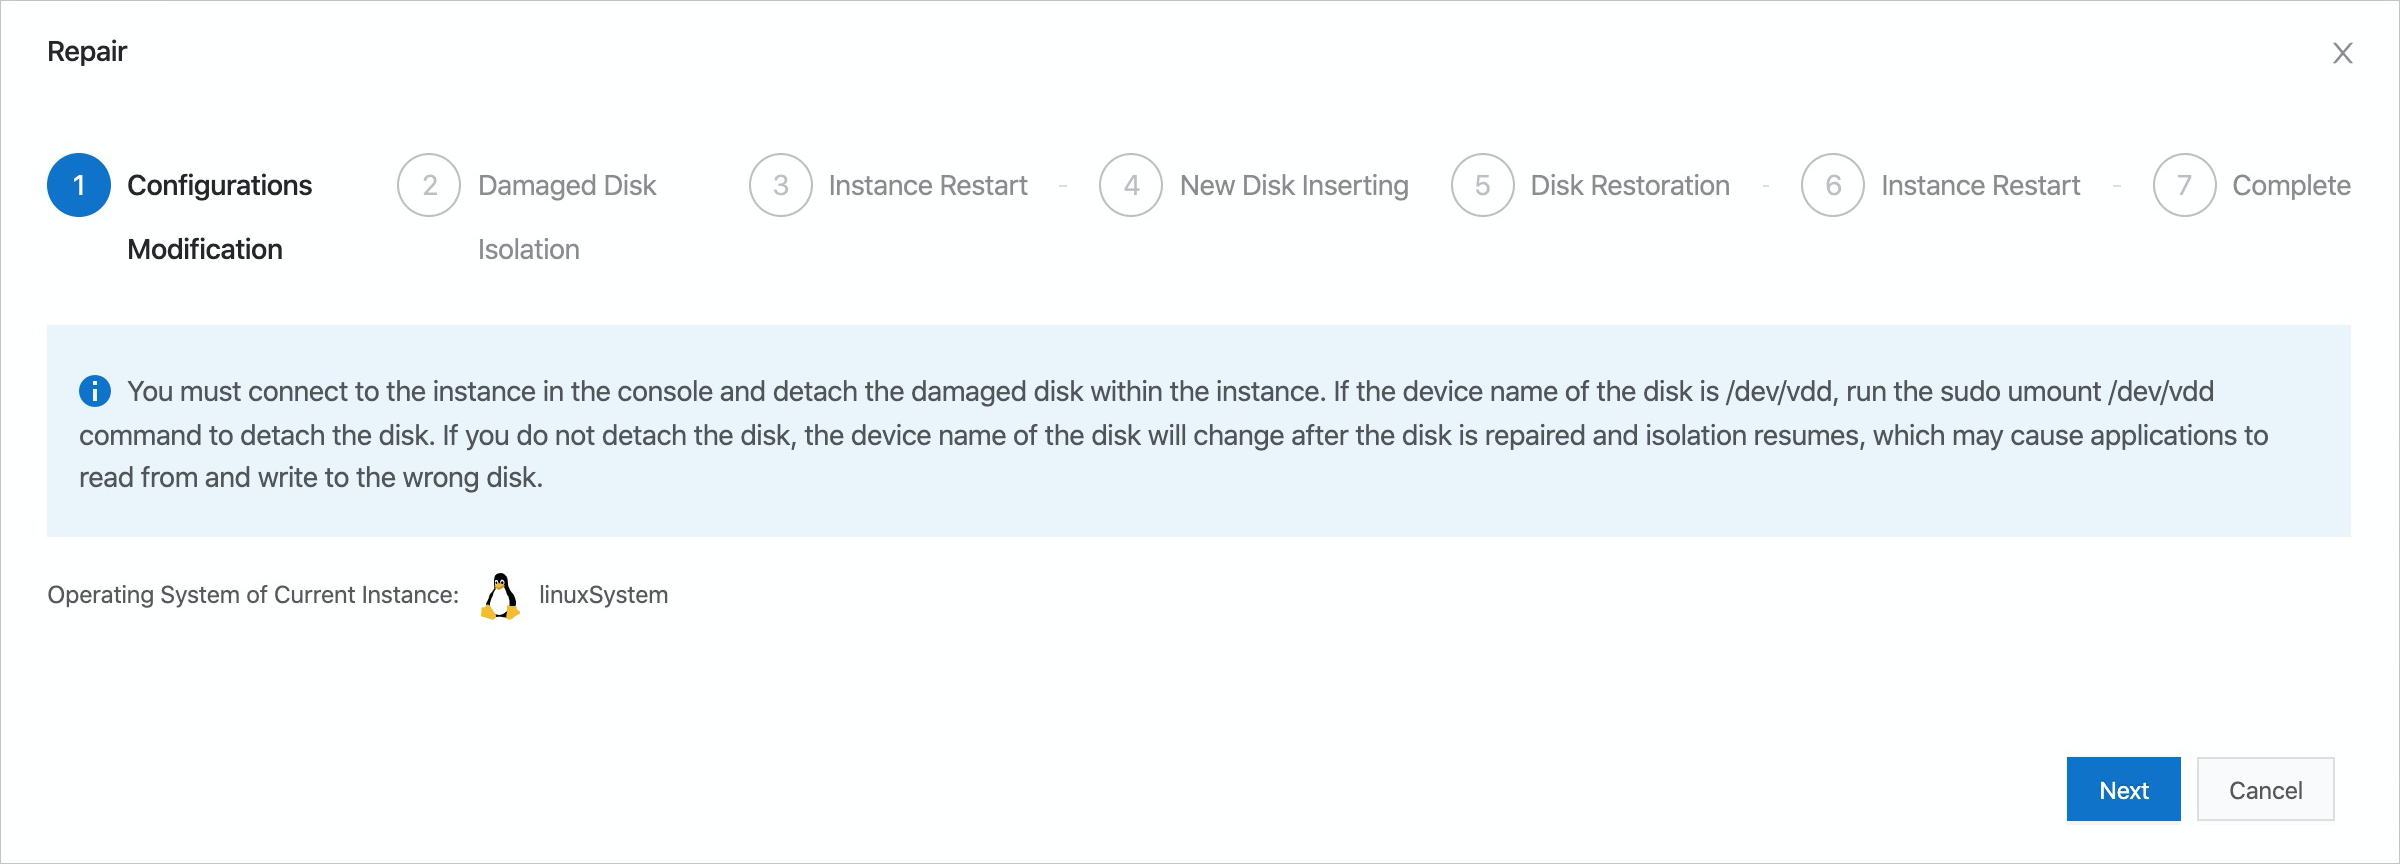
Step 1: Select a disk restoration policy
In the Repair wizard, go to the Configurations Modification step and select a disk restoration policy.
Most disk restoration policies isolate the faulty disk. Before restarting the broker, remove the faulty disk's directory from the log.dirs configuration in the Kafka cluster. If you skip this step, the broker will attempt to access the missing disk on startup and fail to start.
After you complete the required actions for the selected policy, click Next in the lower-right corner.
-
If the wizard advances to the Instance Restart step, continue to Step 2.
-
If the wizard skips directly to the New Disk Inserting step, skip to Step 3.
For details on available policies, see Disk failures and O&M.
Step 2 (conditional): Restart the ECS instance
Complete this step only if the Instance Restart step appears in the Repair wizard. If the wizard went directly to New Disk Inserting, skip to Step 3.
Always stop the broker before restarting the ECS instance. If the instance restarts while the broker is running, Kafka will crash when the local disk disappears, leaving the log directories in an inconsistent state that is difficult to recover.
Perform the following actions in order:
| Action | Console |
|---|---|
| Stop the broker on the affected node | EMR console |
| Click Restart | ECS console — Instance Restart step |
| Start the broker on the affected node | EMR console |
| Verify the broker is running | EMR console |
After the instance restarts, the wizard automatically advances to the New Disk Inserting step.
Step 3: Submit the disk replacement request
In the New Disk Inserting step, click OK.
Alibaba Cloud replaces the faulty local disk on the host physical machine. The replacement is typically completed within five business days. Alibaba Cloud sends a notification when the disk is ready.
Stage 2: Wait for the replacement to complete
No action is required during this stage. Wait for the disk replacement completion notification from Alibaba Cloud before proceeding to Stage 3.
Stage 3: Mount the restored disk
After receiving the completion notification, complete the following steps to mount the disk and restore the Kafka log directories.
Step 1: Confirm the new disk is inserted
-
Log on to the Kafka cluster via SSH.
-
Run
lsblkto confirm the new disk is present.Note A disk size of 1 MB indicates the disk has been inserted but not yet fully restored. This is expected — proceed to the next step.lsblk
Step 2: Trigger disk restoration in the ECS console
In the ECS console, go to the Disk Restoration step and click Restore. Wait for the wizard to advance to the next step.
Step 3 (conditional): Restart the ECS instance again
Complete this step only if the Instance Restart step appears after the Disk Restoration step. If the wizard advanced directly, skip to Step 4.
Use the same sequence as in Stage 1, Step 2:
| Action | Console |
|---|---|
| Stop the broker on the affected node | EMR console |
| Click Restart | ECS console — Instance Restart step |
| Start the broker on the affected node | EMR console |
| Verify the broker is running | EMR console |
Step 4: Verify the disk size is restored
Run lsblk to confirm the disk has been fully restored to its original size.
lsblkThe output should show the disk at its original capacity — no longer 1 MB.
Step 5: Complete the wizard
Click Complete in the Repair wizard.
Do not skip the following steps. The Kafka broker cannot use the restored disk until you format it, mount it, and restore the log directories.
Step 6: Format and mount the restored disk
-
Format the restored disk with ext4.
which mkfs.ext4
mkfs.ext4 -m 0 /dev/vdh
Replace
/dev/vdhwith your actual disk name. -
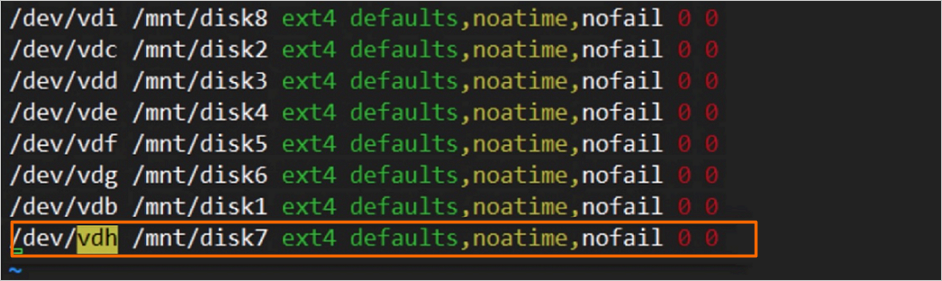
Add the disk to
/etc/fstabso it mounts automatically after reboots.echo "/dev/vdh /mnt/disk7 ext4 defaults,noatime,nofail 0 0" >> /etc/fstabReplace
/dev/vdhwith your disk name and/mnt/disk7with your mount directory. -
Verify the
/etc/fstabentry is correct.more /etc/fstabConfirm the new entry appears in the output.
-
Mount the disk.
mount /dev/vdh /mnt/disk7Replace
/dev/vdhand/mnt/disk7with your actual disk name and mount directory. -
Verify the disk is mounted.
df -hThe output should include an entry for
/mnt/disk7(or your mount directory) with the expected disk size.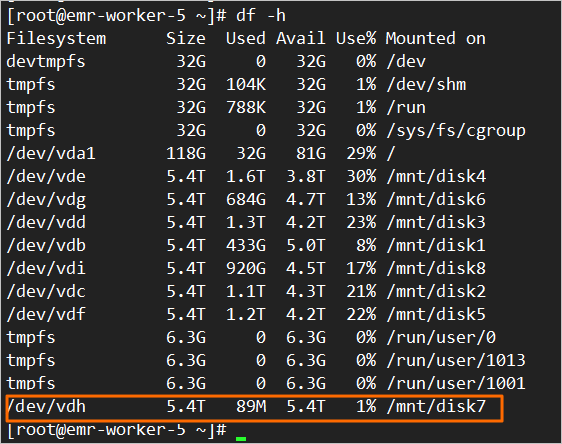
Step 7: Restore Kafka log directories
Restore the log directories of the Kafka broker according to the disk restoration policy you selected in Stage 1. For details, see Disk failures and O&M.
Step 8 (optional): Rebalance partition replicas
If your disk restoration policy requires it, move the Kafka partition replicas back to the restored disk to rebalance the load. For details, see Disk failures and O&M.