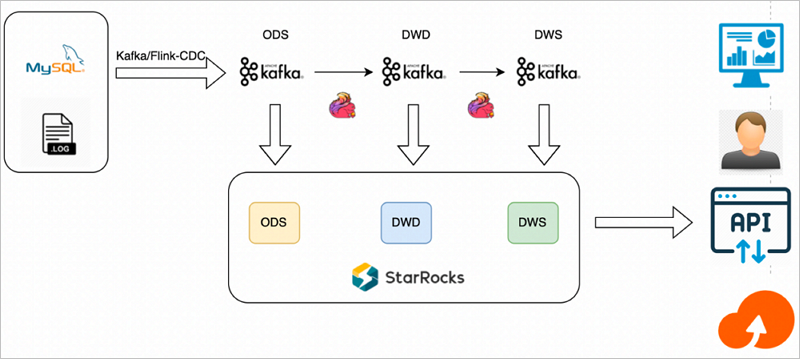
When you need to process database changes as they happen — without the latency of batch pipelines — you can build a layered real-time data warehouse using Flink, Kafka, and StarRocks on E-MapReduce (EMR). Flink captures every MySQL change via change data capture (CDC), routes it through Kafka topics organized by data warehouse layer, and StarRocks persists the results for instant queries.
Limitations
The Dataflow cluster, StarRocks cluster, and ApsaraDB RDS for MySQL instance must be in the same virtual private cloud (VPC) and the same zone.
The Dataflow cluster and StarRocks cluster must be accessible over the Internet.
The MySQL version of the ApsaraDB RDS for MySQL instance must be 5.7 or later.
This solution suits scenarios that require simple, low-latency computations on moderate data volumes — for example, processing event tracking data. It is not suited for high-frequency update scenarios, calculations that cannot accumulate state, or workloads involving resource-intensive operations such as multi-stream JOIN.
How it works
The pipeline uses three components, each with a distinct role:
Flink: Captures MySQL changes via CDC, joins and aggregates data across warehouse layers, and writes results to Kafka topics.
Kafka: Acts as the message bus between layers. Each topic holds data for one layer — operational data store (ODS), Data Warehouse Detail (DWD), or Data Warehouse Summary (DWS).
StarRocks: Subscribes to Kafka topics using Routine Load jobs and persists data for real-time queries.
Data flow:
Flink reads MySQL changes and publishes raw events to ODS-layer Kafka topics.
Flink joins and aggregates ODS data into DWD and DWS topics.
StarRocks Routine Load jobs consume all four topics and persist data into corresponding tables.
Writing modes:
Double-writing: Results in each layer are written to the Kafka topic for the next layer and sunk directly to the corresponding StarRocks table. Use this when you need per-layer persistence at write time.
Single-writing: Results are written only to Kafka topics. StarRocks subscribes and persists all layers in real time. Use this when you want to inspect and update intermediate results before they are finalized.
Architecture
Prerequisites
Before you begin, ensure that you have:
A Dataflow cluster (or a custom cluster with Flink and Kafka services) — Create a cluster
A StarRocks cluster — Create a StarRocks cluster
An ApsaraDB RDS for MySQL instance (MySQL 5.7 or later) — Create an ApsaraDB RDS for MySQL instance
This example uses a Dataflow cluster running EMR V3.40.0, a StarRocks cluster running EMR V5.6.0, and an ApsaraDB RDS for MySQL instance with MySQL 5.7.
Step 1: Create source MySQL tables
Create a database and an account with read and write permissions. For details, see Create accounts and databases.
This example uses a database named
flink_cdcand an account namedemr_test.Log on to the ApsaraDB RDS for MySQL instance using DMS. For details, see Use DMS to log on to an ApsaraDB RDS for MySQL instance.
Run the following statements to create the
ordersandcustomerstables. Create theorderstable:CREATE TABLE flink_cdc.orders ( order_id INT NOT NULL AUTO_INCREMENT, order_revenue FLOAT NOT NULL, order_region VARCHAR(40) NOT NULL, customer_id INT NOT NULL, PRIMARY KEY ( order_id ) );Create the
customerstable:CREATE TABLE flink_cdc.customers ( customer_id INT NOT NULL, customer_age INT NOT NULL, customer_name VARCHAR(40) NOT NULL, PRIMARY KEY ( customer_id ) );
Step 2: Create Kafka topics
Log on to the Dataflow cluster in SSH mode. For details, see Log on to a cluster.
Go to the Kafka bin directory:
cd /opt/apps/FLINK/flink-current/binCreate the four topics — one for each data layer:
kafka-topics.sh --create --topic ods_order --replication-factor 1 --partitions 1 --bootstrap-server core-1-1:9092
kafka-topics.sh --create --topic ods_customers --replication-factor 1 --partitions 1 --bootstrap-server core-1-1:9092
kafka-topics.sh --create --topic dwd_order_customer_valid --replication-factor 1 --partitions 1 --bootstrap-server core-1-1:9092
kafka-topics.sh --create --topic dws_agg_by_region --replication-factor 1 --partitions 1 --bootstrap-server core-1-1:9092
Step 3: Create StarRocks tables and data import jobs
Log on to the StarRocks cluster in SSH mode. For details, see Log on to a cluster.
Connect to the StarRocks cluster:
mysql -h127.0.0.1 -P 9030 -urootCreate the
flink_cdcdatabase:CREATE DATABASE IF NOT EXISTS `flink_cdc`;Create the ODS-layer tables.
customerstable:CREATE TABLE IF NOT EXISTS `flink_cdc`.`customers` ( `customer_id` INT NOT NULL COMMENT "", `customer_age` FLOAT NOT NULL COMMENT "", `customer_name` STRING NOT NULL COMMENT "" ) ENGINE=olap PRIMARY KEY(`customer_id`) COMMENT "" DISTRIBUTED BY HASH(`customer_id`) BUCKETS 1 PROPERTIES ( "replication_num" = "1" );orderstable:CREATE TABLE IF NOT EXISTS `flink_cdc`.`orders` ( `order_id` INT NOT NULL COMMENT "", `order_revenue` FLOAT NOT NULL COMMENT "", `order_region` STRING NOT NULL COMMENT "", `customer_id` INT NOT NULL COMMENT "" ) ENGINE=olap PRIMARY KEY(`order_id`) COMMENT "" DISTRIBUTED BY HASH(`order_id`) BUCKETS 1 PROPERTIES ( "replication_num" = "1" );Create the DWD-layer table:
CREATE TABLE IF NOT EXISTS `flink_cdc`.`dwd_order_customer_valid`(
  `order_id` INT NOT NULL  COMMENT "",
  `order_revenue` FLOAT NOT NULL  COMMENT "",
  `order_region` STRING NOT NULL  COMMENT "",
  `customer_id` INT NOT NULL  COMMENT "",
  `customer_age` FLOAT NOT NULL  COMMENT "",
  `customer_name` STRING NOT NULL  COMMENT ""
) ENGINE=olap
PRIMARY KEY(`order_id`)
COMMENT ""
DISTRIBUTED BY HASH(`order_id`) BUCKETS 1
PROPERTIES (
  "replication_num" = "1"
);
Create the DWS-layer table:
CREATE TABLE IF NOT EXISTS `flink_cdc`.`dws_agg_by_region` (
  `order_region` STRING NOT NULL  COMMENT "",
  `order_cnt` INT NOT NULL  COMMENT "",
  `order_total_revenue` INT NOT NULL  COMMENT ""
) ENGINE=olap
PRIMARY KEY(`order_region`)
COMMENT ""
DISTRIBUTED BY HASH(`order_region`) BUCKETS 1
PROPERTIES (
  "replication_num" = "1"
);
Create Routine Load jobs to subscribe to all four Kafka topics. Replace
192.168..with your actual Kafka broker IP addresses. Each job reads JSON-formatted messages from a Kafka topic and maps fields directly into the target StarRocks table.CREATE ROUTINE LOAD flink_cdc.routine_load_orders ON orders COLUMNS (order_id, order_revenue, order_region, customer_id) PROPERTIES ( "format" = "json", "jsonpaths" = "[\"$.order_id\",\"$.order_revenue\",\"$.order_region\",\"$.customer_id\"]" ) FROM KAFKA ( "kafka_broker_list" = "192.168.**.**:9092,192.168.**.**:9092,192.168.**.**:9092", "kafka_topic" = "ods_order" ); CREATE ROUTINE LOAD flink_cdc.routine_load_customers ON customers COLUMNS (customer_id, customer_age, customer_name) PROPERTIES ( "format" = "json", "jsonpaths" = "[\"$.customer_id\",\"$.customer_age\",\"$.customer_name\"]" ) FROM KAFKA ( "kafka_broker_list" = "192.168.**.**:9092,192.168.**.**:9092,192.168.**.**:9092", "kafka_topic" = "ods_customers" ); CREATE ROUTINE LOAD flink_cdc.routine_load_dwd_order_customer_valid ON dwd_order_customer_valid COLUMNS (order_id, order_revenue, order_region, customer_id, customer_age, customer_name) PROPERTIES ( "format" = "json", "jsonpaths" = "[\"$.order_id\",\"$.order_revenue\",\"$.order_region\",\"$.customer_id\",\"$.customer_age\",\"$.customer_name\"]" ) FROM KAFKA ( "kafka_broker_list" = "192.168.**.**:9092,192.168.**.**:9092,192.168.**.**:9092", "kafka_topic" = "dwd_order_customer_valid" ); CREATE ROUTINE LOAD flink_cdc.routine_load_dws_agg_by_region ON dws_agg_by_region COLUMNS (order_region, order_cnt, order_total_revenue) PROPERTIES ( "format" = "json", "jsonpaths" = "[\"$.order_region\",\"$.order_cnt\",\"$.order_total_revenue\"]" ) FROM KAFKA ( "kafka_broker_list" = "192.168.**.**:9092,192.168.**.**:9092,192.168.**.**:9092", "kafka_topic" = "dws_agg_by_region" );
Step 4: Run the Flink job
Download the following JAR files and upload them to
/opt/apps/FLINK/flink-current/libon the Dataflow cluster:Flink CDC connector for MySQL (
flink-sql-connector-mysql-cdc-2.1.1.jar) — enables Flink to capture MySQL changes via CDC by reading the binlogFlink StarRocks connector (
flink-connector-starrocks-1.1.16_flink-1.13_2.11.jar) — enables Flink to sink data directly to StarRocks
Copy the Kafka connector JARs to the lib directory:
cp /opt/apps/FLINK/flink-current/opt/connectors/kafka/* /opt/apps/FLINK/flink-current/lib/Log on to the Dataflow cluster in SSH mode. For details, see Log on to a cluster.
Start the Flink cluster:
ImportantThis example runs Flink in standalone mode for testing only. For production workloads, submit jobs through YARN or Kubernetes. See Apache Hadoop YARN and Native Kubernetes.
/opt/apps/FLINK/flink-current/bin/start-cluster.shCreate a file named
demo.sql:Parameters for `orders_src` and `customers_src` (mysql-cdc connector):
Parameter Description connectorSet to mysql-cdc. This connector reads MySQL binlog events in real time, capturing every INSERT, UPDATE, and DELETE without polling.hostnameThe internal endpoint of your ApsaraDB RDS for MySQL instance. Find it on the Database Connection page in the ApsaraDB RDS console. Example: rm-2ze5h9qnki343****.mysql.rds.aliyuncs.com.portSet to 3306.usernameThe account you created in step 1. In this example: emr_test.passwordThe password for that account. In this example: Yz12****.database-nameThe database you created in step 1. In this example: flink_cdc.table-nameThe source table: ordersfororders_src,customersforcustomers_src.Parameters for ODS, DWD, and DWS tables (upsert-kafka connector):
Parameter Description connectorSet to upsert-kafka. This connector writes each row as a keyed upsert message (key = primary key), so StarRocks Routine Load always receives the latest value per key.topicThe Kafka topic to write to: ods_order,ods_customers,dwd_order_customer_valid, ordws_agg_by_region.properties.bootstrap.serversComma-separated list of Kafka broker addresses in <ip>:9092format.vim demo.sqlPaste the following Flink SQL. Replace
hostname,username,password, andproperties.bootstrap.serverswith your own values.CREATE DATABASE IF NOT EXISTS `default_catalog`.`flink_cdc`; -- Source tables: the mysql-cdc connector reads MySQL binlog events and -- exposes them as a streaming table. Flink captures every INSERT, UPDATE, -- and DELETE without polling. CREATE TABLE IF NOT EXISTS `default_catalog`.`flink_cdc`.`orders_src`( `order_id` INT NOT NULL, `order_revenue` FLOAT NOT NULL, `order_region` STRING NOT NULL, `customer_id` INT NOT NULL, PRIMARY KEY(`order_id`) NOT ENFORCED ) with ( 'connector' = 'mysql-cdc', 'hostname' = 'rm-2ze5h9qnki343****.mysql.rds.aliyuncs.com', 'port' = '3306', 'username' = 'emr_test', 'password' = 'Yz12****', 'database-name' = 'flink_cdc', 'table-name' = 'orders' ); CREATE TABLE IF NOT EXISTS `default_catalog`.`flink_cdc`.`customers_src` ( `customer_id` INT NOT NULL, `customer_age` FLOAT NOT NULL, `customer_name` STRING NOT NULL, PRIMARY KEY(`customer_id`) NOT ENFORCED ) with ( 'connector' = 'mysql-cdc', 'hostname' = 'rm-2ze5h9qnki343****.mysql.rds.aliyuncs.com', 'port' = '3306', 'username' = 'emr_test', 'password' = 'Yz12****', 'database-name' = 'flink_cdc', 'table-name' = 'customers' ); -- Kafka sink tables: the upsert-kafka connector writes each row as a keyed -- upsert message (key = primary key, value = full row). StarRocks Routine Load -- consumes these messages and merges them into the target table. CREATE TABLE IF NOT EXISTS `default_catalog`.`flink_cdc`.`ods_order_table` ( `order_id` INT, `order_revenue` FLOAT, `order_region` VARCHAR(40), `customer_id` INT, PRIMARY KEY (order_id) NOT ENFORCED ) WITH ( 'connector' = 'upsert-kafka', 'topic' = 'ods_order', 'properties.bootstrap.servers' = '192.168.**.**:9092,192.168.**.**:9092,192.168.**.**:9092', 'key.format' = 'json', 'value.format' = 'json' ); CREATE TABLE IF NOT EXISTS `default_catalog`.`flink_cdc`.`ods_customers_table` ( `customer_id` INT, `customer_age` FLOAT, `customer_name` STRING, PRIMARY KEY (customer_id) NOT ENFORCED ) WITH ( 'connector' = 'upsert-kafka', 'topic' = 'ods_customers', 'properties.bootstrap.servers' = '192.168.**.**:9092,192.168.**.**:9092,192.168.**.**:9092', 'key.format' = 'json', 'value.format' = 'json' ); CREATE TABLE IF NOT EXISTS `default_catalog`.`flink_cdc`.`dwd_order_customer_valid` ( `order_id` INT, `order_revenue` FLOAT, `order_region` STRING, `customer_id` INT, `customer_age` FLOAT, `customer_name` STRING, PRIMARY KEY (order_id) NOT ENFORCED ) WITH ( 'connector' = 'upsert-kafka', 'topic' = 'dwd_order_customer_valid', 'properties.bootstrap.servers' = '192.168.**.**:9092,192.168.**.**:9092,192.168.**.**:9092', 'key.format' = 'json', 'value.format' = 'json' ); CREATE TABLE IF NOT EXISTS `default_catalog`.`flink_cdc`.`dws_agg_by_region` ( `order_region` VARCHAR(40), `order_cnt` BIGINT, `order_total_revenue` FLOAT, PRIMARY KEY (order_region) NOT ENFORCED ) WITH ( 'connector' = 'upsert-kafka', 'topic' = 'dws_agg_by_region', 'properties.bootstrap.servers' = '192.168.**.**:9092,192.168.**.**:9092,192.168.**.**:9092', 'key.format' = 'json', 'value.format' = 'json' ); USE flink_cdc; BEGIN STATEMENT SET; -- ODS layer: forward raw MySQL change events to Kafka topics INSERT INTO ods_order_table SELECT * FROM orders_src; INSERT INTO ods_customers_table SELECT * FROM customers_src; -- DWD layer: join orders and customers, filter out invalid records INSERT INTO dwd_order_customer_valid SELECT o.order_id, o.order_revenue, o.order_region, c.customer_id, c.customer_age, c.customer_name FROM customers_src c JOIN orders_src o ON c.customer_id=o.customer_id WHERE c.customer_id <> -1; -- DWS layer: aggregate revenue and order count by region INSERT INTO dws_agg_by_region SELECT order_region, count(*) as order_cnt, sum(order_revenue) as order_total_revenue FROM dwd_order_customer_valid GROUP BY order_region; END;The following tables describe the key parameters.
Submit the Flink job:
/opt/apps/FLINK/flink-current/bin/sql-client.sh -f demo.sql
Step 5: Verify the StarRocks tables
Log on to the StarRocks cluster in SSH mode. For details, see Log on to a cluster.
Connect to the StarRocks cluster:
mysql -h127.0.0.1 -P 9030 -urootConfirm all four tables exist:
use flink_cdc;
show tables;
Expected output:
+--------------------------+
| Tables_in_flink_cdc      |
+--------------------------+
| customers                |
| dwd_order_customer_valid |
| dws_agg_by_region        |
| orders                   |
+--------------------------+
4 rows in set (0.01 sec)
Step 6: Insert data and query results
Log on to the ApsaraDB RDS for MySQL instance using the
emr_testaccount. For details, see Use DMS to log on to an ApsaraDB RDS for MySQL instance.On the SQL Console tab, insert test data:
INSERT INTO flink_cdc.orders(order_id,order_revenue,order_region,customer_id) VALUES(1,10,"beijing",1);
INSERT INTO flink_cdc.orders(order_id,order_revenue,order_region,customer_id) VALUES(2,10,"beijing",1);
INSERT INTO flink_cdc.customers(customer_id,customer_age,customer_name) VALUES(1, 22, "emr_test");
Connect to StarRocks and switch to the
flink_cdcdatabase:mysql -h127.0.0.1 -P 9030 -urootuse flink_cdc;Query each layer to confirm the data propagated correctly. ODS layer — `orders`:
select * from orders;Expected output:
+----------+---------------+--------------+-------------+
| order_id | order_revenue | order_region | customer_id |
+----------+---------------+--------------+-------------+
|        1 |            10 | beijing      |           1 |
|        2 |            10 | beijing      |           1 |
+----------+---------------+--------------+-------------+
ODS layer — `customers`:
select * from customers;Expected output:
+-------------+--------------+---------------+
| customer_id | customer_age | customer_name |
+-------------+--------------+---------------+
|           1 |           22 | emr_test      |
+-------------+--------------+---------------+
DWD layer — `dwd_order_customer_valid`:
select * from dwd_order_customer_valid;Expected output:
+----------+---------------+--------------+-------------+--------------+---------------+
| order_id | order_revenue | order_region | customer_id | customer_age | customer_name |
+----------+---------------+--------------+-------------+--------------+---------------+
|        1 |            10 | beijing      |           1 |           22 | emr_test      |
|        2 |            10 | beijing      |           1 |           22 | emr_test      |
+----------+---------------+--------------+-------------+--------------+---------------+
2 rows in set (0.00 sec)
DWS layer — `dws_agg_by_region`:
select * from dws_agg_by_region;Expected output:
+--------------+-----------+---------------------+
| order_region | order_cnt | order_total_revenue |
+--------------+-----------+---------------------+
| beijing      |         2 |                  20 |
+--------------+-----------+---------------------+
1 row in set (0.01 sec)