This topic describes how to run PyFlink jobs in an E-MapReduce (EMR) Dataflow cluster that contains the Flink and Kafka services to process streaming data in Kafka.
Prerequisites
The required roles are assigned to EMR by using your Alibaba Cloud account. For more information, see Assign roles.
A Dataflow cluster that contains the Flink and Kafka services is created. For more information about how to create a cluster, see Create a cluster.
In this topic, EMR V5.17.3 is used.
Step 1: Create topics
In this example, two topics named payment-msg and result are created.
Log on to the master node of your cluster. For more information, see Log on to a cluster.
Run the following commands to create topics:
kafka-topics.sh --partitions 3 --replication-factor 2 --bootstrap-server core-1-1:9092 --topic payment-msg --create kafka-topics.sh --partitions 3 --replication-factor 2 --bootstrap-server core-1-1:9092 --topic result --createNoteAfter you create the topic, keep the logon window open for later use.
Step 2: Prepare test data
Run the following commands to continuously generate test data:
python3 -m pip install kafka
rm -rf produce_data.py
cat>produce_data.py<<EOF
import random
import time, calendar
from random import randint
from kafka import KafkaProducer
from json import dumps
from time import sleep


def write_data():
    data_cnt = 20000
    order_id = calendar.timegm(time.gmtime())
    max_price = 100000

    topic = "payment-msg"
    producer = KafkaProducer(bootstrap_servers=['core-1-1:9092'],
                             value_serializer=lambda x: dumps(x).encode('utf-8'))

    for i in range(data_cnt):
        ts = time.strftime("%Y-%m-%d %H:%M:%S", time.localtime())
        rd = random.random()
        order_id += 1
        pay_amount = max_price * rd
        pay_platform = 0 if random.random() < 0.9 else 1
        province_id = randint(0, 6)
        cur_data = {"createTime": ts, "orderId": order_id, "payAmount": pay_amount, "payPlatform": pay_platform, "provinceId": province_id}
        producer.send(topic, value=cur_data)
        sleep(0.5)


if __name__ == '__main__':
    write_data()

EOF
python3 produce_data.py
Step 3: Create and run a PyFlink job
Log on to the master node of your cluster. For more information, see Log on to a cluster.
Run the following commands to generate a PyFlink job:
rm -rf job.py
cat>job.py<<EOF
import os
from pyflink.datastream import StreamExecutionEnvironment, TimeCharacteristic
from pyflink.table import StreamTableEnvironment, DataTypes
from pyflink.table.udf import udf


provinces = ("beijing", "shanghai", "hangzhou", "shenzhen", "jiangxi", "chongqing", "xizang")


@udf(input_types=[DataTypes.INT()], result_type=DataTypes.STRING())
def province_id_to_name(id):
    return provinces[id]

#Enter the following information based on the created Dataflow cluster:
def log_processing():
    kafka_servers = "core-1-1:9092"
    source_topic = "payment-msg"
    sink_topic = "result"
    kafka_consumer_group_id = "test"

    env = StreamExecutionEnvironment.get_execution_environment()
    env.set_stream_time_characteristic(TimeCharacteristic.EventTime)
    t_env = StreamTableEnvironment.create(stream_execution_environment=env)

    t_env.get_config().get_configuration().set_boolean("python.fn-execution.memory.managed", True)

    source_ddl = f"""
            CREATE TABLE payment_msg(
                createTime VARCHAR,
                rt as TO_TIMESTAMP(createTime),
                orderId BIGINT,
                payAmount DOUBLE,
                payPlatform INT,
                provinceId INT,
                WATERMARK FOR rt as rt - INTERVAL '2' SECOND
            ) WITH (
              'connector' = 'kafka',
              'topic' = '{source_topic}',
              'properties.bootstrap.servers' = '{kafka_servers}',
              'properties.group.id' = '{kafka_consumer_group_id}',
              'scan.startup.mode' = 'latest-offset',
              'format' = 'json'
            )
            """

    kafka_sink_ddl = f"""
            CREATE TABLE kafka_sink (
            province VARCHAR,
            pay_amount DOUBLE,
            rowtime TIMESTAMP(3)
            ) with (
              'connector' = 'kafka',
              'topic' = '{sink_topic}',
              'properties.bootstrap.servers' = '{kafka_servers}',
              'properties.group.id' = '{kafka_consumer_group_id}',
              'scan.startup.mode' = 'latest-offset',
              'format' = 'json'
            )
    """

    t_env.execute_sql(source_ddl)
    t_env.execute_sql(kafka_sink_ddl)

    t_env.register_function('province_id_to_name', province_id_to_name)

    sink_ddl = """
    insert into kafka_sink select province_id_to_name(provinceId) as province, sum(payAmount) as pay_amount, tumble_start(rt, interval '5' second) as rowtime
    from payment_msg
    group by tumble(rt, interval '5' second), provinceId
    """

    t_env.execute_sql(sink_ddl)


if __name__ == '__main__':
    log_processing()
EOF
Configure the parameters that are described in the following table based on your business requirements.
Parameter
Description
kafka_serversThe internal IP addresses and port numbers of brokers in the Dataflow cluster. The default port number is 9092.
source_topicThe Kafka topic of the source table. In this example, the topic is payment-msg.
sink_topicThe Kafka topic of the result table. In this example, the topic is result.
Run the following command to run the PyFlink job:
flink run -t yarn-per-job -py job.py -j /opt/apps/FLINK/flink-current/opt/connectors/kafka/flink-sql-connector-kafka-*.jar
Step 4: View job details
Access the web UI of YARN. For more information, see Access the web UIs of open source components.
You can view the details of a PyFlink job on the web UI of YARN.
In the Hadoop console, click the ID of the job.
You can view the details of the job.
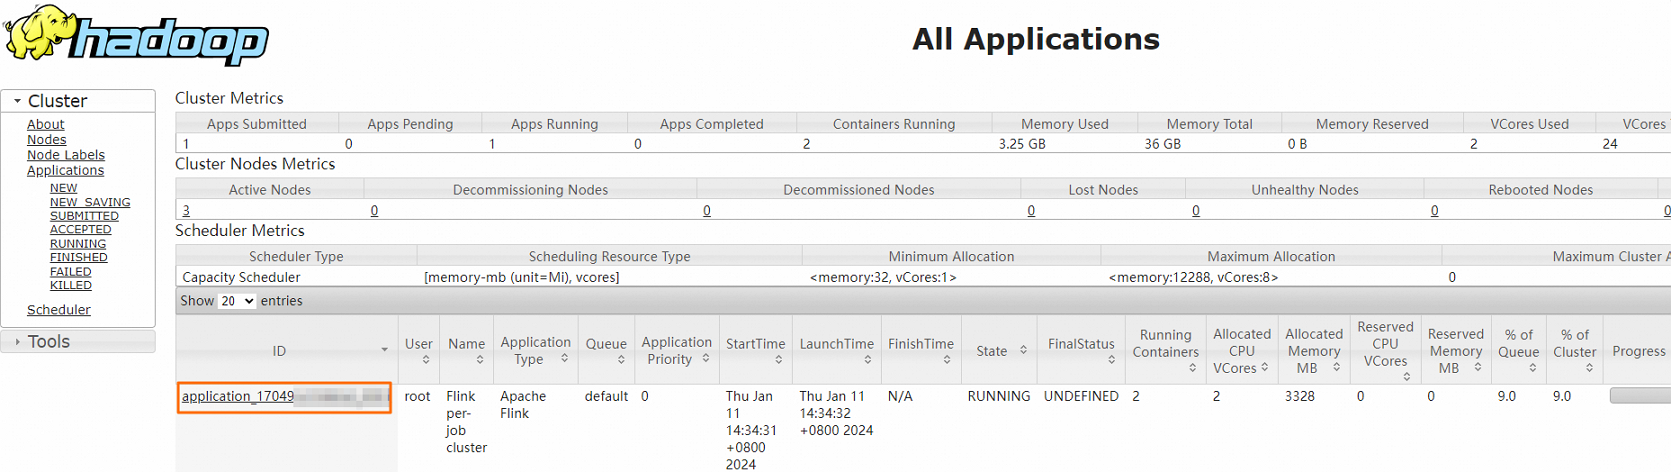
The following figure shows the details.
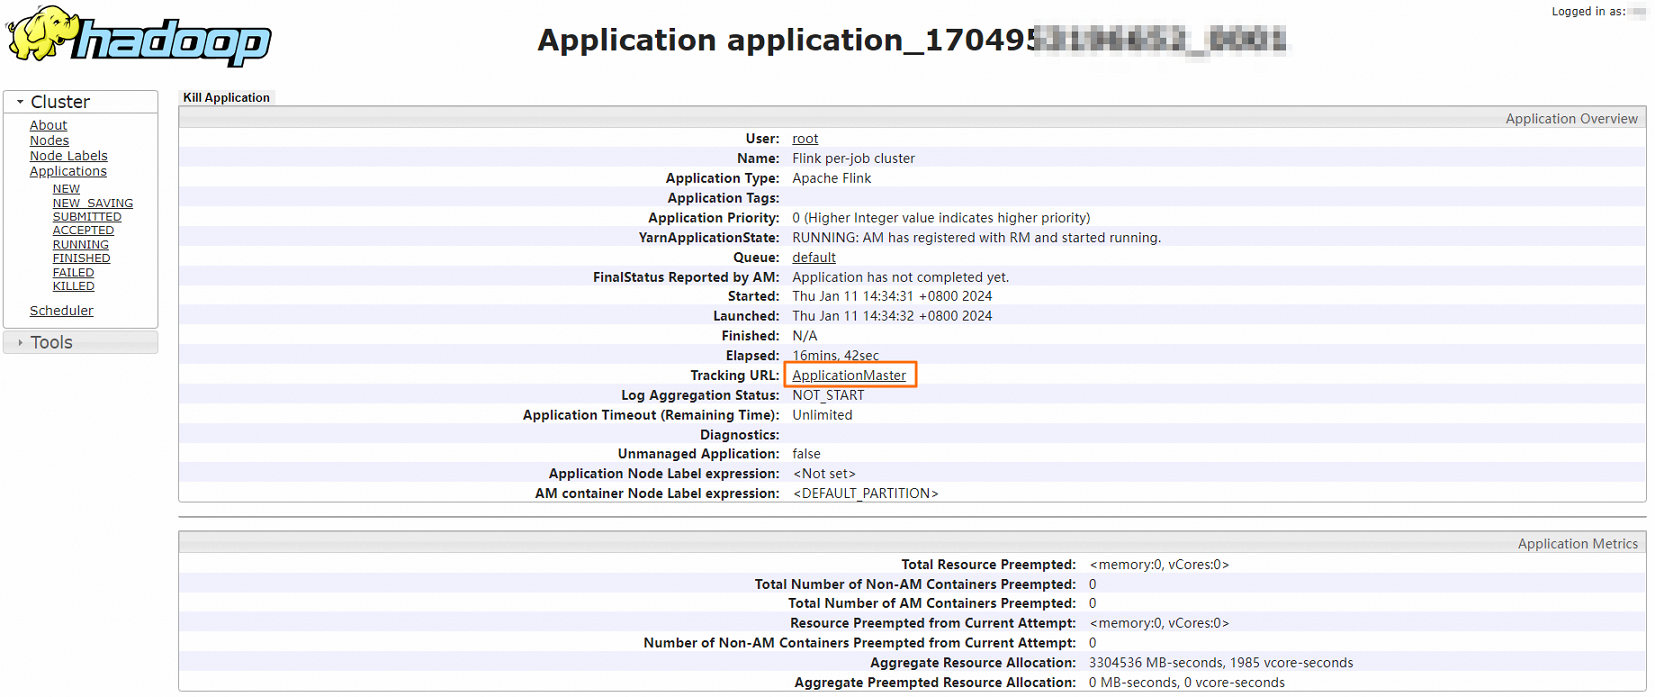
Optional. Click the link next to Tracking URL to go to the Apache Flink Dashboard page.
You can view detailed job information.
Step 5: View the output
Log on to the master node of your cluster. For more information, see Log on to a cluster.
Run the following command to view the data in the result topic:
kafka-console-consumer.sh --bootstrap-server core-1-1:9092 --topic resultThe information shown in the following figure is returned.

References
For information about how to generate and consume data in a Kafka topic, see Apache Kafka SQL connector.