You can migrate data from a self-managed Elasticsearch cluster to an Alibaba Cloud Elasticsearch cluster using Object Storage Service (OSS) snapshots. This process involves creating a snapshot of your self-managed data using the Elasticsearch Snapshot API, storing the snapshot in an OSS bucket, and then restoring the data to your Alibaba Cloud Elasticsearch cluster. This topic describes how to perform this migration.
Background information
OSS lets you migrate large volumes of data from a self-managed Elasticsearch cluster to an Alibaba Cloud Elasticsearch cluster.
Procedure
Prepare a self-managed Elasticsearch cluster, and create an OSS bucket and an Alibaba Cloud Elasticsearch cluster.
Step 2: Install the elasticsearch-repository-oss plug-in
Install the elasticsearch-repository-oss plug-in on each node of the self-managed Elasticsearch cluster. You can create an OSS repository for the self-managed Elasticsearch cluster only after the plug-in is installed.
Step 3: Create a snapshot repository for the self-managed Elasticsearch cluster
Call the snapshot API to create a snapshot repository for the self-managed Elasticsearch cluster.
Step 4: Create a snapshot for specific indexes
Create a snapshot for the indexes that you want to migrate and store the snapshot in the created snapshot repository.
Step 5: Create the same snapshot repository for the Alibaba Cloud Elasticsearch cluster
In the Kibana console of the Alibaba Cloud Elasticsearch cluster, call the snapshot API to create a snapshot repository for the cluster. The snapshot repository must have the same name as the snapshot repository for the self-managed Elasticsearch cluster.
Step 6: Restore data to the Alibaba Cloud Elasticsearch cluster from the created snapshot
Restore data from the snapshot in the snapshot repository of the self-managed Elasticsearch cluster to the Alibaba Cloud Elasticsearch cluster.
Step 7: View restoration results
View the restored indexes and the data in the indexes.
Step 1: Make preparations
Prepare a self-managed Elasticsearch cluster.
We recommend that you deploy an Elasticsearch cluster on Alibaba Cloud Elastic Compute Service (ECS) instances. For more information, see Installing and Running Elasticsearch.
NoteWe recommend that you use Alibaba Cloud ECS instances in the same virtual private cloud (VPC) as the Alibaba Cloud Elasticsearch cluster to deploy a self-managed Elasticsearch cluster. If you use self-managed servers to deploy a cluster, a network connectivity issue may occur.
In this example, a single-node Elasticsearch V6.7.0 cluster is used. In actual production, you can purchase multiple ECS instances that reside in the same VPC to deploy a multi-node Elasticsearch cluster. For more information about how to purchase an ECS instance, see Create an instance on the Custom Launch tab.
Activate OSS, and create a bucket in the region where the ECS instance that hosts the self-managed Elasticsearch cluster resides.
For more information, see Activate OSS and Create a bucket.
ImportantThe storage class of the bucket must be Standard. Elasticsearch does not support the Archive storage class.
Create an Alibaba Cloud Elasticsearch cluster in the region where the created bucket resides.
For more information, see Create an Alibaba Cloud Elasticsearch cluster.
Step 2: Install the elasticsearch-repository-oss plug-in
Connect to the ECS instance that hosts the self-managed Elasticsearch cluster.
For more information, see Connect to a Linux instance using a password or key.
NoteIn this example, a regular user is used.
Download the installation package of the elasticsearch-repository-oss plug-in.
In this example, the version of the plug-in is V6.7.0, which requires JDK 11.0 or later.
wget https://github.com/aliyun/elasticsearch-repository-oss/releases/download/v6.7.0/elasticsearch-repository-oss-6.7.0.zipNoteFor more information about how to obtain the installation package of the elasticsearch-repository-oss plug-in of another version, see FAQ.
Decompress the installation package to the plugins folder in the installation path for the self-managed Elasticsearch cluster on the ECS instance.
sudo unzip -d /usr/local/elasticsearch-6.7.0/plugins/elasticsearch-repository-oss elasticsearch-repository-oss-6.7.0.zipYou can also use a command to install the plug-in.
sudo ./bin/elasticsearch-plugin install file:///usr/local/elasticsearch-repository-oss-6.7.0.zipStart each node in the self-managed Elasticsearch cluster.
cd /usr/local/elasticsearch-6.7.0
./bin/elasticsearch -d
Step 3: Create a snapshot repository for the self-managed Elasticsearch cluster
Connect to the ECS instance that hosts the self-managed Elasticsearch cluster and run the following command to create a snapshot repository:
sudo curl -H "Content-Type: application/json" -XPUT localhost:9200/_snapshot/<yourBackupName> -d' {"type": "oss", "settings": { "endpoint": "http://oss-cn-hangzhou-internal.aliyuncs.com", "access_key_id": "<yourAccesskeyId>", "secret_access_key":"<yourAccesskeySecret>", "bucket": "<yourBucketName>", "compress": true }}'Parameter | Description |
<yourBackupName> | The name of the repository, which can be customized. |
type | The type of the repository. Set this parameter to oss. |
endpoint | The endpoint of your OSS bucket. For more information, see Regions and endpoints. Note If the ECS instance that hosts the self-managed Elasticsearch cluster resides in the same region as your OSS bucket, use the internal endpoint of the OSS bucket. Otherwise, use the public endpoint of the OSS bucket. |
access_key_id | The AccessKey ID of the Alibaba Cloud account that is used to create the OSS bucket. For more information about how to obtain the AccessKey ID, see How do I obtain an AccessKey pair? |
secret_access_key | The AccessKey secret of the Alibaba Cloud account that is used to create the OSS bucket. For more information about how to obtain the AccessKey secret, see How do I obtain an AccessKey pair? |
bucket | The name of the OSS bucket. |
compress | Specifies whether to enable compression. Valid values:
|
A successful response includes "acknowledge":true.
Step 4: Create a snapshot for specific indexes
Create a snapshot for indexes whose data you want to migrate. By default, all indexes in the open state are backed up in the snapshot. If you do not want to back up system indexes, such as indexes whose names start with .kibana, .security, or .monitoring, you can specify the indexes that you want to back up.
We recommend that you do not back up system indexes because they occupy large storage space.
curl -H "Content-Type: application/json" -XPUT localhost:9200/_snapshot/<yourBackupName>/snapshot_1?pretty -d'
{
"indices": "index1,index2"
}'
<yourBackupName> is the name of the repository that you created in Step 3: Create a repository in the self-managed Elasticsearch cluster. index1 and index2 are the names of the indexes that you want to back up. A successful response includes "accepted" : true .
While the snapshot is being created, you can run the GET /_snapshot/<yourBackupName>/<yourSnapshotName>/_status command to view the status of the snapshot. The snapshot is complete when the state parameter in the response is SUCCESS.
Step 5: Create the same snapshot repository for the Alibaba Cloud Elasticsearch cluster
Log on to the Kibana console of your Elasticsearch cluster and go to the homepage of the Kibana console as prompted.
For more information about how to log on to the Kibana console, see Log on to the Kibana console.
NoteIn this example, an Elasticsearch V6.7.0 cluster is used. Operations on clusters of other versions may differ. The actual operations in the console prevail.
In the left-side navigation pane of the page that appears, click Dev Tools.
On the Console tab of the page that appears, run the following command to create a snapshot repository that has the same name as the snapshot repository for the self-managed Elasticsearch cluster.
PUT _snapshot/<yourBackupName>
{
    "type": "oss",
    "settings": {
        "endpoint": "oss-cn-hangzhou-internal.aliyuncs.com",
        "access_key_id": "<yourAccesskeyId>",
        "secret_access_key": "<yourAccesskeySecret>",
        "bucket": "<yourBucketName>",
        "compress": true
    }
}
Replace <yourBackupName> and <yourBucketName> with the repository name and bucket name that you specified in Step 3: Create a snapshot repository for the self-managed Elasticsearch cluster.
Step 6: Restore data to the Alibaba Cloud Elasticsearch cluster from the created snapshot
In Elasticsearch versions 7.10.x and 7.17.x, you can set cluster.restore.ignore_revision.enable to true to allow data restoration from a snapshot with a higher patch version. The patch version is the third number in a version number. For example, in version 7.10.1, 7 is the major version, 10 is the minor version, and 1 is the patch version.
For example, after you set cluster.restore.ignore_revision.enable to true for a running Elasticsearch 7.10.0 cluster, you can restore data from a snapshot that was created from version 7.10.3. The following code provides the configuration.
PUT _cluster/settings
{
  "persistent": {
    "cluster.restore.ignore_revision.enable": true
  }
}
Follow the instructions in Step 5: Create an identical repository on the Alibaba Cloud Elasticsearch cluster. Then, run the following command in the Kibana console to restore all indexes from the snapshot except for system indexes that start with ..
POST _snapshot/es_backup/snapshot_1/_restore
{"indices":"*,-.monitoring*,-.security_audit*","ignore_unavailable":"true"}
A successful response includes "accepted" : true.
The preceding command restores all indexes in the snapshot. You can also specify the indexes that you want to restore. In the Alibaba Cloud Elasticsearch cluster, an existing index may have the same name as an index you want to restore. In this case, if you do not want to overwrite the data in the existing index, you can rename the index you want to restore during the restoration.
POST _snapshot/es_backup/snapshot_1/_restore
{
  "indices":"index1",
  "rename_pattern": "index(.+)",
  "rename_replacement": "restored_index_$1"
}For more information about the commands that are used to create snapshots or restore data, see Create manual snapshots and restore data from manual snapshots.
Step 7: View restoration results
In the Kibana console of the Alibaba Cloud Elasticsearch cluster, run the following command to view the restoration results. Follow the instructions in Step 5: Create the same snapshot repository for the Alibaba Cloud Elasticsearch cluster to perform the operation.
View the restored indexes
GET /_cat/indices?v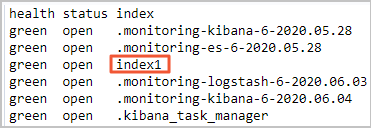
View the data in the restored indexes
GET /index1/_searchIf the command is successfully run, the following result is returned:
{
  "took" : 2,
  "timed_out" : false,
  "_shards" : {
    "total" : 5,
    "successful" : 5,
    "skipped" : 0,
    "failed" : 0
  },
  "hits" : {
    "total" : 1,
    "max_score" : 1.0,
    "hits" : [
      {
        "_index" : "index1",
        "_type" : "_doc",
        "_id" : "1",
        "_score" : 1.0,
        "_source" : {
          "productName" : "testpro",
          "annual_rate" : "3.22%",
          "describe" : "testpro"
        }
      }
    ]
  }
}
FAQ
Q: How do I obtain the installation package of the elasticsearch-repository-oss plug-in of another version?
A: You can download the installation package of the elasticsearch-repository-oss plug-in of the required version from GitHub. If GitHub does not provide the installation package of the required version, we recommend that you download the installation package of a version whose minor version is nearest to the minor version of the required version. Then, change the values of the following parameters in the plugin-descriptor.properties file of the plug-in, package the file again, and then install the plug-in.
version=Required plug-in version
elasticsearch.version=Version of the self-managed Elasticsearch cluster
NoteThe version of the plug-in must be the same as that of the self-managed Elasticsearch cluster.
java.version=1.8
NoteDifferent versions of Elasticsearch clusters depend on different versions of JDKs. The actual JDK version is determined by open source Elasticsearch and the plug-in.
Open source Elasticsearch provides a variety of cluster versions, and different versions of clusters are compiled in different ways. Therefore, before you install the elasticsearch-repository-oss plug-in for your cluster, you need to compile and debug the plug-in based on the cluster version. For example, you deploy a self-managed Elasticsearch V7.6.2 cluster, and the required JDK version is 1.8 or later. After compilation and debugging, the plug-in is elasticsearch-repository-oss-7.6.2.