This topic describes how to integrate the FACE_GUARD software development kit (SDK) for iOS.
Before you begin
Applications that integrate FACE_GUARD require a mature facial recognition algorithm and a system for managing threat policies. We recommend that you first consult with your business manager to assess whether this is suitable for your business scenario.
The iOS SDK has the following limits:
Debugging in an emulator is not supported.
iOS 9.0 or later is required.
According to Apple's privacy policy, if you use the identifier for advertisers (IDFA), you must declare it in the
plistfile and display a pop-up window to request user authorization. Therefore, your development environment must be Xcode 12 or later.
Integration steps
Configure dependencies
Download the iOS SDK. Contact your business manager to obtain the SDK. The SDK is a standard static framework package for Xcode.
NoteThe SO file for a single architecture is about 2 MB.
The FACE_GUARD SDK is relatively large because it includes extensive obfuscation, inflation, and encryption/decryption operations to prevent reverse engineering and ensure data security during network transmission.
Copy the faceguard.framework file from the SDK package to your iOS project folder.
In your project configuration, go to Build Phases > Link Binary With Libraries and add faceguard.framework and its dependent packages:
CoreTelephony.framework
Security.framework
libresolv.tbd
libc++.tbd
libz.tbd
faceguard.framework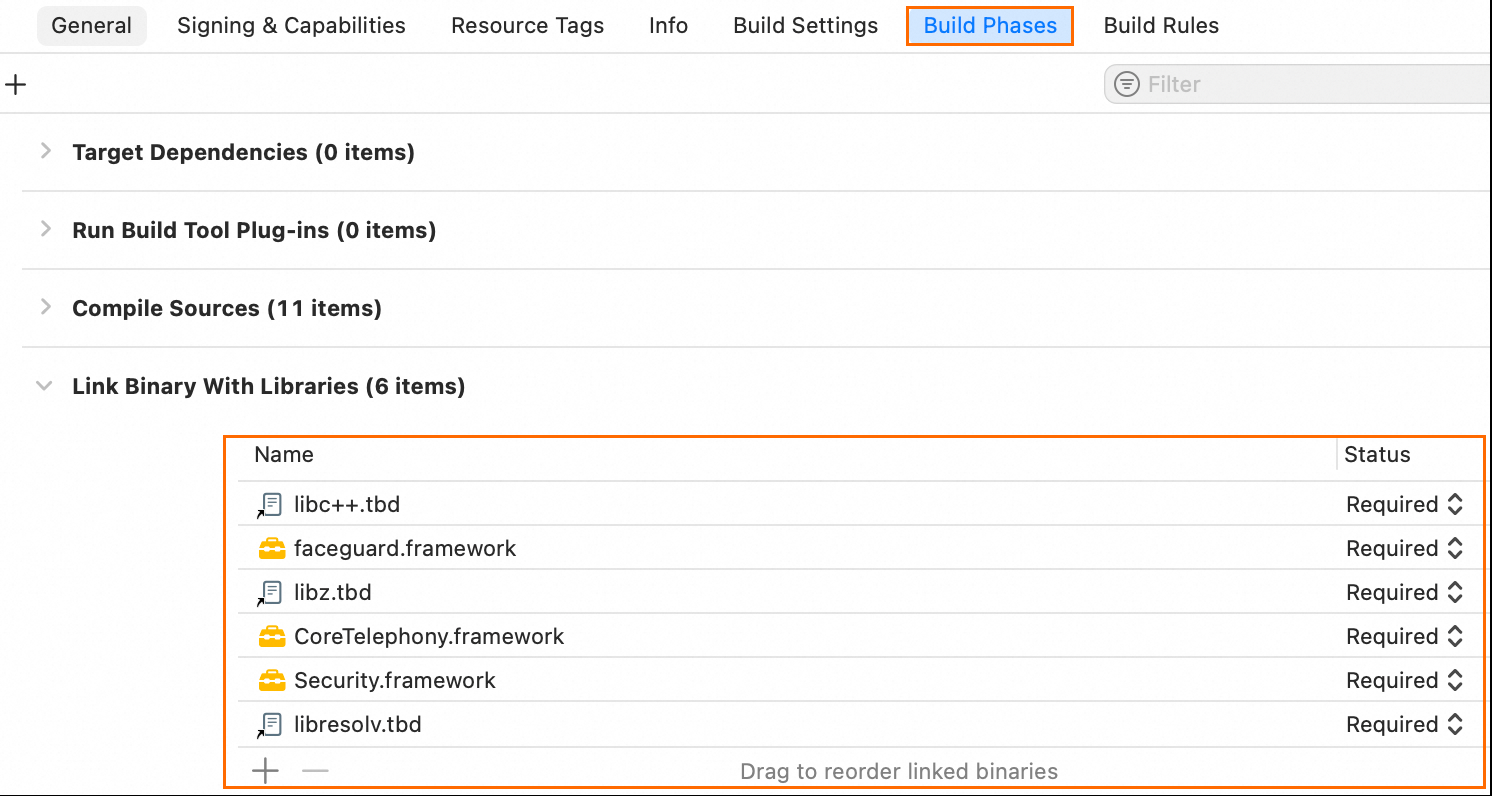
Call the SDK
After you complete the preparations, follow these three steps to complete the client-side integration.
According to Apple's privacy policy, if you use the IDFA, you must declare it in the plist file and display a pop-up window to request user authorization. Therefore, your development environment must be Xcode 12 or later.
1. Initialize the SDK (initFG)
This function initializes the SDK internally. Call this function as early as possible when your app starts. For more information, see Integration flow. Call the initFG API operation at [ Time Point 1 ].
Function prototype
@interface FaceGuardDevice : NSObject

/**
 *  FACE_GUARD initializer function
 */
- (void)initFG:(NSString *)userProductKey
        withOptions:(NSMutableDictionary *)options
        callback:(void (^)(int))initCallback;
// ...
@end
Parameters
userProductKey: Your ProductKey, which is assigned by Alibaba Cloud to identify you. This is different from an AccessKey pair. Contact your business manager to obtain it.
ImportantApplications that integrate FACE_GUARD require a mature facial recognition algorithm and a system for managing threat policies. We recommend that you first consult with your business manager to assess whether this is suitable for your business scenario.
options: Optional parameters for information collection. The default value is nil. The following parameters are available:
NoteFor common international sites (alibabacloud.com), you do not need to set the CustomUrl and CustomHost parameters. The Singapore site is used by default.
To report data to a specific site, you must set CustomUrl and CustomHost to the specified region.
Field
Description
Example
IPv6
Specifies whether to use an IPv6 domain name to report device information.
0 (default): Use an IPv4 domain name.
1: Use an IPv6 domain name.
"1"
DataSwitch
The time to report device information.
0 (default): During initialization.
1: When getting the token.
NoteUse the default configuration.
"1"
CustomUrl
The domain name of the server to which data is reported.
"https://cloudauth-device.ap-southeast-1.aliyuncs.com"
CustomHost
The host of the server to which data is reported.
"cloudauth-device.ap-southeast-1.aliyuncs.com"
initCallback: The callback listener for initialization. You can use this callback to determine whether the initialization is successful. The default value is nil. For information about the valid values of the code field, see Return values of code.
Examples
NSMutableDictionary *options = [[NSMutableDictionary alloc] init];
[options setValue:@"0" forKey:@"IPv6"];       // Set to IPv4.
[options setValue:@"0" forKey:@"DataSwitch"]; // Set data collection to the initialization phase.
// Set a custom data reporting region.
// [options setValue:@"xxx" forKey:@"CustomUrl"];  // Set the URL of the reporting site.
// [options setValue:@"xxx" forKey:@"CustomHost"]; // Set the host of the reporting site.

// Standard call (recommended)
[[FaceGuardDevice sharedInstance] initFG:@"******" withOptions:options callback:nil];

// Callback call
[[FaceGuardDevice sharedInstance] initFG:@"******" withOptions:options callback:^(int code) {
    NSString * initResult = [NSString stringWithFormat: @ "Device helper initialized. Result: %d", code];
    NSLog(@ "%@", initResult);

    if (SC_SUCCESS != code) {
        NSLog(@ "Initialization failed.");
    } else {
        NSLog(@ "Initialization successful.");
    }
}];
2. Get the client token (getDeviceToken)
This function retrieves the client token. For more information, see Integration flow. Call this function at [ Time Point 2 ] and report the token to your server. Then, from your server, call the FaceGuardRisk API operation of FACE_GUARD to retrieve device risk information from the client.
For integration details, see Integration Process. You can call the initFG API operation at [ Timing 1 ] and the getDeviceToken API operation at [ Timing 2 ]. Alternatively, ensure that the interval between the initFG and getDeviceToken API calls is at least 3 seconds.
When you call getDeviceToken, pass the bizId parameter. This binds the token to your unique business authentication ID. When you query the result from the server, pass the ID as well to prevent token tampering.
Call the getDeviceToken API operation on a subthread of the app to prevent potential crashes caused by long call times.
Function prototype
@interface FaceGuardDevice : NSObject
- (FaceGuardToken *) getDeviceToken;
  // Pass bizId.
- (FaceGuardToken *) getDeviceToken:(NSString *)bizId;
@end
Parameter
bizId: Your business ID. You can use this parameter to associate the business ID with the token. You can leave this parameter empty.
Return value
The return value is of the FaceGuardToken type, which is defined as follows:
@interface FaceGuardToken: NSObject

/**
 * The result of the getToken operation.
 */
@property(atomic) int code;

/**
 * The string that contains the token result.
 */
@property(copy, atomic) NSString * token;
@end
code: The status code of the API operation call. You can use it to determine whether the call was successful.
token: The token string. You can use it to call the Alibaba Cloud FACE_GUARD API operation.
ImportantThe token string is about 600 bytes long in a good network environment. In a poor network environment, the length is about 2.5 KB and includes a special identifier:
Good network: "U0dfTkxxxx"
Poor network: "U0dfUFxxxx"
If your business generates a large number of long tokens:
First, ensure that the client has a stable network connection.
Second, for more information, see Integration flow. Call the initFG API operation at [ Time Point 1 ] and the getDeviceToken API operation at [ Time Point 2 ]. Alternatively, ensure that the interval between the calls to the initFG and getDeviceToken API operations is at least 3 seconds.
Example
// Pass bizId to prevent deviceToken tampering.
NSString *bizId = @"1234567890abcdef******";
FaceGuardToken *deviceToken = [[FaceGuardDevice sharedInstance] getDeviceToken:bizId];

if (deviceToken == nil || SC_SUCCESS != deviceToken.code) {
    NSLog(@"Failed to get the token. The call result cannot be used to query risk labels.");
} else {
    NSLog(@"Successfully obtained the token. You can now query risk labels. Token: %@", deviceToken.token);
}
3. Send a request to the server with the token
After you obtain the deviceToken (FaceGuardDevice.token), include this parameter in the request to your business server. The server then queries and verifies the result. For more information, see Server-side API operations.
Complete code example
#import "ViewController.h"
#import <faceguard/faceguard.h>

@implementation ViewController

static NSString *USER_PRODUCT_KEY = @"<Contact your business manager to obtain it>";

- (void)viewDidLoad {
    [super viewDidLoad];

    // Integration example
    [self doStantard];
}

- (void)doStandard {
    // Initialize the SDK.
    // Call this only once during the app lifecycle.
    // Call the initFG API operation at Time Point 1 of the integration flow.
    [self doInit];

    dispatch_async(dispatch_get_global_queue(NULL, NULL), ^{
        // Call the getDeviceToken API operation at Time Point 2 of the integration flow.
        // The 2-second wait here only simulates the facial recognition process.
        // [NSThread sleepForTimeInterval:2.0];

        // Get the token.
        [self doGetToken];
    });
}

- (void)doInit {
    NSMutableDictionary *options = [[NSMutableDictionary alloc] init];
    [options setValue:@"0" forKey:@"IPv6"];       // Set to IPv4.
    [options setValue:@"0" forKey:@"DataSwitch"]; // Set the time to collect and report device information.
    // Set a custom reporting region.
    // [options setValue:@"xxx" forKey:@"CustomUrl"];
    // [options setValue:@"xxx" forKey:@"CustomHost"];
    [[FaceGuardDevice sharedInstance] initFG:USER_PRODUCT_KEY withOptions:options callback:nil];
}

- (void)doGetToken {
    // Pass bizId to prevent deviceToken tampering.
    NSString *bizId = @"1234567890abcdef******";
    FaceGuardToken *deviceToken = [[FaceGuardDevice sharedInstance] getDeviceToken:bizId];

    if (deviceToken == nil || SC_SUCCESS != deviceToken.code) {
        NSLog(@"Failed to get the token. The call result cannot be used to query risk labels.");
    } else {
        NSLog(@"Successfully obtained the token. You can now query risk labels. Token: %@", deviceToken.token);
    }
}

@end