This topic describes how to integrate the FACE_GUARD SDK for HarmonyOS.
Usage notes
Applications that integrate FACE_GUARD require a mature facial recognition algorithm and a system for managing threat policies. We recommend that you first consult with your business manager to assess whether this is suitable for your business scenario.
The HarmonyOS SDK has the following limits:
Debugging in emulator mode is not supported.
For HarmonyOS NEXT (0.0.71) and later, the minimum supported API version is 12.
Only the bytecode encryption solution is supported.
Integration steps
Prerequisites
Before you integrate the SDK, configure the required permissions and dependencies.
Permissions
Configure dependencies
Download and decompress the HarmonyOS SDK, which you can obtain from your business manager. The SDK is a standard HarmonyOS .har package.
Copy the .har file to the folder in your project for storing .har packages. We recommend placing it in the
libsfolder, as suggested in the official HarmonyOS documentation. In the project's root directory, add the authentication package's version to the dependency tree in theoh-package.json5file and update the version number. See the example below:{ .... "dependencies": { "aliyunfaceguard": "file:./libs/AliyunFaceGuard-xxx.har" .... } }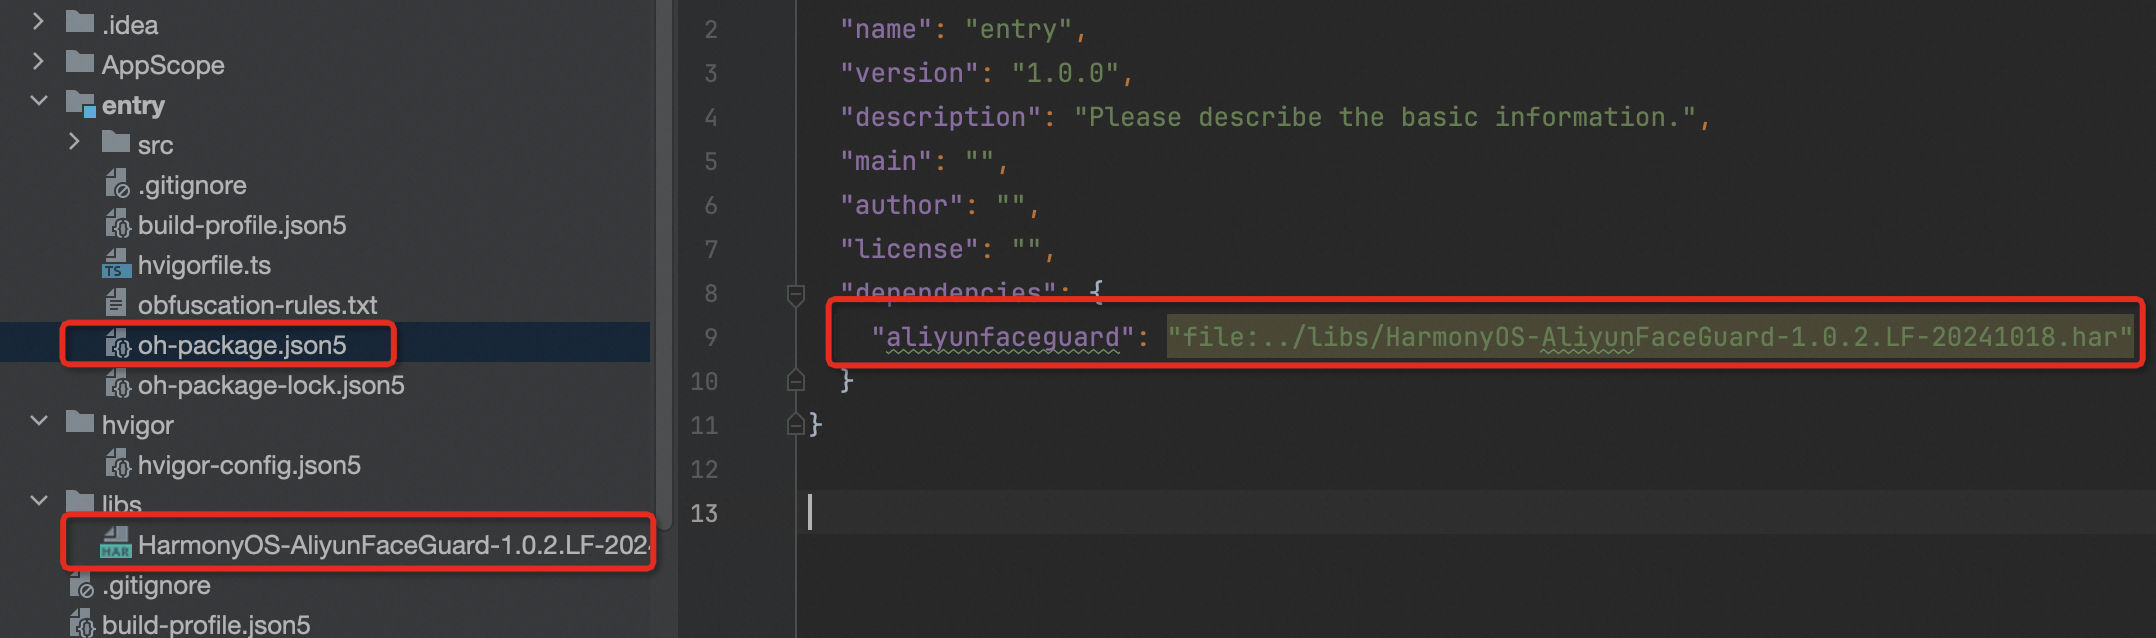
API obfuscation configuration (Important)
Call the SDK
After you complete the prerequisites, follow these three steps to complete the client-side integration.
1. Initialize the SDK (initWithOptions)
This function initializes the SDK. Call this function as early as possible when the application starts. For more information, see Integration flow. Call the initWithOptions API operation at [Timing 1].
In a multi-threaded scenario, you must call the initialization API operation in the main thread. Call this operation only once during the application's lifecycle.
Function prototype
  public initWithOptions(ctx: Context, userProductKey: string,
                         options: Map<string, string>,
                         securityInitListener: SecurityInitListener): void
Parameters
ctx: The current UIContext or Context. You can obtain it using the getContext() method.
userProductKey: The key that identifies the user. This is the product AppKey assigned by Alibaba Cloud, which is different from an AccessKey (AK). Contact your business manager to obtain it.
ImportantApplications that integrate FACE_GUARD require a mature facial recognition algorithm and a system for managing threat policies. We recommend that you first consult with your business manager to assess whether this is suitable for your business scenario.
options: Optional parameters for data collection. The default value is null. The available parameters are listed below.
NoteThe ID Verification client has a built-in Device Guard security module. To meet data collection compliance requirements in different regions, it provides different data reporting sites. You can set CustomUrl and CustomHost to specify a reporting site based on user attributes.
Note: You can specify only one reporting site within a single application session lifecycle. The server query region must match the reporting site.
Specify a reporting site:
Singapore site (default):
https://cloudauth-device.ap-southeast-1.aliyuncs.comIndonesia site:
https://cloudauth-device.ap-southeast-5.aliyuncs.comUS West (Silicon Valley):
https://cloudauth-device.us-west-1.aliyuncs.comGermany (Frankfurt):
https://cloudauth-device.eu-central-1.aliyuncs.comChina (Hong Kong):
https://cloudauth-device.cn-hongkong.aliyuncs.com
For more information about the regions supported by product servers, see Supported regions.
Field name
Description
Example
IPv6
Specifies whether to use an IPv6 domain name to report device information:
0 (default): No (use an IPv4 domain name)
1: Yes (use an IPv6 domain name)
"1"
DataSwitch
The timing for reporting device information.
0 (default): At initialization
1: When getting the token
NoteWe recommend using the default configurations.
"1"
CustomUrl
Sets the data reporting server domain name.
"https://cloudauth-device.ap-southeast-1.aliyuncs.com"
CustomHost
Sets the data reporting server host.
"cloudauth-device.ap-southeast-1.aliyuncs.com
securityInitListener: The initialization callback listener. You can use the callback to determine if the initialization was successful. The default value is null. For a list of possible values for the code field, see Return codes.
Example
@State USER_PRODUCT_KEY: string = "123e4567e89b12d3a45642661417****";

let options: Map<string, string> = new Map<string, string>();
options.set("IPv6", "0"); // Set to IPv4
options.set("DataSwitch", "0"); // Set to collect data during the initialization phase
// Set a custom data reporting region
// options.set("CustomUrl", "xxx"); // Set the reporting site URL
// options.set("CustomHost", "xxx"); // Set the reporting site host

// Standard call (recommended)
FaceSecDevice.getInstance().initWithOptions(getContext(),
                            this.USER_PRODUCT_KEY, options, null);

// Callback call
FaceSecDevice.getInstance().initWithOptions(this.context,
                            this.USER_PRODUCT_KEY, options, {
    onInitFinish(code: number) {
      if (FaceSecCode.SC_SUCCESS != code) {
        console.log("AliyunFaceGuard initialization failed");
      } else {
        console.log("AliyunFaceGuard initialized successfully");
      }
    }
});
2. Get the client token (getDeviceToken)
This operation obtains the client token. For more information, see the Integration flow document. Call this operation at [Timing 2] and report the token to your server. From your server, you can then call the FaceGuardRisk API operation to retrieve the risk information for the client device.
For more information about the integration process, see Integration Process. You must either call the initWithOptions operation at [Timing 1] and the getDeviceToken operation at [Timing 2], or ensure that there is an interval of at least 3 seconds between the calls to the initWithOptions and getDeviceToken operations.
When you call getDeviceToken, we recommend passing a bizId. This binds the token to your unique business authentication ID. When you query the result on the server, you must pass the same ID. Ensure that the bizId value passed by the client matches the value passed by the server. This helps prevent the token from being tampered with.
We recommend calling the getDeviceToken API operation in a subthread. This practice prevents the application from crashing if the API call is time-consuming.
Function prototype
// Recommended to pass bizId
public getDeviceToken(bizId?: string): SecurityToken
Parameters
bizId: Your business ID. This ID is used to associate the business operation with the token. This parameter is optional.
Return value
Returns a FaceSecToken object that has the following properties:
public class FaceSecToken {
    // The status code of the API operation call.
    public code: number = 0;

    // The token string used to query results on the server.
    public token: string = "";
}
code: The status code of the API operation call. You can use it to determine if the call was successful.
token: The token string. This token is used to call the FaceGuardRisk API operation of FACE_GUARD.
ImportantThe token string is about 600 bytes long with a good network connection. With a poor network connection, it is about 2.5 KB and includes a special identifier:
Good network: "U0dfTkxxxx"
Poor network: "U0dfUFxxxx"
If your application generates a large number of long tokens:
First, ensure that the client has a stable network connection.
Second, for more information, see the Integration flow document. Call the initWithOptions API operation at [Timing 1] and the getDeviceToken API operation at [Timing 2]. Alternatively, ensure there is an interval of at least 3 seconds between the calls to the initWithOptions and getDeviceToken API operations.
Example
// Example of passing a bizId. The bizId is the customer's business ID and is optional.
let bizId = "1234567890abcdef1234567890ab****"
let tokenObj: FaceSecToken = FaceSecDevice.getInstance().getDeviceToken(bizId);
if (tokenObj.code == FaceSecCode.SC_SUCCESS) {
  console.log("Aliyun Token: " + tokenObj.token);
} else {
  console.log("Aliyun Code: " + tokenObj.code);
}
3. Send a request to the server with the token
After you successfully obtain the deviceToken (FaceSecToken.token), you must include this parameter in the request sent to your business server. Your server can then query and verify the result. For more information, see the Server-side API operations document.
Complete code example
import { FaceSecCode, FaceSecToken, FaceSecDevice } from 'aliyunfaceguard';

@Entry
@Component
struct Index {
  @State message: string = 'AliyunFaceGuard';
  @State USER_PRODUCT_KEY: string = "<Contact your business manager to get the key>";

  build() {
    Row() {
      Column() {
        Button(this.message)
          .fontSize(18)
          .fontWeight(FontWeight.Bold)
          .onClick((event: ClickEvent) => {
            // Initialize the SDK.
            // Call only once during the app lifecycle.
            // We recommend calling the initWithOptions API operation at Timing 1 of the integration flow.
            this.doInit();

            // Wait for 2s here to simulate the facial recognition process.
            setTimeout(() => {
              // We recommend calling the getDeviceToken API operation at Timing 2 of the integration flow.
              this.doGetToken();
            }, 2000);
          })
          .margin({ top: 10 })
      }
      .width('100%')
    }
    .height('100%')
  }

  doInit(): void {
    let options: Map<string, string> = new Map<string, string>();
    options.set("IPv6", "0"); // Set to IPv4 mode.
    options.set("DataSwitch", "0"); // Set to collect data during the init phase.
    // options.set("CustomUrl", "xxx"); // Set the reporting site URL.
    // options.set("CustomHost", "xxx"); // Set the reporting site host.
    FaceSecDevice.getInstance().initWithOptions(getContext(), this.USER_PRODUCT_KEY, options, null);
  }

  doGetToken(): void {
    // Example of passing a bizId. The bizId is the customer's business ID and is optional.
    let bizId = "1234567890abcdef1234567890ab****"
    let tokenObj: FaceSecToken = FaceSecDevice.getInstance().getDeviceToken(bizId);
    if (tokenObj.code == FaceSecCode.SC_SUCCESS) {
      console.log("Aliyun Token: " + tokenObj.token);
    } else {
      console.log("Aliyun Code: " + tokenObj.code);
    }
  }
}