For text-to-image workloads, use ComfyUI with DeepGPU to accelerate the inference speed of FLUX and SD models. For example, using ComfyUI with DeepGPU on a GPU instance can boost text-to-image performance for the FLUX model by approximately 30% compared to a standard setup. This topic explains how to install and use ComfyUI with DeepGPU.
Performance comparison
The DeepGPU inference acceleration component from Alibaba Cloud provides significant performance gains for text-to-image inference with FLUX.1, SD, or SDXL models.
Compared to a setup without the ComfyUI and DeepGPU acceleration nodes, configuring them on a GPU instance (a single-card gn8is instance is recommended) boosts performance for the flux1-dev model by approximately 30% for both bf16 and fp8 precision. The following table compares the text-to-image acceleration performance for select models.
|
Model weight precision |
Image resolution (W x H) |
Time (unaccelerated) |
Time (accelerated) |
Speedup rate |
|
default(bf16) |
1024 x 1024 |
20.83s |
16.62s |
25.3% |
|
default(bf16) |
1280 x 720 |
19.02s |
15.07s |
26.2% |
|
default(bf16) |
680 x 1024 |
14.21s |
11.21s |
26.8% |
|
default(bf16) |
576 x 768 |
8.81s |
7.27s |
21.2% |
|
fp8_e4m3_fast |
1024 x 1024 |
15.16s |
11.15s |
36.0% |
|
fp8_e4m3_fast |
1280 x 720 |
13.66s |
9.97s |
37.0% |
|
fp8_e4m3_fast |
680 x 1024 |
9.93s |
7.51s |
32.2% |
|
fp8_e4m3_fast |
576 x 768 |
6.07s |
4.88s |
24.4% |
Prerequisites
-
You have created a GPU instance that meets the following requirements:
-
The operating system must be Ubuntu 20.04 or Ubuntu 22.04.
-
The NVIDIA driver and CUDA are installed and meet the version requirements.
NoteWhen you create a GPU instance, we recommend selecting the Install GPU Driver option after choosing an image. Then, select the required versions for CUDA, the driver, and cuDNN.
-
The instance has a fixed public IP address or is associated with an Elastic IP address (EIP). For information about how to enable public network access, see Enable public network access.
-
-
You have configured security group rules.
Port 22, required for remote connections, is open by default when you create a security group. The ComfyUI server requires a specific port, such as 7860, to access its web UI. Ensure that inbound rules for ports 22 and 7860 are added to the security group. If they are not open, manually configure security group rules.
Install ComfyUI and DeepGPU
ComfyUI is an open-source project. You must install it before installing the DeepGPU inference acceleration component. For information about DeepGPU nodes and workflows in ComfyUI, see Node and workflow overview.
-
Set up ComfyUI.
NoteFor an overview of related nodes and workflows in ComfyUI, see Node and workflow overview.
If you plan to load a native LoRA model in ComfyUI (by using the LoraLoaderModelOnly node) and accelerate it with deepgpu-torch, modify one line in the ComfyUI source code.
-
In the ComfyUI/comfy/sd.py file, add the parameter
weight_inplace_update=Trueto the following line of code.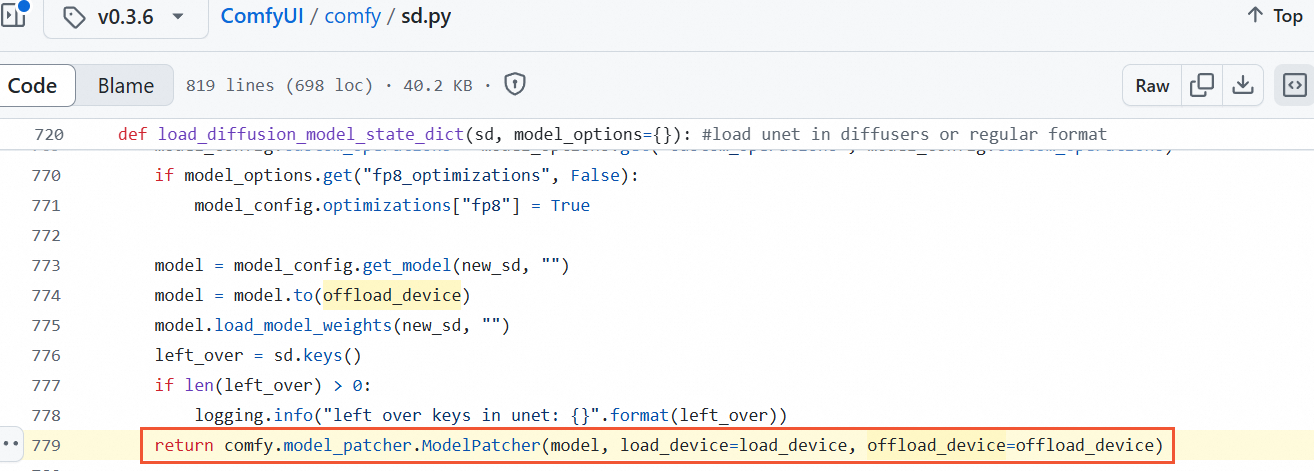
The modified code should look like this:
return comfy.model_patcher.ModelPatcher(model, load_device=load_device, offload_device=offload_device, weight_inplace_update=True) -
In the ComfyUI/comfy/sd.py file, add the parameter
weight_inplace_update=Trueto the following line of code.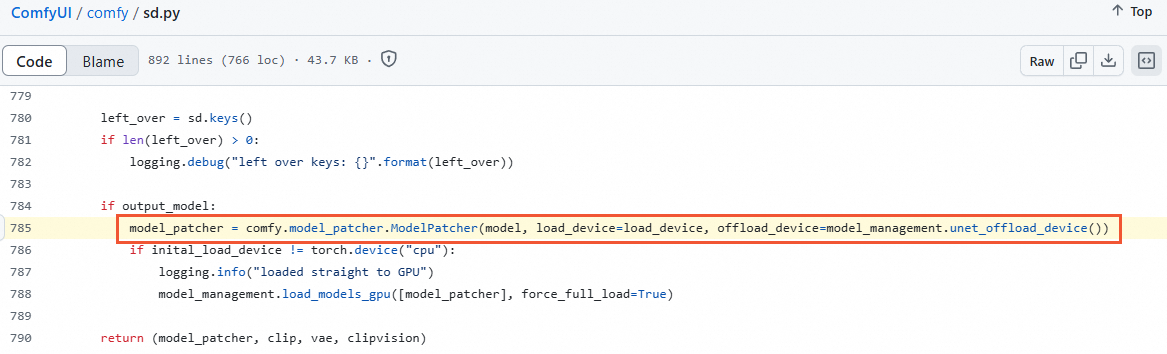
The modified code should look like this:
model_patcher = comfy.model_patcher.ModelPatcher(model, load_device=load_device, offload_device=model_management.unet_offload_device(), weight_inplace_update=True)
-
-
Install the DeepGPU inference acceleration component.
-
Check your Python version to ensure it meets the dependency requirements for the deepgpu-torch acceleration component.
The deepgpu-torch acceleration component requires Python 3.10.
Ubuntu 22.04
Run
python3 -Vto check your Python version. As shown in the following figure, Ubuntu 22.04 comes with Python 3.10.12 by default, which meets the dependency requirement.
Ubuntu 20.04
Run
python3 -Vto check your Python version. As shown in the following figure, Ubuntu 20.04 comes with Python 3.8.10 by default, which does not meet the dependency requirement.
You can install Miniconda to create an isolated Python 3.10 environment, or use another method.
-
Run the following command to download the Miniconda installation script.
wget https://repo.anaconda.com/miniconda/Miniconda3-py310_24.1.2-0-Linux-x86_64.sh -
Run the following commands to install Miniconda and activate the environment.
bash ./Miniconda3-py310_24.1.2-0-Linux-x86_64.sh -b -p /workspace/miniconda source /workspace/miniconda/bin/activate -
Run
python3 -Vagain to check the Python version. Note
NoteEach time you log in, run
source /workspace/miniconda/bin/activateto activate the virtual Python 3.10 environment.
-
-
Run the following command to install torch.
The deepgpu-torch acceleration component requires torch 2.5.x+cu124. This example installs torch 2.5.0. To install a different version, replace the version number accordingly.
pip install torch==2.5.0Run
python3 -c "import torch; print(torch.__version__)"to confirm that torch 2.5.0+cu124 is installed.
-
Run the following commands to install deepgpu-torch.
apt-get install which curl iputils-ping -y
pip install deepgpu-torch==0.0.15+torch2.5.0cu124 -f https://aiacc-inference-public-v2.oss-cn-hangzhou.aliyuncs.com/deepgpu/deepytorch/index.html
Run
pip list | grep deepgpu-torchto view the installed version of deepgpu-torch.
-
Run the following commands to download and install the ComfyUI plugin for the DeepGPU inference acceleration component.
Download the plugin for the DeepGPU inference acceleration component and extract it to the
ComfyUI/custom_nodes/directory.cd ComfyUI/custom_nodes/ wget https://aiacc-inference-public-v2.oss-cn-hangzhou.aliyuncs.com/deepgpu/comfyui/flux/20250102/ComfyUI-deepgpu.tar.gz tar zxf ComfyUI-deepgpu.tar.gz cd ../.. pip install deepgpu-comfyui==1.0.8 -f https://aiacc-inference-public-v2.oss-cn-hangzhou.aliyuncs.com/deepgpu/comfyui/index.htmlRun
pip list | grep deepgpu-comfyuito verify that the plugin for the DeepGPU inference acceleration component is installed.
Accelerate text-to-image inference
This example demonstrates how to use ComfyUI with DeepGPU to test the acceleration of text-to-image inference for a FLUX model. The setup uses a gn8is instance running Ubuntu 22.04 with DeepGPU installed.
-
Install the basic environment, including torch, ComfyUI dependencies, and the DeepGPU acceleration component.
-
Run the
python3 -Vcommand to ensure your Python version is 3.10.Ubuntu 22.04 comes with Python 3.10.12 by default, which meets the dependency requirement for the deepgpu-torch acceleration component. If you are using a GPU instance with Ubuntu 20.04, you must create an isolated Python 3.10 environment. For more information, see Ubuntu 20.04.
-
Run the following command to install torch.
# This example installs torch 2.5.0. To install a different version, replace the version number accordingly.
pip install torch==2.5.0 torchvision==0.20.0 torchaudio==2.5.0
Run
python3 -c "import torch; print(torch.__version__)"to view the installed torch version.
-
Run the following command to install ComfyUI dependencies.
pip install PyYAML safetensors numpy Pillow einops psutil transformers scipy torchsde aiohttp comfyui-frontend-package==1.11.8 kornia spandrel av -
Run the following commands to install the DeepGPU acceleration component.
apt-get install which curl iputils-ping -y
pip install deepgpu-torch==0.0.15+torch2.5.0cu124 -f https://aiacc-inference-public-v2.oss-cn-hangzhou.aliyuncs.com/deepgpu/deepytorch/index.html
pip install deepgpu-comfyui==1.0.8 -f https://aiacc-inference-public-v2.oss-cn-hangzhou.aliyuncs.com/deepgpu/comfyui/index.html
Run
pip list | grep deepgpu-torchorpip list | grep deepgpu-comfyuito view the installed version of the DeepGPU acceleration component.
-
Run the following command to download the ComfyUI source code.
This example uses the official ComfyUI source code. You can also use your own customized version of the ComfyUI code.
Ubuntu 22.04
git clone -b v0.3.26 https://github.com/comfyanonymous/ComfyUI
sed -i "s|comfy.model_patcher.ModelPatcher(model, load_device=load_device, offload_device=model_management.unet_offload_device())|comfy.model_patcher.ModelPatcher(model, load_device=load_device, offload_device=model_management.unet_offload_device(), weight_inplace_update=True)|g" ComfyUI/comfy/sd.py
Ubuntu 20.04
apt install git git clone -b v0.3.26 https://github.com/comfyanonymous/ComfyUI sed -i "s|comfy.model_patcher.ModelPatcher(model, load_device=load_device, offload_device=model_management.unet_offload_device())|comfy.model_patcher.ModelPatcher(model, load_device=load_device, offload_device=model_management.unet_offload_device(), weight_inplace_update=True)|g" ComfyUI/comfy/sd.py -
Run the following commands to download the plugin for the DeepGPU inference acceleration component.
cd ComfyUI/custom_nodes/ wget https://aiacc-inference-public-v2.oss-cn-hangzhou.aliyuncs.com/deepgpu/comfyui/flux/20250102/ComfyUI-deepgpu.tar.gz tar zxf ComfyUI-deepgpu.tar.gz ls cd ../.. -
Run the following commands to download the FLUX model.
This example uses the official FLUX model. You can also use your own trained models.
cd ComfyUI wget -P models/unet https://aiacc-inference-public-v2.oss-cn-hangzhou.aliyuncs.com/deepgpu/comfyui/flux/models/flux1-dev.safetensors wget -P models/clip https://aiacc-inference-public-v2.oss-cn-hangzhou.aliyuncs.com/deepgpu/comfyui/flux/models/t5xxl_fp16.safetensors wget -P models/clip https://aiacc-inference-public-v2.oss-cn-hangzhou.aliyuncs.com/deepgpu/comfyui/flux/models/clip_l.safetensors wget -P models/vae https://aiacc-inference-public-v2.oss-cn-hangzhou.aliyuncs.com/deepgpu/comfyui/flux/models/ae.safetensorsNoteThe model download may take some time.
-
Run the following command to start the ComfyUI service.
python3 main.py --listen 0.0.0.0 --port 7860 -
Navigate to
http://IP:7860to access the ComfyUI service.Replace
IPwith the public IP address of your GPU instance. -
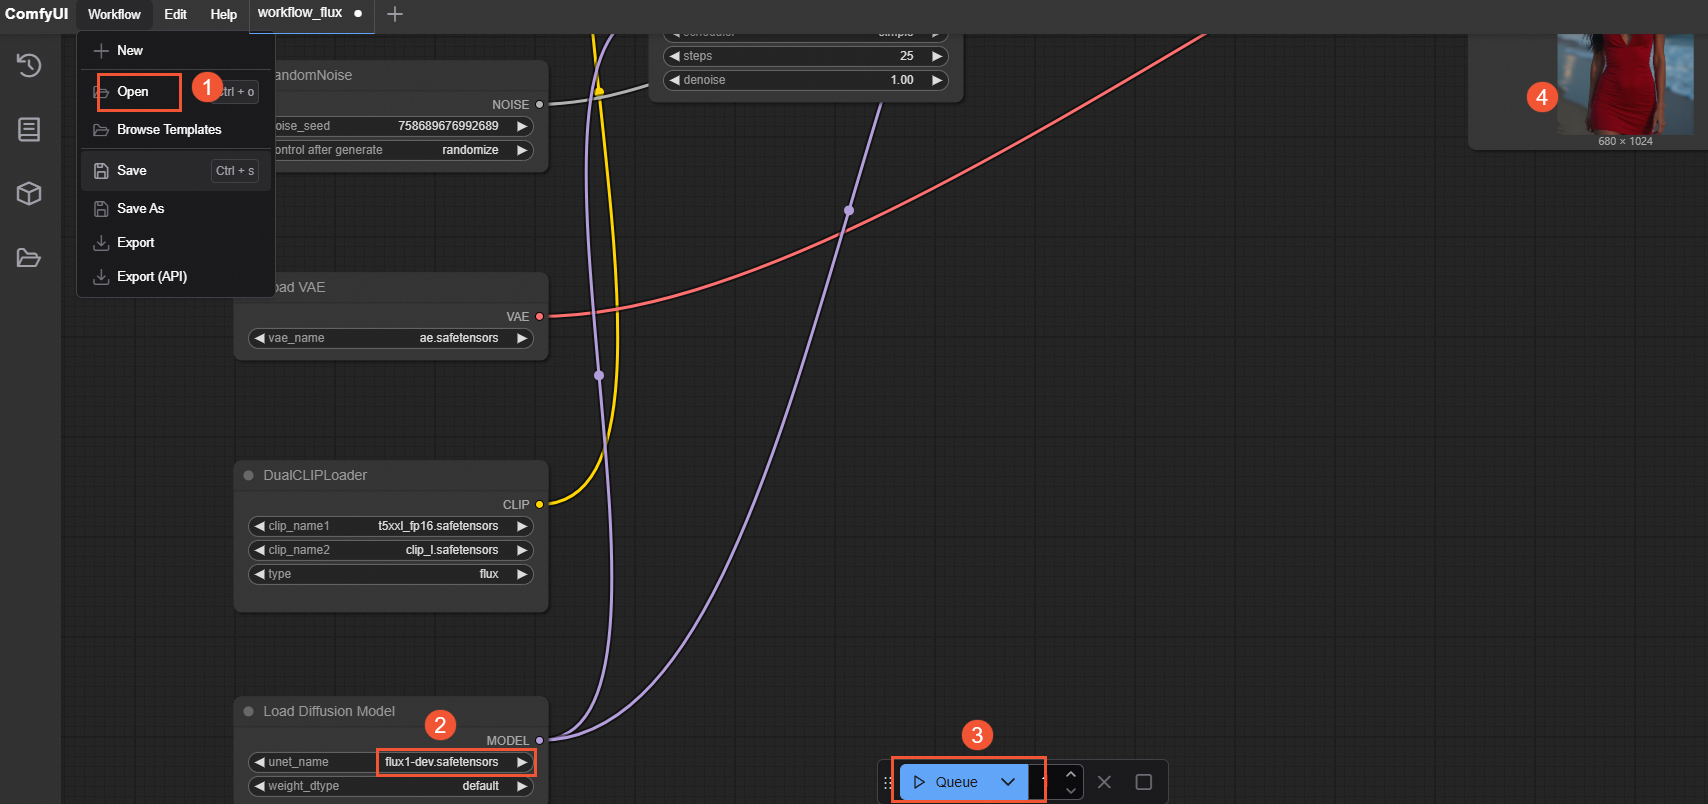
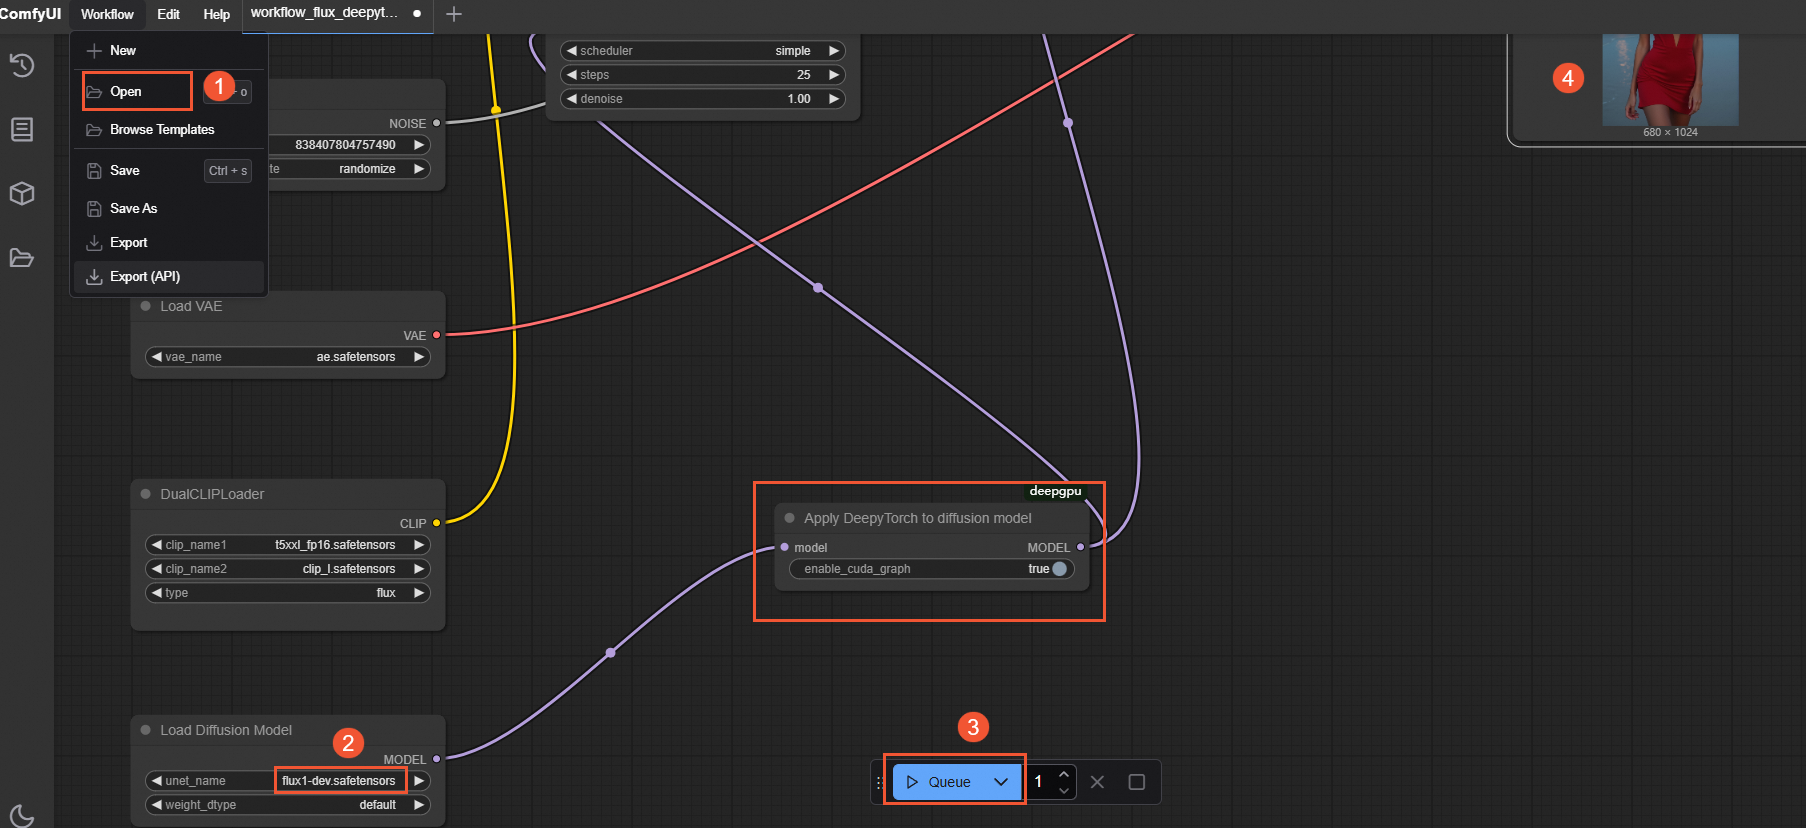
In the ComfyUI interface, select , select the JSON file provided in the sample workflow, and then click Queue Prompt.
ImportantYou must restart the ComfyUI service when switching between workflows with and without DeepGPU acceleration.
-
Without DeepGPU acceleration: Select the base flux-dev JSON file (workflow_flux.json). The following figure shows the workflow execution.
-
With DeepGPU acceleration: Select the accelerated flux-dev DeepyTorch JSON file (workflow_flux_deepytorch.json). The following figure shows the workflow execution.
After the process is complete, check the text-to-image execution time in the terminal where you started ComfyUI. This is the time displayed after
Prompt executed in, as shown in the following figure. The execution time is significantly shorter when using the ComfyUI and DeepGPU configuration compared to the standard setup. For more performance details, see Performance comparison.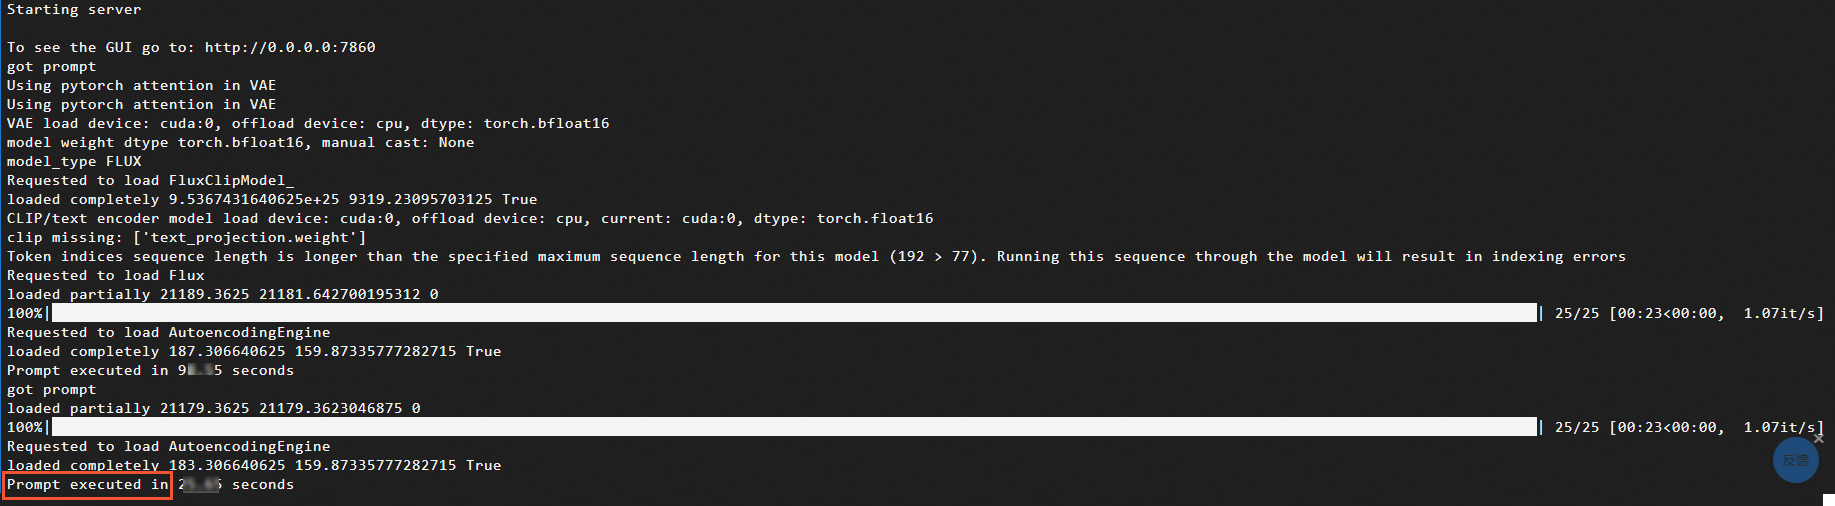
-
Node and workflow overview
DeepGPU node types
The plugin for the DeepGPU inference acceleration component includes several DeepGPU-specific nodes. In the ComfyUI interface, you can right-click a blank area and select to view the available DeepGPU node types.
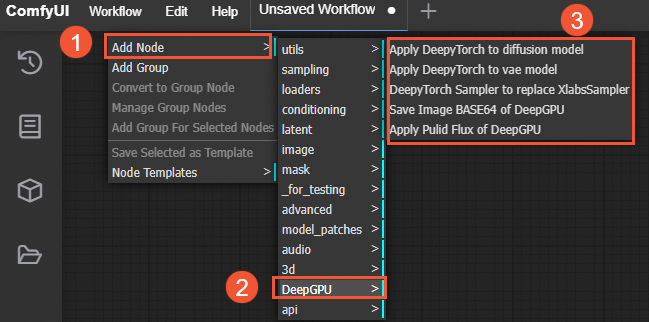
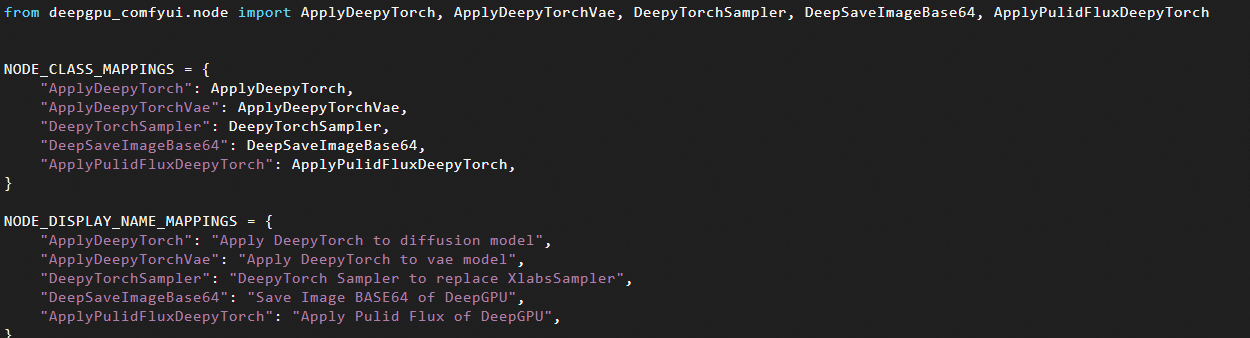
Navigate to the ComfyUI/custom_nodes/ComfyUI-deepgpu directory and open the __init__.py file to see the corresponding node types.
The main node types are described below:
-
ApplyDeepyTorch node: For FLUX models, the ApplyDeepyTorch node depends on other nodes. You must insert it after a Load Diffusion Model, Load Flux LoRA, or Apply Flux IPAdapter node. For other models, this node must be inserted after a Load Checkpoint or LoraLoaderModelOnly node.
-
DeepyTorchSampler node: For FLUX models, this node is a new sampler that offers better performance than the XLabsSampler node (from x-flux-comfyui). When you use this node, you do not need to add an ApplyDeepyTorch node.
-
ApplyPulidFluxDeepyTorch node: For FLUX models, this node outperforms the ApplyPulidFlux node (from ComfyUI-PuLID-Flux-Enhanced) and replaces it. You do not need to add an ApplyDeepyTorch node when using this node.
Example workflows
This section provides example workflows for accelerating FLUX and SD model inference.
FLUX.1 models
-
For the base
flux-devmodelIn the ComfyUI interface, insert an
ApplyDeepyTorchnode after theLoad Diffusion Modelnode, as shown in the following figure: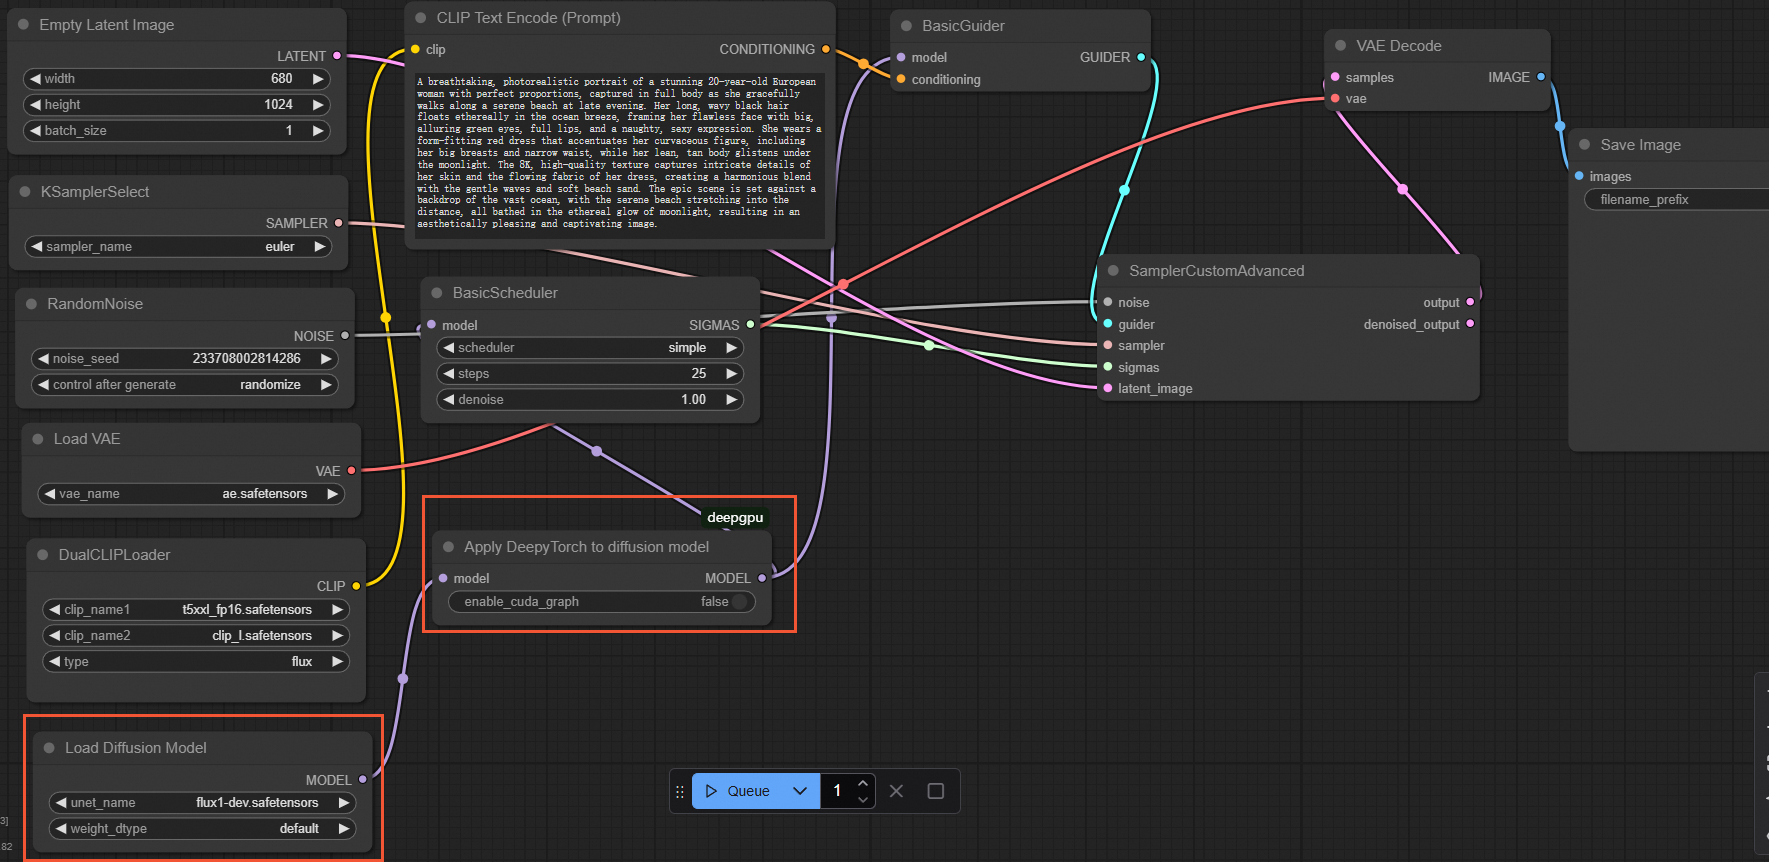
Example workflow files:
-
Base flux-dev version: workflow_flux.json
-
Accelerated flux-dev DeepyTorch version: workflow_flux_deepytorch.json
-
-
For native ComfyUI LoRA models
NoteDeepGPU supports both the XLabs and native ComfyUI LoRA implementations for the FLUX.1-dev model.
In the ComfyUI interface, insert an
ApplyDeepyTorchnode after the lastLoraLoaderModelOnlynode, as shown in the following figure: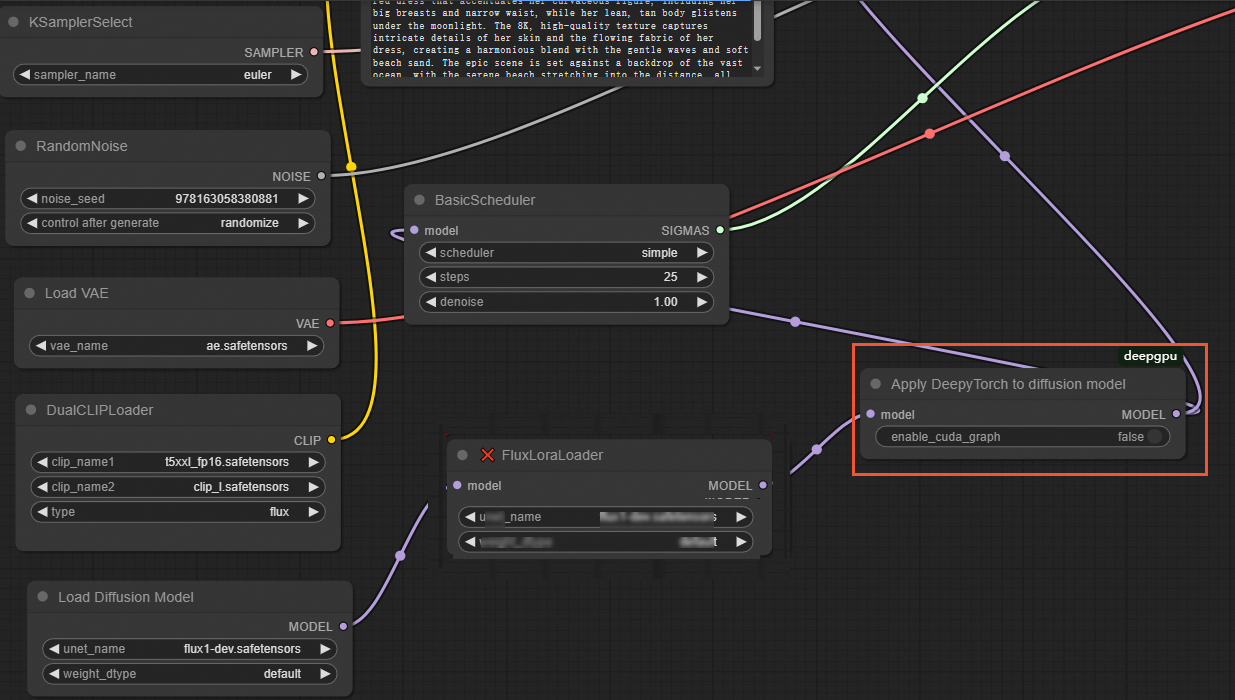
Example workflow files:
-
Original flux-dev+lora version: workflow_flux_lora_wukong.json
-
Accelerated flux-dev+lora DeepyTorch version: workflow_flux_lora_deepytorch_wukong.json
-
-
For FLUX models with the Pulid plugin
NoteThe Pulid plugin is from ComfyUI-PuLID-Flux-Enhanced.
In the ComfyUI interface, replace the
Apply Pulid Fluxnode with theApplyPulidFluxDeepyTorchnode. NoApplyDeepyTorchnode is needed. The workflow is shown in the following figure: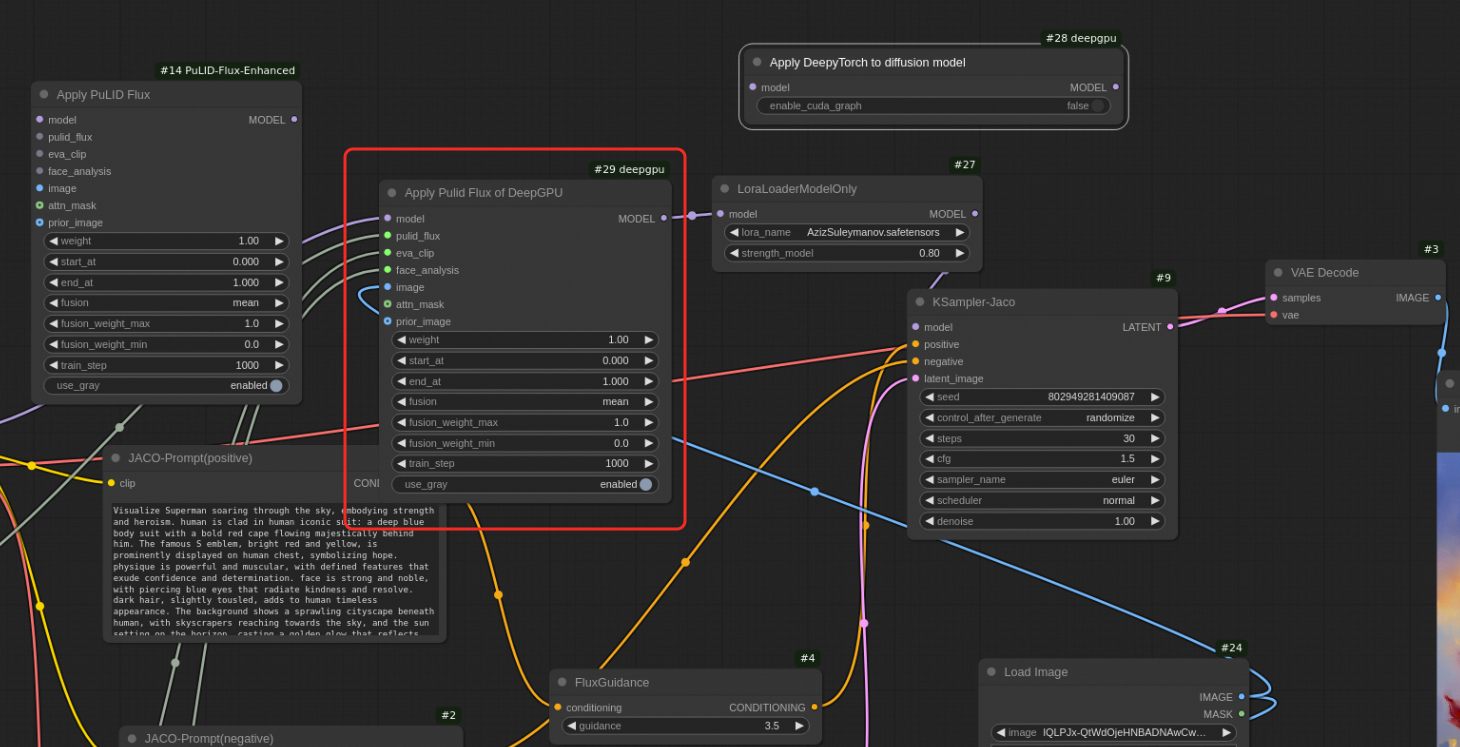
-
For custom FLUX LoRA models
Before starting the ComfyUI service, you must set the following environment variable to execute the workflow in the ComfyUI interface.
export DEEPGPU_ENABLE_FLUX_LORA=trueIn the ComfyUI interface, insert an
ApplyDeepyTorchnode after the lastLoad Flux LoRAnode, as shown in the following figure: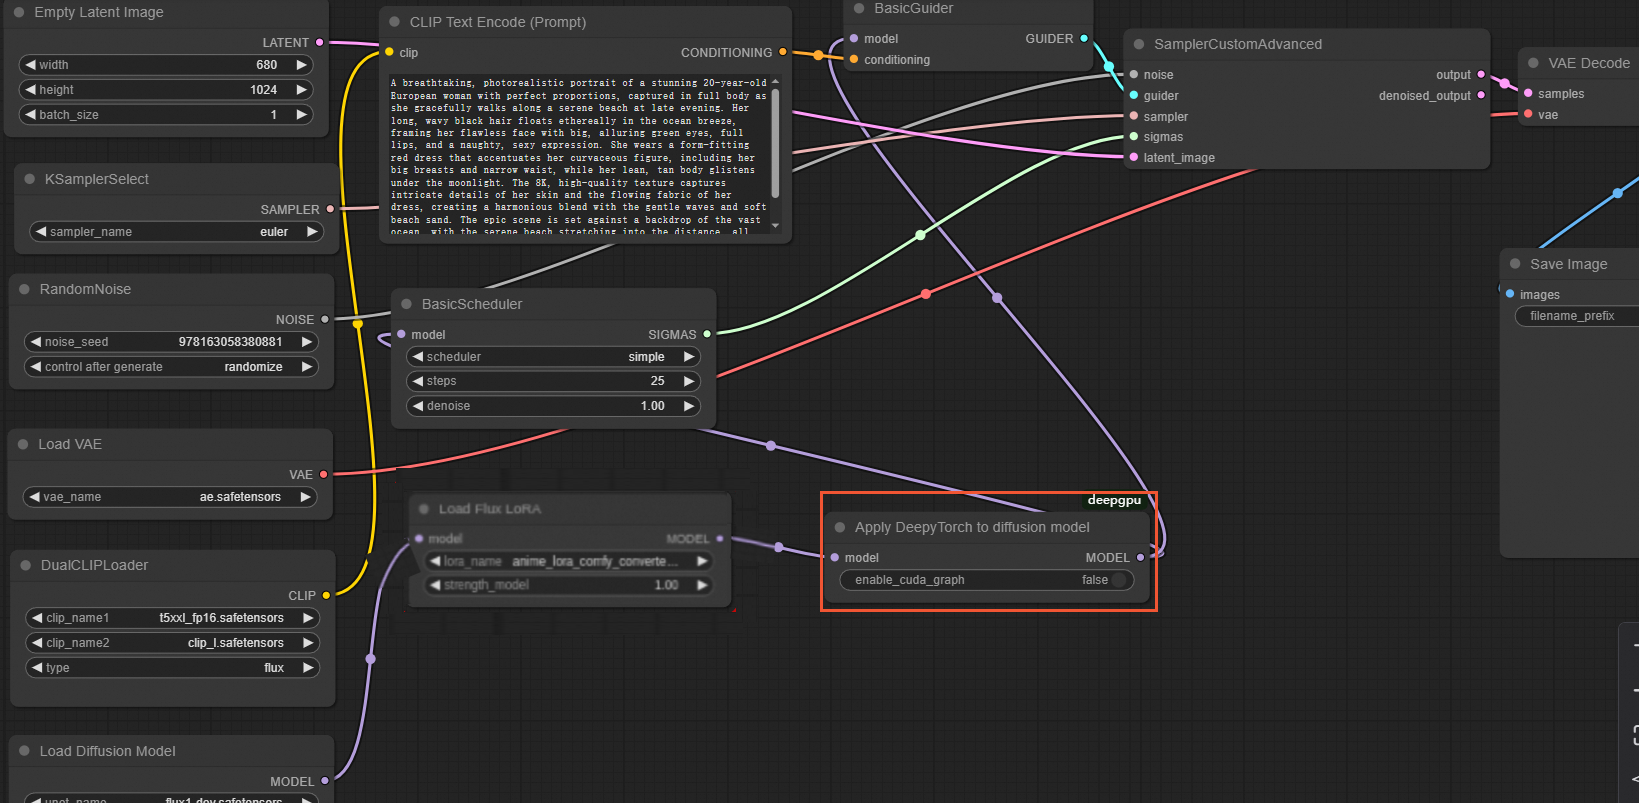
Example workflow files:
-
Original flux-dev+lora version: workflow_flux_lora.json
-
Accelerated flux-dev+lora DeepyTorch version: workflow_flux_lora_deepytorch.json
-
-
For custom FLUX IP-Adapter
Before starting the ComfyUI service, you must set the following environment variable to execute the workflow in the ComfyUI interface.
export DEEPGPU_ENABLE_FLUX_LORA=trueIn the ComfyUI interface, insert an
ApplyDeepyTorchnode after theApply Flux IPAdapternode, and replace theXLabsSamplernode with theDeepyTorch Samplernode, as shown in the following figure:NoteThe test image used as input for this scenario is the XLabs-AI image.
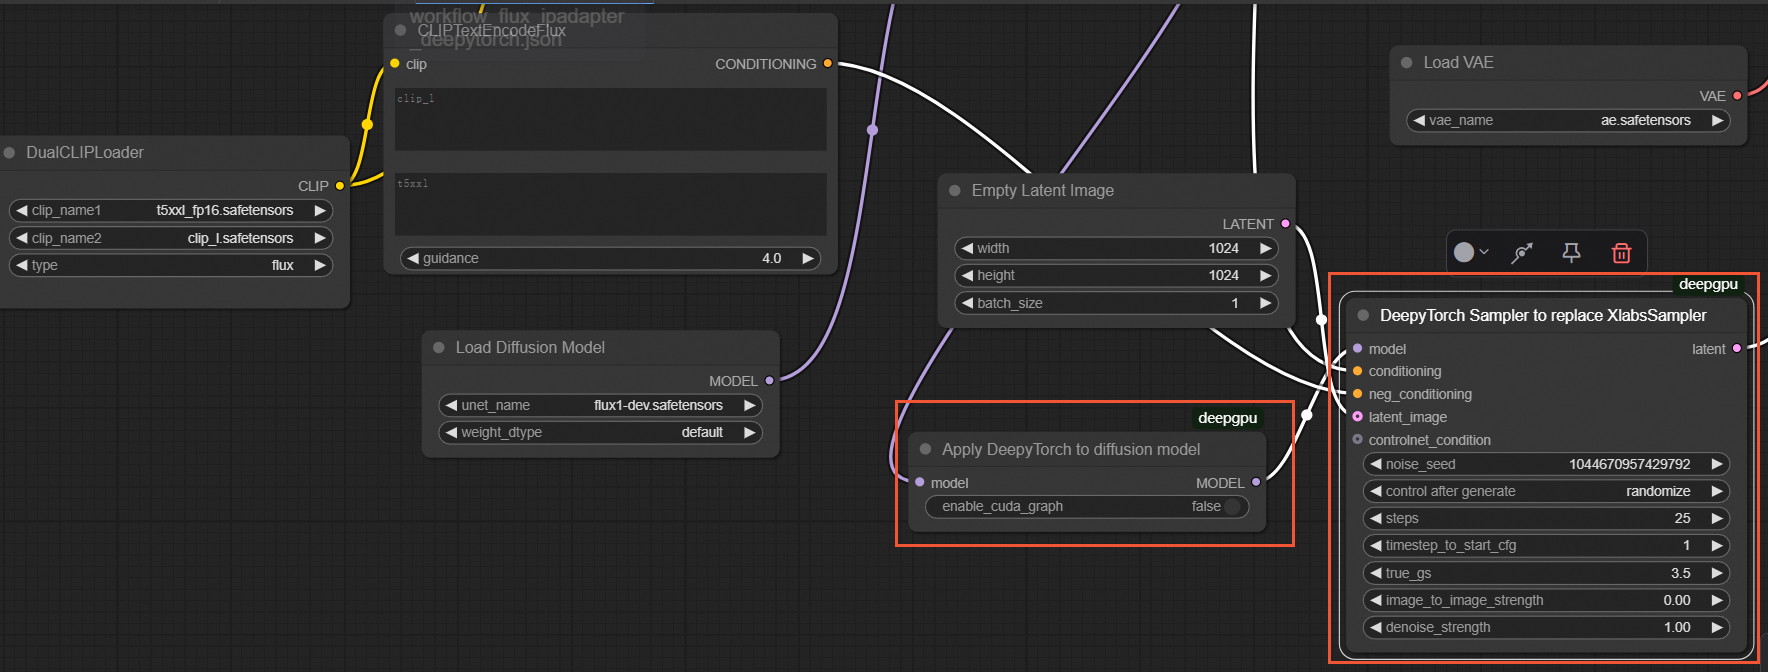
Example workflow files:
-
Original flux-dev+ip-adapter version: workflow_flux_ipadapter.json
-
Accelerated flux-dev+ip-adapter DeepyTorch version: workflow_flux_ipadapter_deepytorch.json
-
-
For custom FLUX ControlNet
In the ComfyUI interface, replace the
XLabsSamplernode with theDeepyTorch Samplernode, as shown in the following figure:NoteThe test image used as input for this scenario is the XLabs-AI image.
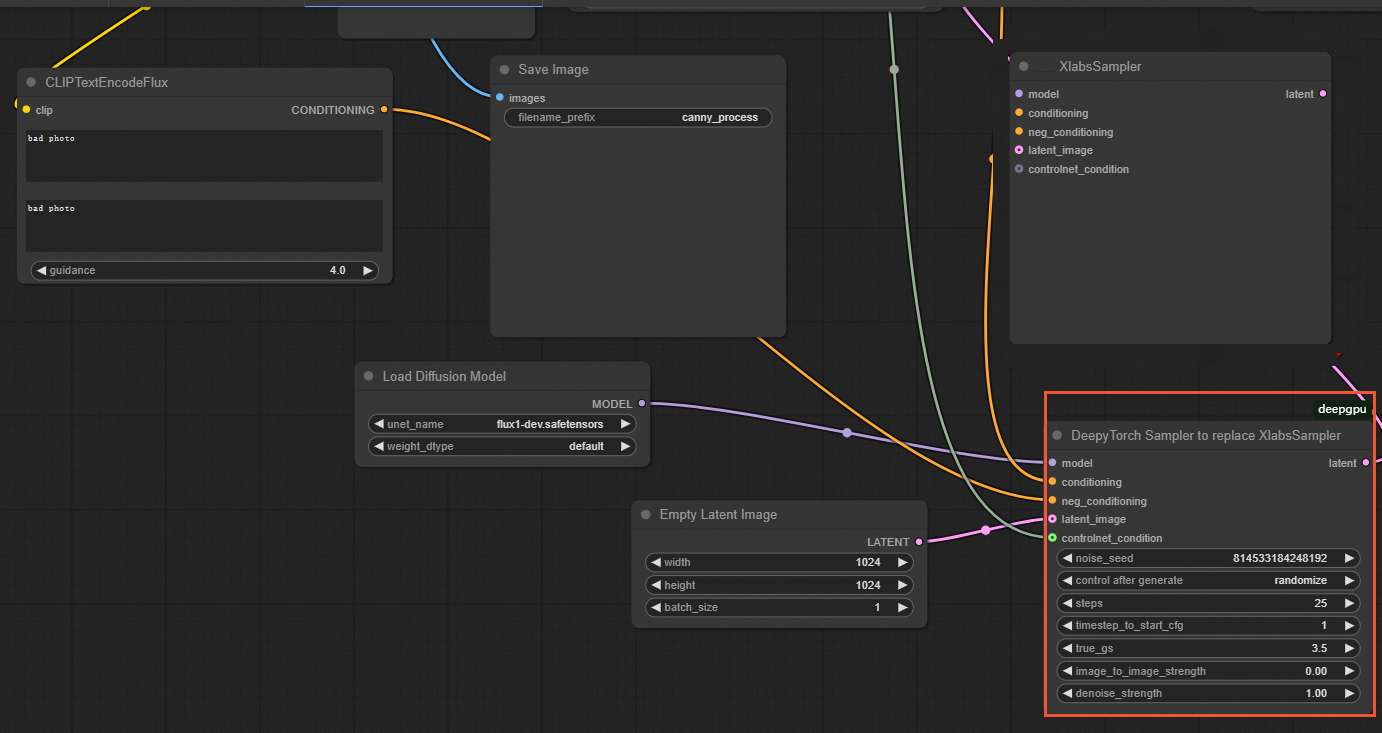
Example workflow files:
-
Original flux-dev+controlnet version: workflow_flux_controlnet.json
-
Accelerated flux-dev+controlnet DeepyTorch version: workflow_flux_controlnet_deepytorch.json
-
SD 1.5 models
-
For native ComfyUI LoRA models
NoteDeepGPU supports both the XLabs and native ComfyUI LoRA implementations for the FLUX.1-dev model.
In the ComfyUI interface, insert an
ApplyDeepyTorchnode after the lastLoraLoaderModelOnlynode, as shown in the following figure:Example workflow files:
-
Original flux-dev+lora version: workflow_flux_lora_wukong.json
-
Accelerated flux-dev+lora DeepyTorch version: workflow_flux_lora_deepytorch_wukong.json
-
-
For custom SD ControlNet
In the ComfyUI interface, insert an
ApplyDeepyTorchnode after theLoad Checkpointnode, as shown in the following figure: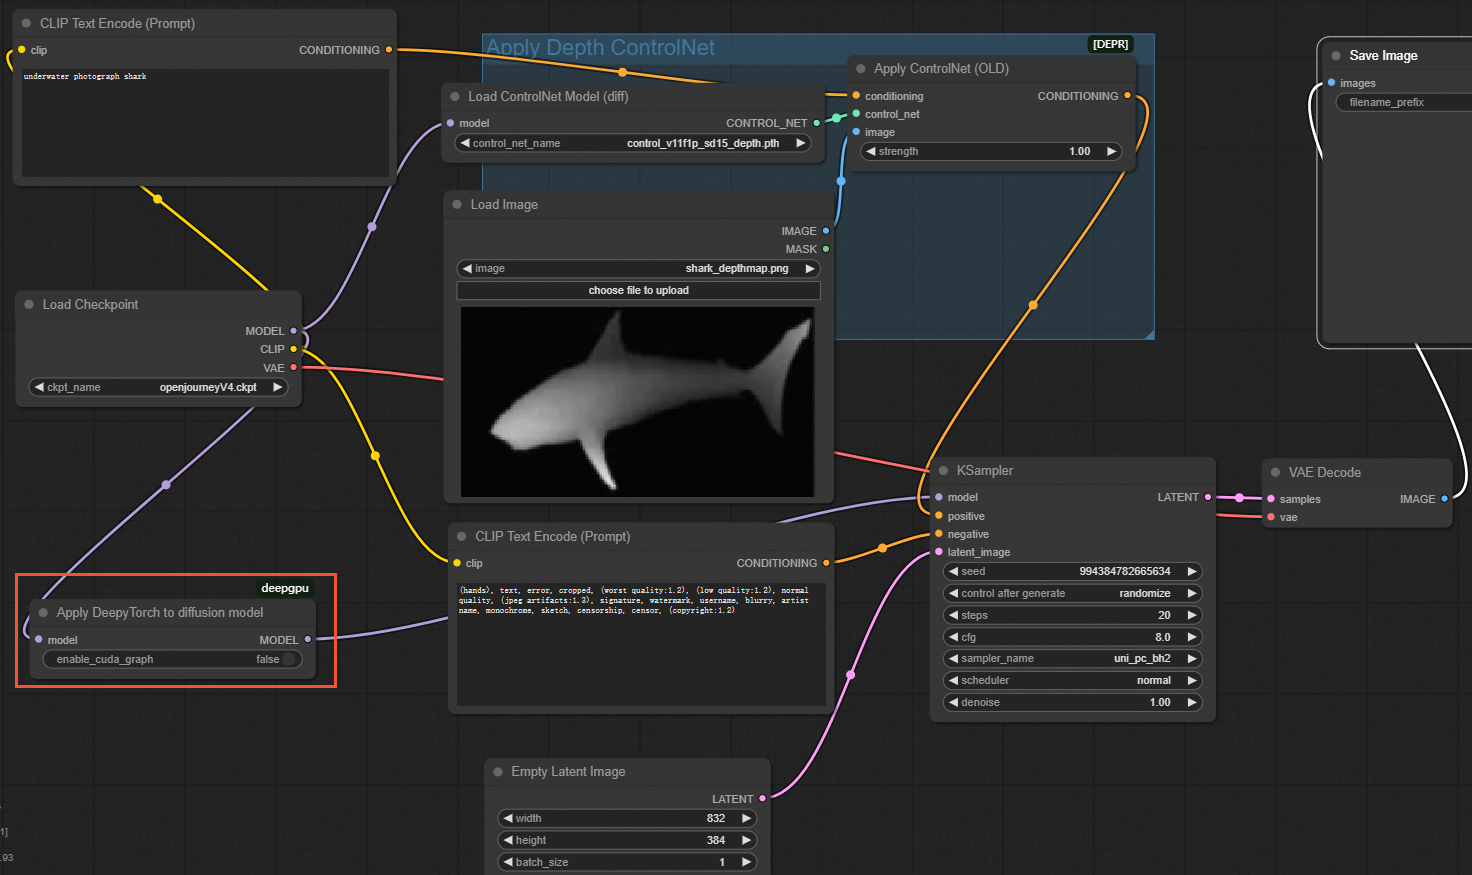
Example workflow files:
-
Original sd1.5+controlnet version: workflow_sd1.5_controlnet.json
-
Accelerated sd1.5+controlnet DeepyTorch version: workflow_sd1.5_controlnet_deepytorch.json
-
SDXL models
To accelerate SDXL models, insert an ApplyDeepyTorch node after both the BASE and REFINER Load Checkpoint nodes, as shown in the following figure:
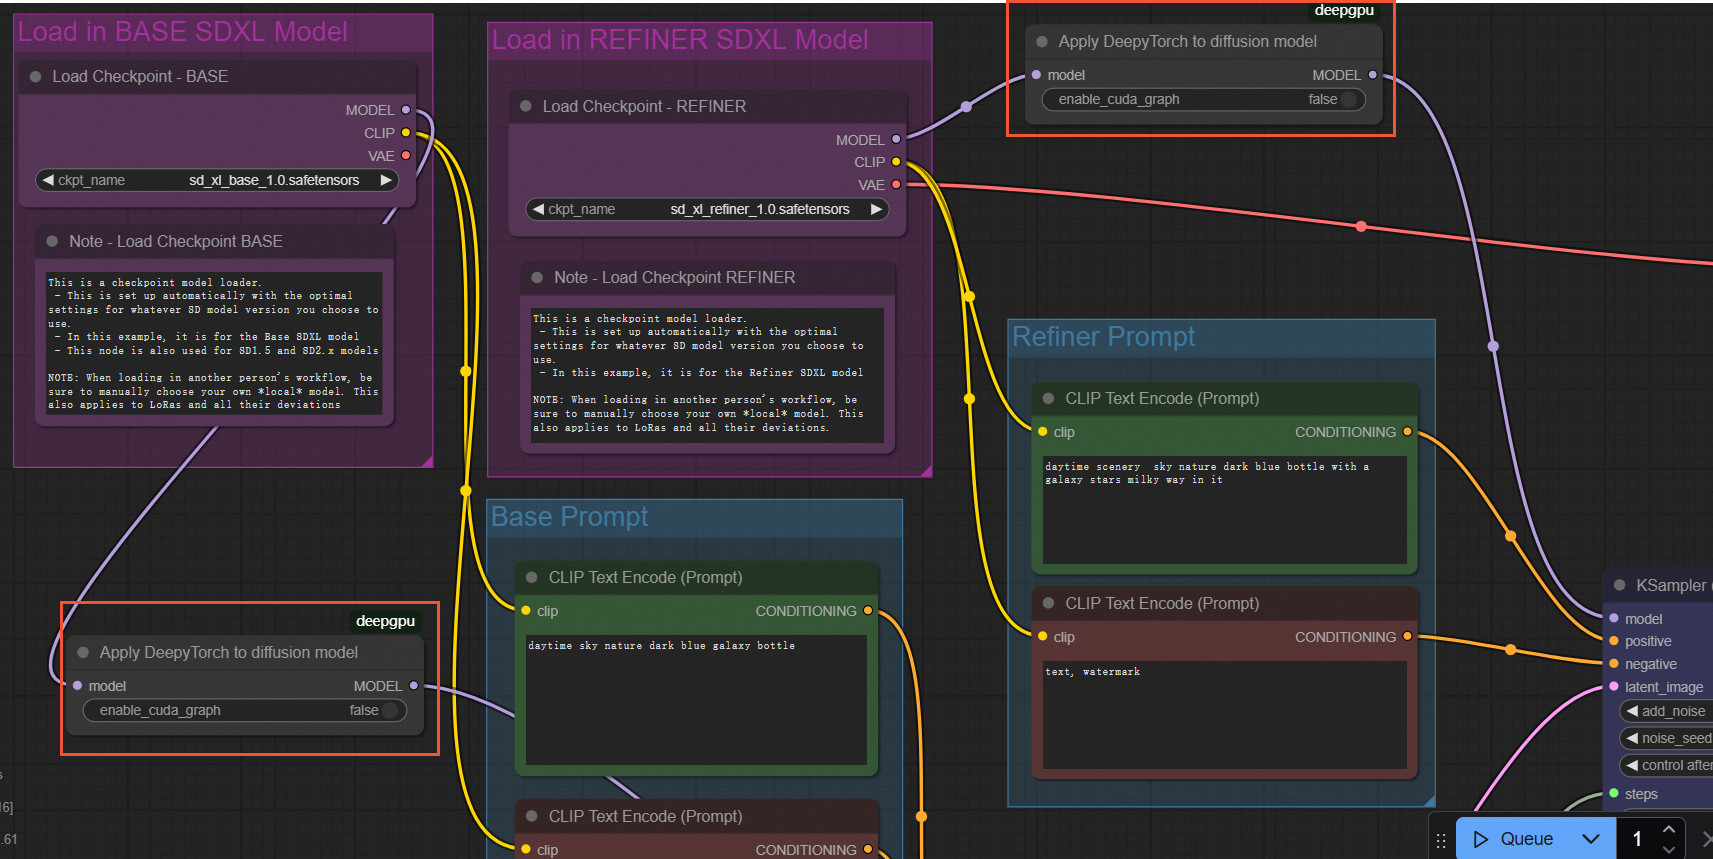
Example workflow files:
-
Original sdxl version: workflow_sdxl_base_refiner.json
-
Accelerated sdxl DeepyTorch version: workflow_sdxl_base_refiner_deepytorch.json