When you use ESA TCP/UDP proxy, client IP addresses are not transported by default. Configure NGINX with PROXY protocol v1 or v2 to pass real client IPs to your backend for accurate logging, access control, and geolocation.
How it works
When ESA acts as a Layer 4 (TCP/UDP) proxy in front of your NGINX origin server, it terminates the client TCP connection and opens a new one to your backend. As a result, NGINX sees ESA's IP address instead of the real client IP.
PROXY protocol solves this by prepending a header to each TCP stream—before any application data—that carries the original client IP and port. NGINX reads this header and exposes the client IP through the $proxy_protocol_addr variable, which you can use for logging, access control, and geolocation.
To enable this, configure both sides: update your NGINX configuration to accept PROXY protocol headers, and enable PROXY protocol passthrough in the ESA console.
Before you begin
Check which NGINX version you need based on your target protocol version:
Install NGINX
The following commands install NGINX from source with the --with-stream module, which is required for TCP/UDP proxying.
# Install dependencies for compiling NGINX.
yum -y install gcc gcc-c++ autoconf automake
yum -y install zlib zlib-devel openssl openssl-devel pcre-devel
# Download the installation package.
wget http://nginx.org/download/nginx-1.20.0.tar.gz
# Decompress the source package.
tar -zxvf nginx-1.20.0.tar.gz
# Go to the NGINX directory.
cd nginx-1.20.0
# Configure NGINX build settings, including the --with-stream module.
./configure --prefix=/usr/local/nginx --sbin-path=/usr/local/nginx/sbin/nginx --conf-path=/usr/local/nginx/conf/nginx.conf --with-http_stub_status_module --with-http_gzip_static_module --with-stream
# Compile NGINX.
make
# Install NGINX.
make install
Configure NGINX to accept PROXY protocol
Step 1: Update the NGINX configuration
Add the proxy_protocol parameter to the listen directive in each server block that should accept PROXY protocol headers. The $proxy_protocol_addr variable then holds the real client IP, which you can use in log formats and as a forwarded header. For the full directive reference, see Accepting the PROXY Protocol.
The example below configures both the http block (for HTTP/HTTPS traffic) and the stream block (for raw TCP traffic). Both use proxy_protocol on the listen directive to accept the PROXY protocol header from ESA.
http {
    log_format combined '$proxy_protocol_addr - $remote_user [$time_local] '
                        '"$request" $status $body_bytes_sent '
                        '"$http_referer" "$http_user_agent"';
    #...

    server {
        server_name localhost;

        listen 80   proxy_protocol;
        listen 443  ssl proxy_protocol;

        ssl_certificate      /etc/nginx/ssl/public.example.com.pem;
        ssl_certificate_key  /etc/nginx/ssl/public.example.com.key;

        location /app/ {
            proxy_pass       http://backend1;
            proxy_set_header Host            $host;
            proxy_set_header X-Real-IP       $proxy_protocol_addr;
            proxy_set_header X-Forwarded-For $proxy_protocol_addr;
        }
    }
}

stream {
    log_format basic '$proxy_protocol_addr - $remote_user [$time_local] '
                     '$protocol $status $bytes_sent $bytes_received '
                     '$session_time';
    #...
    server {
        listen              8080 ssl proxy_protocol;

        ssl_certificate     /etc/nginx/ssl/cert.pem;
        ssl_certificate_key /etc/nginx/ssl/cert.key;

        proxy_pass          esa.example.com:8080;
        proxy_protocol      on;
    }
}
Step 2: Create a Layer 4 proxy
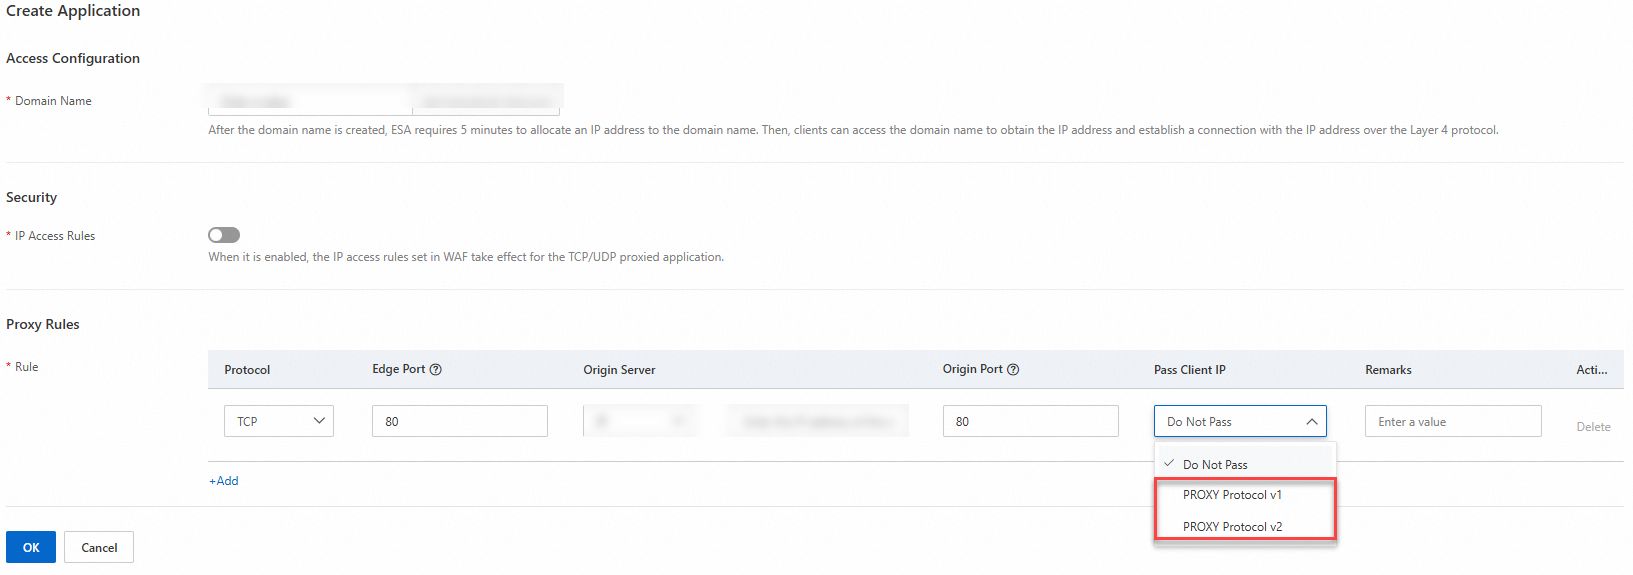
In the ESA console, go to your website details page. In the left navigation pane, choose TCP/UDP Proxy > Settings, and then click Create Application. Set Protocol to TCP and Pass Client IP to PROXY Protocol v1 or PROXY Protocol v2. Configure other parameters as needed.
Verify the configuration
-
Start a simple HTTP server on port 8080.
python -m SimpleHTTPServer 8080 -
Send a test request through ESA to the HTTP server.
curl -i "https://esa.example.com:8080" -
Check the NGINX logs. The real client IP address appears in the log entries.

For information about HAProxy support for the PROXY protocol, see Use the Proxy Protocol to Preserve a Client's IP Address.