If the IP address of your origin server is associated with multiple domain names and requests are redirected to the origin server over HTTPS, you need to configure the Server Name Indication (SNI) feature for the origin server. SNI specifies the domain name for which requests are destined. The origin server returns the corresponding SSL certificate based on the SNI.
Background information
SNI is an extension of the TLS/SSL protocol by which a client determines which hostname it is attempting to connect to at the beginning of the handshake process. SNI allows a server to present multiple SSL certificates on the same IP address. After you enable SNI, when a point of presence (POP) sends a TLS handshake request to the origin server, the origin server determines the requested domain name based on the SNI information that is carried in the TLS handshake request. Then, the origin server returns the correct SSL certificate.
The origin server must be capable of parsing the SNI information that is carried in the TLS handshake request.
If multiple origin servers are configured for an accelerated domain name, you can configure the origin SNI feature in the Alibaba Cloud CDN console. This way, all origin fetch requests point to the domain name that corresponds to the SNI value. If you want to specify different SNI values for different origin servers, submit a ticket.
The following figure shows how origin SNI works.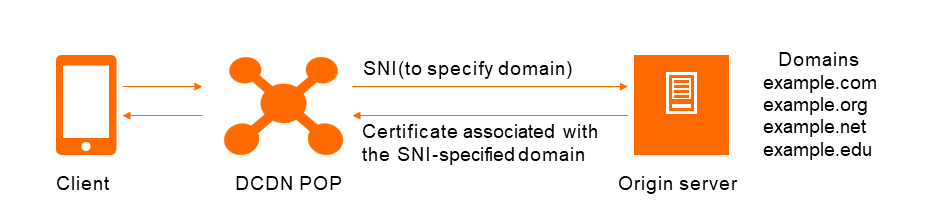
SNI for origin fetch works based on the following process:
A POP redirects a request to the origin server over HTTPS. The domain name for which the request is destined, such as example.com, is specified by SNI.
After the origin server receives the request, it responds with the certificate of the requested domain name, such as example.com, based on SNI.
After the POP receives the certificate, the POP establishes a secure connection to the origin server.
Procedure
Log on to the DCDN console.
In the left-side navigation pane, click Domain Names.
On the Domain Names page, find the domain name that you want to manage and click Configure.
In the left-side navigation tree of the domain name, click Origin Fetch.
On the Origin Fetch tab, find Default Origin SNI.
Turn on the Default Origin SNI switch and enter the domain name for origin SNI, such as
example.com.NoteThe origin SNI value must be an exact-match domain name. Wildcard domain names are not supported.
Click OK.