This topic describes how to smoothly migrate microservice-oriented applications that are running on your Elastic Compute Service (ECS) instances to Enterprise Distributed Application Service (EDAS).
Prerequisites
The microservice-oriented applications of the OnlineShop demo project are deployed on your ECS instances. For more information, see Build a local development environment for microservices applications. You can refer to this topic to migrate other microservice-oriented applications that are running on your ECS instances to EDAS.
Create a microservices namespace
Log on to the EDAS console.
In the left-side navigation pane, choose .
In the upper-right corner of the Microservices Namespace page, click Create Microservices Namespace.
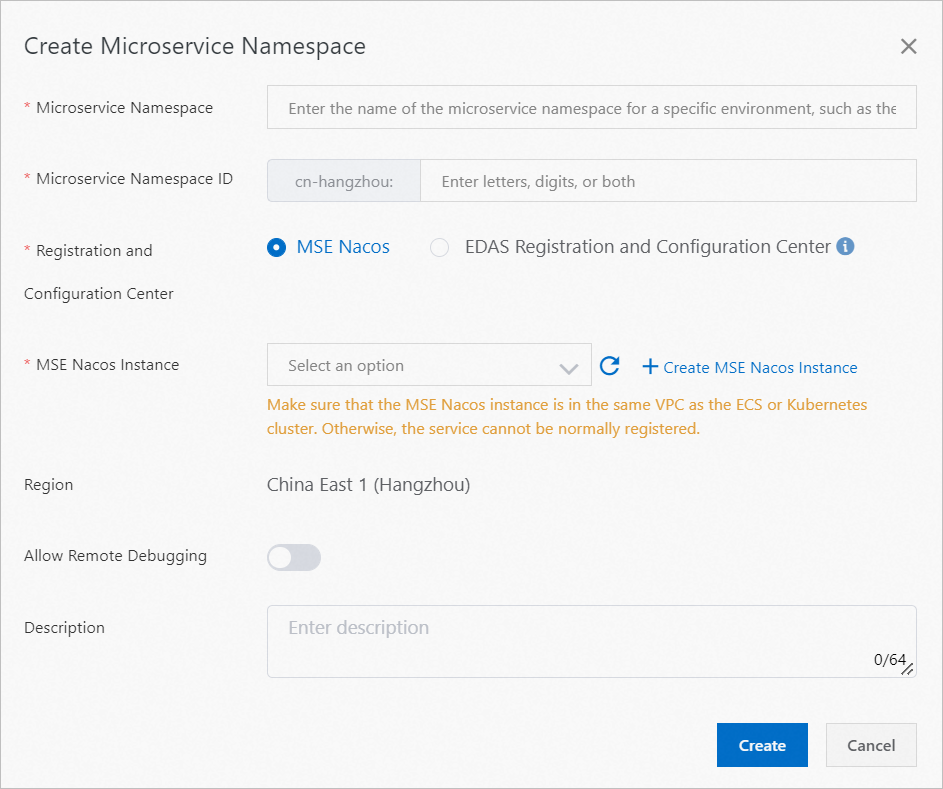
In the Create Microservices Namespace dialog box, configure parameters based on your business requirements and click Create. The following table describes the parameters.
Parameter
Description
Microservices Namespace
The name of the microservices namespace that you want to create.
Microservices Namespace ID
The custom ID of the microservices namespace that you want to create. Only letters and digits are allowed.
Registration and Configuration Center
MSE Nacos: the Microservice Engine (MSE) Nacos engine that you purchased. MSE Nacos can be seamlessly integrated with EDAS to implement service registration and configuration management.
EDAS Registration and Configuration Center: a free service registration and configuration center that is provided by EDAS. If your application requires high performance and stability, we recommend that you use MSE Nacos as the service registration and configuration center.
MSE Nacos Instance
The Nacos instance that is created by using MSE. For more information, see Create a Nacos engine.
Region
The region to which the microservices namespace that you want to create belongs. You cannot change the default value.
Allow Remote Debugging
If you want to connect to a cloud application from your on-premises computer, you can turn on the Allow Remote Debugging switch on the editing page of the microservices namespace to which the application belongs.
Description
The description of the microservices namespace.
Procedure
Log on to the EDAS console.
In the left-side navigation pane, choose .
On the ECS Clusters page, select a region in the top navigation bar, select a microservices namespace, and then click Create Cluster.
You can select a microservices namespace on this page or in the Create Cluster dialog box.
If resource or service isolation is required, select the microservices namespace that you created.
If resource or service isolation is not required, select Default from the Microservices Namespace drop-down list.
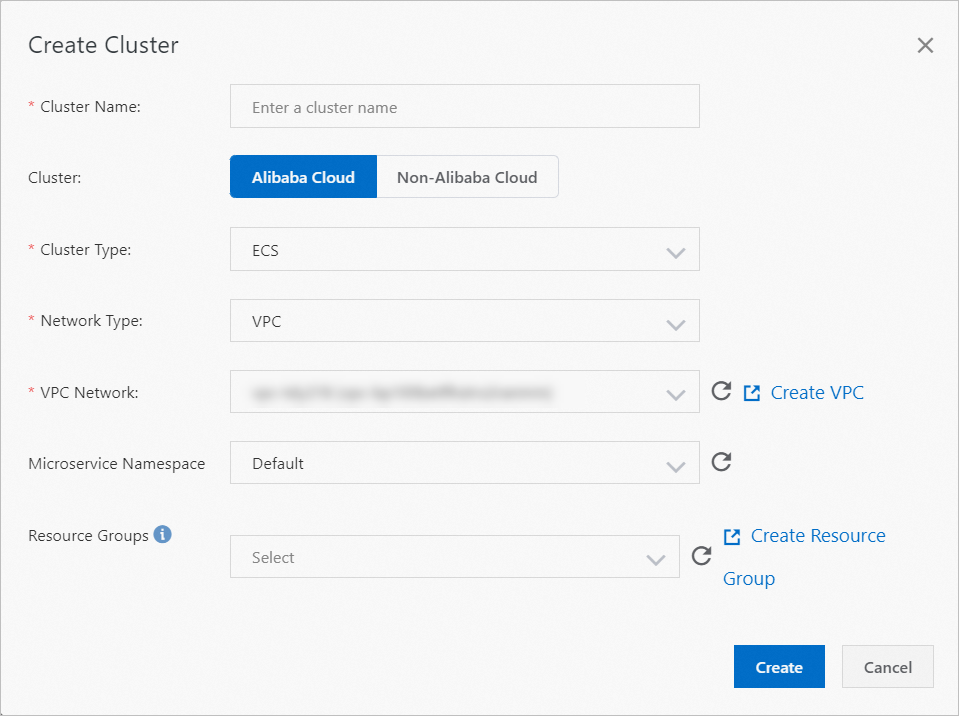
In the Create Cluster dialog box, configure parameters based on your business requirements and click Create.
Parameter
Description
Cluster Name
The name of the cluster. The name must be 1 to 64 characters in length and can contain letters, digits, underscores (_), and periods (.).
Cluster
Alibaba Cloud: an Alibaba Cloud ECS cluster.
Non-Alibaba Cloud: a hybrid cloud ECS cluster. In a hybrid cloud ECS cluster, the instances that are provided by Alibaba Cloud ECS, on-premises data centers, and other cloud service providers are interconnected over Express Connect circuits. For more information about hybrid cloud ECS clusters, see Create a hybrid cloud ECS cluster.
Cluster Type
This parameter can be set only to ECS.
Network Type
Valid values: Classic Network and VPC.
ImportantIf you set Cluster to Non-Alibaba Cloud, you can set this parameter only to VPC.
VPC
After you select VPC for Network Type, you must select a created VPC.
Microservices Namespace
The microservices namespace to which the cluster belongs. By default, the namespace selected on the ECS Clusters page is displayed. If no microservices namespace is selected, Default is displayed in the Microservices Namespace drop-down list. Configure this parameter based on your business requirements.
Resource Groups
The resource group to which the cluster belongs. The resource group is created by the current Alibaba Cloud account in the Resource Management console. This group is not an EDAS resource group. If no resource groups are available, click Create Resource Group to go to the Resource Management console and create a resource group. For more information, see Create a resource group.
After a cluster is created, the Created message appears on the top of the page, and the cluster appears in the cluster list.
Deploy microservice-oriented applications in EDAS
Deploy the Cart Service, Product Service, and Frontend applications in EDAS by performing the following steps. The following procedure describes how to create a service provider. You can follow a similar procedure to create a service consumer.
Log on to the EDAS console.
In the left-side navigation pane, choose . In the top navigation bar, select a region. In the upper part of the Applications page, select a microservices namespace from the Microservices Namespace drop-down list. Then, click Create Application in the upper-left corner of the Applications page.
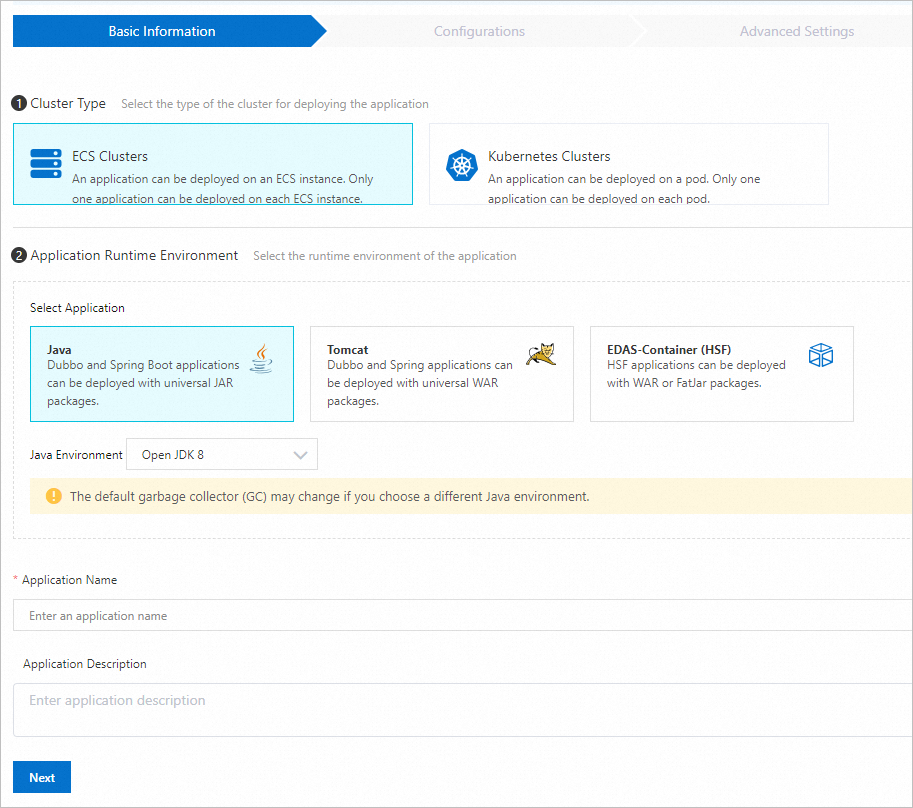
In the Basic Information step of the Create Application wizard, configure the basic information of the Cart Service application and click Next.
Parameter
Description
Cluster Type
The type of the cluster that is used to deploy the application. In this example, ECS Clusters is selected.
Application Runtime Environment
The runtime environment of the application. In this example, Java is specified for the Select Application parameter, and Open JDK 8 is selected from the Java Environment drop-down list.
Application Name
The custom name of the application.
Application Description
Optional. The description of the application.
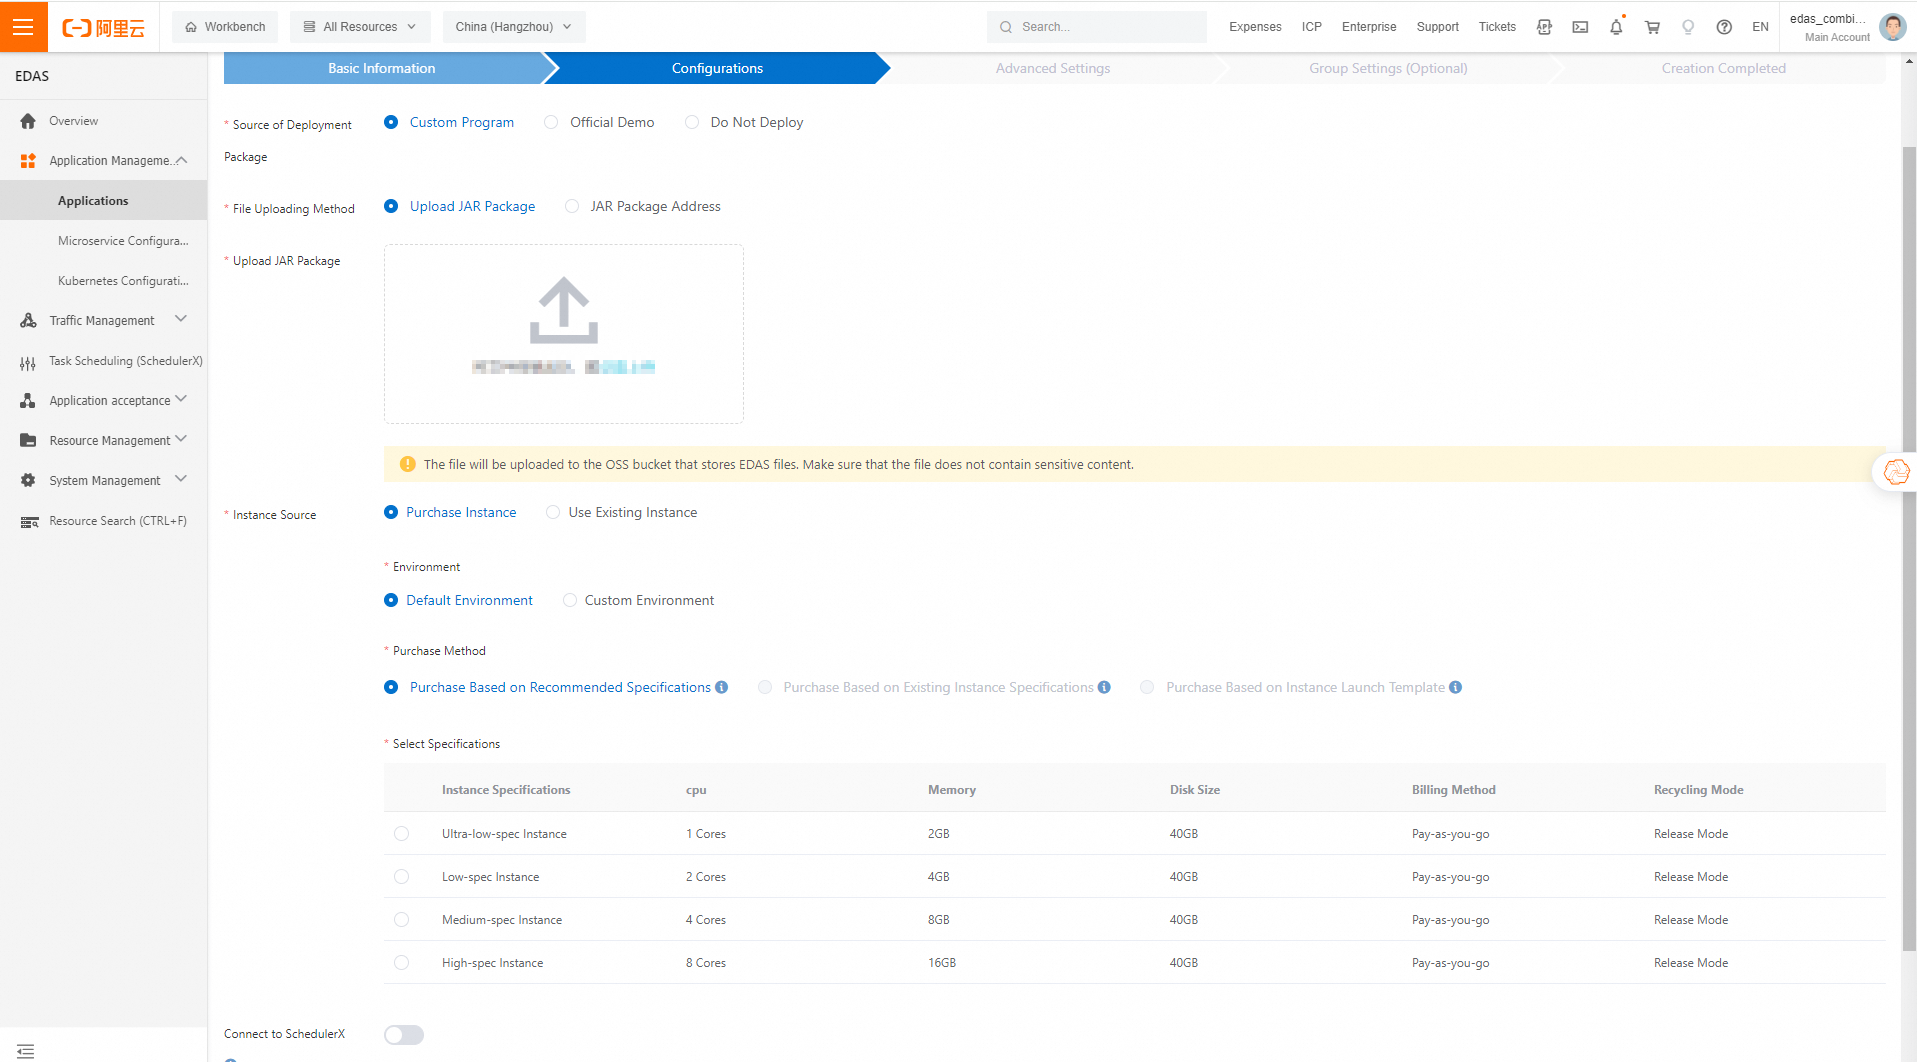
In the Configurations step of the Create Application wizard, specify a deployment package and an ECS instance for the application, and then click Next.
Parameter
Description
Source of Deployment Package
The source of the deployment package. In this example, Custom Program is selected.
File Uploading Method
The method that is used to upload files. In this example, Upload JAR Package is selected.
Upload JAR Package
Upload your JAR deployment package.
Instance Source
The source of the instance. In this example, Purchase Instance is selected.
Environment
In this example, Custom Environment is selected.
Microservices Namespace
The namespace that is used to isolate resources and services. Select a namespace from the drop-down list. If no namespace is created, the Default namespace is selected.
Cluster
Select the cluster that you created in the "Procedure" section from the drop-down list. A cluster is a collection of cloud resources that are required to run applications.
Purchase Method
The method that is used to purchase the instance. In this example, Purchase Based on Recommended Specifications is selected.
NoteIf you have added ECS instances to your cluster, you can select Purchase Based on Existing Instance Specifications.
If you have created a launch template in the ECS console, you can select Purchase Based on Instance Launch Template.
Select Specifications
The available instance types. In this example, Low-spec Instance is selected.
Quantity
The number of instances that you want to purchase. Default value: 1.
Logon Password
A password that is used to log on to the purchased ECS instance. Record and keep the password properly. If you forget the password, you can reset the password in the ECS console. The new password takes effect after the instance is restarted.
Terms of Service
Select Elastic Compute Service Terms of Service | Terms of Service for Images.
In the Advanced Settings step of the Create Application wizard, configure the parameters that are described in the following table, and then click Create Application.
Parameter
Description
Version
The version of the application. By default, EDAS uses the current timestamp as the version number of the application, in the format of
yyyymmdd:hhmmss. You can also customize the version number.Application Health Check
Optional. Specify a URL to perform health checks on the application.
In the Group Settings (Optional) step of the Create Application wizard, set the Resource Groups parameter and click Create Application.
In the Creation Completed step of the Create Application wizard, check the basic information, configurations, and advanced settings of the application, and click Create Application.
Configure Java virtual machine (JVM) parameters for the application.
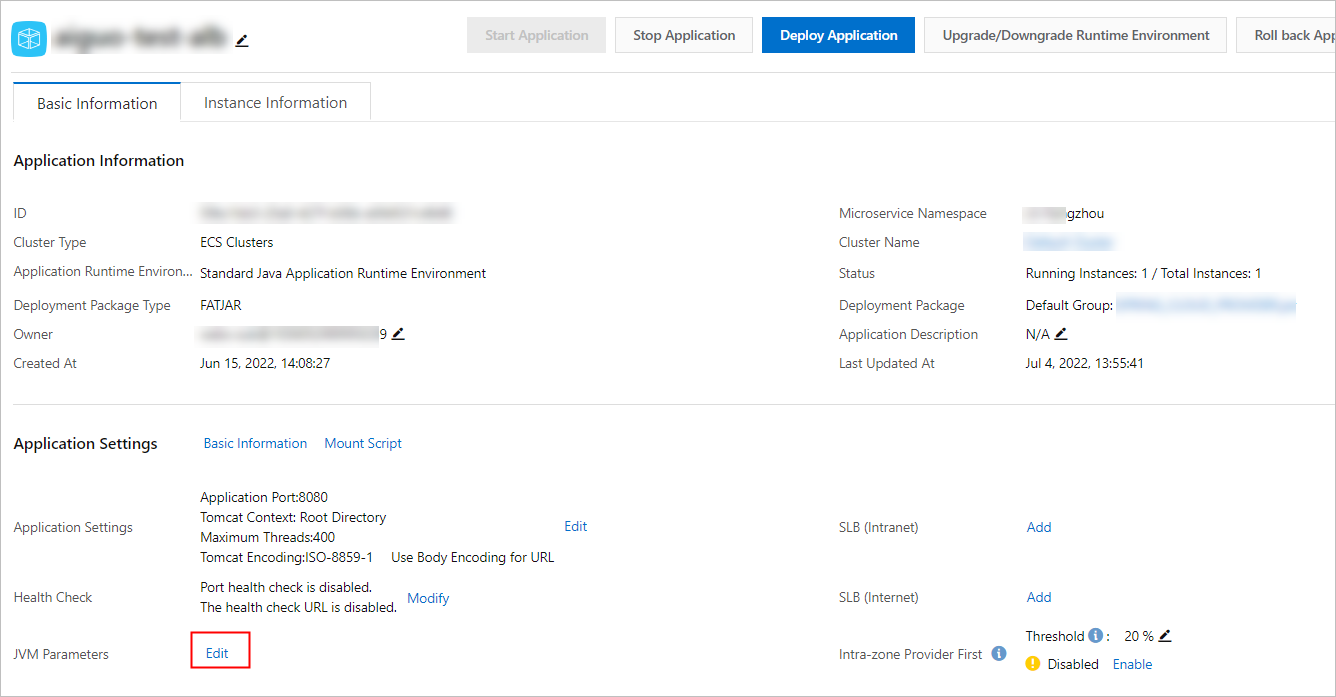
On the Basic Information tab of the application, click Edit to the right of JVM Parameters in the Application Settings section.
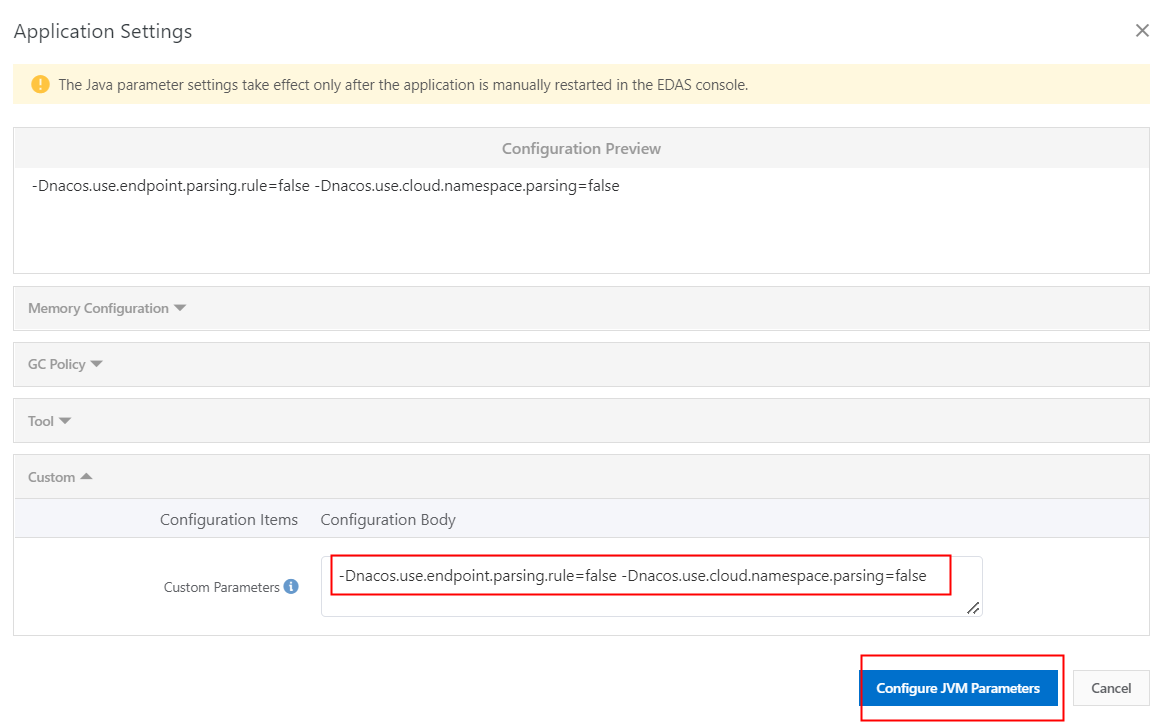
In the Application Settings dialog box, show the Custom section, enter
--Dnacos.use.endpoint.parsing.rule=false -Dnacos.use.cloud.namespace.parsing=falsein the Custom Parameters field, and then click Configure JVM Parameters.ImportantIf you use a self-managed Nacos registry, you must add the preceding JVM parameters.
If you use a registry that is provided by EDAS or a self-managed non-Nacos registry, you do not need to add the preceding JVM parameters.
Click the Instance Information tab. In the Actions column of the instance, click Restart. Then, restart the application as prompted.
Log on to the Microservices Engine (MSE) console. In the left-side navigation pane, choose Microservices Registry > Instances.
On the Instances page, click the ID of the instance to go to the Basic Information page. In the left-side navigation pane, click Services. On the Services page, view the service information. The number of providers for the Cart Service application changes to 2 in the Number of Providers column.

Repeat Steps 1 to 8 to deploy the Product Service and Frontend applications.
After all applications are deployed, you can enter
http://{Public IP address of the Frontend application instance}:8080in the browser to access the application.
Migrate access traffic to EDAS
The OnlineShop project is deployed in both EDAS and ECS. All the access traffic is routed to the ECS instance on which you deploy the Frontend application in ECS. No access traffic is routed to the Frontend application in EDAS. To migrate the access traffic to EDAS, you need to change the default backend server in the Server Load Balancer (SLB) console.
Log on to the SLB console.
Find the SLB instance that is associated with the Frontend application and click Add Backend Server in the Actions column. In the Available Servers panel, select the ECS instance on which you deploy the Frontend application in EDAS.

Modify the weights of the two backend servers.
Check whether the access traffic is routed as expected.
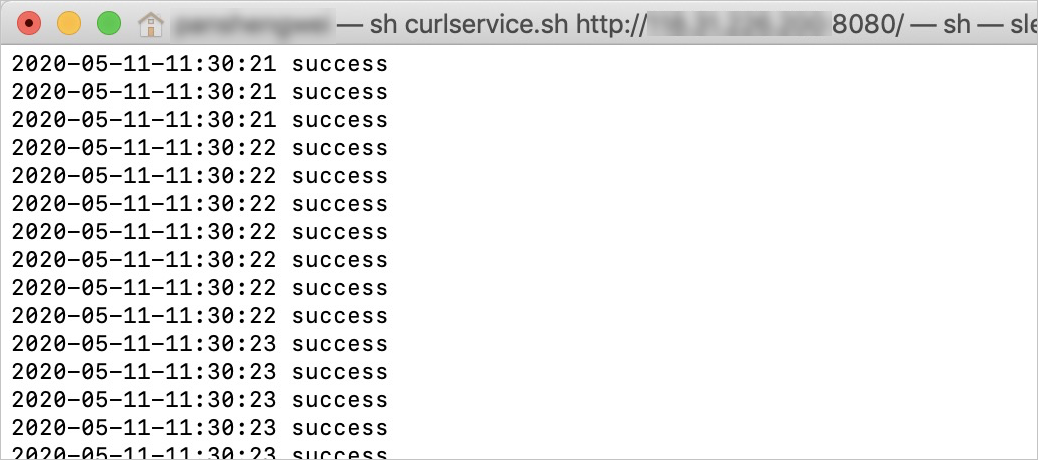
Remove the backend server for the Frontend application in ECS so that all the access traffic is routed to the Frontend application in EDAS.

Check whether the access traffic is routed as expected.
Stop the OnlineShop project that you deploy in ECS and delete the related ECS instances if all the access traffic is routed to EDAS.