Enterprise Distributed Application Service (EDAS) provides microservice application demos for Spring Cloud, Dubbo, and High-speed Service Framework (HSF). You can use these demos to quickly deploy microservice applications to a custom Elastic Compute Service (ECS) environment, which is a specified ECS cluster. This topic describes how to deploy a microservice application in a custom ECS environment.
Prerequisites
-
EDAS is activated. For more information, see Activate EDAS.
-
Auto Scaling is activated and authorized.
-
A virtual private cloud (VPC) and ECS instances are created.
NoteA custom environment includes a microservices namespace, a VPC, an ECS cluster, and ECS instances. You can create a microservices namespace and an ECS cluster when you deploy an application. However, you must create the VPC and ECS instances in advance.
-
Create a VPC with an IPv4 CIDR block. This feature does not support IPv6. The region of the VPC must be the same as the region where you want to deploy the application. For more information, see Create a VPC with an IPv4 CIDR block.
-
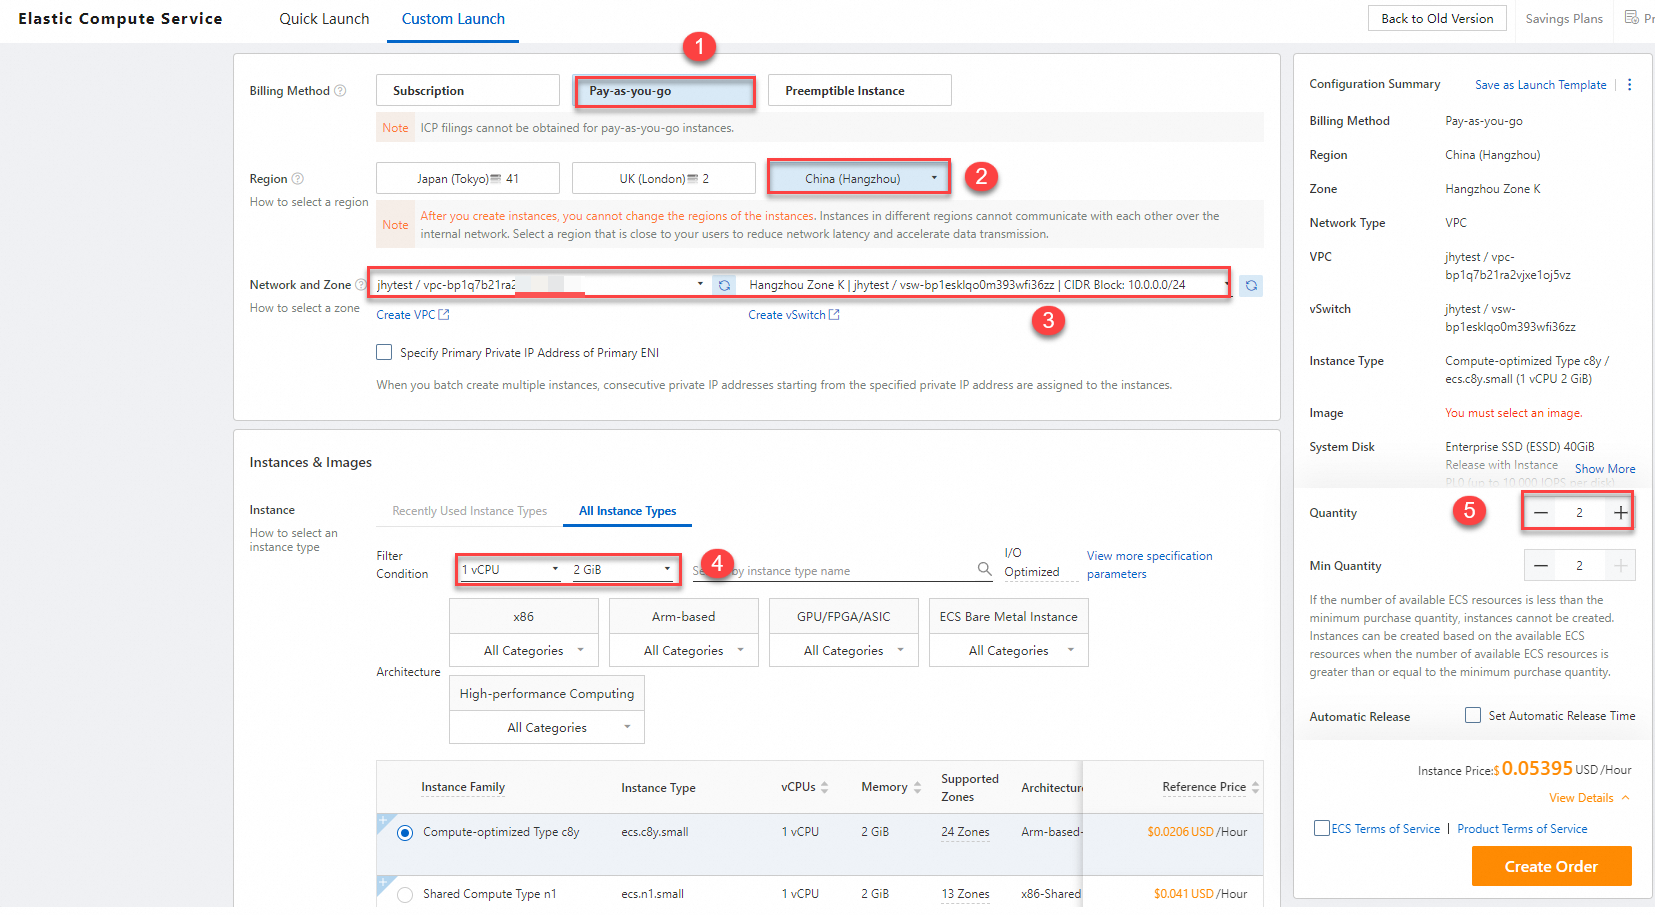
Create ECS instances. When you create the ECS instances, select the VPC that you created in step a. For this demo, create two pay-as-you-go ECS instances with 1 vCPU and 2 GB of memory. To avoid unnecessary charges, release the instances as soon as you complete the demo. For more information, see Create an instance.
 Important
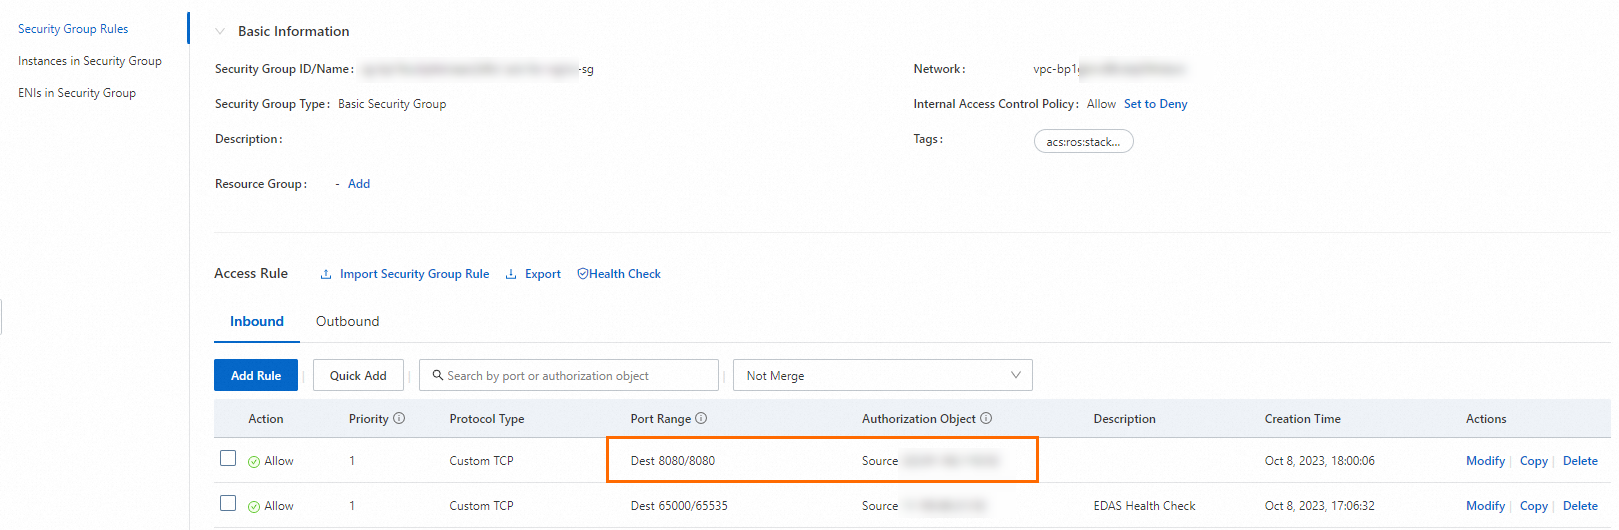
The demo application uses port 8080. Ensure that port 8080 is open in the security group when you create the ECS instances. Otherwise, you cannot access the client application's web page. After you deploy the application, you can also go to the application details page. On the Basic Information tab, find the Application Port in the Application Settings section. Then, set the Port Range for the security group rule based on the application port.
-
Background information
Custom ECS environment: An ECS cluster in a specified microservices namespace and VPC within a region.
Application demo: EDAS provides application demos for the Spring Cloud, Dubbo, and HSF frameworks in the console. Each demo consists of a pair of microservice applications that can perform simple service invocations. The deployment procedure is similar for all frameworks. This topic uses a Spring Cloud application demo as an example. For more information about the demos, see alibabacloud-microservice-demo.
To learn how to implement features for microservice applications, see Application development overview.
Python applications are not supported in ECS environments. You can deploy Python applications in Kubernetes (K8s) environments using images. For more information, see Quickly deploy Spring Cloud and Dubbo applications in a K8s cluster using the console.
Procedure
Create a provider application
The microservice application demo contains a server-side application (provider) and a client-side application (consumer). This topic describes how to deploy the provider application. After you deploy the provider, you can follow the same steps to deploy the consumer application.
-
Log on to the EDAS console.
-
In the left-side navigation pane, choose .
- In the top navigation bar of the Applications page, select the region in which you want to deploy the application. On the page that appears, select the microservices namespace that you want to manage, and click Create Application.
-
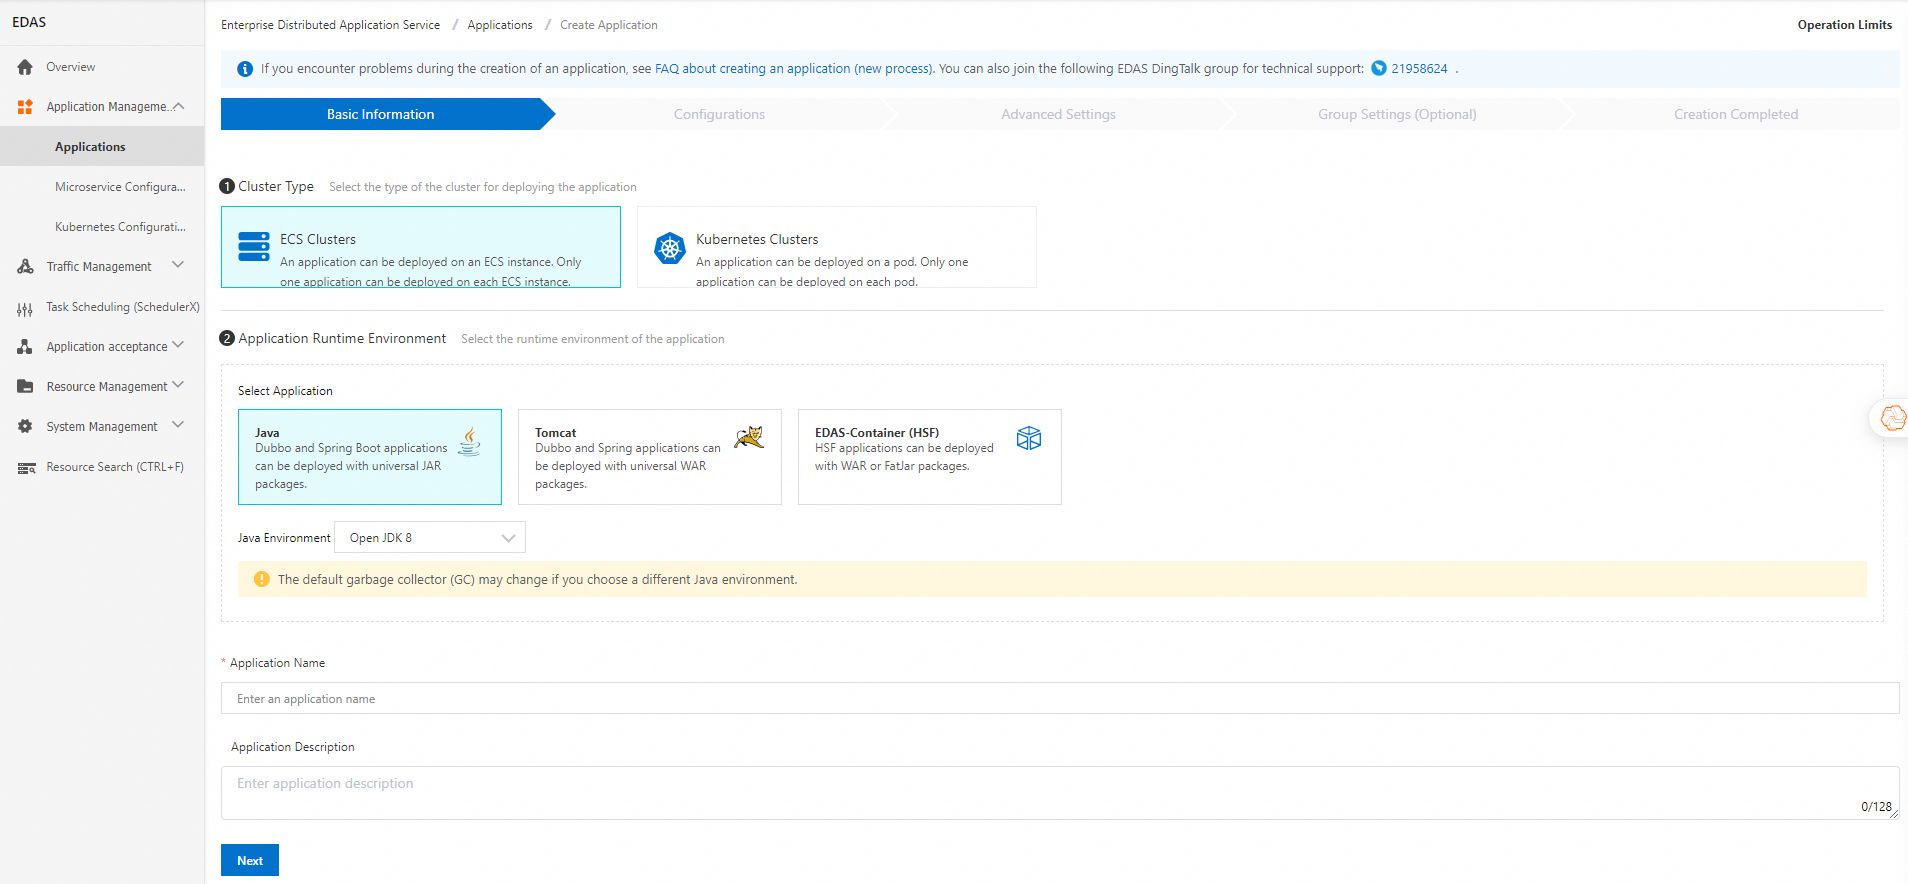
On the Basic Information tab of the Create Application page, set the basic information for the application and click Next.
-
In the Cluster Type section, click ECS Cluster.
-
In the Application Runtime Environment section, click Java. From the Java Environment drop-down list, select Open JDK 8.
This topic uses a JAR package demo of a Spring Cloud application as an example. Therefore, Java is selected as the application runtime environment. If you want to deploy a WAR package of a Spring Cloud or Dubbo application, or an HSF application, select an appropriate application runtime environment and version as prompted on the page.
-
In the Application Name text box, enter a name for the application.
-
Optional: In the Application Description text box, enter a description for the application.
-
-
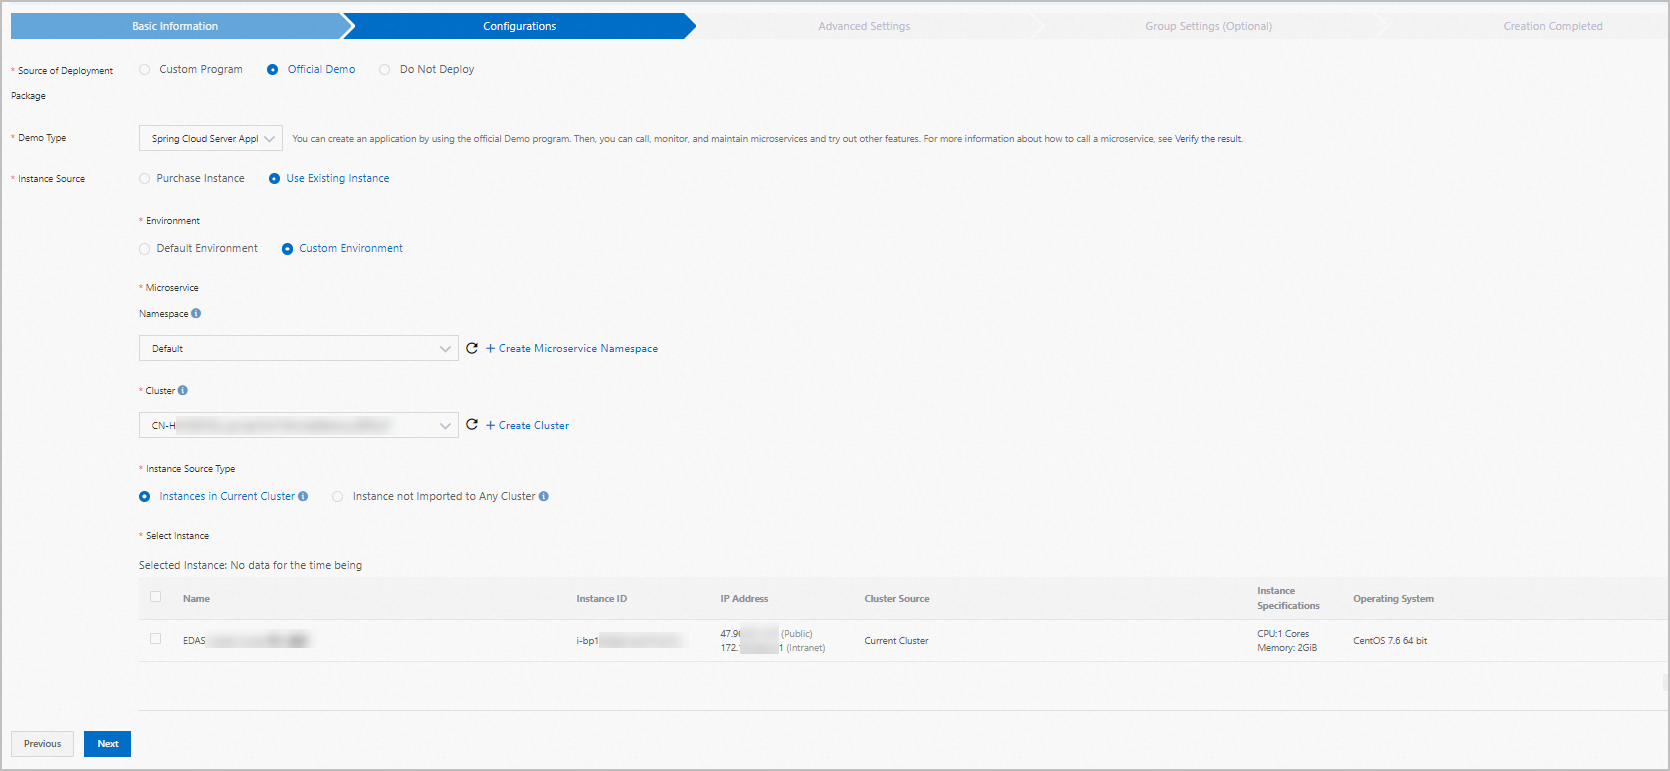
On the Application Configuration tab, configure the deployment package and environment, and then click Next.
Configuration
Action
Deployment Package Source
Select Official Demo.
Demo Type
Select Spring Cloud Server Application.
Instance Source
Select Use Existing Instances.
Environment
Select Custom Environment.
Microservices Namespace
From the drop-down list, select the microservices namespace where the cluster is located.
NoteIf the cluster was created in the default microservices namespace, select the Default microservices namespace.
Cluster
From the drop-down list, select an existing cluster. To create a new cluster, follow these steps.
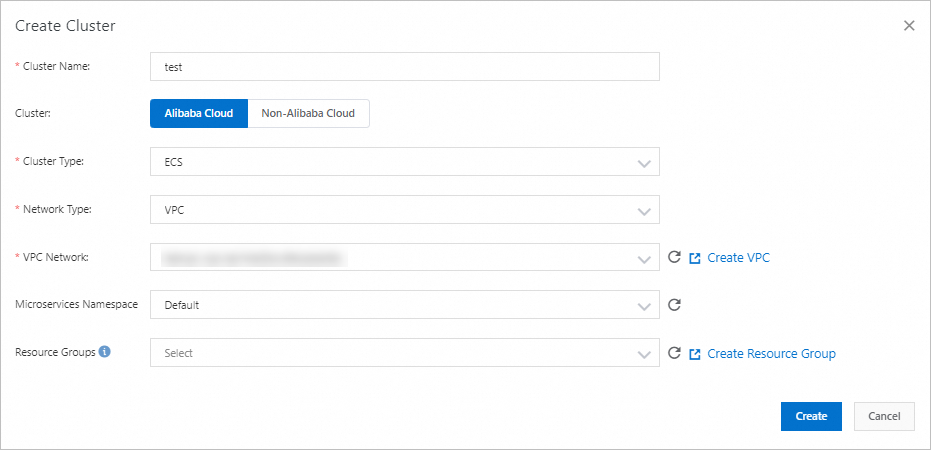
Click Create Cluster. In the Create Cluster dialog box, set Cluster Network Type to VPC, and for VPC Network, select the VPC that you created in step a.
Instance Source Type
Select Instance not Imported to Any Cluster.
You can also import instances into the cluster and then select Instances in Current Cluster. To do this, follow these steps:
-
On the Resource Management > EDAS ECS Clusters page, click the destination cluster. In the ECS Instances section, click the
 icon, and then click Add Existing ECS.
 -
On the Add ECS Instance page, select Import ECS, select the instances that you created, and then click Next.
-
On the Ready to Import page, confirm the instance information, and then click Confirm and Import.
-
On the Import page, wait until Directly imported. appears in the Status column. Then, click Back to Cluster Details. The imported instances appear in the ECS Instances section.
Select Instance
Select the ECS instances that you created.
-
-
On the Advanced Settings tab, specify the Version, Application Health Check, Batch, Batch Mode, and Wait Time Between Batches, and then click Create Application.
NoteThe Wait Time Between Batches parameter is required only for deployments that involve two or more instances. In this example, the application is deployed to a single ECS instance, so you do not need to configure this parameter.
-
Version: The default version is the current timestamp, formatted as
yyyymmdd:hhmmss. -
Batch: 1.
-
Batch Mode: Automatic.
-
- In the Creation Completed step, confirm Basic Information, Configurations, and Advanced Settings. Then, click Create Application.
After EDAS starts to deploy the application, the message Application change in progress... is displayed in the upper part of the Basic Information tab. The deployment takes about 2 minutes.
You can also click View Details next to the message to go to the Change Details page of the application. On this page, you can check the deployment progress and log data.
Create a consumer application
Follow the steps in Create a provider application to create a consumer application, setting Demo Type to Spring Cloud Client Application.
Verify the result
The client-side application contains web services. After both the server-side and client-side applications are deployed, check whether you can log on to the web interface of the client-side application.