For cross-VPC or cross-account service access, you can use PrivateLink to access services over a private network instead of the Internet. This reduces your exposure to the Internet and improves network security. When you use a Server Load Balancer (SLB) service for private access, you can enable Proxy Protocol v2. This lets you obtain the request's source Virtual Private Cloud (VPC) ID and PrivateLink endpoint ID to better control network access.
Security risks
In cloud environments, services such as self-built database platforms and AI inference applications, along with Alibaba Cloud services such as Object Storage Service (OSS), are often configured with elastic IP addresses (EIPs) or public endpoints for easy access. This practice is convenient, but it exposes services directly to the Internet. This introduces serious security risks:
Risk of public network attacks: Any service exposed to the public network can become an attack target. It faces threats such as DDoS attacks, application vulnerability scans and exploits, and brute-force attacks.
Risk of identity spoofing: Traditional Internet services primarily rely on username and password authentication. If credentials are leaked, attackers can impersonate legitimate users from anywhere in the world to illegally access, steal, or tamper with data. The public access model cannot effectively restrict the network source of requests.
Data exfiltration channel: Internal employees might use personal accounts to upload and exfiltrate core corporate data from the internal network through the public endpoints of Alibaba Cloud services, such as OSS. Because the communication occurs over the public network, corporate network policies are difficult to enforce effectively.
Best practices
Use PrivateLink for cross-VPC access within the same zone

Description: A network service, such as a web service, is deployed on an ECS instance in VPC2. A PrivateLink connection is created between VPC1 and VPC2. This allows the network service to be accessed from VPC1 using a private IP address (endpoint).
Note: To use PrivateLink, the endpoint (service consumer) and the endpoint service (service provider) must be in the same zone. More specifically, the zones where the endpoint is deployed must be a subset of the zones where the endpoint service resources are deployed. For example, if an endpoint service is deployed in Zones A and B, the endpoint can be created only in Zone A or Zone B.
Core steps:
Server-side (service provider) configuration
Create a load balancer: In VPC2, create an SLB instance that supports PrivateLink, such as a private Classic Load Balancer (CLB) or Network Load Balancer (NLB). Configure a backend server group and a listener.
Create an endpoint service: In the PrivateLink console, create an endpoint service. Associate it with the SLB instance created in the previous step.
Configure a service whitelist (only for cross-account access): If VPC1 belongs to a different Alibaba Cloud account, add the account's UID to the service whitelist of the endpoint service.
Accept the connection request: After the client initiates a connection, navigate to the Connections tab of the endpoint service. Find the pending connection request and accept it. You can also set the service to automatically accept connections during creation.
Client-side (service consumer) configuration
Create an endpoint: In VPC1, create an endpoint. During creation, select the endpoint service created on the server side.
Configure the network: Select a vSwitch and a security group in VPC1 for the endpoint. This controls which resources in VPC1 can access the endpoint.
Obtain the endpoint details: After the endpoint is created, a private domain name and an IP address are generated.
Initiate access: After the service provider accepts the connection, applications in VPC1 can use this domain name or IP address to access the service in VPC2.
For more information, see Access Alibaba Cloud services over a private network.
Use Proxy Protocol to control accessible VPCs and their private IP addresses
When you provide services through PrivateLink, the server can identify the true source of network requests, such as which endpoint or VPC they come from. This allows the service to set security rules. For example, you can restrict a user account to be used only within a legitimate private network, which means it accepts access only from a legitimate VPC. Even if the account credentials are leaked, this prevents the account from being used to access the service from the Internet or an unauthorized network.
Follow the steps in Use PrivateLink for cross-VPC access within the same zone, and then enable the server-side application to identify the source VPC of a request and implement access control based on this information.
Enable Proxy Protocol v2: Enable Proxy Protocol v2 on the server-side NLB listener and subscribe to the VPC ID and endpoint ID.
# Use the Alibaba Cloud CLI to enable Proxy Protocol v2 for a specified listener and subscribe to the VPC ID and endpoint ID aliyun nlb UpdateListenerAttribute \ --ListenerId lsn-xxxxxxxxxxxxxxxx \ --ProxyProtocolEnabled true \ --ProxyProtocolV2Config '{"Ppv2VpcIdEnabled":true,"Ppv2PrivateLinkEpIdEnabled":true}' \ --RegionId cn-hangzhou--ListenerId: The ID of the listener created for the web service in the example.--ProxyProtocolEnabled:trueindicates that the Proxy Protocol is enabled. Note: This protocol passes client connection information in the first packet after the TCP handshake. The backend service must support this protocol (see Step 2 for configuration). Otherwise, the service will be interrupted.--ProxyProtocolV2Config: Adds Alibaba Cloud-defined TLV fields. In this example, it subscribes to the source network's VPC ID and the PrivateLink endpoint ID.
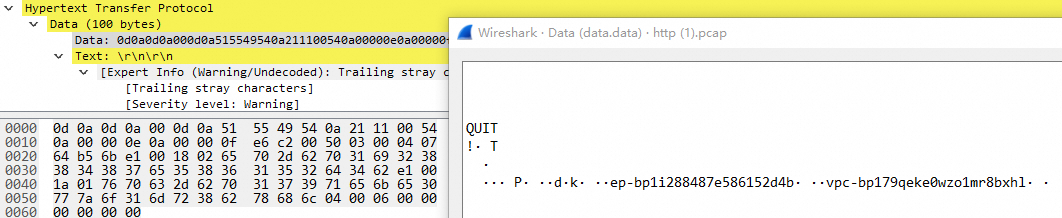 The corresponding TLV parsing is as follows:
Meaning/Content
Original Content
Protocol header
Fixed signature of the Proxy Protocol
0d0a0d0a000d0a515549540a
Version 2, PROXY command
21
TCP/IPv4
11
The following data is 84 bytes long
0054
Address information
Source IP: 10.0.0.14
0a00000e
Destination IP: 10.0.0.15
0a00000f
Source port: 59074
e6c2
Destination port: 80
0050
TLV1
Type 03
034 bytes
00040764b56b
0764b56b
TLV2
Type e1 (custom type)
e124 bytes
0018PrivateLink endpoint ID:
ep-bp1i288487e586152d4b
0265702d6270316932383834383765353836313532643462
TLV3
Type e1 (custom type)
e1
26 bytes
001a
VPC ID:
vpc-bp179qeke0wzo1mr8bxhl
017670632d627031373971656b6530777a6f316d72386278686c
TLV4
04(PP2_TYPE_NETNS), used to pass the network namespace04
6 bytes
0006000000000000000000000000If your web service uses NGINX, configure NGINX to support the Proxy Protocol as follows:
(NGINX Plus R16 or later, or open source NGINX 1.13.11 or later, supports Proxy Protocol v2)
server {
    listen 80 proxy_protocol;   # Enable Proxy Protocol v1/v2
    # Other configurations...
}
With this method, nginx automatically parses the Proxy Protocol TLV on port 80, but the standard version of nginx only supports fetching the IP address from the TLV.
A Lua extension is required to process custom VPC IDs and PrivateLink endpoint IDs from Alibaba.
The following code is an example of a Lua plugin for
nginx.confthat handles TCP connections by reading packets from a socket and parsing the TLV buffer.Store the PrivateLink endpoint ID in the request context. For
/loginrequests, check that this ID is correct. The following is a Lua code example:stream { server{ listen 80; # Do not enable proxy_protocol. Let the Lua code below handle it. preread_by_lua_block { -- 1. Try to read the fixed 16 byte protocol header local sock = ngx.req.socket(true) local header, err = sock:receive(16) if not header then ngx.log(ngx.ERR, "failed to receive proxy protocol header: ", err) return end -- 2. Check the protocol signature (12 bytes) if string.sub(header, 1, 12) ~= "\x0D\x0A\x0D\x0A\x00\x0D\x0A\x51\x55\x49\x54\x0A" then -- If it is not the Proxy Protocol, put the read data back into the buffer to avoid corrupting the original request sock:setreused(header) return end -- 3. Parse the rest of the protocol header local ver_cmd = string.byte(header, 13) -- Version and command local family = string.byte(header, 14) -- Address family and protocol local len = string.byte(header, 15) * 256 + string.byte(header, 16) -- Total length of the variable part if len == 0 then -- No address or TLV information, return directly return end -- 4. Read the variable-length part (contains address and TLV) local variable_part, err = sock:receive(len) if not variable_part or #variable_part < len then ngx.log(ngx.ERR, "failed to read variable part (address + tlvs): ", err) return end -- 5. Determine the length of the address information based on the address family local addr_len = 0 local protocol = family & 0x0F local address_family = family >> 4 if address_family == 1 then -- AF_INET (IPv4) addr_len = 12 elseif address_family == 2 then -- AF_INET6 (IPv6) addr_len = 36 elseif address_family == 3 then -- AF_UNIX addr_len = 216 end -- 6. Separate the address information and TLV data local address_block = string.sub(variable_part, 1, addr_len) -- You can parse the address information if needed local tlv_string = string.sub(variable_part, addr_len + 1) -- 7. Parse the TLV data local tlvs = {} local pos = 1 while pos <= #tlv_string do -- Make sure there are at least 3 bytes (Type, Length) if pos + 2 > #tlv_string then ngx.log(ngx.ERR, "malformed TLV data: not enough bytes for type and length") break end local tlv_type = string.byte(tlv_string, pos) local tlv_length = string.byte(tlv_string, pos + 1) * 256 + string.byte(tlv_string, pos + 2) -- Make sure the length of the value does not exceed the boundary if pos + 2 + tlv_length > #tlv_string then ngx.log(ngx.ERR, "malformed TLV data: length exceeds available data") break end local tlv_value = string.sub(tlv_string, pos + 3, pos + 2 + tlv_length) table.insert(tlvs, { type = tlv_type, length = tlv_length, -- Encode the binary value in Base64 for easy storage and viewing value = ngx.encode_base64(tlv_value) }) pos = pos + 3 + tlv_length end -- 8. Cache the parsed TLV in ngx.ctx -- ngx.ctx is unique for each request and is the standard way to pass data if #tlvs > 0 then ngx.ctx.proxy_protocol_tlvs = tlvs -- Example: If you want to log it, you can use the $proxy_protocol_tlvs variable in log_format in the http section -- You need to define `lua_set $proxy_protocol_tlvs 'return ngx.var.proxy_protocol_tlvs_json';` in the http block -- and `ngx.var.proxy_protocol_tlvs_json = cjson.encode(ngx.ctx.proxy_protocol_tlvs)` in `preread_by_lua_block` end } proxy_pass localhost:8080; # Pass subsequent HTTP requests to the HTTP server } } http { server { listen 8080; # Dedicated location to handle /login requests location /login { access_by_lua_block { local expected_value = "some value" -- Get the value of the second TLV (Base64-encoded) passed from the stream layer from the NGINX variable local privateLinkEndId = ngx.var.pp_tlv2_value -- Deny the request if the value does not meet the expectation if received_value ~= expected_value then ngx.log(ngx.ERR, "Access to /login denied: TLV value mismatch. Expected '", expected_value, "', got '", received_value, "'") return ngx.exit(ngx.HTTP_FORBIDDEN) end -- If the verification is successful, the request continues to be processed } # After successful verification, forward the request to the backend Python program proxy_pass http://your_python_backend; } # Handle all other requests location / { # Here, you can decide whether to allow access based on your needs # For example, forward directly to the backend proxy_pass http://your_python_backend; } } # Your Python backend service upstream definition upstream your_python_backend { server 127.0.0.1:5000; # Assume your backend program runs on port 5000 } }
Use PrivateLink to access Alibaba Cloud services
Some Alibaba Cloud services support access through PrivateLink to avoid the security risks of public network access by configuring authorized accounts in a private network to avoid
Using personal accounts poses a risk of enterprise data exfiltration. You can also configure enterprise accounts to allow access only from legitimate private networks to prevent external exploitation if the account is compromised.
Some Alibaba Cloud services now support access through PrivateLink to avoid the risks of public network access. 1) Configure legitimate accounts that are allowed to be used in the private network. This prevents the risk of data exfiltration using personal accounts. 2) Configure enterprise accounts to be accessible only from legitimate private networks. This prevents the accounts from being exploited externally if the credentials are leaked.
Create an endpoint for an Alibaba Cloud service: In the PrivateLink console, create a gateway endpoint for the Alibaba Cloud service you need to access, such as OSS. Associate the endpoint with your enterprise's VPC and route table.
You can associate it with your internal VPC and route table.
Configure an endpoint access policy: In the endpoint's policy, restrict access to only Resource Access Management (RAM) identities (users or roles) under your enterprise's Alibaba Cloud account. This prevents other accounts, such as employees' personal accounts, from accessing OSS through this private channel.
This prevents other accounts, such as the personal accounts of employees, from accessing OSS through this private channel.
In the endpoint access policy, restrict access to the Alibaba Cloud service to only the accounts that belong to your enterprise.
Configure a RAM policy (optional enhancement): For stronger control, you can configure policies for RAM users or roles. For example, you can enforce that their access to OSS must originate from a specified VPC.
They must access OSS from a specified VPC.
Compliance
Check: Determine if there is access from a VPC to a public IP address
Before you start, you can check your environment for public network communications that can be optimized using PrivateLink. To do this, analyze VPC flow logs to find outbound traffic from a VPC to public IP addresses.
Outbound traffic from a VPC to public IP addresses of Alibaba Cloud services.
Steps:
Enable VPC flow logs: Enable the flow log feature for the VPC where your core business resides. Deliver the logs to Simple Log Service.
Analyze outbound traffic: In Simple Log Service, query the VPC flow logs and filter for outbound traffic (direction = out).
Filter and locate:
Filter response packets: To reduce noise, filter out traffic with destination ports less than 1024 and other traffic that is part of a normal service response.
Identify Alibaba Cloud public IP addresses: Query the ownership of the destination IP addresses (dstaddr) in the logs using tools such as ipip.net. Focus on public IP addresses that belong to Alibaba Cloud.
Take special note of public IP addresses that belong to Alibaba Cloud.
Locate the source ECS instance: Use the
vm-idfield in the flow log to pinpoint the ECS instance that initiated the access.
Sample log analysis:
By analyzing these types of logs, you can identify which instances are accessing other cloud resources over the public network.
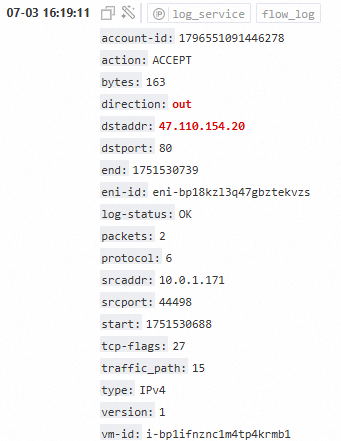
Result determination:
If the queried destination public IP address is a public endpoint for an Alibaba Cloud service, such as OSS or ECS, we strongly recommend switching to a PrivateLink endpoint.
Accessing nodes
If a destination public IP address points to a service (such as an EIP or an SLB) in another VPC within your account, you can use PrivateLink for this cross-VPC communication scenario.
This is an ideal scenario for optimization.