Image check verifies that custom images are valid and can be used to create functional Elastic Compute Service (ECS) instances. You can use this feature during image creation and import. After the check is complete, you can view the results in the ECS console and apply the repair suggestions to improve image quality. This ensures your ECS instances run stably and efficiently
Image check is triggered after an image is created or imported. This process does not interrupt the workflow, even if the check fails.
Image check is free of charge.
Images that pass check are automatically assigned an
Operating Systemversion tag (acs:ecs:image:osVersion) and aKernel Versiontag (acs:ecs:image:kernelVersion).
Limitations
Image check applies only to custom images created from snapshots that do not include encrypted snapshots, or from source instances that do not contain encrypted cloud disks.
Image check does not support some Linux and Windows operating systems. See the tables below for details.
Configure image check
Configure the check during image creation
Console
Image check is enabled by default when you create a custom image in the ECS console. For more information, see Create from an instance and Create from a snapshot.
API
Call the CreateImage operation and set the DetectionStrategy parameter to Standard. You can use OpenAPI Explorer to run this operation, which simplifies the process by handling signature calculations and automatically generating SDK code examples.
Configure the check during image import
Console
Image check is enabled by default when you import a custom image in the ECS console. For more information, see Import a custom image.
API
Call the ImportImage operation and set the DetectionStrategy parameter to Standard. You can use OpenAPI Explorer to run this operation, which simplifies the process by handling signature calculations and automatically generating SDK code examples.
View image check results
Console
On the Custom Images page, find the image you created. Image check runs automatically after the image status changes to Available.
Hover over the check result and click View More to view the detailed image check report.

If any items require repair, apply the recommended solutions.
(Linux only) You can click Repair to launch the public template ACS-ECS-RepairImage in CloudOps Orchestration Service (OOS) for automated repair.
Alternatively, you can fix the issues manually by following the recommendations in the image details. For a detailed description of each check item and its repair suggestions, see Image check items and repair suggestions.

API
Call the DescribeImages operation and filter by the image ID. You can use OpenAPI Explorer to run this operation, which simplifies the process by handling signature calculations and automatically generating SDK code examples.
In the response, DetectionOptions contains the detection results. Status indicates the detection status, and Item contains the results for individual checks.
Image check items and repair suggestions
Linux
Check item | Description | Repair suggestion |
GUESTOS.Platform | The system platform. Must be a Linux operating system. | Not applicable |
GUESTOS.OSVersion | The operating system version. | Not applicable |
GUESTOS.Architecture | The system architecture. | Not applicable |
GUESTOS.RtcTimeMode | The Real-Time Clock (RTC) hardware clock time zone, which can be UTC or local. We recommend setting the clock to UTC. | To set the hardware clock time standard to UTC, see Linux time and time zones. |
GUESTOS.BootMode | The image boot mode, which can be LEGACY or UEFI. | Not applicable |
GUESTOS.KernelVersion | The kernel version. | Not applicable |
GUESTOS.Virtio | Checks if the virtio driver is installed. ECS instances require virtio drivers to support virtualization. Missing drivers can cause startup failures. | To install the virtio driver for an image, see Install virtio driver. |
GUESTOS.Nvme | Checks if the NVMe Driver is installed. Some ECS instance types, such as ecs.g7se, use cloud disks attached via the NVMe protocol, which requires the appropriate drivers in the image. | To install the NVMe driver for an image, see How do I install the NVMe driver for an existing custom image?. |
GUESTOS.Fstab | Checks the system disk device mount information in the | To correctly configure /etc/fstab, see Configure UUIDs in the fstab file to automatically mount data disks. |
GUESTOS.Grub | Checks if the GRand Unified Bootloader (GRUB) bootloader file is valid. Incorrect configurations, such as incorrect device settings, non-existent devices, or incorrect UUIDs, can cause system startup failures | None |
GUESTOS.Dhcp | Checks if the network configuration file is set to DHCP mode. Using a static IP address in the image can cause network configuration failures after the instance starts. | To set the network configuration mode of the image to DHCP, see Configure DHCP for a Linux instance. |
GUESTOS.Selinux | Checks if SELinux is disabled. We recommend disabling SELinux for cloud images, as it may cause system startup failures. | To disable SELinux, see Enable or disable SELinux. |
GUESTOS.OnlineResizeFS | Checks if the image supports automatic partition extension for the root partition. If cloud-init, the growpart command, and other tools are installed, the root partition extends automatically when an instance is created. For example, if your image size is 20 GB and you create an instance with a 100 GB system disk, the root partition automatically extends to 100 GB. | To configure the image to support automatic expansion, see Install cloud-init. |
GUESTOS.SystemImage | Checks if the image is a valid system disk image. The image must be a valid system disk image, not an ISO or empty image. | Not applicable |
GUESTOS.CloudAssistant | Checks if Cloud Assistant is installed. Cloud Assistant is a native automation and management tool for ECS that allows you to run batch operations, execute commands (such as Shell, PowerShell, and Bat), and transfer files on ECS instances without passwords, logins, or bastion hosts. We recommend installing Cloud Assistant to manage your ECS instances efficiently. | To install Cloud Assistant, see Install the Cloud Assistant Agent. |
GUESTOS.CloudInit | Checks if the Security Center agent is installed. Security Center is a unified security management system that provides real-time threat detection, analysis, and alerting to protect your servers and web applications. | To install cloud-init for an image, see Install cloud-init. |
GUESTOS.SecurityCenterAgent | Checks whether the Security Center Agent is installed in the image. Security Center is a unified security management system that identifies, analyzes, and warns about security threats in real time. It provides security capabilities such as anti-ransomware, anti-virus, tamper-proofing, and compliance checks to comprehensively detect and protect your servers and web applications. | To install the Security Center Agent for an image, see Install the client. |
GUESTOS.SupportMocInstanceTypes | Checks if the image supports Alibaba Cloud ECS Bare Metal Instance families. The latest ECS instance families, such as ecs.g6 and ecs.g7, are typically ECS Bare Metal Instances. Images with outdated operating systems and kernel versions may fail to start on these instance families. For more information about instance types, see Instance family. |
|
Windows
Check item | Description | Repair suggestion |
GUESTOS.Platform | The system platform. Must be a Windows operating system. | Not applicable |
GUESTOS.OSVersion | The operating system version. | Not applicable |
GUESTOS.Architecture | The system architecture. | Not applicable |
GUESTOS.KernelVersion | The kernel version. | Not applicable |
GUESTOS.Virtio | Checks if the virtio driver is installed. ECS instances rely on virtualization drivers. Missing drivers can cause startup failures. | To install the virtio driver for an image, see Install the Alibaba Cloud virtio driver. |
GUESTOS.BCD | Checks whether the Boot Configuration Data (BCD) file in the image is correct. A missing or corrupted BCD file can prevent the instance from starting. | Use the correct BCD file. |
GUESTOS.Registry | Checks if the registry files are valid. Missing or corrupted registry files can cause startup failures. | Use the correct registry file. |
GUESTOS.Hotfix | Checks if the installed patches are correct. Missing necessary patches or installing problematic patches can cause startup failures. |
|
GUESTOS.Disk | Checks if the disk settings are correct. Residual driver entries in the registry can cause startup failures. | |
GUESTOS.Sysprep | Checks if the Sysprep process completed during image creation. If the Sysprep process was interrupted (for example, by a forced shutdown), it can cause startup failures. | Create the image again. Make sure not to interrupt the Sysprep process. For more information, see Create a VM and install an operating system. |
GUESTOS.Update | Checks if the Update process completed during image creation. If the Update process was interrupted (for example, by a forced shutdown), it can cause startup failures. | Create the image again. Make sure not to interrupt the system update process. For more information, see Create a VM and install an operating system. |
GUESTOS.Xen | Checks for residual Xen drivers, which can prevent the system from starting correctly. | |
GUESTOS.CloudAssistant | Checks if Cloud Assistant is installed. Cloud Assistant is a native automation and management tool for ECS that allows you to run batch operations, execute commands (such as Shell, PowerShell, and Bat), and transfer files on ECS instances without passwords, logins, or bastion hosts. We recommend installing Cloud Assistant to manage your ECS instances efficiently. | To install Cloud Assistant, see Install the Cloud Assistant Agent. |
GUESTOS.Server | Checks if the service configurations in the image are correct. If driver installation is disabled, the instance will fail to update drivers. | |
GUESTOS.DesktopConfig | Checks if the desktop configuration file (desktop.ini) is missing. If it is missing, desktop configurations will be invalid. | Configure the correct desktop.ini file. |
GUESTOS.BootMgr | Checks if the system boot manager (BootMgr) is missing. A missing BootMgr prevents the system from booting. | Configure the correct BootMgr. |
Clear residual drivers from the registry
The HKEY_LOCAL_MACHINE\SYSTEM\CurrentControlSet\Control registry tree contains configuration information that controls system startup and certain devices. The Class subkey contains filter drivers registered on the device. If a driver was uninstalled but its entry remains in the registry, instances created from the image may fail to start. This section describes how to manually clean up residual entries for disk class drivers.
Log on to the source server from which the image file was created.
Open the Registry Editor.
For example, on Windows 10, enter regedit in the taskbar search box and press Enter.
Open the disk registry key.
The path is HKEY_LOCAL_MACHINE\SYSTEM\ControlSet001\Control\Class\{4d36e967-e325-11ce-bfc1-08002be10318}.
Confirm and delete the residual driver entries.
Check the value of the UpperFilter property to see if there are any residual driver entries.
An entry is considered residual if its corresponding driver file is missing from C:\Windows\System32\drivers.
WarningBe cautious when deleting driver entries. Ensure the driver is not a system-default driver to avoid causing system instability.
For example,
partmgrshown in the figure below is a system-default driver and must not be deleted from UpperFilters.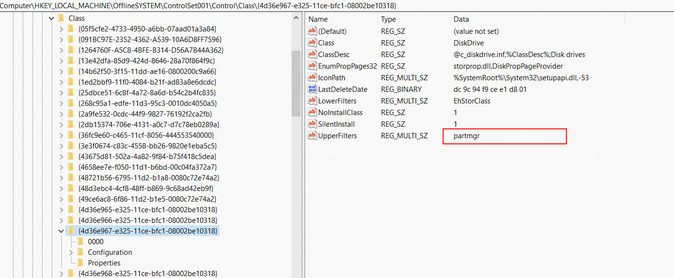
In UpperFilters, delete the names of the residual drivers.
Disable the Xen driver
A virtual private cloud (VPC) does not use the Xen driver, but older images might contain residual Xen drivers that cause startup failures. You can disable the Xen driver in the registry.
Log on to the source server from which the image file was created.
Open the Registry Editor.
For example, on Windows 10, enter regedit in the taskbar search box and press Enter.
Open the corresponding registry key.
The path is HKEY_LOCAL_MACHINE\SYSTEM\ControlSet001\Services\XenPCI\Parameters.
Modify the value of the hide_devices property by clearing its value.

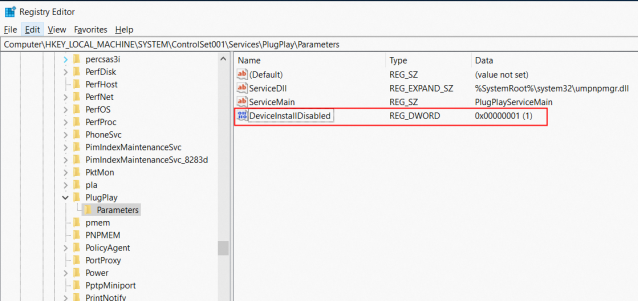
Allow driver installation
Driver installation might be disabled by a registry setting. If it is, instances created from the image cannot update their drivers. You must modify the registry to re-enable driver installation.
Log on to the source server of the image.
Open the Registry Editor.
For example, on Windows 10, enter regedit in the taskbar search box and press Enter.
Open the corresponding registry key.
For Windows Server 2008 R2 and later: HKEY_LOCAL_MACHINE\SYSTEM\ControlSet001\Services\DeviceInstall\Parameters.
For Windows Server 2008 R2 and earlier: HKEY_LOCAL_MACHINE\SYSTEM\ControlSet001\Services\PlugPlay\Parameters.
Modify the property that disables driver installation. If the DeviceInstallDisabled property exists and its value is not 0, change its value to 0 or delete the property.
Example for Windows Server 2008 R2:
Example for Windows Server 2016:

What to do next
After you check and repair a custom image, you can use it to create fully functional ECS instances. For more information, see Create an instance from a custom image or a shared image.