Install and configure Jetty on an ECS instance to host Java web applications in a lightweight servlet container.
Prerequisites
Your ECS instance must meet the following conditions:
-
The instance has a static public IP address or an Elastic IP Address (EIP).
-
The security group allows inbound access on ports for remote connections and Jetty, such as ports 22, 3389, and 8080. See Add a security group rule.
-
A Java environment is deployed on the instance. See Deploy a Java environment.
Procedure
Choose a procedure based on the operating system of your ECS instance.
Linux
This topic uses Jetty 12.0.16 as an example. If you use a different version or directory, replace the version number and path accordingly.
-
Log on to the Linux server. See Log on to a Linux instance using Workbench.
-
Download and decompress the Jetty 12 installation package.
Important-
To install a different version or if the download link is invalid, visit the official Jetty website for the correct download link and replace the URL.
-
Different Jetty versions support different JDK versions. Check the official Jetty website to select a compatible Jetty version for your JDK.

wget https://repo1.maven.org/maven2/org/eclipse/jetty/jetty-home/12.0.16/jetty-home-12.0.16.tar.gz --no-check-certificate tar -zxvf jetty-home-12.0.16.tar.gz -
-
Move the Jetty directory.
sudo mv jetty-home-12.0.16 /usr/local/jetty/ -
Create the
jetty-basedirectory.sudo mkdir /usr/local/jetty-base -
Set the environment variables.
-
Edit the
~/.bashrcfile.sudo vim ~/.bashrc -
Press
ito enter edit mode and add the following content to the file.NoteSet
JETTY_HOMEto the actual Jetty installation directory andJETTY_BASEto thejetty-basedirectory.export JETTY_HOME=/usr/local/jetty export JETTY_BASE=/usr/local/jetty-base -
Press
Esc, enter:wq, and pressEnterto save and close the file. -
Apply the changes.
source ~/.bashrc
-
-
Enable the Jetty modules and initialize the
jetty-basedirectory.-
Go to the
jetty-basedirectory.cd /usr/local/jetty-base -
Initialize the
jetty-basedirectory. This creates the$JETTY_BASE/start.d/directory and other directories that contain server configuration.Note-
To view available modules, run the
java -jar $JETTY_HOME/start.jar --list-modules=*command. -
If you use Jetty 9, replace
--add-modulewith--add-to-start.
sudo java -jar $JETTY_HOME/start.jar --add-module=server,http,deploy
-
-
-
Verify the deployment.
ImportantRun the following commands in the
jetty-basedirectory.-
Deploy the Jetty sample web application.
-
If you use Jetty 11 or 10, replace
demoswithdemoin the following command. -
If you use Jetty 9, run the
sudo mv $JETTY_HOME/demo-base/webapps/ROOT $JETTY_BASE/webappscommand to deploy the sample.
NoteYou can also upload a local WAR package to the
$JETTY_BASE/webappsdirectory for testing. See Upload or download files.sudo java -jar $JETTY_HOME/start.jar --add-module=demos -
-
Start Jetty.
NoteBy default, Jetty listens on port 8080. Run
sudo netstat -tunlp | grep 8080to check if the port is in use. If so, specify a different port:nohup sudo java -jar $JETTY_HOME/start.jar jetty.http.port=8081 &.nohup sudo java -jar $JETTY_HOME/start.jar & -
In your browser, enter
http://<Public IP address>:8080. If the test page appears, the deployment is successful.Note-
If you changed the Jetty port, replace 8080 with the new port number and allow the new port in the security group. See Add a security group rule.
-
If you uploaded a local WAR package, access
http://<Public IP address>:8080/<Package name>to test it.

-
-
Windows
This section applies only to Jetty 12, Jetty 11, and Jetty 10.
This topic uses Jetty 12.0.16 as an example. If you use a different version or directory, replace the version number and path accordingly.
-
Log on to the Windows server. See Use Workbench to log on to a Windows instance.
-
Download Jetty.
Different Jetty versions support different JDK versions. Check the official Jetty website to select a compatible version for your JDK, then download the installation package.


-
Decompress the Jetty package.
Decompress the package to your preferred location. This topic uses
C:\downloadas an example.ImportantDecompress Jetty to a path without spaces.
-
Set the
JETTY_HOMEenvironment variable.-
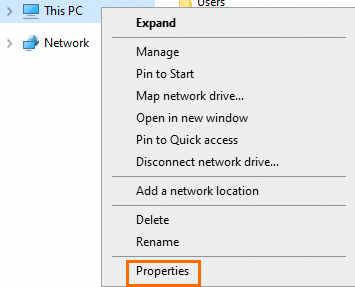
Right-click This PC and select Properties.
-
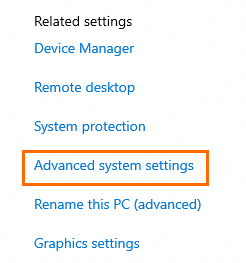
On the About page, scroll to the bottom and click Advanced system settings.
-
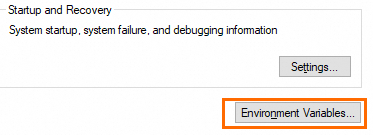
Click Environment Variables.
-
In the System variables section, click New. Set the variable name to
JETTY_HOMEand the value to the Jetty installation directory, such asC:\download\jetty-home-12.0.16. Click OK.
-
Click OK to save the configuration.
-
-
Create a
jetty-basefolder. This topic usesC:\downloadas an example.
-
Initialize the
jetty-basefolder.-
Go to the
jetty-basefolder, entercmdin the address bar, and pressEnterto open the command prompt.
-
Initialize the
jetty-basefolder. This creates thestart.ddirectory and other directories that contain server configuration.java -jar %JETTY_HOME%/start.jar --add-module=http,server,deploy
-
-
Verify the deployment.
-
Deploy the Jetty sample web application.
If you use Jetty 11 or 10, replace
demoswithdemoin the following command.NoteYou can also upload a local WAR package to the
<jetty-base>/webappsdirectory for testing.<jetty-base>is the path to thejetty-basefolder, such asC:\download\jetty-base. See Upload or download files.java -jar %JETTY_HOME%/start.jar --add-module=demos -
Start Jetty. Do not close the command prompt window after Jetty starts.
NoteBy default, Jetty listens on port 8080. Run
netstat -ano | findstr :8080to check if the port is in use. If so, specify a different port:java -jar %JETTY_HOME%/start.jar jetty.http.port=8081.java -jar %JETTY_HOME%/start.jar -
In your browser, enter
http://<Public IP address>:8080. If the test page appears, the deployment is successful.Note-
If you changed the Jetty port, replace 8080 with the new port number and allow the new port in the security group. See Add a security group rule.
-
If you uploaded a local WAR package, access
http://<Public IP address>:8080/<Package name>to test it.
-
-
Next steps
-
Configure a website on the server and associate a domain name with the public IP address of the instance. See Build a website.
If your application needs a database, add the database configuration to your web project configuration files, such as a Properties file. After development, deploy the WAR package to the
$JETTY_BASE/webappsdirectory and start Jetty to access your application. For more details, visit the official Jetty website.NoteIf you use a different Jetty version, replace the version number in the URL.
To upload local files to an ECS instance, see Upload or download files (Linux).
To use a database, use ApsaraDB RDS for MySQL or deploy a MySQL database on your instance.
-
Use Server Load Balancer (SLB) to improve the availability and performance of your website.
FAQ
After deployment, I cannot access http://<Public IP address>:8080 from my local browser
After deploying Jetty, you might be unable to access http://<Public IP address>:8080 from your browser. Possible causes:
-
Cause 1: Firewall or SELinux blocks access
The system firewall or SELinux might block external access. Solutions:
-
Linux: Disable the system firewall and SELinux.
-
Windows: Disable the system firewall.
-
-
Cause 2: Custom Jetty port
You changed the Jetty port at startup.
Replace 8080 in
http://<Public IP address>:8080with the new port number and allow the new port in the security group.