In most cases, Linux software packages are stored in software repositories. After you add a software repository, you can use a package management tool provided by Linux to search for, install, or update software in the repository. This way, you can quickly perform system O&M or meet application development requirements. This topic describes how to install, manage, and use software repositories in different Linux distributions. In the following examples, Alibaba Cloud software repositories are used.
Background information
The speed of access to a software repository varies based on various factors, such as the region and distance. The Alibaba Cloud open source image website is built on the Alibaba Cloud infrastructure to provide high-speed all-in-one image services for Internet users free of charge, including the software repositories of mainstream Linux distributions such as CentOS, Debian, Ubuntu, Fedora, and openSUSE. All users can use the software repositories on the Alibaba Cloud open source image website free of charge, regardless of whether the users have Alibaba Cloud accounts. For more information, visit the Alibaba Cloud open source image website.
-
The public images provided by Alibaba Cloud automatically replace the software repository addresses of common Linux distributions with the private addresses of the Alibaba Cloud Elastic Compute Service (ECS) software repositories of the Linux distributions. ECS users can use the ECS software repositories without the need to perform manual configuration. If you want to add or repair the software repository of a Linux distribution, perform the operations described in this topic.
-
In the following examples, the
http://mirrors.aliyun.compublic repository address is used, which is suitable for Linux servers that can access the Internet. If your servers are Alibaba Cloud ECS instances, we recommend that you use thehttp://mirrors.cloud.aliyuncs.comrepository address, which is the private repository address of ECS, to accelerate the image download speed.
Add an Alibaba Cloud software repository to a Linux instance
-
Connect to a Linux instance.
For more information, see Connect to Linux. In the following example, the ecs-user account is used to connect to a Linux instance. You can use another connection method.
-
Add an Alibaba Cloud software repository.
NoteThe following section describes how to add Alibaba Cloud software repositories to common Linux distributions. Perform operations based on the Linux distribution that you use. If you want to add Alibaba Cloud software repositories to other Linux distributions, go to the Alibaba Cloud open source image website and click the operating system distribution that you use to view the procedure.
Alibaba Cloud Linux 2 and 3
-
Back up the original software repository.
sudo mv /etc/yum.repos.d/AliYun.repo /etc/yum.repos.d/AliYun.repo.backup -
Run one of the following commands to add the Alibaba Cloud software repository based on the operating system.
Alibaba Cloud Linux 3
sudo rpm -Uvh --reinstall https://mirrors.aliyun.com/alinux/3/updates/x86_64/Packages/alinux-repos-3.2104.10-2.al8.x86_64.rpmAlibaba Cloud Linux 2
sudo rpm -Uvh --reinstall https://mirrors.aliyun.com/alinux/2/updates/x86_64/Packages/alinux-release-2.1903-11.al7.x86_64.rpm -
Generate a local cache for fast searching and installation of software.
sudo yum clean all && sudo yum makecache
CentOS 6, 7, and 8
-
Back up the original software repository.
sudo mv /etc/yum.repos.d/CentOS-Base.repo /etc/yum.repos.d/CentOS-Base.repo.backup -
Run one of the following commands to add the Alibaba Cloud software repository based on the operating system.
CentOS 8
url=https://mirrors.aliyun.com/repo/Centos-vault-8.5.2111.repo;if [ -f /usr/bin/curl ];then sudo curl -sSO $url;else sudo wget -O /etc/yum.repos.d/Centos-vault-8.5.2111.repo $url; fiCentOS 7
url=https://mirrors.aliyun.com/repo/Centos-7.repo;if [ -f /usr/bin/curl ];then sudo curl -sSO $url;else sudo wget -O /etc/yum.repos.d/Centos-7.repo $url; fiCentOS 6
url=https://mirrors.aliyun.com/repo/Centos-vault-6.10.repo;if [ -f /usr/bin/curl ];then sudo curl -sSO $url;else sudo wget -O /etc/yum.repos.d/Centos-vault-6.10.repo $url; fi -
Generate a local cache for fast searching and installation of software.
sudo yum clean all && sudo yum makecache
Ubuntu
-
Back up the original software repository.
sudo mv /etc/apt/sources.list /etc/apt/sources.list.backup -
Create and open a configuration file.
sudo vim /etc/apt/sources.list -
Press the
Ikey to enter Insert mode and add the following information to the configuration file.Ubuntu 24.04
deb https://mirrors.aliyun.com/ubuntu/ noble main restricted universe multiverse
deb-src https://mirrors.aliyun.com/ubuntu/ noble main restricted universe multiverse

deb https://mirrors.aliyun.com/ubuntu/ noble-security main restricted universe multiverse
deb-src https://mirrors.aliyun.com/ubuntu/ noble-security main restricted universe multiverse

deb https://mirrors.aliyun.com/ubuntu/ noble-updates main restricted universe multiverse
deb-src https://mirrors.aliyun.com/ubuntu/ noble-updates main restricted universe multiverse

# deb https://mirrors.aliyun.com/ubuntu/ noble-proposed main restricted universe multiverse
# deb-src https://mirrors.aliyun.com/ubuntu/ noble-proposed main restricted universe multiverse

deb https://mirrors.aliyun.com/ubuntu/ noble-backports main restricted universe multiverse
deb-src https://mirrors.aliyun.com/ubuntu/ noble-backports main restricted universe multiverse
Ubuntu 23.04
deb https://mirrors.aliyun.com/ubuntu/ lunar main restricted universe multiverse
deb-src https://mirrors.aliyun.com/ubuntu/ lunar main restricted universe multiverse

deb https://mirrors.aliyun.com/ubuntu/ lunar-security main restricted universe multiverse
deb-src https://mirrors.aliyun.com/ubuntu/ lunar-security main restricted universe multiverse

deb https://mirrors.aliyun.com/ubuntu/ lunar-updates main restricted universe multiverse
deb-src https://mirrors.aliyun.com/ubuntu/ lunar-updates main restricted universe multiverse

# deb https://mirrors.aliyun.com/ubuntu/ lunar-proposed main restricted universe multiverse
# deb-src https://mirrors.aliyun.com/ubuntu/ lunar-proposed main restricted universe multiverse

deb https://mirrors.aliyun.com/ubuntu/ lunar-backports main restricted universe multiverse
deb-src https://mirrors.aliyun.com/ubuntu/ lunar-backports main restricted universe multiverse
Ubuntu 22.04
deb https://mirrors.aliyun.com/ubuntu/ jammy main restricted universe multiverse
deb-src https://mirrors.aliyun.com/ubuntu/ jammy main restricted universe multiverse

deb https://mirrors.aliyun.com/ubuntu/ jammy-security main restricted universe multiverse
deb-src https://mirrors.aliyun.com/ubuntu/ jammy-security main restricted universe multiverse

deb https://mirrors.aliyun.com/ubuntu/ jammy-updates main restricted universe multiverse
deb-src https://mirrors.aliyun.com/ubuntu/ jammy-updates main restricted universe multiverse

# deb https://mirrors.aliyun.com/ubuntu/ jammy-proposed main restricted universe multiverse
# deb-src https://mirrors.aliyun.com/ubuntu/ jammy-proposed main restricted universe multiverse

deb https://mirrors.aliyun.com/ubuntu/ jammy-backports main restricted universe multiverse
deb-src https://mirrors.aliyun.com/ubuntu/ jammy-backports main restricted universe multiverse
Ubuntu 20.04
deb https://mirrors.aliyun.com/ubuntu/ focal main restricted universe multiverse
deb-src https://mirrors.aliyun.com/ubuntu/ focal main restricted universe multiverse

deb https://mirrors.aliyun.com/ubuntu/ focal-security main restricted universe multiverse
deb-src https://mirrors.aliyun.com/ubuntu/ focal-security main restricted universe multiverse

deb https://mirrors.aliyun.com/ubuntu/ focal-updates main restricted universe multiverse
deb-src https://mirrors.aliyun.com/ubuntu/ focal-updates main restricted universe multiverse

# deb https://mirrors.aliyun.com/ubuntu/ focal-proposed main restricted universe multiverse
# deb-src https://mirrors.aliyun.com/ubuntu/ focal-proposed main restricted universe multiverse

deb https://mirrors.aliyun.com/ubuntu/ focal-backports main restricted universe multiverse
deb-src https://mirrors.aliyun.com/ubuntu/ focal-backports main restricted universe multiverse
Ubuntu 18.04
deb https://mirrors.aliyun.com/ubuntu/ bionic main restricted universe multiverse deb-src https://mirrors.aliyun.com/ubuntu/ bionic main restricted universe multiverse deb https://mirrors.aliyun.com/ubuntu/ bionic-security main restricted universe multiverse deb-src https://mirrors.aliyun.com/ubuntu/ bionic-security main restricted universe multiverse deb https://mirrors.aliyun.com/ubuntu/ bionic-updates main restricted universe multiverse deb-src https://mirrors.aliyun.com/ubuntu/ bionic-updates main restricted universe multiverse # deb https://mirrors.aliyun.com/ubuntu/ bionic-proposed main restricted universe multiverse # deb-src https://mirrors.aliyun.com/ubuntu/ bionic-proposed main restricted universe multiverse deb https://mirrors.aliyun.com/ubuntu/ bionic-backports main restricted universe multiverse deb-src https://mirrors.aliyun.com/ubuntu/ bionic-backports main restricted universe multiverse -
Press the
Esckey, enter:wq, and then press theEnterkey to save and close the configuration file. -
Update the software packages in the software repository.
sudo apt update
Debian
-
Back up the original software repository.
sudo mv /etc/apt/sources.list /etc/apt/sources.list.backup -
Create and open a configuration file.
sudo vim /etc/apt/sources.list -
Press the
Ikey to enter Insert mode and add the following information to the configuration file.Debian 11.x
deb http://mirrors.cloud.aliyuncs.com/debian/ bullseye main non-free contrib
deb-src http://mirrors.cloud.aliyuncs.com/debian/ bullseye main non-free contrib
deb http://mirrors.cloud.aliyuncs.com/debian-security/ bullseye-security main
deb-src http://mirrors.cloud.aliyuncs.com/debian-security/ bullseye-security main
deb http://mirrors.cloud.aliyuncs.com/debian/ bullseye-updates main non-free contrib
deb-src http://mirrors.cloud.aliyuncs.com/debian/ bullseye-updates main non-free contrib
Debian 10.x
deb http://mirrors.cloud.aliyuncs.com/debian-archive/debian/ buster main non-free contrib
deb http://mirrors.cloud.aliyuncs.com/debian-archive/debian-security buster/updates main
deb http://mirrors.cloud.aliyuncs.com/debian-archive/debian/ buster-updates main non-free contrib
deb-src http://mirrors.cloud.aliyuncs.com/debian-archive/debian/ buster main non-free contrib
deb-src http://mirrors.cloud.aliyuncs.com/debian-archive/debian-security buster/updates main
deb-src http://mirrors.cloud.aliyuncs.com/debian-archive/debian/ buster-updates main non-free contrib
Debian 9.x
deb http://mirrors.cloud.aliyuncs.com/debian-archive/debian stretch main contrib non-free
#deb http://mirrors.cloud.aliyuncs.com/debian-archive/debian stretch-proposed-updates main non-free contrib
#deb http://mirrors.cloud.aliyuncs.com/debian-archive/debian stretch-backports main non-free contrib
deb http://mirrors.cloud.aliyuncs.com/debian-archive/debian-security stretch/updates main contrib non-free
deb-src http://mirrors.cloud.aliyuncs.com/debian-archive/debian stretch main contrib non-free
#deb-src http://mirrors.cloud.aliyuncs.com/debian-archive/debian stretch-proposed-updates main contrib non-free
#deb-src http://mirrors.cloud.aliyuncs.com/debian-archive/debian stretch-backports main contrib non-free
deb-src http://mirrors.cloud.aliyuncs.com/debian-archive/debian-security stretch/updates main contrib non-free
Debian 8.x
deb http://mirrors.cloud.aliyuncs.com/debian-archive/debian/ jessie main non-free contrib deb-src http://mirrors.cloud.aliyuncs.com/debian-archive/debian/ jessie main non-free contrib -
Press the
Esckey, enter:wq, and then press theEnterkey to save and close the configuration file. -
Update the software packages in the software repository.
sudo apt update
Fedora
-
Back up the original software repositories.
sudo mv /etc/yum.repos.d/fedora.repo /etc/yum.repos.d/fedora.repo.backup sudo mv /etc/yum.repos.d/fedora-updates.repo /etc/yum.repos.d/fedora-updates.repo.backup -
Add the Fedora software repository of Alibaba Cloud.
url=http://mirrors.aliyun.com/repo/fedora.repo;if [ -f /usr/bin/curl ];then sudo curl -sSO $url;else sudo wget -O /etc/yum.repos.d/fedora.repo $url; fi -
Add the Fedora-updates software repository of Alibaba Cloud.
url=http://mirrors.aliyun.com/repo/fedora-updates.repo;if [ -f /usr/bin/curl ];then sudo curl -sSO $url;else sudo wget -O /etc/yum.repos.d/fedora-updates.repo $url; fi -
Generate a local cache.
sudo yum clean all && sudo yum makecache
openSUSE 15.6
-
Back up the original software repository.
sudo rename '.repo' '.repo.backup' /etc/zypp/repos.d/openSUSE*.repo -
Add Alibaba Cloud software repositories.
sudo zypper addrepo -f http://mirrors.aliyun.com/opensuse/distribution/leap/15.6/repo/oss/ openSUSE-15.6-Oss sudo zypper addrepo -f http://mirrors.aliyun.com/opensuse/distribution/leap/15.6/repo/non-oss/ openSUSE-15.6-Non-Oss sudo zypper addrepo -f http://mirrors.aliyun.com/opensuse/update/leap/15.6/oss/ openSUSE-15.6-Update-Oss sudo zypper addrepo -f http://mirrors.aliyun.com/opensuse/update/leap/15.6/non-oss/ openSUSE-15.6-Update-Non-Oss -
Generate a local cache.
sudo zypper ref
-
Use package management tools to manage software
In Linux operating systems, you can use package management tools to manage software in software repositories. Common package management tools include Yellowdog Updater Modified (YUM), Dandified YUM (DNF), Advanced Packaging Tool (APT), and Zypper. This section describes how to search for, install, update, and remove software by using package management tools in different operating system distributions. Replace the software package names in the following examples with the actual names based on your business requirements.
Software packages in Linux distributions are continuously updated to add new features, fix bugs, and provide security updates. You can update software packages to the latest versions based on your business requirements.
Alibaba Cloud Linux, CentOS, and Fedora
-
Search for a software package
Use the YUM package management tool to search for a software package.
sudo yum search <Search keyword>For example, run the following command to search for software packages whose names contain the
nginxkeyword:sudo yum search nginx -
Install a software package
Use the YUM package management tool to install a software package.
sudo yum install <Software package name>For example, run the following command to install the
nginxsoftware package:sudo yum install nginx -
Re-install a software package
Use the YUM package management tool to re-install a software package.
sudo yum reinstall <Software package name>For example, run the following command to re-install the
nginxsoftware package:sudo yum reinstall nginx -
Update a software package
Use the YUM package management tool to update a software package.
sudo yum update <Software package name>For example, run the following command to update the
nginxsoftware package:sudo yum update nginx -
Remove a software package
Use the YUM package management tool to remove a software package.
sudo yum remove <Software package name>For example, run the following command to remove the
nginxsoftware package:sudo yum remove nginx
Ubuntu and Debian
-
Search for a software package
Use the APT package management tool to search for a software package.
sudo apt search <Search keyword>For example, run the following command to search for software packages whose names contain the
nginxkeyword:sudo apt search nginx -
Install a software package
Use the APT package management tool to install a software package.
sudo apt install <Software package name>For example, run the following command to install the
nginxsoftware package:sudo apt install nginx -
Re-install a software package
Use the APT package management tool to re-install a software package.
sudo apt install --reinstall <Software package name>For example, run the following command to re-install the
nginxsoftware package:sudo apt install --reinstall nginx -
Update a software package
Use the APT package management tool to update a software package.
sudo apt upgrade <Software package name>For example, run the following command to update the
nginxsoftware package:sudo apt upgrade nginx -
Remove a software package
Use the APT package management tool to remove a software package.
sudo apt remove <Software package name>For example, run the following command to remove the
nginxsoftware package:sudo apt remove nginx
openSUSE
-
Search for a software package
Use the Zypper package management tool to search for a software package.
sudo zypper search <Search keyword>For example, run the following command to search for software packages whose names contain the
nginxkeyword:sudo zypper search nginx -
Install a software package
Use the Zypper package management tool to install a software package.
sudo zypper install <Software package name>For example, run the following command to install the
nginxsoftware package:sudo zypper install nginx -
Re-install a software package
Use the Zypper package management tool to re-install a software package.
sudo zypper install --force <Software package name>For example, run the following command to re-install the
nginxsoftware package:sudo zypper install --force nginx -
Update a software package
Run the following command to use the Zypper package management tool to update a software package:
sudo zypper update <Software package name>For example, run the following command to update the
nginxsoftware package:sudo zypper update nginx -
Remove a software package
Use the Zypper package management tool to remove a software package.
sudo zypper remove <Software package name>For example, run the following command to remove the
nginxsoftware package:sudo zypper remove nginx
FAQ
What do I do if the "Failed to fetch" error occurs when I install OpenJDK on an ECS instance that runs Ubuntu 14.04?
Problem description
When you run the following command to install the openjdk-7-jre-headless package on an ECS instance that runs Ubuntu 14.04, the Failed to fetch error occurs.
apt-get install openjdk-7-jre-headlessThe following figure shows a sample command output.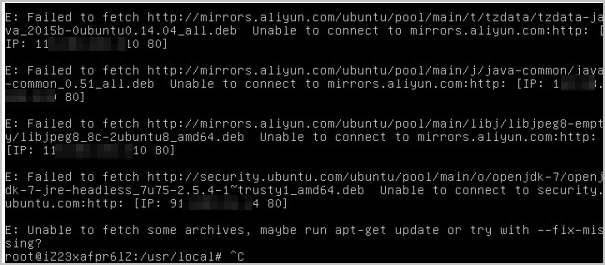
Cause
The ECS instance that runs Ubuntu 14.04 is connected to an external software repository. As a result, you cannot install Open Java Development Kit (OpenJDK) on the instance.
Solution
-
Connect to the Linux ECS instance.
For more information, see Connect to Linux.
-
Run the following command to re-install OpenJDK:
apt-get install openjdk-7-jre-headless --fix-missing
What do I do if I cannot use the YUM package management tool to install MySQL on an ECS instance that runs CentOS 7.0 and the "File contains no section headers." error message appears?
How do I configure the RPMForge software repository on an ECS instance that runs CentOS 6?
Procedure
RPMForge is a third-party software repository recommended by the CentOS official community. To configure the RPMForge software repository on an ECS instance that runs CentOS 6, perform the following steps:
-
Connect to the Linux ECS instance.
For more information, see Connect to Linux.
-
Check the system architecture.
uname -iThe following command output shows that the x86_64 architecture is used.
x86_64 -
Run a command, such as the
wgetcommand, to download the required RPM package based on the actual system architecture.http://repository.it4i.cz/mirrors/repoforge/redhat/el6/en/i386/rpmforge/RPMS/rpmforge-release-0.5.3-1.el6.rf.i686.rpm http://repository.it4i.cz/mirrors/repoforge/redhat/el6/en/x86_64/rpmforge/RPMS/rpmforge-release-0.5.3-1.el6.rf.x86_64.rpm -
Import the GNU Privacy Guard (GPG) key of the Dag repository.
rpm --import http://apt.sw.be/RPM-GPG-KEY.dag.txt -
Install the downloaded RPM package.
rpm -i rpmforge-release-0.5.3-1.el6.rf.*.rpm -
Go to the following directory and check whether the repository configuration files whose names contain the rpmforge keyword exist in the directory:
/etc/yum.repos.d/The following command output indicates that the RPMForge software repository is installed.

What do I do if the "error processing package install-info (--configure)" error message appears when I run the apt-get command to install software?
What do I do if the "Segmentation faultsts" error occurs when I run the apt-get command to install or update software?
What do I do if the "Reading package lists... Error!" error message appears when I run the apt-get command to install software?
Problem description
When you run the apt-get command to install software on an ECS instance that runs Ubuntu, the following error message appears:
Reading package lists... Error! E: Encountered a section with no Package: header E: Problem with MergeList /var/lib/apt/lists/AZ.archive.ubuntu.com_ubuntu_dists_natty_main_i18n _Translation-en E: The package lists or status file could not be parsed or opened.Cause
The software package list is corrupted, which causes a software installation error.
Solution
To clear the corrupted software package list and regenerate the latest software package list, perform the following steps:
-
Clear the corrupted software package list from the software package list directory.
rm -rf /var/lib/apt/lists/* -
Regenerate the latest software package list.
apt-get update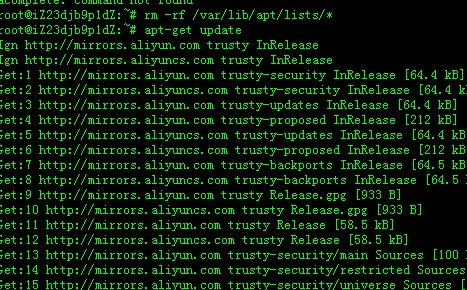
-
Re-install the software. If the issue is resolved, the preceding error message no longer appears.
What do I do if the "Error http://mirrors.aliyun.com/ubuntu/ trusty-updates/main unzip amd64 6.0-9ubuntu1.1 404 Not Found [IP: 112.124.XXX.XXX 80]" error message appears when I run the apt-get install unzip or aptitude install unzip command?
What do I do if the "The following signatures were invalid: KEYEXPIRED 1544811256" error message appears when I run the apt-get update command?
Problem description
When you run the apt-get update command on an Ubuntu instance, the following error message appears:
The following signatures were invalid: KEYEXPIRED 1544811256Cause
An update error occurred because the signatures of the used software repository expired.
Solution
Perform the following steps to update the expired key:
-
Connect to the Ubuntu instance.
For more information, see Connect to Linux.
-
Obtain the expired key.
sudo apt-key list | grep -A 1 expired
-
Update the expired key.
apt-key adv --keyserver hkp://keyserver.ubuntu.com:80 --recv-keys [$Key]NoteReplace [$Key] with the expired key that you obtained in the previous step.
-
Update and synchronize the APT software repository.
apt-get update
What do I do if I cannot install Docker by using third-party YUM repositories on an Alibaba Cloud Linux 2 instance?
Problem description
When you use third-party YUM repositories, such as Docker Community Edition (Docker-CE) and Extra Packages for Enterprise Linux (EPEL) repositories, that are compatible with CentOS 7 and run the yum install docker-ce command to install Docker on an Alibaba Cloud Linux 2 instance that meets the following conditions, Docker cannot be installed and the following error message is returned.
-
The instance uses the Alibaba Cloud Linux 2.1903 LTS 64-bit image.
-
The image used by the instance is aliyun_2_1903_x64_20G_alibase_20210325.vhd or earlier.
Loaded plugins: fastestmirror, langpacks, update-motd
Loading mirror speeds from cached hostfile
  * epel: mirror.sjtu.edu.cn
https://mirrors.aliyun.com/docker-ce/linux/centos/2.1903/x86_64/stable/repodata/repomd.xml: [Errno 14] HTTPS Error 404 - Not Found
Trying other mirror.
Downloading packages:
docker-ce-20.10.6-3.el7.x86_64 FAILED
https://mirrors.aliyun.com/docker-ce/linux/centos/2.1903/x86_64/stable/Packages/docker-ce-20.10.6-3.el7.x86_64.rpm: [Errno 14] HTTPS Error 404 - Not Found
Trying other mirror.
docker-ce-rootless-extras-20.1 FAILED
https://mirrors.aliyun.com/docker-ce/linux/centos/2.1903/x86_64/stable/Packages/docker-ce-rootless-extras-20.10.6-3.el7.x86_64.rpm: [Errno 14] HTTPS Error 404 - Not Found
 Trying other mirror.


Error downloading packages:
  3:docker-ce-20.10.6-3.el7.x86_64: [Errno 256] No more mirrors to try.
  docker-ce-rootless-extras-20.10.6-3.el7.x86_64: [Errno 256] No more mirrors to try.
Cause
Third-party YUM repositories are compatible only with CentOS 7. The $releasever value of Alibaba Cloud Linux 2 is different from that of CentOS 7. As a result, the Docker package cannot be downloaded because the resolved YUM repository addresses are invalid.
When YUM installs Docker-CE, YUM obtains the version number ($releasever value) from the system and replaces the $releasever value in the baseurl of the corresponding YUM repository with the obtained version number to obtain required data. The $releasever value of CentOS 7 is 7, and the $releasever value of Alibaba Cloud Linux 2 is 2.1903. As a result, the baseurl is resolved to a non-expected address for Alibaba Cloud Linux 2, and YUM cannot obtain the required data from the address.
Solutions
Use one of the following methods to resolve the issue:
-
Change the value of
$releasever. -
Install the yum-plugin-releasever-adapter plug-in, and then use the plug-in to change the value of $releasever.
In the examples, the Docker-CE repository is used. You can perform the same operations for other YUM repositories.
Solution 1: Change the $releasever value
-
Connect to the Linux instance.
For more information, see Connect to Linux.
-
Modify the
/etc/yum.repos.d/docker-ce.repoconfiguration file.vim /etc/yum.repos.d/docker-ce.repo-
Press the
Ikey to enter Insert mode. In the docker-ce.repo file, find all repositories for which enabled=1 is displayed, and change the$releasevervalue in the baseurls of the repositories to 7, as shown in the following figure.
-
Press the
Esckey, enter:wq, and then press the Enter key to save and close the configuration file. Then, re-install Docker.
-
Solution 2: Use a plug-in to change the $releasever value
Install the yum-plugin-releasever-adapter plug-in to automatically change the $releasever value from 2.1903 to 7.
-
Check whether the instance supports the yum-plugin-releasever-adapter plug-in.
The following table describes the current versions of the yum-plugin-releasever-adapter plug-in and the third-party repositories that are supported by default.
Plug-in version
Third-party repository supported by default
Limits on the plug-in
1.0-1.3
Docker-CE and EPEL
To use the plug-in, make sure that the following requirements are met:
-
The operating system is Alibaba Cloud Linux 2.
-
Run the following command to check whether the plus repository exists:
cat /etc/yum.repos.d/AliYun.repo |grep -A3 plusThe following command output indicates that the plus repository exists.

-
-
Connect to the Linux instance.
For more information, see Connect to Linux.
-
Install the yum-plugin-releasever-adapter plug-in. The plug-in changes the
$releasevervalues of the Docker-CE and EPEL repositories.yum install yum-plugin-releasever-adapter --disablerepo=* --enablerepo=plus -
If you do not need to change the value of $releasever for other YUM repositories, install Docker after the plug-in is installed. If you need to change the value of $releasever for other YUM repositories, perform the following operations:
-
Go to the specified directory.
cd /etc/yum/pluginconf.d/ -
Modify the
releasever-adapter.confconfiguration file. If you want to add other YUM repositories, append the.repofile names of the YUM repositories to the includes field. Separate the file names with commas (,).vim releasever-adapter.confThe following sample command output is displayed:
[main] enabled=1 hostfilepath=timedhosts.txt [releasevermapping] release_dict={'2.1903':'7', '3':'8'} [reposlist] includes=docker-ce.repo, epel.repoNote-
The following parameters are used in the configuration file:
-
[main]: the main control part of the plug-in that is used to enable or disable the plug-in. If enabled is set to 1, the plug-in is enabled. If enabled is set to 0, the plug-in is disabled.
-
[releasevermapping]: the mappings between the
$releasevervalues that you want to change. 2.1903 is mapped to 7, and 3 is mapped to 8. -
[repolist]: the list of repositories that you want to modify. If you want to add other YUM repositories, append the
.repofile names of the repositories to the includes field. Separate the file names with commas (,).
-
-
A
.repofile contains multiple repositories, and each repository name is unique within the system. For example, thedocker-ce-stableanddocker-ce-stable-debuginforepositories exist at the same time in thedocker-ce.repofile. -
Make sure that each .repo file name added to the
releasever-adapter.confconfiguration file is the prefix of the names of the repositories that are contained in the .repo file. For example, thedocker-ce.repofile contains thedocker-ce-stable-debuginfoanddocker-ce-stablerepositories that share thedocker-ceprefix.
-
-
Save the configuration file and run the following command to install Docker by using the Docker-CE and EPEL repositories.
yum install docker-ce
-
What do I do if I cannot install Docker by using third-party DNF repositories on an Alibaba Cloud Linux 3 instance?
Problem description
You cannot install Docker by running the dnf install docker-ce command on an Alibaba Cloud Linux 3 instance that meets the following conditions, and an error message is returned.
-
The instance uses third-party DNF repositories that are compatible with CentOS 8.
-
The instance uses an image of the aliyun_3_x64_20G_alibase_20210425.vhd version or earlier.
Sample error message:
Docker CE Stable - x86_64
Failed to download metadata for repo 'docker-ce-stable'
Error: Failed to download metadata for repo 'docker-ce-stable'
Cause
Third-party DNF repositories are compatible only with CentOS 8. The $releasever value of Alibaba Cloud Linux 3 is different from that of CentOS 8. As a result, the Docker package cannot be downloaded because the resolved DNF repository addresses are invalid.
When DNF installs Docker-CE, DNF obtains the version number ($releasever value) from the system and replaces the $releasever value in the baseurl of the corresponding DNF repository with the obtained version number to obtain required data. The $releasever value of CentOS 8 is 8, and the $releasever value of Alibaba Cloud Linux 3 is 3. As a result, the baseurl is resolved to a non-expected address for Alibaba Cloud Linux 3, and DNF cannot obtain the required data from the address.
Solutions
Use one of the following methods to resolve the issue:
-
Change the value of
$releasever. -
Install the dnf-plugin-releasever-adapter plug-in, and then use the plug-in to change the value of $releasever.
In the examples, the Docker-CE repository is used. You can perform the same operations for other DNF repositories.
Solution 1: Change the $releasever value
-
Connect to the Linux instance.
For more information, see Connect to Linux.
-
Open the
/etc/yum.repos.d/docker-ce.repoconfiguration file.vim /etc/yum.repos.d/docker-ce.repo -
Press the
Ikey to enter Insert mode. In thedocker-ce.repofile, find all repositories for which enabled=1 is displayed, and change the$releasevervalue in thebaseurlsof the repositories to 8, as shown in the following figure.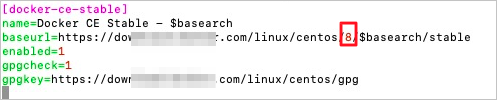
-
Press the
Esckey, enter:wq, and then press theEnterkey to save and close the configuration file. Then, re-install Docker.
Solution 2: Use a plug-in to change the $releasever value
Install the dnf-plugin-releasever-adapter plug-in to automatically change the $releasever value from 3 to 8.
-
Check whether the instance supports the dnf-plugin-releasever-adapter plug-in.
The following table describes the current versions of the dnf-plugin-releasever-adapter plug-in and the third-party repositories that are supported by default.
Plug-in version
Third-party repository supported by default
Limits on the plug-in
-
New version: 1.0-2
-
Old version: 1.0-1.3
NoteThe new and old versions of the plug-in are not compatible with each other. The configuration file of the new version is named
releasever_adapter.conf, and the configuration file of the old version is namedreleasever-adapter.conf. When the plug-in is upgraded to the new version, the configuration file of the old version is deleted. After the plug-in is upgraded, if you want the plug-in to support third-party repositories other than Docker-CE and EPEL, modify the include field of the configuration file and keep the other settings unchanged.Docker-CE and EPEL
To use the plug-in, make sure that the following requirements are met:
-
The operating system is Alibaba Cloud Linux 3.
-
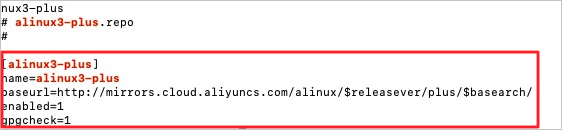
Run the following command to check whether the alinux3-plus repository exists:
cat /etc/yum.repos.d/AliYun.repo |grep -A3 alinux3-plusThe command output shown in the following figure indicates that the alinux3-plus repository exists.
-
-
Connect to the Linux instance.
For more information, see Connect to Linux.
-
Install the dnf-plugin-releasever-adapter plug-in.
NoteThe plug-in changes the
$releasevervalues of the Docker-CE and EPEL repositories.dnf install dnf-plugin-releasever-adapter --repo alinux3-plus -
If you do not need to change the value of $releasever for other DNF repositories, install Docker after the plug-in is installed. If you need to change the value of $releasever for other DNF repositories, perform the following operations:
-
Go to the
/etc/yum/pluginconf.d/directory.cd /etc/yum/pluginconf.d/ -
Modify the
releasever_adapter.confconfiguration file.vim releasever_adapter.conf-
Press the
Ikey to enter Insert mode. If you want to add other DNF repositories, append the.repofile names of the DNF repositories to the include field. Separate the file names with commas (,).NoteIn most cases, the
.repofiles of DNF repositories reside in the/etc/yum.repos.d/directory.Sample command output:
[main] enabled=1 [releasevermapping] 2.1903 = 7 3 = 8 [reposlist] include=docker-ce.repo, epel.repoNote-
The following parameters are used in the configuration file:
-
[main]: the main control part of the plug-in that is used to enable or disable the plug-in. If enabled is set to 1, the plug-in is enabled. If enabled is set to 0, the plug-in is disabled.
-
[releasevermapping]: the mappings between the
$releasevervalues that you want to change. 2.1903 is mapped to 7, and 3 is mapped to 8. -
[repolist]: the list of repositories that you want to modify. If you want to add other DNF repositories, append the
.repofile names of the repositories to the include field. Separate the file names with commas (,).
-
-
In most cases, a
.repofile contains multiple repositories, and each repository name is unique within the system. For example, thedocker-ce-stableanddocker-ce-stable-debuginforepositories exist at the same time in the docker-ce.repo file.
-
-
-
Press the
Esckey, enter:wq, and then press the Enter key to save and close the configuration file. -
Run the following command to install Docker-CE by using the Docker-CE and EPEL repositories and the other repositories that you added:
dnf install docker-ce
-