Persistent memory on Elastic Compute Service (ECS) instances can be used as memory or local disks based on instance types. This topic describes how to configure persistent memory as local disks. This topic also describes how to resolve the following issue: An ecs.re6p or ecs.i4p persistent memory-optimized instance on which persistent memory can be used as local disks failed to allocate a memory pool by using Low-Level Persistence Library (LLPL).
Prerequisites
Persistent memory is suitable for the following instance types and image versions:
Instance types
Instance family on which persistent memory can be used as memory: ecs.re6p-redis
ImportantIf you use persistent memory as memory on an instance, the following situations occur:
You can use persistent memory immediately after you purchase the instance, without the need to initialize persistent memory.
The persistent memory used as memory does not provide data persistence, and the data stored in the persistent memory is lost when the instance is stopped or restarted.
Instance families on which persistent memory can be used as local disks: ecs.re6p and ecs.i4p
ImportantIf you use persistent memory as local disks on an instance, the following situations occur:
You can initialize persistent memory after you purchase the instance. For more information, see the Configure persistent memory as a local disk section in this topic.
The persistent memory used as local disks provides data persistence but may cause data loss. We recommend that you back up data in advance. For more information about local disks, see Local disks.
Image versions
Alibaba Cloud Linux 2
CentOS 7.6 and later
Ubuntu 18.04 and 20.04
Background information
Persistent memory has higher access latency compared to regular memory, but it is cost-effective and suitable for use as local storage. The data stored in persistent memory is retained when you stop or restart instances. Persistent memory can be used as memory or local disks.
When persistent memory is used as memory, you can move some data from regular memory to persistent memory, such as non-hot data that does not require high-speed storage access. Persistent memory offers large capacity at a lower price per GiB and helps reduce the total cost of ownership (TCO) per GiB of memory.
When persistent memory is used as local disks, it supports block-level read/write operations and delivers ultra-high I/O performance and a read/write latency as low as 170 nanoseconds. You can use persistent memory for core application databases that require consistent response time. You can replace Non-Volatile Memory Express (NVMe) SSDs with persistent memory-based local disks to provide higher IOPS, higher bandwidth, and lower latency and resolve performance bottlenecks.
The reliability of data stored in persistent memory varies based on the reliability of persistent memory devices and the physical servers to which these devices are attached. Risks of single points of failure exist. To ensure the reliability of application data, we recommend that you implement data redundancy at the application layer and use cloud disks for long-term data storage.
Configure persistent memory as a local disk
In this example, an instance that has the following configurations is used:
Instance type: ecs.re6p.2xlarge
Image: Alibaba Cloud Linux 2.1903 LTS 64-bit
Log on to a created instance.
For more information, see Use Workbench to connect to a Linux instance over SSH.
Run the following commands to install the utilities that are used to manage persistent memory and delete all namespaces and labels:
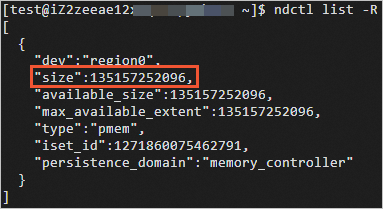
sudo yum install -y ndctl daxctl
sudo ndctl disable-namespace all && sudo ndctl destroy-namespace all #Delete all namespaces.
sudo ndctl disable-region all && sudo ndctl zero-labels all && sudo ndctl enable-region all #Delete all labels.
Check the size of persistent memory.
ndctl list -RThe following figure shows a sample command output, in which the size parameter indicates the size of persistent memory.
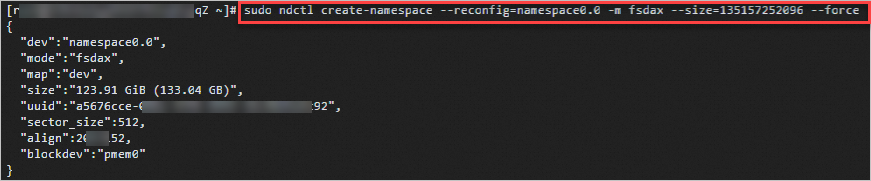
Set the usage mode to fsdax.
sudo ndctl create-namespace --reconfig=namespace0.0 -m fsdax --size={region-size} --forceNoteReplace the {region-size} variable with the size value obtained in the previous step.
Run the following commands to format and mount the persistent memory (/dev/pmem) device:
sudo mkfs -t ext4 /dev/pmem0
sudo mkdir /mnt/sdb
sudo mount -o dax,noatime /dev/pmem0 /mnt/sdb
View the mounted /dev/pmem device.
df -h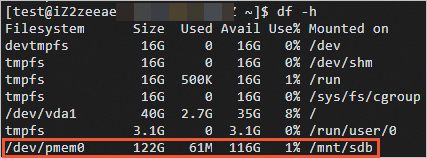
After the /dev/pmem device is mounted, you can use disk performance test tools to test the performance of the device.
For information about how to test the performance of local disks on an i4p or re6p instance, see the Test the performance of local disks on an i4p instance section of this topic.
Test the performance of local disks on an i4p instance
In this example, the following configurations and test tool are used:
Instance type: ecs.i4p.2xlarge
Image: Alibaba Cloud Linux 2.1903 LTS 64-bit
Test tool: flexible I/O tester (fio). fio is an open source, powerful I/O performance benchmarking tool that can test the performance metrics of block storage devices, such as random read and write operations and sequential read and write operations.
The fio tool may cause data loss. Before you test the performance of local disks, make sure that the local disks that you want to test do not contain data.
If you must test local disks that contain data, back up the disk data before you test the performance of the disks. For more information, see Back up data on a local disk.
Connect to an ECS instance.
For more information, see Use Workbench to connect to a Linux instance over SSH.
Run the following command to install the fio tool:
sudo yum install -y ndctl daxctl ipmctl libpmem librpmem libpmemblk libpmemlog libpmemobj libpmempool pmempool fioRun commands to test the performance of the local disks.
For information about the sample commands, see the Test IOPS, Test throughput, and Test latency sections of this topic.
ImportantIf you consecutively perform tests, run the
sudo rm /mnt/sdb/* -rfcommand after each test to delete the residual results of the previous test on the local disks and prepare a clean environment for the next test.The following table describes the performance comparison between local Non-Volatile Memory Express (NVMe) SSDs, Enterprise SSDs (ESSDs), and persistent memory-based local disks.
NoteThe performance data in the following table is only for reference. Data in the results of your tests prevails.
Metric
128-GiB persistent memory
1,788-GiB NVMe SSD
800-GiB ESSD at performance level 1 (PL1)
Read bandwidth
8 GB/s to 10 GB/s
2 GB/s to 3 GB/s
0.2 GB/s to 0.3 GB/s
Read/write bandwidth
8 GB/s to 10 GB/s
1 GB/s to 2 GB/s
0.2 GB/s to 0.3 GB/s
Write bandwidth
2 GB/s to 3 GB/s
1 GB/s to 2 GB/s
0.2 GB/s to 0.3 GB/s
Read IOPS
1,000,000
500,000
20,000 to 30,000
Read/write IOPS
1,000,000
300,000
20,000 to 30,000
Write IOPS
1,000,000
300,000
20,000 to 30,000
Read latency
300 nanoseconds to 400 nanoseconds
100,000 nanoseconds
250,000 nanoseconds
Write latency
300 nanoseconds to 400 nanoseconds
20,000 nanoseconds
150,000 nanoseconds
Test IOPS
Test the sequential read IOPS of the local disks
sudo fio --name=test --directory=/mnt/sdb --ioengine=libpmem --direct=1 --thread=8 --numjobs=8 --iodepth=1 --rw=read --bs=4k --size=8GB --norandommap=1 --randrepeat=0 --invalidate=1 --iodepth_batch=1 --sync=1 --scramble_buffers=0 --numa_cpu_nodes=0 --numa_mem_policy=bind:0 --cpus_allowed_policy=splitTest the sequential write IOPS of the local disks
sudo fio --name=test --directory=/mnt/sdb --ioengine=libpmem --direct=1 --thread=8 --numjobs=8 --iodepth=1 --rw=write --bs=4k --size=1GB --norandommap=1 --randrepeat=0 --invalidate=1 --iodepth_batch=1 --sync=1 --scramble_buffers=0 --numa_cpu_nodes=0 --numa_mem_policy=bind:0 --cpus_allowed_policy=splitTest the random read IOPS of the local disks
sudo fio --name=test --directory=/mnt/sdb --ioengine=libpmem --direct=1 --thread=8 --numjobs=8 --iodepth=1 --rw=randread --bs=4k --size=8GB --norandommap=1 --randrepeat=0 --invalidate=1 --iodepth_batch=1 --sync=1 --scramble_buffers=0 --numa_cpu_nodes=0 --numa_mem_policy=bind:0 --cpus_allowed_policy=splitTest the random write IOPS of the local disks
sudo fio --name=test --directory=/mnt/sdb --ioengine=libpmem --direct=1 --thread=8 --numjobs=8 --iodepth=1 --rw=randwrite --bs=4k --size=1GB --norandommap=1 --randrepeat=0 --invalidate=1 --iodepth_batch=1 --sync=1 --scramble_buffers=0 --numa_cpu_nodes=0 --numa_mem_policy=bind:0 --cpus_allowed_policy=split
Test throughput
Test the sequential read throughput of the local disks
sudo fio --name=test --directory=/mnt/sdb --ioengine=libpmem --direct=1 --thread=8 --numjobs=96 --iodepth=1 --rw=read --bs=64k --size=1GB --norandommap=1 --randrepeat=0 --invalidate=1 --iodepth_batch=1 --sync=1 --scramble_buffers=0 --numa_cpu_nodes=0 --numa_mem_policy=bind:0 --cpus_allowed_policy=splitTest the sequential write throughput of the local disks
sudo fio --name=test --directory=/mnt/sdb --ioengine=libpmem --direct=1 --thread=1 --numjobs=8 --iodepth=1 --rw=write --bs=64k --size=1GB --norandommap=1 --randrepeat=0 --invalidate=1 --iodepth_batch=1 --sync=1 --scramble_buffers=0 --numa_cpu_nodes=0 --numa_mem_policy=bind:0 --cpus_allowed_policy=splitTest the random read throughput of the local disks
sudo fio --name=test --directory=/mnt/sdb --ioengine=libpmem --direct=1 --thread=8 --numjobs=96 --iodepth=1 --rw=randread --bs=64k --size=1GB --norandommap=1 --randrepeat=0 --invalidate=1 --iodepth_batch=1 --sync=1 --scramble_buffers=0 --numa_cpu_nodes=0 --numa_mem_policy=bind:0 --cpus_allowed_policy=splitTest the random write throughput of the local disks
sudo fio --name=test --directory=/mnt/sdb --ioengine=libpmem --direct=1 --thread=8 --numjobs=96 --iodepth=1 --rw=randwrite --bs=64k --size=1GB --norandommap=1 --randrepeat=0 --invalidate=1 --iodepth_batch=1 --sync=1 --scramble_buffers=0 --numa_cpu_nodes=0 --numa_mem_policy=bind:0 --cpus_allowed_policy=split
Test latency
Test the sequential read latency of the local disks
sudo fio --name=test --directory=/mnt/sdb --ioengine=libpmem --direct=1 --thread=1 --numjobs=1 --iodepth=1 --rw=read --bs=4k --size=8GB --norandommap=1 --randrepeat=0 --invalidate=1 --iodepth_batch=1 --sync=1 --scramble_buffers=0 --numa_cpu_nodes=0 --numa_mem_policy=bind:0 --cpus_allowed_policy=splitTest the sequential write latency of the local disks
sudo fio --name=test --directory=/mnt/sdb --ioengine=libpmem --direct=1 --thread=1 --numjobs=1 --iodepth=1 --rw=write --bs=4k --size=8GB --norandommap=1 --randrepeat=0 --invalidate=1 --iodepth_batch=1 --sync=1 --scramble_buffers=0 --numa_cpu_nodes=0 --numa_mem_policy=bind:0 --cpus_allowed_policy=split
Resolve the issue that an instance failed to allocate a memory pool by using LLPL
Problem description
An ecs.re7p or ecs.i4p instance on which persistent memory can be used as local disks failed to allocate a memory pool by using LLPL. The Failed to create heap. Cannot read unsafe shutdown count** error message is returned.
Cause
By default, unsafe shutdown detection is enabled in LLPL source code. However, virtualized non-volatile memory (NVM) does not support unsafe shutdown detection. For more information, see llpl.
Solution
Perform the following steps to disable unsafe shutdown detection in the LLPL source code:
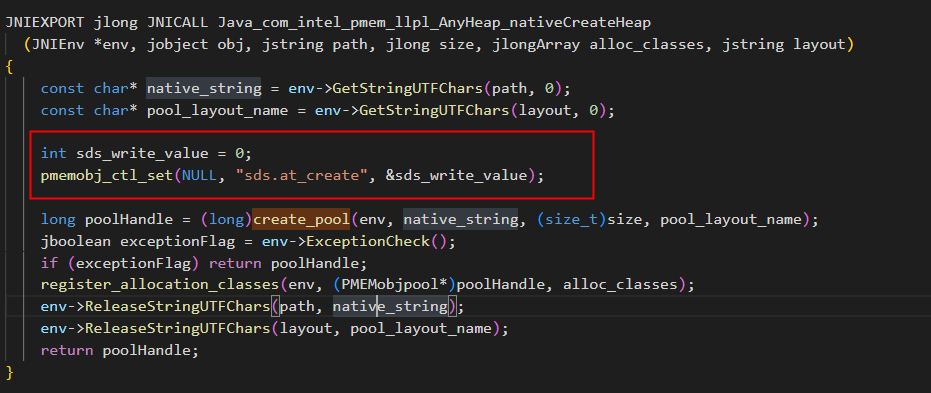
Add the following code to the src/main/cpp/com_intel_pmem_llpl_AnyHeap.cpp file of the LLPL source code:
int sds_write_value=0;
pmemobj_ctl_set(NULL,"sds.at_create",&sds_write_value)
The following figure shows that the preceding code is added to the file.
Log on to the instance.
For more information, see Use Workbench to connect to a Linux instance over SSH.
Run the following command to run a test case by using LLPL:
mvn clean && mvn test -Dtest.heap.path=/mnt/sdbIf the "Failed to create heap. Cannot read unsafe shutdown count**" error message is not returned, you can proceed to allocate a memory pool.