Run a distributed, end-to-end secure Apache Spark application on Intel® TDX enabled g8i instances with BigDL PPML for data encryption, secure computing, and privacy protection.
Background
As enterprises migrate data and compute resources to the cloud, protecting data privacy and confidentiality becomes a critical challenge for big data analytics and AI applications.
BigDL PPML can be used to run standard big data and AI applications (such as Apache Spark, Apache Flink, Tensorflow, and PyTorch) on Alibaba Cloud TDX instances while protecting data in transit and in use and assuring application integrity. See BigDL-PPML.
-
Intel® Trusted Domain Extensions (Intel® TDX) provides hardware-assisted data protection independent of firmware and host security status, enabling confidential computing on physical machines.
-
Alibaba Cloud g8i instances are Intel® TDX enabled instances (hereinafter referred to as TDX instances) that provide hardware-enforced confidential computing. TDX instances mitigate malware attack risks and ensure data privacy and application integrity.
-
BigDL PPML is a solution built on Intel® TDX to secure data analysis and AI applications.
Architecture
BigDL PPML runs existing distributed big data analytics and AI applications, such as Apache Spark, Apache Flink, Tensorflow, and PyTorch, in a confidential environment with no code changes. Applications run on Kubernetes clusters based on TDX instances, where Intel® TDX protects compute and memory. BigDL PPML provides the following end-to-end security mechanisms:
-
Trusted cluster attestation in a Kubernetes cluster based on TDX instances.
-
Key Management Service (KMS): manages keys to encrypt and decrypt distributed data.
-
Secure, distributed computing and communication.

As shown in the preceding figure, BigDL PPML secures the end-to-end big data and AI pipeline in a Kubernetes cluster deployed on Intel® TDX enabled instances. All data is encrypted and stored in data lakes and data warehouses.
-
BigDL PPML workers load encrypted input data, obtain data keys through remote attestation or KMS, and decrypt input data on TDX instances.
-
BigDL PPML workers preprocess data in a distributed manner, train models, and perform inference with big data and AI frameworks.
-
BigDL PPML workers encrypt and write final results, output data, or models to distributed storage.
Data transmitted between nodes is encrypted in transit with security protocols, such as Advanced Encryption Standard (AES) and Transport Layer Security, to ensure end-to-end data security and privacy.
Procedure
This example uses an Apache Spark Simple Query application on TDX instances. For other big data and AI applications, see BigDL PPML Tutorials & Examples.
Step 1: Deploy a Kubernetes cluster and runtime environment
This example uses a Kubernetes cluster with one master node and two worker nodes. The number of nodes must match the number of TDX instances you purchase. Adjust the cluster size based on your requirements.
-
Create Intel® TDX enabled g8i instances.
See Create an instance with Custom Launch. Note the following parameters:
-
Instance Type: Select an instance type with at least 32 vCPUs and 64 GiB of memory. This example uses ecs.g8i.8xlarge.
-
Image: Select Alibaba Cloud Linux 3.2104 LTS 64-bit.
-
Public IP Address: Select Assign Public IPv4 Address.
-
Quantity: Enter 3.
-
-
Connect to an instance.
-
Deploy a Kubernetes cluster and configure security settings.
-
Deploy a Kubernetes cluster on the g8i instances.
-
Configure security settings (role-based access control) on the master node:
kubectl create serviceaccount spark
kubectl create clusterrolebinding spark-role --clusterrole=edit --serviceaccount=default:spark --namespace=default
-
-
Create a PersistentVolume.
-
Create the pv-volume.yaml file as the root user:
vim pv-volume.yaml -
Press the
Ikey to enter the Insert mode. -
Add the following content to pv-volume.yaml:
apiVersion: v1 kind: PersistentVolume metadata: name: task-pv-volume labels: type: local spec: storageClassName: manual capacity: storage: 10Gi accessModes: - ReadWriteOnce hostPath: path: "/mnt/data" -
Press the
Esckey and enter:wqto save the changes and exit the Insert mode. -
Create and view the PersistentVolume:
kubectl apply -f pv-volume.yaml
kubectl get pv task-pv-volume
-
-
Create a PersistentVolumeClaim.
-
Create the pv-claim.yaml file as the root user:
vim pv-claim.yaml -
Press the
Ikey to enter the Insert mode. -
Add the following content to pv-claim.yaml:
apiVersion: v1 kind: PersistentVolumeClaim metadata: name: task-pv-claim spec: storageClassName: manual accessModes: - ReadWriteOnce resources: requests: storage: 3Gi -
Press the
Esckey and enter:wqto save the changes and exit the Insert mode. -
Create and view the PersistentVolumeClaim:
kubectl apply -f pv-claim.yaml
kubectl get pvc task-pv-claim
-
Step 2: Encrypt training data
-
Obtain the BigDL PPML image on each node of the Kubernetes cluster.
This image runs standard Apache Spark applications with data encryption and decryption.
docker pull intelanalytics/bigdl-ppml-trusted-bigdata-gramine-reference-16g:2.3.0-SNAPSHOT -
Generate the training dataset file people.csv.
-
Download the training script generate_people_csv.py on the master node:
wget https://github.com/intel-analytics/BigDL/raw/main/ppml/scripts/generate_people_csv.py -
Generate people.csv:
python generate_people_csv.py </save/path/of/people.csv> <num_lines>Note-
</save/path/of/people.csv>: the output path for people.csv. This example uses /home/user.
-
<num_lines>: the number of lines in people.csv. This example uses 500.
-
-
Move people.csv to the target directory:
sudo scp /home/user/people.csv /mnt/data/simplekms/Important-
Replace
/home/userwith the actual directory. -
This example uses
/mnt/data/simplekms/to store encrypted and decrypted data. The/mnt/data/simplekms/directory is not separately described in subsequent sections.
-
-
-
Run the bigdl-ppml-client container on the master node.
This container encrypts and decrypts training data.
NoteReplace
/home/user/kuberconfig:/root/.kube/configbased on the user running the container.-
For the root user, replace with
/root/kuberconfig:/root/.kube/config. -
For a common user (e.g., test), replace with
/home/test/kuberconfig:/root/.kube/config.
export K8S_MASTER=k8s://$(kubectl cluster-info | grep 'https.*6443' -o -m 1) echo The k8s master is $K8S_MASTER . export SPARK_IMAGE=intelanalytics/bigdl-ppml-trusted-bigdata-gramine-reference-16g:2.3.0-SNAPSHOT sudo docker run -itd --net=host \ -v /etc/kubernetes:/etc/kubernetes \ -v /home/user/kuberconfig:/root/.kube/config \ -v /mnt/data:/mnt/data \ -e RUNTIME_SPARK_MASTER=$K8S_MASTER \ -e RUNTIME_K8S_SPARK_IMAGE=$SPARK_IMAGE \ -e RUNTIME_PERSISTENT_VOLUME_CLAIM=task-pv-claim \ --name bigdl-ppml-client \ $SPARK_IMAGE bash docker exec -it bigdl-ppml-client bash -
-
Encrypt people.csv on the master node of the Kubernetes cluster.
-
Generate a primary key (primarykey) from the application ID (APPID) and an API key (APIKEY).
Use simple KMS to generate an APPID and APIKEY (1 to 12 characters). In this example, APPID is 98463816**** and APIKEY is 15780936****. --primaryKeyPath specifies the primary key storage directory.
java -cp '/ppml/spark-3.1.3/conf/:/ppml/spark-3.1.3/jars/*:/ppml/bigdl-2.3.0-SNAPSHOT/jars/*' \ com.intel.analytics.bigdl.ppml.examples.GeneratePrimaryKey \ --primaryKeyPath /mnt/data/simplekms/primaryKey \ --kmsType SimpleKeyManagementService \ --simpleAPPID 98463816**** \ --simpleAPIKEY 15780936**** -
Create the encryption script encrypt.py.
-
Switch to the
/mnt/data/simplekmsdirectory:cd /mnt/data/simplekms -
Create and open the encrypt.py file:
sudo vim encrypt.py -
Press the
Ikey to enter the Insert mode. -
Add the following content to the encrypt.py file:
# encrypt.py from bigdl.ppml.ppml_context import * args = {"kms_type": "SimpleKeyManagementService", "app_id": "98463816****", "api_key": "15780936****", "primary_key_material": "/mnt/data/simplekms/primaryKey" } sc = PPMLContext("PPMLTest", args) csv_plain_path = "/mnt/data/simplekms/people.csv" csv_plain_df = sc.read(CryptoMode.PLAIN_TEXT) \ .option("header", "true") \ .csv(csv_plain_path) csv_plain_df.show() output_path = "/mnt/data/simplekms/encrypted-input" sc.write(csv_plain_df, CryptoMode.AES_CBC_PKCS5PADDING) \ .mode('overwrite') \ .option("header", True) \ .csv(output_path) -
Press the
Esckey and enter:wqto save the changes and exit the Insert mode.
-
-
Encrypt people.csv in the bigdl-ppml-client container with APPID, APIKEY, and primarykey.
The encrypted data is stored in
/mnt/data/simplekms/encrypted-output.java \ -cp '/ppml/spark-3.1.3/conf/:/ppml/spark-3.1.3/jars/*:/ppml/bigdl-2.3.0-SNAPSHOT/jars/*' \ -Xmx1g org.apache.spark.deploy.SparkSubmit \ --master 'local[4]' \ --conf spark.network.timeout=10000000 \ --conf spark.executor.heartbeatInterval=10000000 \ --conf spark.python.use.daemon=false \ --conf spark.python.worker.reuse=false \ --py-files /ppml/bigdl-2.3.0-SNAPSHOT/python/bigdl-ppml-spark_3.1.3-2.3.0-SNAPSHOT-python-api.zip,/ppml/bigdl-2.3.0-SNAPSHOT/python/bigdl-spark_3.1.3-2.3.0-SNAPSHOT-python-api.zip,/ppml/bigdl-2.3.0-SNAPSHOT/python/bigdl-dllib-spark_3.1.3-2.3.0-SNAPSHOT-python-api.zip \ /mnt/data/simplekms/encrypt.py
-
-
Copy
/mnt/data/simplekmsfrom the master node to each worker node.cd /mnt/data sudo scp -r user@192.168.XXX.XXX:/mnt/data/simplekms .NoteReplace user with the actual username and 192.168.XXX.XXX with the actual IP address of the master node.
Step 3: Run a BigDL PPML based big data analytics example
-
In the bigdl-ppml-client container, submit a Spark job to run the Simple Query example.
NoteIn spark.driver.host=192.168.XXX.XXX, replace 192.168.XXX.XXX with the actual master node IP address.
${SPARK_HOME}/bin/spark-submit \ --master $RUNTIME_SPARK_MASTER \ --deploy-mode client \ --name spark-simplequery-tdx \ --conf spark.driver.memory=4g \ --conf spark.executor.cores=4 \ --conf spark.executor.memory=4g \ --conf spark.executor.instances=2 \ --conf spark.driver.host=192.168.XXX.XXX \ --conf spark.kubernetes.authenticate.driver.serviceAccountName=spark \ --conf spark.cores.max=8 \ --conf spark.kubernetes.container.image=$RUNTIME_K8S_SPARK_IMAGE \ --class com.intel.analytics.bigdl.ppml.examples.SimpleQuerySparkExample \ --conf spark.network.timeout=10000000 \ --conf spark.executor.heartbeatInterval=10000000 \ --conf spark.kubernetes.executor.deleteOnTermination=false \ --conf spark.driver.extraClassPath=local://${BIGDL_HOME}/jars/* \ --conf spark.executor.extraClassPath=local://${BIGDL_HOME}/jars/* \ --conf spark.kubernetes.file.upload.path=/mnt/data \ --conf spark.kubernetes.driver.volumes.persistentVolumeClaim.${RUNTIME_PERSISTENT_VOLUME_CLAIM}.options.claimName=${RUNTIME_PERSISTENT_VOLUME_CLAIM} \ --conf spark.kubernetes.driver.volumes.persistentVolumeClaim.${RUNTIME_PERSISTENT_VOLUME_CLAIM}.mount.path=/mnt/data \ --conf spark.kubernetes.executor.volumes.persistentVolumeClaim.${RUNTIME_PERSISTENT_VOLUME_CLAIM}.options.claimName=${RUNTIME_PERSISTENT_VOLUME_CLAIM} \ --conf spark.kubernetes.executor.volumes.persistentVolumeClaim.${RUNTIME_PERSISTENT_VOLUME_CLAIM}.mount.path=/mnt/data \ --jars local:///ppml/bigdl-2.3.0-SNAPSHOT/jars/bigdl-ppml-spark_3.1.3-2.3.0-SNAPSHOT.jar \ local:///ppml/bigdl-2.3.0-SNAPSHOT/jars/bigdl-ppml-spark_3.1.3-2.3.0-SNAPSHOT.jar \ --inputPartitionNum 8 \ --outputPartitionNum 8 \ --inputEncryptModeValue AES/CBC/PKCS5Padding \ --outputEncryptModeValue AES/CBC/PKCS5Padding \ --inputPath /mnt/data/simplekms/encrypted-input \ --outputPath /mnt/data/simplekms/encrypted-output \ --primaryKeyPath /mnt/data/simplekms/primaryKey \ --kmsType SimpleKeyManagementService \ --simpleAPPID 98463816**** \ --simpleAPIKEY 15780936**** -
View the Spark job status on the master node.
-
View the names and status of drivers and executors:
kubectl get podWhen the job completes, STATUS changes from
RunningtoCompleted.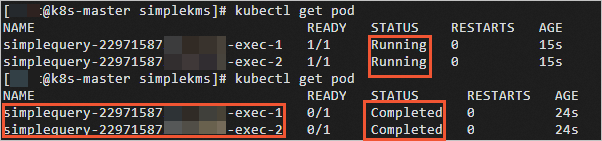
-
View the logs of the pod:
kubectl logs simplequery-xxx-exec-1NoteReplace simplequery-xxx-exec-1 with the Name value from the preceding step.
When the job completes,
Finishedappears in the pod logs.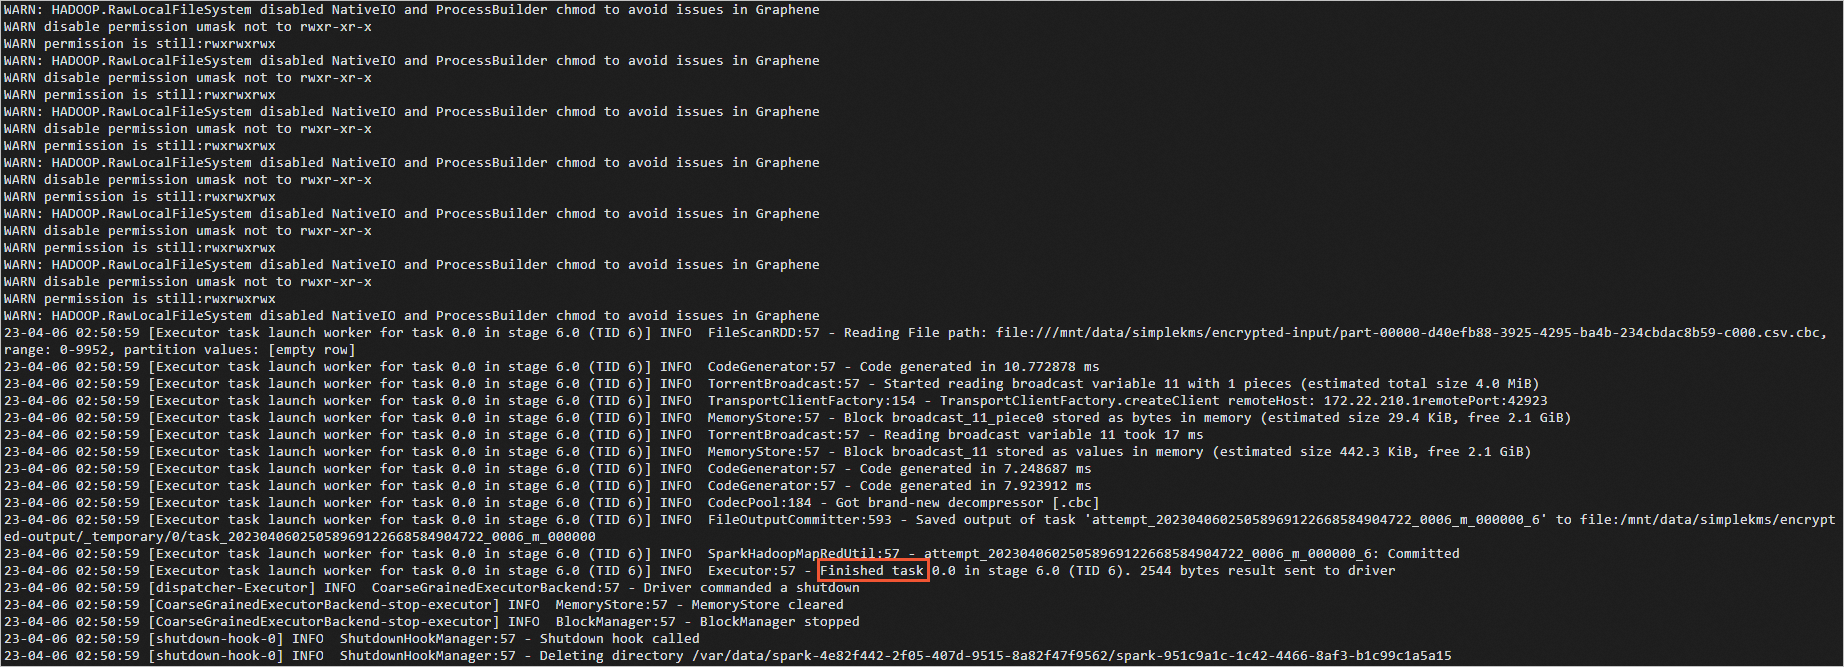
-
Step 4: Decrypt the results
-
Upload the
.metaandpart-XXXX.csv.cbcfiles from the encrypted-output directory of each worker node to the master node's encrypted-output directory.After upload, the master node's encrypted-output directory contains data as shown below.

-
Create the decrypt.py file in
/mnt/data/simplekmson the master node.-
Switch to the
/mnt/data/simplekmsdirectory:cd /mnt/data/simplekms -
Create and open the decrypt.py file:
sudo vim decrypt.py -
Press the
Ikey to enter the Insert mode. -
Add the following content to the decrypt.py file:
from bigdl.ppml.ppml_context import * args = {"kms_type": "SimpleKeyManagementService", "app_id": "98463816****", "api_key": "15780936****", "primary_key_material": "/mnt/data/simplekms/primaryKey" } sc = PPMLContext("PPMLTest", args) encrypted_csv_path = "/mnt/data/simplekms/encrypted-output" csv_plain_df = sc.read(CryptoMode.AES_CBC_PKCS5PADDING) \ .option("header", "true") \ .csv(encrypted_csv_path) csv_plain_df.show() output_path = "/mnt/data/simplekms/decrypted-output" sc.write(csv_plain_df, CryptoMode.PLAIN_TEXT) \ .mode('overwrite') \ .option("header", True)\ .csv(output_path) -
Press the
Esckey and enter:wqto save the changes and exit the Insert mode.
-
-
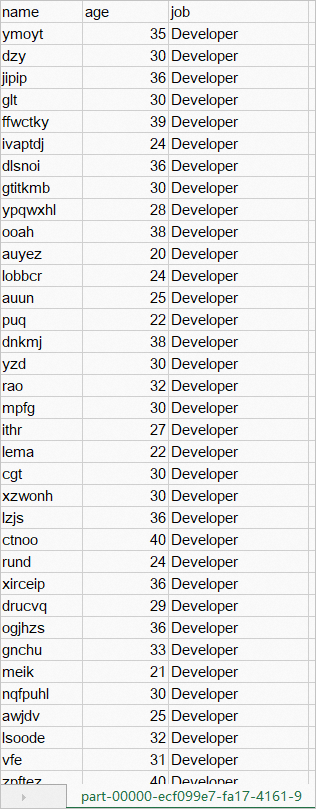
Decrypt the data in the
encrypted_csv_pathdirectory on the master node.APPID, APIKEY, and primarykey decrypt the data. The decrypted file
part-XXXX.csvis stored in/mnt/data/simplekms/decrypted-output.java \ -cp '/ppml/spark-3.1.3/conf/:/ppml/spark-3.1.3/jars/*:/ppml/bigdl-2.3.0-SNAPSHOT/jars/*' \ -Xmx1g org.apache.spark.deploy.SparkSubmit \ --master 'local[4]' \ --conf spark.network.timeout=10000000 \ --conf spark.executor.heartbeatInterval=10000000 \ --conf spark.python.use.daemon=false \ --conf spark.python.worker.reuse=false \ --py-files /ppml/bigdl-2.3.0-SNAPSHOT/python/bigdl-ppml-spark_3.1.3-2.3.0-SNAPSHOT-python-api.zip,/ppml/bigdl-2.3.0-SNAPSHOT/python/bigdl-spark_3.1.3-2.3.0-SNAPSHOT-python-api.zip,/ppml/bigdl-2.3.0-SNAPSHOT/python/bigdl-dllib-spark_3.1.3-2.3.0-SNAPSHOT-python-api.zip \ /mnt/data/simplekms/decrypt.pyThe decrypted data appears as shown below.